
Part Numbers: SS98GV,C31433
Thank you! Your comment has been submitted successfully. You should be able to view your question/comment here within a few days.
Error submitting comment. Please try again momentarily.


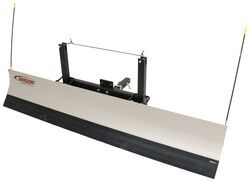
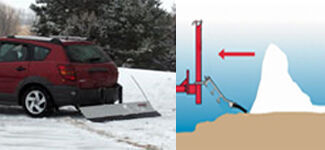
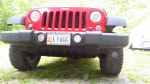
82 x 14 Residential plow with thick rubber cutting edge self-adjusts up and down to smoothly clear a path on any terrain. Aluminum blade stays in straight-ahead position, and makes plowing your driveway as easy as pulling forward or backing out.
Features:
Specs:
Snowplow Installation
Front or rear mount? Versatility is the SnowSport LT's middle name.
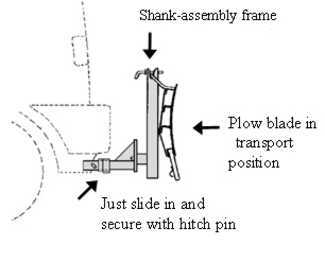
Installation is quick and simple - just slide the included shank assembly into your 2" hitch receiver and secure with pin.
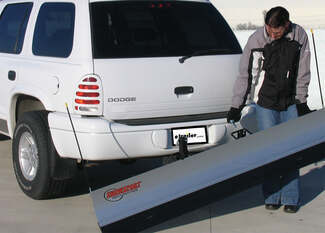
Once the plow frame is connected, attach the blade by lifting one end at a time onto the frame's holders. The lightweight aluminum blade construction makes lifting or adjusting an easy, one-person job. Secure the blade in either the transport or plowing position with the plow's snap pins. The low-profile design won't block your headlights, and the transport position is secure enough for highway travel.
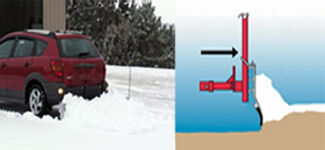
If using with a rear-mount receiver, simply lower the blade to plow position and back up as usual. For a front-mounted plow blade, just drive forward with the blade in the plow position. The unique design takes the hassle out of plowing: This device has no hydraulics or complicated wiring. The push frame on the shank assembly allows the blade to move along the grade of the terrain for easier, more efficient plowing. The heavy-duty rubber cutting edge is effective yet turf friendly, collecting snow and squeegeeing slush without digging into the ground.
When you are ready to reverse your driving direction, the blade lies back, skimming over the surface of the ground until you change direction again to plow.
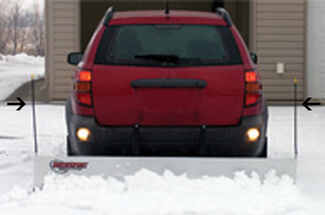
Handy blade markers extend vertically from the ends of the plow to help you see where you are plowing.
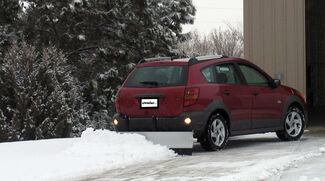
With the SnowSport LT, plowing snow is as easy as backing out of your driveway. Once you are finished plowing, simply lift the blade, refasten it in the transport position and head off for work or errands.
California residents: click here

Easily attach a variety of accessories to the front of your vehicle with this fully welded, corrosion-resistant trailer hitch receiver. Perfect for winches, spare tire carriers and more.
Features:
Specs:
At etrailer.com we're committed to the products we sell, and to our customers. Our experienced and knowledgeable staff are available via both phone and email to address your questions and concerns for the lifetime of your hitch. The technicians at etrailer perform hitch installations on a daily basis, making them a valuable resource for do-it-yourselfers. The one-on-one, personal service you'll receive comes straight from an expert in the towing and automotive field. We've installed it, we've wired it and we've towed with it, so whatever your question, we can answer it.
Videos are provided as a guide only. Refer to manufacturer installation instructions and specs for complete information.
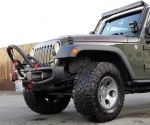
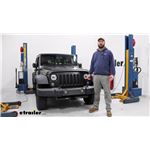
Hey guys, it's Jake here with etrailer. Today we have a 2017 Jeep Wrangler Unlimited, and we're gonna be taking a look at, I'm gonna show you how to install the Curt front mount trailer hitch. Adding a front mount trailer hitch to the front of your Jeep Wrangler is gonna allow you to do a couple of different things. Primarily, you can use it for bike racks, cargo carriers, front mount winches. I would say that's probably the most common one. We've also got some small snowplows that fit on the front of Jeep Wranglers.
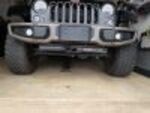
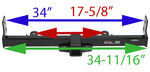
You can use it for a lot of different things. People use it as a recovery point because they have these hooks up front, but sometimes you need a lower one to be able to pop you out of those deep mud holes. Your hitch receiver tube opening is going to be a two inch by two inch hitch receiver tube. That is the most common size for accessories and ball mounts if you plan on picking anything up. The hitch pin hole is a 5/8 inch hitch pin.
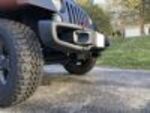
A pin and clip does not come with the hitch, but if you have an accessory already, chances are you already have one. Or if you pick one up off our website, a lot of ours will come with one. Now some measurements for you so you know what it's gonna look like on the front of your Jeep. The hitch receiver tube on this one is gonna be almost perfectly flushed with the front of your bumper. It's so exactly perfect I can't even give you a measurement, but for the face but from the center of the hitch pin hole to the outermost part, it's about two inches.
You don't have to worry about hitting your shin on it at all if you don't have an accessory installed. Obviously, if you have an accessory, that'll be hanging out from the ground to the top inside of the receiver tube is about 16 inches. Maybe just a little shy of that. That'll help you to line up those accessories if you're looking for something that folds up to the front of your Jeep, or maybe clearance for a bike rack, something like that. Now for ground clearance, from the ground to the bottom of our hitch is gonna be about 13 and a half inches.
Now if you don't do a whole lot of off-roading with your Jeep, that's not really something huge to worry about. But if you do, just keep in mind that this may come in the way. If you do take it off road and that's a little low for your liking, we do have a skid plate that goes into a hitch receiver tube that you can put on that so that whenever you get to your off-roading site, you take your accessory out, put the skid plate in there, and that'll help to redirect the front end rather than your hitch getting hung up on something. We are sitting on a factory set of wheels and tires so if you have upgraded wheels and tires and they're a little bit larger, or your Jeep may have a lift, that's gonna give you more ground clearance. As far as the weight capacities go, we're gonna have three weight capacities that are mainly concerned with front mount hitches. The first being the tongue weight capacity. The max tongue weight capacity on this hitch is going to be 350 pounds. That is the downward pressure on the inside of the receiver tube. So for bike racks, cargo carriers, you just wanna be careful. Don't overload 'em so that you're overloading the hitch. Your trailer, your max trailer weight capacity is gonna be your second measurement. That is going to be 3,500 pounds so if you plan on moving trailers around, stuff like that, a lot of people like to use Jeeps 'cause they have a pretty good turning radius to be able to maneuver trailers around and get 'em into a tighter spot than they could if they we inchesre backing it in, and then your last measurement is going to be your straight line pole. That is, if you're using it for a recovery point or for a winch, you wanna be sure that you're not exceeding the 9,000 pound capacity of the straight line pole. Now as far as the installation goes, this install is not too bad at all. I will say you do not have to make any modifications to your vehicle other than taking your skid plate off. You will have to take that off. If you wanna try to mock it up, you can to trim out stuff to be able to get the skid plate back on. This just has a really large exposed cross tube on the front. It might be difficult in order to do that, but if this is a hitch you wanna go with, you can definitely try to trim some of that out. We did not because the manufacturer does not recommend putting it back on. But with that being said, let's go ahead and show you how to put it in place. To begin our installation, we're gonna have to remove our skid plate down here. Now if it's a metal skid plate that you have, typically those are on the Rubicon models, you're gonna have some 15 millimeter bolts under here that you'll have to remove. If you have a plastic one, it's just going to be these pushman fasteners, and all you have to do is take either a flathead screwdriver or a trim panel removal tool, and you wanna pop the head out, and then the base should come out right after it. So just follow along the whole edge of this. There are gonna be a few behind here that we have to remove. Now to start running our hardware, we don't have to drill anything out, which is really nice. We'll have two holes on the outside of our frame rail, and then we'll have to bring a bolt out of this hole right here. You'll have this square opening in each side of the frame. That's how we're gonna run our hardware. We'll take our fish wire, run it up. I'm gonna come out of the let's do the bottom hole first so that it's not in our way, but you'll take your spacer block, put it on first, then thread on your bolts. We'll shove our spacer block up in there, followed by our bolt, and then you'll wanna make sure that it will pull out of the hole just like that. So we'll wanna toss it back in because our hitch is gonna slide up right here along this frame. So we'll get this next bolt run, and then get our other bolt run down to the bottom. (metal clanging) Now on the passenger side, it's actually the lower hardware is gonna go through this elongated hole, not this round hole. We just lifted our hitch up into place to kinda test fit it, and it lined up with the wrong one. So we need to pull our hardware through this hole. Now you'll just wanna repeat that same process on the other side of our vehicle. Now with an extra set of hands, we can lift this up into place. You'll take your fish wires, slide it through each one of the holes in our hitch. This can get a little tricky with these that go up beside the frame rail. And once you get it, kinda pull on the fish wires at the same time. Now what we ended up having to do is because our hitch was fit so tight to the outside of this frame rail, it was able to hold itself in place, and we had to pull our fish wires back out because they we inchesre getting jammed up in here, and we could not pull them through. So we pulled them out, we just tapped the hitch up into place, and now we're gonna take our fish wires and line 'em up with these holes, and run 'em back out. And what you can do is you can rest one of your fingers against the bolt, pull the fish wire off, keep your finger there so that it stays in place, and then thread on our bolts, and I like to thread it on by hand to make sure it's threading in properly. Now we get the rest of our hardware started. Now we'll take a 19 millimeter socket and snug up all of our hardware. (tool whirring) Now with our hardware snugged up, we'll come back with the torque wrench, torque it all down to the specifications in the instructions. (tool beeping) Now with everything torqued down, that's gonna do it for the installation. As far as the skid plate goes, because of the way that this hitch fits, you're not gonna be able to put the skid plate back on. You can try to trim it, but you're probably gonna end up trimming a lot more than you'd prefer, and then some of this hitch tube may still end up sticking out. We do have some other options that are a little bit cleaner look if you wanna go with one of those options. Well guys, hopefully this video helped you decide whether or not the Curt front mount trailer hitch is right for you and your 2017 Jeep Wrangler Unlimited.
Average Customer Rating: 4.6 out of 5 stars (17 Customer Reviews)
82 x 14 Residential plow with thick rubber cutting edge self-adjusts up and down to smoothly clear a path on any terrain. Aluminum blade stays in straight-ahead position, and makes plowing your driveway as easy as pulling forward or backing out. Easily attach a variety of accessories to the front of your vehicle with this fully welded, corrosion-resistant trailer hitch receiver. Perfect for winches, spare tire carriers and more.Fit was tight but with a floor jack I was able to install. Looks like it will work well for me. The bolt guide wires were critical to installation. Very good construction of the hitch.
After correcting a mistake and taking another receiver back at their expense, etrailer shipped me the correct hitch for my 2017 Jeep Wrangler Rubicon Recon. If your Wrangler has the steel Hard Rock / Anniversary Edition bumper in the attached pictures, this is the right receiver. It's very well made and has a much better paint job than the Draw Tite that didn't fit my Jeep. The tolerances are VERY tight, so much so that I had to hammer it into place with a block of wood. The supplied fishwires made getting the carriage bolts and spacers in place a breeze. Unfortunately, you will have to remove the steel skid plate that's attached to the bumper. I thought it might be possible to cut it around the hitch and put it back, but it doesn't look there's enough clearance. Great service from etrailer!
First one purchased came with correct item Nr on the box but inside was a 1” hitch for small sedan. Second came correct but was an 1/8 too small. Welds weren’t square and warped. Make sure to verify your vehicles measurements. I wound up grinding and having to repaint the hitch. Only needs to support a front rod holder or I would have returned it again. Sometimes ya fight your own battles
Directions were clear and concise, however the side brackets were slightly narrower than the vehicle frame and it needed a fair amount of convincing to slide up and over into place. Furthermore the driver side superior bracket hole was offset just enough not to allow the bolt to pass through the frame. The hole in the frame had to be slightly enlarged. Otherwise it looks great!!
this is the only hictch i have found that is not custom made that will work with my aev bumper that is on my jk. fits perfect and i can still put a winch in my bumper. you will need a hammer to get it in place though it tight. it does hang down a bit low so you will loose some ground cleance, the aev and the skid plate had to be removed but it will be fine. i needed a way to carry cooler and fishing rods this will work great.

I was a little surprised with the snow plow. I thought it was going to be hydraulic/electric. It does okay, going on flat and slight declines. Inclines not so good. I also. Bought a rear trailer hitch. Very pleased with it.
Great fit went on in 30 minutes. can confirm it will fit with the Warn winch bumper.
By moving the secondary mounting bolts from the factory bumper to the front frame crossbar this front mount version for Jeep JK allows for the installation of many aftermarket bumpers, which will be my next project. These Curt mounts are super solid. I have had one on my '98 Cherokee for the last 6 years for plowing snow. The mount is fine but the Cherokee is tired. ;-)
My install took 30 mins.
your service and speed of delivery were great. now i have to put it on and see how it fits. on the down side the hitch was not packed very well and the paint was cracked off in several places. i will have to use touch-up paint so it doesn't rust. its going to be under the jeep so i won't really see it, its not worth the hassle sending it back because i want to use it this weekend. your phone staff was very nice.
By the way, are tongue weight and vertical weight different measurements??
Great fit Well made
Bolted right on but a little tight. A big hammer did the trick. Once again a nice hitch. Now I have on front and back of my jeep JK.
The part bolted right in, took about 20 minutes to complete. My second product bought, and a great company to work with.
Looks great. Well made. Installed in under 30 min.
Strong work,
Ask the Experts about this Snow Plow
Do you have a question about this Snow Plow?
Info for these parts were:
At etrailer.com we provide the best information available about the products we sell. We take the quality of our information seriously so that you can get the right part the first time. Let us know if anything is missing or if you have any questions.
Jeep Wrangler Unlimited Accessories


Mike L.
1/22/2019
Essentially, theyre the same thing. Tongue weight and vertical load limit represent the maximum amount of downward force that can be applied to the receiver tube.