
Agri-Cover SnowSport LT Snowplow for 2" Hitches - 82" Wide Blade
Curt Front Mount Trailer Hitch Receiver - Custom Fit - 2"
Part Numbers: SS98GV,31049
Retail:$1,746.95
Our Price: $1,621.94
You Save: $125.01
In Stock


Need help with installation?
Locate installers near meAgri-Cover SnowSport LT Snowplow for 2" Hitches - 82" Wide Blade
part number: SS98GV
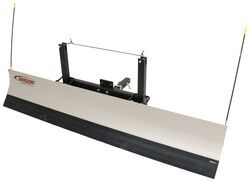
82 x 14 Residential plow with thick rubber cutting edge self-adjusts up and down to smoothly clear a path on any terrain. Aluminum blade stays in straight-ahead position, and makes plowing your driveway as easy as pulling forward or backing out.
Features:
- Lightweight, user-friendly plow allows for quick and easy snowplowing with no controls or hydraulics
- Self-adjusting plow frame allows up and down movement over rough terrain
- Safe for use on grass, concrete, gravel, brick and other uneven surfaces
- Practical design does not block headlights in either plow or transport position
- Effortless installation on the front or back of your vehicle
- Designed for use on 2" front or rear trailer hitches (sold separately)
- Durable construction
- Rust-resistant aluminum blade
- Long-lasting, heavy-duty rubber cutting edge
- Complete kit includes plow blade with blade markers, fixed 2" shank assembly, push frame, hardware kit, and interceptor
- Made in the USA
Specs:
- Application: SUVs, trucks, and minivans with a 2" front- or rear-mounted hitch receiver
- Must have 8" to 14" clearance under the receiver
- Overall blade dimensions: 82" wide x 14-1/2" tall
- Rubber cutting edge dimensions: 6" tall x 1" thick
- Blade weight: approximately 68 lbs
- Plow mounting frame: 31" wide
- Warranty:
- 1-Year for plow parts
- 3-Year for rubber cutting edge
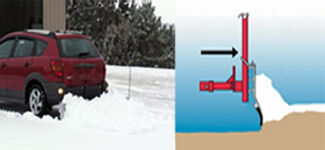
Snowplow Installation
Front or rear mount? Versatility is the SnowSport LT's middle name.
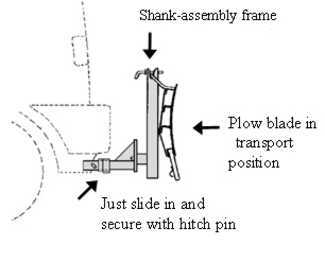
Installation is quick and simple - just slide the included shank assembly into your 2" hitch receiver and secure with pin.
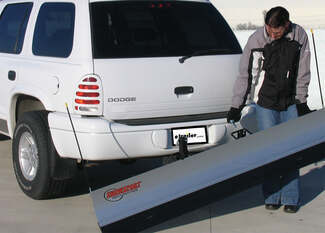
Once the plow frame is connected, attach the blade by lifting one end at a time onto the frame's holders. The lightweight aluminum blade construction makes lifting or adjusting an easy, one-person job. Secure the blade in either the transport or plowing position with the plow's snap pins. The low-profile design won't block your headlights, and the transport position is secure enough for highway travel.
How to Plow
If using with a rear-mount receiver, simply lower the blade to plow position and back up as usual. For a front-mounted plow blade, just drive forward with the blade in the plow position. The unique design takes the hassle out of plowing: This device has no hydraulics or complicated wiring. The push frame on the shank assembly allows the blade to move along the grade of the terrain for easier, more efficient plowing. The heavy-duty rubber cutting edge is effective yet turf friendly, collecting snow and squeegeeing slush without digging into the ground.
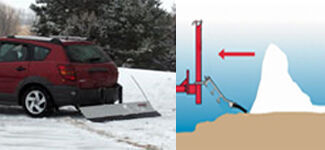
When you are ready to reverse your driving direction, the blade lies back, skimming over the surface of the ground until you change direction again to plow.
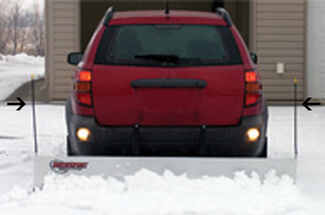
Handy blade markers extend vertically from the ends of the plow to help you see where you are plowing.
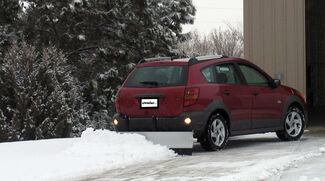
With the SnowSport LT, plowing snow is as easy as backing out of your driveway. Once you are finished plowing, simply lift the blade, refasten it in the transport position and head off for work or errands.
80664 Agri-Cover SnowSport LT Snowplow for 2" Hitches - 82" Wide Blade
California residents: click here
Curt Front Mount Trailer Hitch Receiver - Custom Fit - 2"
part number: 31049
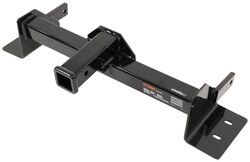
Easily attach a variety of accessories to the front of your vehicle with this fully welded, corrosion-resistant trailer hitch receiver. Perfect for winches, spare tire carriers and more.
Features:
- Front-mount hitch provides attachment point for hitch-mounted accessories
- Winch, spare tire carrier, snowplow, cargo carrier and more
- No more blindly backing trailer in - just hook it up and drive it forward
- Custom fit is designed specifically for your vehicle
- Precision, robotic welding maximizes strength and improves fit
- Easy, bolt-on installation - no welding required
- Complete hardware kit and installation instructions included
- Lifetime technical support from the experts at etrailer.com
- Gloss black powder coat finish over steel resists corrosion
- Sturdy, square-tube design
- Assembled in USA
Specs:
- Line pull: 9,000 lbs
- Vertical load: 500 lbs
- Gross trailer weight: 5,000 lbs
- Receiver opening: 2" x 2"
- Pin hole diameter: 5/8"
- Limited lifetime warranty
etrailer.com Technical Support
At etrailer.com we're committed to the products we sell, and to our customers. Our experienced and knowledgeable staff are available via both phone and email to address your questions and concerns for the lifetime of your hitch. The technicians at etrailer perform hitch installations on a daily basis, making them a valuable resource for do-it-yourselfers. The one-on-one, personal service you'll receive comes straight from an expert in the towing and automotive field. We've installed it, we've wired it and we've towed with it, so whatever your question, we can answer it.
31049 Curt Front-Mount Trailer Hitch Receiver
Video of Agri-Cover SnowSport LT Snowplow for 2" Hitches - 82" Wide Blade


Videos are provided as a guide only. Refer to manufacturer installation instructions and specs for complete information.

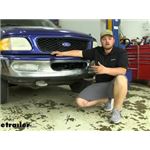
Video Transcript for Curt Front Mount Trailer Hitch Installation - 1997 Ford F-150 and F-250 Light Duty
Hello, everybody. Clayton here at etrailer.com. Here at etrailer, we install, test, and review a ton of different products to help you as a customer make a more educated decision before your purchase. Today, we're going to be working on a 1997 Ford F-150. We're going to be taking a look at. I'll be walking through how to install the Curt Front Mount Trailer Hitch Receiver.
Adding a front hitch to your F-150 is gonna be a great upgrade. It's gonna allow you to use a winch or even a snowplow on the front of your vehicle. Now, an added benefit to this is gonna be whenever you're moving trailers, it's a lot easy to hook them up to the front versus having to back them up. And as far as our weight capacities are concerned, we're gonna be a 5,000-pound trailer weight rating. You wanna keep in mind, that's going to be the weight of the trailer and the load included that our hitch can push.
We're going to have a 500-pound tongue weight rating. So that's going to be 500 pounds pushing straight down on our receiver tube opening, and we already have a 9,000-pound straight line pull rating. That's going to be how much our hitch can actually pull backwards. So we will have to find a way to relocate our license plate. You can find one of these hitch-mounted brackets here at etrailer.
It's really easy. You just slide this into your hitch receiver and then add your pin and clip, just like any other ball-mounted accessory. Now again, you wanna keep in mind a pin and clip don't come included, but you can find them here at etrailer. And with that being said, getting this thing installed really isn't too bad at all. There's no drilling, welding, or anything like that.
You don't even have to do any trimming, so that's definitely a great upgrade. We're now going to move underneath the front of our F-150 to begin our installation. There's going to be some plastic rivets, holding on our under splash shield. We're just going to take a trim panel tool, kind of come behind those rivets, and pry them out. Now, there are gonna be a number of them around the outside of this panel. With all our push pins removed, we can slide this down and out of the way. We now need to remove our license plate frame, there's gonna be a plastic clip supporting this on the back of our bumper. I'm gonna grab a flat-bladed screwdriver, then I work behind here and pry those out. You might have to pull back on the top of the license plate frame, to help you get under there. On the bottom of our license plate frame, there's going to be two arms that come back into our bumper. We're going to have a rivet on each side, that we need to remove with our trim panel tool. Now, we need to remove our tow hooks. We're gonna be using a 15-millimeter socket to do so. I highly recommend spraying these down with penetrating oil before, since this vehicle is a little bit older these are more than likely gonna be rusted. We grab that 15, we get our two bolts off of each tow hook. With our tow hook down, we're now gonna slide out our stock nut plate. None of this hardware is gonna be reused. Now, we grab one of our fish wires, and we're gonna move to the inside of our frame rail. We're gonna be using this hole here. We wanna take the coiled end of our fish wire, and feed that out into the front end of our opening. And on that front end, we'll be adding our spacer block and our carriage bolt. Now your gonna pull the other end of our fish wire to get hardware to come through, just like so. We're not gonna be using our two bottom holes that our tow hooks are in. This time, we're gonna need our larger spacer block, and our larger carriage bolt. We're going to do the same thing. Might need to add a little bit of bend to our coil wire. Just gonna feed that through, like so. And that comes up the front. The front will be threading on our hardware the exact same way. With an extra set of hands, we now lift our hitch into position. We want to get our fish wires set into position. We'll just feed those to the according hitches, with the according holes in our hitch. Then you need to feed that receiver tube up through the opening in your bumper. We kind of have to work that under that front splash guard. We're gonna pull off our pull wires. We're gonna take our flange nuts, and just thread those onto our bolts. We just wanna get all of our hardware started for now so that the hitch can support itself. Then we'll come back and add our tow hooks, and tighten everything down. Now, we're gonna come back with a 19-millimeter socket, and tighten down our two bolts that are on the outside of our frame. Now we'll take those flange nuts back off. We're gonna grab our tow hook, pull down on our air dam, and slide that through the holes on our tow hook. We thread them back on, get them started. We can come back with a 19-millimeter socket, and tighten it down. And we're gonna be doing the same process on the driver's side. Now we're ready to come back, and torque it down to the amount specified in our instructions. Now, we're gonna re-install that under splash shield that we removed earlier. With our license plate mounted up, we're now ready to hit the road. That's gonna do it for our look at and our installation of Curt's Front Mount Trailer Hitch Receiver on our 1997 Ford F-150..
Customer Reviews
Agri-Cover SnowSport LT Snowplow for 2" Hitches - 82" Wide Blade - SS98GV
Curt Front Mount Trailer Hitch Receiver - Custom Fit - 2" - 31049
Average Customer Rating: 4.7 out of 5 stars (3 Customer Reviews)
82 x 14 Residential plow with thick rubber cutting edge self-adjusts up and down to smoothly clear a path on any terrain. Aluminum blade stays in straight-ahead position, and makes plowing your driveway as easy as pulling forward or backing out. Easily attach a variety of accessories to the front of your vehicle with this fully welded, corrosion-resistant trailer hitch receiver. Perfect for winches, spare tire carriers and more.by: James10/04/2016
I was a little surprised with the snow plow. I thought it was going to be hydraulic/electric. It does okay, going on flat and slight declines. Inclines not so good. I also. Bought a rear trailer hitch. Very pleased with it.
by: Glenn Weber09/29/2017
1998 Ford F-150 and F-250 Light Duty
Great product,easy installation and dealing with etrailer has been a real good experience.
by: Anonymous 07/01/2021
3
3
Ask the Experts about this Snow Plow
Do you have a question about this Snow Plow?
- Position of the CURT Front Trailer Hitch Receiver on a 1997 Ford F-150 and F-250 Light Duty
- I spoke with my contact at CURT regarding the front mount trailer hitch, # 31049. He did not have any pictures he could send to me of the hitch installed. However, You can determine where the receiver will be based on some measurements.
This trailer hitch mounts to the bottom of the frame rails on the vehicle. The receiver is above the mounting points. If you measure up from the bottom of the frame 9.66 inches, that is where the top of the receiver will be in the center of the vehicle.
view full answer... - Recommended Front Mounted Trailer Hitch Receiver for 1997 Ford F-150 4WD for Snow Plow
- The Curt hitch # 31049 for your 1997 Ford F-150 cannot be mounted upside down. It is designed to be that high for winch mounting and a more hidden look with greater ground clearance.
Based on your need to have the hitch lower for your snowplow, I recommend the Draw-Tite Front Mount Trailer Hitch Receiver - Custom Fit - 2" # 65025 which is a confirmed fit for your F-150 4WD. Based on customer measurements, this hitch will be about 14 inches from the ground.
I also recommend using
view full answer... - Correct Front Mount Trailer Hitch for 1998 Ford Expedition 4WD with Factory Tow Hooks
- The Curt Front Mount Trailer Hitch Receiver part # 31049 is a confirmed fit for a 1998 Ford Expedition 4WD with factory tow hooks. It mounts to the same two holes in the bottom of the frame that the tow hooks use which you can see from the attached instructions.
view full answer... - Recommendation of Front Mount Hitch Receiver on a 1998 Ford Expedition 4-Wheel Drive for a Snow Plow
- Looking at the installation between the front mount hitches that fit your 1998 Ford Expedition, the Curt, part # 31049, installs much higher where the license plate is normally mounted. The benfit is more ground clearance but you'll need to relocate your license plate using part # C31002. Also, on your Expedition that seems like an extremely high mounting point for a snow plow.
The Draw-Tite, part # 65025, installs quite a bit lower, sitting under the front bumper and fascia. This
view full answer... - Front Mount Trailer Hitch for a 1998 Lincoln Navigator
- We do have a front mount hitch that fits the 1998 Lincoln Navigator but it is not # 31049. Instead you will need Draw-Tite hitch # 65025. This hitch has a 500 pound vertical pull capacity (tongue weight) so make sure the weight of the snow plow does not exceed that. Also make sure the front axle capacity is high enough for use with a plow.
view full answer... - Will the Curt Front Mount Hitch # 31049 Install on a 1998 Ford F-150 2WD Extended Cab
- I spoke with my contact at Curt and he told me you can install the Curt Front Mount Hitch, # 31049, on your 1998 Ford F-150 2WD as long as the frame of your truck matches the width of the bolt holes on the hitch. The frame width should be the same between the 2WD and 4WD models, but I would recommend measuring just to verify. The bolt holes that mount to the underside of the frame rail measure 31-7/8 in. from center to center. If your frame rails approximately 31-7/8 in. apart on center,
view full answer... - How Does the Curt Front Mount Trailer Hitch Mount on a 1997 Ford Expedition
- Yes, the Curt Front Mount Hitch Receiver, # 31049, bolts to the frame of your 1997 Ford Expedition 4x4. This hitch comes with 6 carriage bolts that will be fed through the inside of the frame and out using the fish wire tool.
This hitch comes will all of the necessary mounting hardware and installation instructions and does not require any drilling or welding. I have attached a link to the installation instructions for you to check out.
I have added a link to an article on hitch installation
view full answer... - Receiver Orientation of Curt Front Receiver Part # 31049 for 1998 Ford F-250
- The orientation of the hitch that is shown in the instructions is the correct one. The receiver mounting flanges attach to the bottom of the frame. I will have our photo changed to show the correct orientation.
The folks at Curt did not have any photos of this particular receiver installed on a vehicle, so I cannot say with any certainty where the receiver opening will be in relation to the bumper. I was told that the top of the receiver opening is 9.66 inches above the mounting flange.
view full answer... - Front Mount Hitch For A 1998 Ford F-150 & F-250
- For your 1998 Ford F-150/250, I recommend the Curt Front Mount Trailer hitch # 31049. This trailer hitch is capable of handling a 500-lbs vertical load limit, a maximum line pull limit of 9,000-lbs, and a GTW of 5,000-lbs.
Additionally, you may need a license plate relocation kit as the front hitch might cover the license plate. Should you need it, you can use the Curt Front Mount Trailer Hitch License Plate Holder # C31002.
view full answer... - Front Hitch For 1997 Ford F150
- After reaching out to Curt about your specific question, I've found that the Curt Front Hitch # 31049 will work for your 1997 Ford F150!
view full answer... - SnowBear Snowplows and Mounting Kit Options for 1998 Ford Pickup
- We offer SnowBear plows and mounting kits for your 1998 Ford pickup that are shown on the linked page. Install kits are either 2-inch hitches like # 31049 for the 4WD or custom bracket kits like # SB397-104 which works with 2WD trucks. At the top of the page you can use the Select Vehicle Style drop-down menu tool to select your drive train.
The photos on the page will also allow you to identify your plow model to confirm it is compatible with your truck.
view full answer... - Front Mount Trailer Hitch Options for a 2001 GMC Sierra 2500
- First, for a 2001 GMC Sierra 2500 the correct front mount hitch is going to be # 65028 from Draw-Tite or # 31108 from Curt. The hitch you referenced # 31049 is for Ford vehicles.
I have included links to the installation instructions for each of the hitches that will fit your truck so you can see what each installation entails. There is no drilling required on the Draw-Tite or Curt hitches unless you will need to enlarge some holes. No new holes will be drilled.
view full answer...

Info for these parts were:

Expert Research:
Mike L

Expert Research:
Michael H

Expert Research:
John H

Expert Research:
Adam R

Written by:
Lindsey S

Video Edited:
Dustin K

Video by:
Chris R

Updated by:
Wilson B

Updated by:
Kristina F

Updated by:
Isabelle B

Test Fit:
Clayton O
At etrailer.com we provide the best information available about the products we sell. We take the quality of our information seriously so that you can get the right part the first time. Let us know if anything is missing or if you have any questions.


Product Experts Available Now!
Call 1-800-940-8924
Thank you! Your comment has been submitted successfully. You should be able to view your question/comment here within a few days.
Error submitting comment. Please try again momentarily.