
Illuminate your campsite, backyard, or workshop with this telescoping light. Extends up to 10' and includes a built-in power bank and wireless remote. Can be used with ground spikes for increased stability on uneven terrain or windy environments.
Features:
Specs:
Videos are provided as a guide only. Refer to manufacturer installation instructions and specs for complete information.
Hi everybody, Andy here with etrailer.com. Let's take a look at this FLi Over-Lander Telescoping LED light. Now, this telescoping light can illuminate your campsite, your backyard, your workshop. You could use this inside of your garage. You can use this virtually anywhere that you need some extra light. And this is going to be very portable and very easy to set up and use.
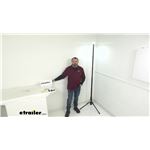
So, this is going to be very, a very convenient extra source of light for you. Now, this light extends up to 10 feet tall and right now I have it set at about seven feet tall. I really don't have the room inside of my studio to extend it all the way up for you to see it on camera. So, it's sitting right at about seven feet tall and I'm about 5"9, 5"10 depending on how my day is going. So, hopefully that kind of gives you an idea of how tall it is now and how tall it can go.
And this is going to give you 360 degrees of bright light and it's going to extend up to 30 meters away. And the COB flood lens is going to provide you up to 2,600 lumens of light. So, as you can see, I do have it on right now and even with our studio lights on, it's blinding to me when I look at it. I have it on all the way up at the highest setting, but to give you a better demonstration of what this is going to look like, I'm gonna turn the studio lights off and it probably doesn't translate too well over camera, but in my studio it's plenty bright. I can see everything even though I just have a light source coming from one corner of my studio.
But again, you're gonna get 360 degrees of light. It does come with a remote that I'm gonna show you in the next few minutes or so, but you can adjust the brightness. So, I do have it at the brightest setting right now, but let me go ahead and just kick this down so you can hopefully see that the intensity is going down and then you see that flash. That means that I have it at the lowest setting. So, it just kind of gives you a flash there, letting you know it's at the lowest setting.
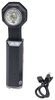
Now I'm gonna start kicking it back up, it's getting brighter, and then it gives me a flash, letting me know that that's at the brightest setting or the highest setting. Now this also has a red LED night vision that is going to allow you to use this without dilating your eyes or attracting bugs. So, let me flip that on. Now this will be quite a bit dimmer than the white light. So, here's the red light and this is at its brightest and as you can see, it flashed at me when I hit the bright setting, let me know it's at the brightest. So, I'm gonna go ahead and start lowering it and you can hopefully see that it's going down and it's flashing at me, letting me know that I'm at the lowest setting. I would be surprised if you could see that on camera because I can barely see it on my monitor, but that's at the brightest setting. And then, as you can see, I'm gonna turn it on again, and it also has a strobe feature. So, the red LED has a strobe feature for emergency situations. And then I'm going to hit the strobe feature for that white light. So, the white and the red light has a strobe feature. Let me go ahead and put that back to normal, so I don't make you crazy with that strobe feature. So again, strobe features for the white light and for the red light that you can use for emergency situations. So, that's a nice built-in feature. Now, this does have a runtime when it's at the lowest setting of about 30 hours. And then when you have this at the highest setting, it has a runtime of about six hours and the battery is a 14,000 milliamp hour of battery. So, I'm gonna go ahead and turn my studio lights back on here. And as I mentioned, I'm gonna go ahead and turn this off. This is extendable and it is collapsible and this is the fiberglass poles are going to give this the ability to extend and collapse. And the best way that I could describe the poles to you is it reminds me of when I was a kid, they would sell these, they we inchesre like swords that you would kind of project out or fling out and those poles would extend out to extend the sword and then they would kind of hold in place and then when you wanted to collapse that sword, you would just push it down. That's what these tubes remind me of, but they are fiberglass, so I'm just gonna go ahead and collapse it. And so, I'm just going to start pushing each of these individual poles down, just like that. And so this is, oh by the way, I did wanna point out and I felt it, when this light is on the top of this light will get very hot. And so, just be aware of that. As I was pushing it down, I was reminded of that very quickly that that does get hot. So, our base is 27 inches wide and this is, the base is equipped with steel legs, they're reinforced legs. And so, this is going to allow you to adjust this, especially for uneven terrain. I am going to loosen this here. This has a tightening ring here, so I'm going to loosen that and that's going to allow me to bring my legs up, just like that. And then the rubber feet will nest in there. And so, this is what it's gonna look like when it's fully collapsed, so in this condition. I'm gonna go ahead and set this up here and hopefully give you a closer view. So, this is the top of the light and then this is what it's gonna look like when this is fully extended. And then I'm just going to push that all the way in, so it's not going to slide out. So, this is what it's gonna look like in its collapsed form. And I'm just going to give you a quick measurement here. Get my tape measure here, showing you what this looks like fully collapsed. See if I can line this up for you real quick. So, it looks like we're sitting at right about maybe right at about almost 26 inches when this is fully collapsed. So, that's quite a difference from how it can be fully extended all the way up to 10 feet. So, this is gonna be very easy to store. You can buy separately spikes to put into the rubber feet or through the legs rather to give you more stability in the ground so you don't have to worry about it falling out of the ground or anything like that. Those ground spikes would be a separate purchase though. And this light is going to be weather resistant. It's gonna hold up against inclement conditions. Again, the poles are fiberglass, the legs here are steel and this weighs about four and a half pounds. So, overall it's very lightweight, and I wanted to show you here, Let me see if I can bring this up here. We do have a USBA and a USBC port there that's going to allow you to, not only charge this light, but then you can plug into the USBA port to charge like your smartphone or other compatible devices. So, that is a really nice feature that this has. And this also has a battery light here. Let me see if I can show this to you right here. So, I turned the light on there briefly. And as you can see, those four LEDs mean that it's fully charged. And of course, as the battery power is being used, it's gonna go down to three, two, and then one light. And then when it's charging, it'll indicate that with these lights. And so, I just turn that light off. So, you pressing that button, again, you'll have full control of the light. Let me see if I can bring this into frame here. Pressing it once, the light is on. If I hold that button down, that's going to allow me to control the intensity. So, holding it down, it goes all the way to the lowest setting and it flashed at me to let me know. And then holding it again, it's gonna go to the highest setting and flash at me, and then turns it off. I'm gonna turn it on again, it the button again, that takes me to the red and then hold that down. It's gonna go all the way down to the lowest setting and flash at me, holding it down again, It's gonna go up to the highest setting. And of course, the red is not as bright as the white. And then turn that off. And then I'm gonna turn it on again, keep hitting it. That's gonna be the strobe. Keep hitting it again. That's the strobe white, previously, strobe red now. I'm gonna turn that off. So, all the functionality of the remote that we have right here that can also all be controlled from that one button on the light itself as well. But the remote is really a great addition to this. This is gonna operate up to 50 feet away and then when you're putting the light away, it can store magnetically underneath the light. So, everything is in one nice compact package. So, that's a really nice feature. So, let me go ahead and see if I can set this up for you one more time. So, I have everything nested together. So, I'm gonna go ahead and pull out our tripod legs here and extend them all the way out. And then, I'm going to tighten them with this ring, and just give that a few good turns until it's tight and it feels like it's tight. Then I'm gonna go ahead and bring this into frame so you can see. And then, just begin to pull this light up. And as you can see, these poles are adjustable. So, I'm just going to set this up to where it's still in the frame here. And just put some tension on these poles to make sure it's where I want it and as tight as I want it. And that's gonna be as simple as that to set this up. And I'm gonna turn that light on. Well, I think that's going to wrap up our look today. I do hope that it was illuminating for you, that I did fail to mention some instructions are included to guide you through the operation. Mainly all the things that we did in our time together. It does come with the charging cable and an adapter to plug this in. So, you'll have everything that you need to charge this up. But other than that, I think that covers all the bases. I do hope that it was helpful for you and I hope it'll be enough information so you can be confident if this is going to be light that is going to work for you. Again, my name is Andy. Thank you for joining me.
Info for this part was:
At etrailer.com we provide the best information available about the products we sell. We take the quality of our information seriously so that you can get the right part the first time. Let us know if anything is missing or if you have any questions.


Thank you! Your comment has been submitted successfully. You should be able to view your question/comment here within a few days.
Error submitting comment. Please try again momentarily.