
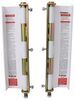
Get the safest and most comfortable ride while hauling your camper with tie-downs that mount on the frame of your pickup. Great for your truck's looks: remove the arms from the brackets and you'll hardly know that the brackets are there.
Features:
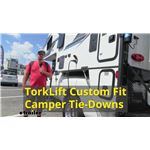
TorkLift Custom Frame-Mounted Camper Tie-Downs - Front:Videos are provided as a guide only. Refer to manufacturer installation instructions and specs for complete information.
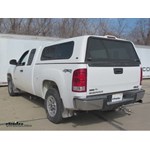
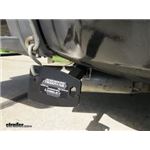
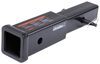
Today on our 2011 GMC Sierra, we're going to be taking a look at and installing the TorkLift Custom Frame Mounted Camper Tie-Downs, part number TLC2207. Now, if you're going to be installing a camper on your vehicle, these are going to be a great accessory. These are going to be nice and secure to the frame of the vehicle, as opposed to hooking it to the body of the truck.With these front tie downs on, you can still access your front quad doors on your vehicle without any interference. As you can see, these are nice black, powder-coated finish. You're not going to lose any ground clearance with ours installed because it fits right up against the bottom of the body on your frame. When they're out, they're virtually undetectable.
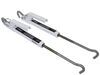
They are nice. They're adjustable for width depending on what size camper you have and how much overhang you have.They're simple to install. With this style tie-down, you're not going to have to drill any holes in the bottom of your vehicle, and it's not going to make any contact with your body panels. Now, let's go ahead and show you how to install them.This is what your front kit's going to consist of. You have your two tie-down receivers, the support brackets, and support bracket for the bottom, your hardware kit.
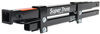
Then we have our tie-down inserts. It's going to slide into the receiver and you're going to attach your camper to.We're going to start off on the driver's side on the front. In between the cab mount we're going to located the rearmost cab mount. We're going to squeeze these two ebrake cables together with a zip tie that's supplied with our kit. We're just going to pull them together to give us a little extra room so we can get our bolt that's going to end up going through the bracket on the bottom side here.Now, we'll take this support bracket that's got the three holes and the notch on the end.
We want to make sure that this notch part is pointing down, and the single hole's going to be to the back. We're going to slide it behind the cab mount. Now, if there's any rocks or dirt up in there, you want to push it out of the way because the bracket won't sit flat. Once we have the holes lined up in the center here, we're going to take one of our half-inch bolts with a star washer. From the backside, place it through.
Take a flat washer, a lock washer and our nut, and we'll hand tighten it.We'll take another half-inch bolt and star washer and secure it from the backside through this hole. You're going to leave that one just as it is for now. Now, we're going to take another half-inch bolt and it's going to slip through the middle bracket bolt hole. Once we have that one in place, we'll take a flange nut and we'll attach that onto that side, hand tight.Now, we'll take our receiver bracket. The one for the driver's side is going to be the one with the angle. It's going to fit against the cab mount, behind our cables. We'll get into the grove and slide this to the front. Once we have it up here, we'll slide it up. Once we have our stud protruding through the hole, we can place on our washers. Put on our flat washer, our lock washer and our nut. Just want to reach back and make sure you're not going to pinch any wires in between the bracket as you tighten it up.Our next step is going to be another half-inch bolt and then our plate. Slip it through. So we go into the bottom part of the hole where your ebrake cables go through. Then we'll take a flange nut and we're going to place it on the other side of that. And we'll hand tighten that.Now, we're going to mount the bottom bracket. It's just going to slip in between our skid plate, if your vehicle's equipped with one. We're going to push it up in between there. It's going to grab around the outside of the frame. Then we're going to take another half-inch bolt. We'll place a star washer, a flat washer and another star washer. Slip it inside. Then we're going to install a flange nut. And the same thing.Now we're going to go ahead and start torquing our bolt. You're going to want to make sure that you have your bracket up as far as it will go so this is sitting against the frame rail. Then we'll start at the top and we'll torque the top ones to the specifications in the instructions. And we're going to work our way down.Then we can move onto the back one, at the top. Now, these are not going to require to use a wrench on the back side of these top ones because of the way we placed our lock washers. We can go ahead and torque our two bottom ones. These are all 3/4" bolts so we'll need 3/4" tools.Now the only one left we have to torque is the one with the block on it. You want to make sure you keep that block straight and have the bolt down as far in the slot as it can go. What I'm going to do is I'm going to go ahead and pre-torque it so we can keep our brackets straight by holding the front side and inaudible 00:06:29 on the back. That will allow our bracket not to move around.After we've torqued all our bolts, we can snip our zip tie back off of there, discard that. And we'll repeat the same process for the other side.And that's going to do it for our look at and install for the TorkLift Custom Frame Mount Camper Tie-Downs for the front, part number TLC2207 on our 2011 GMC Sierra.
Info for this part was:
At etrailer.com we provide the best information available about the products we sell. We take the quality of our information seriously so that you can get the right part the first time. Let us know if anything is missing or if you have any questions.


Thank you! Your comment has been submitted successfully. You should be able to view your question/comment here within a few days.
Error submitting comment. Please try again momentarily.