
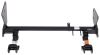
Curt Trailer Hitch Receiver - Custom Fit - Class III - 2"
(14 reviews)
Price: $215.34
In Stock
Curt Trailer Hitch Receiver - Custom Fit - Class III - 2"
Item # 13593
Retail:$354.95
Our Price: $215.34
You Save: $139.61
Will this fit?
To see if this custom-fit item will work for you please tell us what vehicle you'll use it with.
In Stock
Thank you! Your comment has been submitted successfully. You should be able to view your question/comment here within a few days.
Error submitting comment. Please try again momentarily.


- All Info
- Reviews (14)
- Q & A (0)
- Videos (2)
- Photos
CURT Trailer Hitch - 13593
- 2 Inch Hitch
- Class III
- 3500 lbs GTW
- Concealed Cross Tube
- CURT
- 350 lbs TW
- Custom Fit Hitch
This fully welded trailer hitch receiver bolts onto your vehicle's frame with no welding required. Powder coated steel is sturdy and corrosion resistant.
Features:
- Custom fit is designed specifically for your vehicle
- Precision, robotic welding maximizes strength and improves fit
- Bolt-on installation - no welding required
- Complete hardware kit and installation instructions included
- Lifetime technical support from the experts at etrailer.com
- Gloss black powder coat finish over protective base coat offers superior rust resistance
- Sturdy, square-tube design
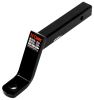
- Ball mount, pin and clip sold separately
- Hitch assembled in the USA, bolts overseas
Specs:
- Receiver opening: 2" x 2"
- Rating: Class III
- Maximum gross trailer weight: 3,500 lbs
- Maximum tongue weight: 350 lbs
- Not rated for use with weight-distribution systems
- Limited lifetime warranty
etrailer.com Technical Support
At etrailer.com we're committed to the products we sell, and to our customers. Our experienced and knowledgeable staff are available via both phone and email to address your questions and concerns for the lifetime of your hitch. The technicians at etrailer perform hitch installations on a daily basis, making them a valuable resource for do-it-yourselfers. The one-on-one, personal service you'll receive comes straight from an expert in the towing and automotive field. We've installed it, we've wired it and we've towed with it, so whatever your question, we can answer it.
13593 Curt Class 3 Trailer Hitch Receiver
Installation Details
This Product Fits The Following Vehicles
- 2007 - 2012 Mazda CX-7


Video of Curt Trailer Hitch Receiver - Custom Fit - Class III - 2"


Videos are provided as a guide only. Refer to manufacturer installation instructions and specs for complete information.


Video Transcript for Trailer Hitch Installation - 2008 Mazda CX-7 - Curt
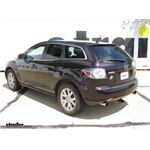
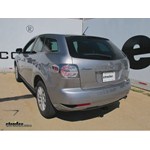
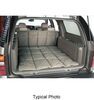
Today in our 2008 Mazda CX-7 we'll be having a look at the Curt class 3 receiver hitch part number 13953. Here's what our hitch looks like installed on the back of our Mazda CX-7. You can see there's a very minimal amount showing at all. The entire frame of the hitch is tucked up back underneath the bumper cover. The only thing hanging down is the actual 2 inch receiver itself. Now this class 3 hitch has a 350 pound max tongue weight rating and a 3,500 pound max trailer weight rating.
We have these nice loops here to hook our safety chains of our trailer up on to. They're real easy to get to. We have our standard 5/8s hitch pin hole here where you can insert your hitch pin or your locking hitch pin, whichever device you choose to use. Now for a couple measurements to help better assist you in choosing any hitch mounted accessories you may need. You're looking about 10 inches from the center of the hitch pin hole to the back of the rear bumper here. We're looking about 12 inches from the ground to the top of a 2 inch opening in the receiver itself.
Just keep those measurements in mind when you're looking for any hitch mounted accessories such as a ball mount, bike rack, or cargo carrier. To begin our installation we need to remove our exhaust hangers. There's 2 on either side of the muffler. Just spray some penetrating oil on them. Let it soak in there a little bit to help them slide off a little bit easier. Now we'll take a pry bar.
Wedge it up between the frame and the exhaust hanger, and we'll pry the hanger off. Push out the inaudible 00:01:43 hand, like so. Before we remove all of our exhaust hangers we'll take a strap here, put it around our tail pipe section, just to help support it so it doesn't droop too much. Now we can continue removing the rest of our hangers. There's 3 holes that our hitch will go into, but we need to enlarge our center hole here large enough for our spacer plates to fit in and we'll finish all 3 of our spacer plates on either side through the center hole.
Using our step drill bit make sure we have our gloves and our safety glasses on because this does throw some metal places. We enlarge it just enough on this side. We'll repeat the process on the other side. We'll take our fish wire here. Thread it through our front hole. Put a little bend on it so it's easier to grab. Pull out our fish wire, just like so. Put our spacer plate on. Push it up inside the frame rail, like so. Thread out one of our carriage bolts on. Our bolt threaded on, our spacer plate in the frame rail, we'll push the bolt on in, just pull it through our front hole, just like so. We'll take our feed wire off. Feed our wire through our back hole. Take another spacer plate. Insert it in the frame rail. Thread another carriage bolt on. Pull it through. Remove our fish wire again. Now the middle hole's slightly different. Take our basic plate. Already insert our bolt. Put our feed wire on. We'll do what we call a reverse pull. With that, feed the bolt in, then the spacer plate, and then pull the bolt on down, just like so. Remove our feed wire. Now we can repeat the process for the other side doing the exact same technique. We'll raise our hitch into position with our assistant, making sure we don't accidentally push our bolts into the frame, making sure we get all 3 of our bolts through the hole in the hitch. Now if all 6 of our bolts started. Now using our 3/4 inch sockets we'll tighten our 6 bolts up. Now we can torque our bolts to manufacturer specifications found in the instructions. With all of our bolts torqued to manufacturer specification, we can now raise our exhaust back into position, slide our hanger back on. Now with all 4 of our exhaust hangers reattached we can remove our support strap that we installed and our installation's complete. That completes our work at the Curt class 3 receiver hitch part number 13593 on our 2008 Mazda CX-7.
Customer Satisfaction Score:
95% were satisfied with this product
5% of customers were not satisfied
Customer Reviews
Curt Trailer Hitch Receiver - Custom Fit - Class III - 2" - 13593
Average Customer Rating: 4.8 out of 5 stars (14 Customer Reviews)
This fully welded trailer hitch receiver bolts onto your vehicle's frame with no welding required. Powder coated steel is sturdy and corrosion resistant.by: Richard05/16/2024
2011 Mazda CX-7
For starters Packaging wat beat up all around, and powder coating is scratched in various places, exposing metal. Otherwise it is what I ordered, and installation was easy with the provided wire bolt fisher. The plug and play wire harness bought separate was accurate and works like a charm.


by: Chris06/01/2020
I bought this hitch for my son's 2011 CX-7 so he can attach his bike rack.
The hitch itself seems to be well made, with a black paint or powder coat that was consistent on the entire hitch - no thin spots or chipped areas. All hardware was included, and the directions were accurate, but a little sparse. Spend a little time looking at the directions, your hitch, and your car, and it makes sense. Read the directions thoroughly before you start!
I am an advanced amateur when it comes to working on cars. Installation was time consuming, but straight forward. The directions say 30 min, but it took me about 4 hours. In that time, I went to Lowe's for a grinding tool, which took at least 45 min. About the grinding tool: the hitch attaches to the car via 6 holes in the frame. The instructions say that two of the 6 holes will need to be enlarged, but in my case, I had to enlarge all 6 holes. Enlarging the holes is what took the longest. Aside from the grinder, I used no power tools - just basic ratchets and wrenches. Once the holes were enlarged, the hitch installed perfectly, and fit the car without any problems. I was able to do the installation alone, and used a floor jack to support the hitch and muffler when needed. I supported the car on a pair of ramps from the auto parts store.
I would buy this hitch again, and now that I know how to install it, I bet I could do it in 1 to 1.5 hours.


by: shanna03/30/2017
Mazda
We've had our trailer hitch installed on our Mazda CX7 for a year now and its worked just fine. The installation was quick and super easy. The only trouble we've run into with towing in general probably has more to do with Lowe's products than the hitch itself. The ball mount has a lot of slack in it, so when we're going down the road with the trailer, it gets really noisy. We've had to stop a few times just to make sure the mount wasn't coming loose. The hitch itself, though, it's not going anywhere.
by: Claus03/22/2020
Ram 3500
First off, this is a two man job, and it's better to have ramps or Jack stands than a lift, because it's easier to lay on your back to support the hitch while your helper guide the bolts through the holes. There really isn't much room to work with, and leverage is required when holding it steady for a while.
Also the muffler rubber mounts are not the easiest to get pulled off, and with the hitch in place there isn't much room to move it sideways when putting them back on. Not the fault of the hitch, just an observation.
The instruction video makes it look easy, which it technically is, but the two front square washers on the passenger side didn't both lay flat because the two holes were too close. This caused one of the bolts to be at an angle, and it was a bit iffy trying to match all three holes up without pushing the bolt back up into the cavity.
We got it done and didn't loose a bolt, and it looks very nice installed.
Also bought a non-powered harness and it was easy to connect.
For some reason the instructions had me remove the entire floor panel, each tray beside the spate and the plastic piece of trim covering the latch pin. None were needed since there isn't a way to get the trailer wires from the cargo area to the hitch.
Simply open the passenger side cover under the tear window, locate the connector and hook up the wire harness. The just install the cover and let the wire hang out and store it in the tray under the floor cover.
When you need to hook it up just pull it out and close the hatch on it.
For less than $xx.xx I am now able to pull 3500 pounds. Well worth it, and it arrived in just a couple of days with the free shipping option.
Thank you etrailer!
by: Stephen Cook04/17/2017
Mazda
I don't have pictures to share of the installation of a hitch on a Mazda GX7.
Customer service was just excellent Jennifer The person that help me couldn't of been more helpful with the order that I needed to place.
Everything in that video showed a simple installation and it was absolutely accurate. I needed this hitch to pull a trailer back home for items that I had purchased.
The shipping was free it came a day early no pun intended but I'm a happy camper.
Thank you Jennifer for making my experience extra special.
by: William07/06/2018
2008 Mazda CX-7
I am 73 years old, and I was able to install the Hitch to my 2008 Mazda CX-7 with no problems. I found the hitch easy to put on, after I was able to straighten one side, with no problems (I thought since the box was damaged that ups bent it. Any way the hitch fit as discribed. I am very pleased.
by: Brandon 09/27/2021
This hitch has been absolutely great! I've had it for about a year now and I've pulled a trailer with it almost every day since then. It was really easy to install by myself and I've had no problems with it. I would definitely order from etrailer.com again!
by: William 06/02/2020
Shipping extremely fast. Receive hitch within a couple of days. Hitch installed with little effort just as the video showed. am well please with service & product.
by: Jason 05/11/2020
As advertised. My son and I installed in 2.5 hours with little difficulty. May need a die grinder to situate mounting bolts for install.
by: Dan Laz05/02/2017
Great but paint flaking off and hitch rusting already:(
by: Steve.g01/02/2020
Incredible quality in the second year and not even so much as a speck of rust would highly recommend also was fairly easy to install I use it to you my fishing boats around has held up solid !!!
by: Bernadette05/20/2020
2011 Mazda CX-7
Just had it installed and is great with super quick shipping!
by: Nathan01/19/2022
Great experience top to bottom. Good f it.
by: David 07/24/2022
2010 Mazda CX-7
14
14
See what our Experts say about this CURT Trailer Hitch
- What Will a Class III Trailer Hitch Look Like When Installed on a 2009 Mazda CX-7We have several Class III trailer hitches available for the 2010 Mazda CX-7. First is the Draw-Tite Trailer Hitch, # 75512. I have included a link to the instructions and a video for this hitch as well. For the most part, only the receiver shows. The other Class III Hitch, # 13593, will have a similar appearance after it is installed. Both of these hitches, when installed, are pretty well hidden as you can see in the videos. For the most part, only the receiver shows.
view full answer...
Info for this part was:

Written by:
Lindsey S

Video Edited:
Joshua S

Video Edited:
Chris R

Video by:
Jacob T

Test Fit:
Shane T

Test Fit:
Brent H

Updated by:
Wilson B

Updated by:
Amanda M

Updated by:
Kristina F

Updated by:
Isabelle B
At etrailer.com we provide the best information available about the products we sell. We take the quality of our information seriously so that you can get the right part the first time. Let us know if anything is missing or if you have any questions.
Product Experts Available Now!
Call 1-800-940-8924
Dan L.
5/7/2018
Great but paint flaking off and rusting