
Demco Tail Light Wiring Bulb and Socket Kit with 7-Wire to 6-Wire Coiled Connector
Item # DM9523047-54
Our Price: $205.31
Confirmed to Fit
2004 Honda CR-V
Will this fit?
To see if this custom-fit item will work for you please tell us what vehicle you'll use it with.
In Stock


Need help with installation?
Locate installers near me- All Info
- Reviews (2)
- Q & A (0)
- Videos (1)
- Photos
2004 Honda CR-V - Demco Tail Light Wiring Bulb and Socket Kit with 7-Wire to 6-Wire Coiled Connector
- Bulb and Socket Kit
- Bypasses Vehicle Wiring
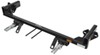
- Tail Light Mount
- Demco
- Universal
Get signal lights for your towed car without tapping into its wiring. Self-contained wiring kit bypasses your Honda CR-V's electrical system, eliminating concerns over violating manufacturer's warranty. Includes 7-way to 6-way adapter cord.
Features:
- Allows for brake, running, and signal lights in your towed car without tapping into its wiring
- Bypasses towed car's electrical system completely - wiring is routed beneath the car
- Maintains vehicle warranty and eliminates any concerns about electrical feedback
- Works via independent plugs and sockets mounted inside the tail light lenses
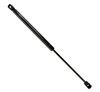
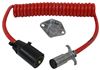
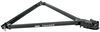
- 7-Wire to 6-wire adapter cord allows you to run power from your RV to your towed vehicle
- Coiled design prevents wire from dragging on the ground
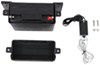
- 6-Way socket wires to included harness and mounts on towed car with bracket (sold separately)
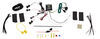
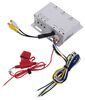
- Kit includes:
- 7-Way to 6-way adapter cord
- 6-Way socket
- 4-Wire harness
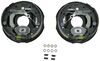
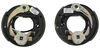
- 2 Incandescent bulbs and sockets
- 5 Quick-splice wire connectors
- 5 Butt connectors
- 3 Ring terminals
- Nylon ties
- Made in the USA
Specs:
- Wiring harness length: 26'
- Wire gauge: 16
- Adapter cord extended length: 7'
- 1-Year warranty
Note: Towed car must have enough room inside the tail light lens housing for an extra bulb and socket.
9523047 Demco Tail Light Bulb and Socket Kit
9523054 Demco 7-Wire to 6-Wire Coiled Electrical Cord - 7' Long


Video of Demco Tail Light Wiring Bulb and Socket Kit with 7-Wire to 6-Wire Coiled Connector


Videos are provided as a guide only. Refer to manufacturer installation instructions and specs for complete information.

Video Transcript for Demco Tail Light Wiring Bulb and Socket Kit Installation 2011 Chevrolet Cruze
Ryan : How's it going, Ryan here at etrailer.com. Today on our 2011 Chevrolet Cruze, we're going to be taking a look at and showing you how to install the Demco tail light wiring bulb and socket kit, with seven to six wire coiled connector. What the bulb and socket kit is going to allow you to do, is hook up to your motor home. That way all the lighting signals here at the back of the Cruze are going to match up with those of your motor home, and keep you safe and legal. One thing I really like about this kit is how it's going to come with everything you need. It's going to include the round, six-way plug here at the front, as well as a coiled cable that lets you plug one end to the front of your Cruze, and the other end into your motor home.
The cord is going to be really nice and thick and heavy duty, and on one end of it we'll have our six-way, and on the other a seven-way.Now since it is coiled too, we're not going to have to worry about it dragging on the ground because whenever you make those wide turns, it'll simply stretch and then come back to that coiled position whenever you're going straight down the road. One thing I really like about the plug is that it's made from metal, so we know it's going to hold up really well, not have to worry about it breaking or cracking, unlike some of the plastic styles available. Lid's going to be spring-loaded that way when we're not using it, it's going to help keep the inside nice and sealed, help prevent any corrosion. And on the bottom of that lid, it's going to be a small tab here. That way whenever we plug in, the tab is going to help catch our six-way connector here, and prevent it from accidentally getting pulled out.When it comes to setting up a flat tow, some of our customers do find it a little bit challenging to pick out all the components that they're going to need.
That's what's really nice about this kit. It's going to come with these two, that sometimes are easily forgot about, and this is going to make life that much easier to get everything figured out. Now keep in mind this is going to be one of five main components needed to flat tow your Cruze down the road. The other four components are going to includes your base plate, your tow bar, a braking system, as well as safety cables. One thing that's nice about the bulb and socket, is that it's going to be completely isolated from your vehicles factory wiring, so it's going to have its own wiring ran from the back all the way up to the front.However, it does require you to drill a hole into your taillight housing to add that additional bulb.
Now, if you're not very comfortable with having to drill that opening into your taillight housing, there are other wiring kits available such as diode wiring or even magnetic lights. Now, as far as the installation goes, it is relatively straightforward. It shouldn't take you a whole lot of time. My only advice is just be patient, and kind of slow down a little bit whenever you are drilling the holes in your taillight housings. Speaking of which, let's go ahead and do that together now.
To begin our installation, we're going to be here at the back of our Cruze. We're going to need to take our taillights out, so we'll start by opening up our trunk. Here in our taillight, we're going to have two plastic covers. We need to open them up to expose some hardware underneath.I'm going to take a small flathead screwdriver, beginning at the top, and just pop them caps open. Now, once you have them open there's going to be Phillips head screw on each one. So we'll grab our Phillips screwdriver and take those out. Now, once we have those screws out, you can grab the taillight and kind of just wiggle it around and pull towards you, until it pops out. And if we flip it over, we'll go ahead and start disconnecting some of our electrical. For this one up here, you'll just turn to the left about a quarter turn. That bulb will pop out. That should be more or less the same setup for the rest of them. I'm just going to give them a quarter turn. Take them out.We can just set our bulbs and our taillight to the side for now, and repeat that same exact process over on the passenger side. Now we can grab our floor liner or trunk liner rather, and just pull it out. We're just going to set this off to the side. Then, we're going to have to loosen up our side panels right here. So there's going to be a push pin fastener, this small flathead, and pry underneath the head of it, and underneath the base. That'll pop it out. We can just work our fingers kind of behind the panel. It might help to grab that screwdriver if it's a little tight, and kind of just work it back enough. You don't have to get too crazy with it. We just need enough room to kind of get our hands back in here where this wiring runs through. Now I'm going to do the same thing over on the other side.So over here on the passenger side, right next to our side panel here, we're going to have a little plastic grommet. What we're going to do is drill it out large enough to be able to run our wiring through it. So I'm just going to use a stepper bit, kind of work that hole, roughly about three-eighths of an inch, just big enough to get our wires through it. Now we can grab our wiring. Now, since in our particular case, we are using a six- pole connector at the front. We're going to cut both of our four-pole flat connectors off. Now, if you are using a four-pole connector at the front, you'd simply leave one of these on and you'd leave the one on that simply corresponds with the style that your motor home has. Like I said, since we're not using them, I'll cut both of those off with a pair of snips.From here, I can take one end of our wiring and start to feed it down underneath our car, through that hole in the grommet that we just made. Take our wiring and just feed it all the way down. Now, I'm not going to push it completely through. I am going to leave maybe four to six foot of wire here at the top. That way we can run it to both taillights and get everything hooked up. What I'm going to do is take our green wire and just kind of separate it by peeling it back from the other three wires. I'll just do this for maybe four or five foot of it. Now, at this point, these three wires are going to get ran over to the driver's side. To do that, I am going to remove this threshold right here. Taking our threshold off, we're going to have two push-pin style fasteners just like this on each side. Take a flathead, remove the head of it, and then just pop the base of it out.With those fasteners removed, now we can grab the bottom of our threshold, just kind of pull it outwards and then up to release it from the body of the vehicle, and we'll just set it off to the side for now. I went ahead and ran the wires and here's how I did it. The single green wire here on the passenger side, what I've done is simply just came up here to this taillight grommet and just poked a small hole in it using a little screwdriver. Then I was actually able to just to feed, and the end of that green wire is going to come out here through our taillight pocket. As far as the yellow, brown and white wire, what I've done is simply just ran that across the body of our vehicle here, just somewhat loosely, securing them with some zip ties.That way we can still move it, but they're tight enough to keep everything in place. I ran that all the way over to the driver's side, and I more or less did the same thing. I just came up to the grommet, poked a small hole in it, and pushed those wires through. This is what those three wires look like coming into our driver's-side tail light pocket through our rubber grommet. Now we can take our taillights and drill a couple of holes. That way we can install our sockets. If you turn the light over, and this is the driver's-side light, where we're going to put our socket is right here. It's relatively flat and open and easy to get to. What I did is, just took our socket, put it in the position I want it, just kind of traced around it with the marker and centered it out.Now, from here, I'm going to drill that out to the size indicated in the instructions with a hole saw bit, or you can even use a regular style drill bit. As well, just take your time with this. You don't want to blow through it and end up accidentally cracking your light, so just take your time and you'll be just fine. Now, with our hole drilled out, what we're going to do is take our socket and our bulb, connect them two together. That bulb will just push in and you'll rotate it to get it to lock into place. Push your bulb down, and then rotate it to lock it into place. Then we're just going to push this into the hole that we drilled in the taillight. Now, there's going to be some tabs here that can be pulled out or pushed in, depending on how tight we want it to sit in the hole.Well, in this case, without any adjustments here, it actually feels like it's going to fit in there nice and tight and properly. But if your hole is a little larger, you'd simply space these out, pull them out with a small screwdriver to help fill that void. The way this works, is you're just going to click that socket into the taillight. You're going to want it to fit snug, and try to push it down evenly. Well, this one is kind of fighting me a little bit. So, what I think I'm going to do is make a couple adjustments on these tabs here. We'll push them in just a hair. Now that I closed in the tabs a little bit more, should be able to more easily work that in, but still be snug. It's nice and tight fit just like that.Now, at this point, what you're going to want to do is pick up some silicone, and we're going to lay a nice thick bead around this whole edge as well as where the wires go into the back of the light. That's just really going to help prevent any moisture from getting in there and potentially damaging the bulb or the taillight itself. Once you have this sealed up, we're going to repeat that same process to our other taillight, and while we're letting the silicone dry, it'd be a great time to run some more of our wire. Now, what I went ahead and done, is took the extra red and brown wire that came included and I followed the same wiring that we ran a little bit ago, and the two ends will end up here in the passenger-side taillight pocket, through that grommet.I'm going to come down and along the threshold here, and up through the driver's-side taillight grommet, and into the taillight pocket. Now we can start stripping some wires back and work on getting it hooked up. Working on the driver's side, what we can do is kind of cut off this little bit of extra wiring that we have here to match our brown and red wire. We can separate the three wires. Just carefully cut in between them. Peel them back some, to give us room to work. Then we can strip back the insulation on all of our wires to expose the copper underneath. I like to twist them tight. Now, with them all stripped back, what we're going to do is take the extra brown wire, and we're going to twist it together with this brown wire.I'll take them two, and twist them together, nice and tight. Grab a butt connector. Now, I'm using a heat shrink butt connector just to give us a little more protection. However, the ones that come included in the kit will work just fine too. But if you'd rather use these, you can find them here at etrailer. And, crimp it down. Now I'm going to do the same thing here with our white wire that's going to get connected to our extra red wire. Twist it together. We have our butt connector. I'm going to grab a inaudible 00:14:59. Once these two are butt-connected together, we're going to come to our yellow wire, and just put on a single butt connector. Slide that over and crimp it down.Over here on the passenger side, very similar process except we don't have to worry about tying any of the wires together. You'd simply just take all three wires, strip back that insulation on them, and crimp on a butt connector on each one. Now, over here on the driver's side, we can take our taillight with our bulb and socket in place, and get these wires hooked up. It's pretty straight forward. The white wire, we're going to plug that into the red and white butt connector here. Push that in and crimp it down. We're going to use that same process for the other two wires, so the brown wire coming from the light, we'll simply plug into the brown wires here in this butt connector. Then the black wire coming from the light, we're going to get that connected to the yellow wire. Now, over on the passenger side, we're going to get all these crimped together, so the brown wire coming from the light, it's going to come to the brown wire that we ran over here. Put them two together, and crimp them down.The other two, the red wire is going to get connected to the white wire coming from the light, and the green wire is going to get connected to the black wire coming from the light. Now, with all of our connections made, since I used teachering butt connectors, I'll come back with the heat source to seal everything up. Now, what we can do is take all of our light bulbs and just get those reinstalled. Needs to go in the same way we took them out. Just push them down, and give them a quarter turn the other way to lock them all in place. Now we can go ahead and reinstall our taillights. We'll get everything lined up, and put back into position.Tighten our screws back down, and we'll just take our caps and push them back into place. Repeat that process over on the other side. Now before we start working on putting our trunk back together, it's a good idea to take some silicone, and in that hole, through this grommet that we drilled, to run our wiring through, I like to take that silicone and just pack it in there to try to help keep everything sealed up. Now you can go ahead and push your panels back in place and button everything back up. Pop in our push-pin fasteners, and same thing with our threshold. Get that lined up. If the little center piece comes out, not a big deal. Just pop that back in place, and make sure your weather stripping is sitting on top of the threshold. That way everything stays sealed back here.Finally, we'll put in those last two push pin fasteners. Put in our floor covering and we should be all done back here. Now here, underneath the car, right here is where our wiring dropped through that grommet inside of the trunk. I left a little bit of slack here because what we're going to need to do is very carefully split this white wire in two. You're just going to carefully cut it. We're going to work it off of the other wires. Then we're going to strip back the insulation on both ends. From there, I just took a six or eight inch piece of white wire that we had leftover, that we cut off. Remember, we we're hooking up the taillights and I stripped back the insulation on both ends. We're going to take one end of it and twist them together.The other end of it, we're going to take one of the included ring terminals. Put that over the wire, and crimp it down. Now we can grab a butt connector to connect the white wires back together. Now, if those come together, this extra wire that we ran off with the ring terminal, we're going to ground that to the vehicle's body. I'm just going to go right here along the frame. To do that we'll grab the included self-tapping screw and run it into place. I went ahead and shrunk down our heat shrink butt connector. Then I ran the rest of our wiring all way up to the front of the vehicle. Here's the path that I took. This came up along our frame rail here, and use some zip ties to get it secured. Now, when you're running your wiring you're going to want to make sure to avoid any hot or moving parts.That being said, I just followed our frame rail up along through here, and just pushed it up a little bit where our gas tank is, down along through here. I was able to feed our wiring into this portion of the frame, and kept it tight against the side of the frame around some tubing, along our sub frame here, securing it to the side of our sub frame, and then just around here towards the front of the vehicle, leaving us a little slack. That way we can push it up and hook up our six-way plug. Here at the front, I want ahead and stripped back our wires. We're going to take our grommet here, and feed our wires through it. You can just let that hang down there out of the way for now. Now we can grab our six-way plug and work on getting that hooked up. If you flip it over, we're going to notice some lettering with an arrow pointing in the direction of the terminal, and the ones that we're going to need to focus on.Can I just spin this around Will be this one here, RT, which will mean right turn, and our green wire will go to LT, which is left turn. Our yellow wire will go to that one. GD, which means ground. Our white wire will go to that one. Then we're going to have a TM right there, which is taillights and our brown wire will go to that one. The way it works, is there's going to be set screws in here. Let's see, I'll grab a small flathead and run one down. You can see it. I'll grab a small flathead screwdriver and back all those out to give us enough room to get our wires into the terminals. Then we're just going to take the corresponding wire. So we'll do RT for right turn, which will be the green wire.You're going to push that down. I like to try to get all the wire in there. If you have to, you can come back and grab a pair of snips and just shorten the wire up a little bit. You'll hold it in place, then take your flathead, and tighten down that set screw. Make sure it's in there nice and good. I'm just going to repeat that same process for the other remaining terminals. This is what the back of our six-way is going to look like once everything is hooked up. What I like to do is take some dielectric grease, and just smear it all over the terminals. That'll just help prevent any potential corrosion or anything like that could happen. Once we have that covered, we'll slide our rubber cover over it. Then we can take a couple self-tapping screws and secure our wiring to the base plate.Now we can go ahead and plug in, either to a tester box or even our motor home and, run through our lighting functions to make sure everything is working properly. Go ahead and turn on our taillights, our left turn, our right turn and our brake lights. I went ahead and just got some wire loom and a couple of zip ties and just tidied everything up. Now at this point, since we did do this with our fascia off,, right after our base plate to give us some more room to work, we're going to get that back together. But I do want to mention you don't have to take your whole fascia off to get this wiring done. You can do it with everything put together up here. It just makes it a lot easier with it removed because we have all this room.Once we got our fascia up, I did notice that our license plate frame, if tried to open up our cap, it's just going to be really tight and really close. So, what I've done is just use a razor knife and cut out a little opening on the bottom side of our plate frame. That way we can get our wiring pigtail in and out nice and easily. That'll finish up our look at and our installation of the Demco taillight wiring, bulb and socket kit on our 2011 Chevrolet Cruze.
Customer Satisfaction Score:
93% were satisfied with this product
7% of customers were not satisfied
- Wrong item was ordered
Customer Reviews
Demco Tail Light Wiring Bulb and Socket Kit with 7-Wire to 6-Wire Coiled Connector - DM9523047-54
Average Customer Rating: 3.5 out of 5 stars (2 Customer Reviews)
Get signal lights for your towed car without tapping into its wiring. Self-contained wiring kit bypasses your vehicle's electrical system, eliminating concerns over violating manufacturer's warranty. Includes 7-way to 6-way adapter cord.by: RW07/18/2021
The wiring harness is not of that great of quality. When I pulled the trailer wiring apart then the insulation came off the wire I was pulled. For instance when I separated the green and yellow wires then part of the insulation from the green wire stayed with the yellow wire and vice versa. Plus the wiring was only 16 or 18 gauge wire. If I had it to do over again I would probably source each item in the kit separately. The coiled cable also appears to be cheaply made. Plus who uses butt connectors that aren't heat shrink?
by: Frank 07/01/2021
once more a great product
2
2
See what our Experts say about this Demco Flat Tow Wiring Harness
- Flat Towing Setup for 1984 Chevy Blazer 4x4Your 1984 Chevy Blazer 4x4 can be flat towed as long as it has a true transfer case neutral or if you disconnect the drive shaft. We do have the Roadmaster Crossbar-Style Base Plate Kit - Fixed Arms # 108-1 and you can use the Roadmaster Falcon 2 Tow Bar - Motorhome Mount - 2" Hitch - 6,000 lbs # RM-520 along with safety cables # RM-643. Then for your wiring, I recommend the Demco Tail Light Wiring Bulb and Socket Kit with 7-Wire to 6-Wire Coiled Connector # DM9523047-54 which will bypass...
view full answer... - Parts Needed to Flat Tow 2020 Chevy SparkI'll start off by saying that from what I was able to determine from the owner's manual, the automatic transmission version of the 2020 Chevy Spark cannot be dinghy towed and would need to be towed on a dolly like the Demco Kar Kaddy # DM9713045. If you've got a manual transmission, there are a number of parts you'll need to flat tow a vehicle: base plates, a compatible tow bar, safety cables, tow bar wiring, supplemental braking and most likely a high/low adapter. I've also linked some...
view full answer... - Parts Needed and Guide To Flat Tow A 2020 Chevy Spark LS With Manual TransmissionCongratulations on the new 2020 Chevy Spark LS. To flat tow the Spark, it will need a base plate to begin with. I recommend Blue Ox Base Plate Kit - Removable Arms part # BX1725 which have removable base plate tabs for a discreet look when not in use. For the tow bar, I recommend The Blue Ox Avail Tow Bar part # BX7420 which is a non-binding design to make hooking up and unhooking the Spark from the motor home so much easier. The latches release tension to allow you to unhook the Spark...
view full answer...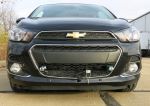
Do you have a question about this Flat Tow Wiring Harnes?
Info for this part was:

Edited by:
Lindsey S

Video by:
Joshua S

Video Edited:
Chris R

Updated by:
Wilson B

Written by:
Kristina F

Test Fit:
Ryan G
At etrailer.com we provide the best information available about the products we sell. We take the quality of our information seriously so that you can get the right part the first time. Let us know if anything is missing or if you have any questions.
Thank you! Your comment has been submitted successfully. You should be able to view your question/comment here within a few days.
Error submitting comment. Please try again momentarily.