
THIS ITEM IS NOT A FIT FOR
2016 Toyota Highlander
Custom Fit Roof Rack Kit With Y00428 | Y36AR | Y64AR
Item # Y67HB
Our Price: $688.85
2016 Toyota Highlander
Will this fit?
To see if this custom-fit item will work for you please tell us what vehicle you'll use it with.


- All Info
- Reviews (50)
- Q & A (0)
- Videos (6)
- Photos
Yakima Roof Rack - Y67HB
- Crossbars
- Aero Bars
- 2 Bars
- 50 Inch Bar Space
- Yakima
- Silver
- Overhang
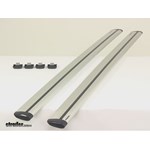
Extremely quiet, aerodynamic crossbars attach to Yakima towers to create a stylish roof rack for your vehicle. Rubber strips in T-slots push down to load carriers or accessories - no need to trim. Full-length aluminum bars maximize carrying capacity.
Features:
Yakima 50" JetStream SM - Silver:- Quiet, low-profile crossbars let you build an aftermarket roof rack for your vehicle
- Pair with Yakima towers and a fit kit (sold separately) to create a complete roof rack
- Asymmetrical JetFlow shape creates an extremely aerodynamic roof rack system
- Built-in WindRidges help control air flow over bars to dramatically reduce wind noise and vibration
- Aero-style bars reduce drag to help maintain fuel efficiency
- Full-length design maximizes space for carriers and accessories
- Versatile crossbars accommodate accessories that mount in the T-slots or clamp around the bars
- Works with most universal-mount bike, water, snow, and cargo carriers
- Rubber SmartFill strips in T-slots allow for easy installation of channel-mounted accessories
- Simply push down on the SmartFill strips to slide in accessories - no trimming required
- Bottom channels allow for easy installation on Yakima towers
- Fit BaseLine, RidgeLine, SkyLine, and TimberLine towers (sold separately)
- Etched measurements on bottoms of bars help center rack on your roof
- Lightweight aluminum bars are durable and rustproof
- Internal JetTruss extrusions provide exceptional bar strength
- Clear anodized alloy finish is corrosion resistant
Yakima SightClip 47:
- Custom-fit clips and pads allow you to mount 4 SightLine or RidgeLine towers (sold separately) on your vehicle with flush, factory side rails
- Inner and outer clips tighten together with a single bolt for even, secure grip on rails
- Snap into place on DropHooks inside towers
- Powder coated stainless steel clips are durable and rust resistant
- Molded rubber pads fit the contour of your side rails
- Clip onto bottoms of towers
- Protect side rails from scratches and abrasions
Yakima SightLine Towers (4-pack):
- 4 Low-profile towers mount Yakima crossbars to your vehicle with flush, factory side rails
- Pair with 2 Yakima crossbars and SightClips or RidgeClips (sold separately) to create a complete roof rack
- Tower pitch can be adjusted 6 degrees forward and 6 degrees backward to level your crossbars
- Pivoting bases automatically adjust during installation to ensure towers are seated correctly
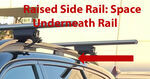
- Versatile BarBeds are curved to accommodate the elliptical shape of Yakima CoreBar and JetStream crossbars
- Also fit RoundBar crossbars with adapter (Y03536 - sold separately) or HD crossbars with adapter (Y03541 - sold separately)
- Safe and easy installation with included torque tool
- Clip holder adjusts on 3 axes for perfect fit on your flush rails
- SightClips or RidgeClips (sold separately) attach to hooks in tower assemblies and tighten together for even, secure grip on rails
- Torque tool clicks 3 times when clips are secure - eliminates fear of under- or over-tightening
- Lockable with Yakima Same Key System (SKS) lock cores (Y07204 - sold separately)
- Durable, weather-resistant stainless steel, glass-reinforced plastic, and elastomer construction
8000428 Yakima Jet Stream CrossBbars - Aluminum - 50" Long - Qty 2 - Silver
8006447 Custom Sight Clips and Pads for Yakima Sight Line and Ridge Line Towers
8001635 Yakima Sight Line Roof Rack Towers - Qty 4
Replaces Yakima RidgeLine Y00145
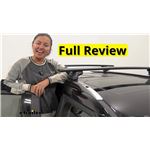
Video of Custom Fit Roof Rack Kit With Y00428 | Y36AR | Y64AR


Videos are provided as a guide only. Refer to manufacturer installation instructions and specs for complete information.


Video Transcript for Yakima Roof Rack Installation - 2019 Toyota Highlander
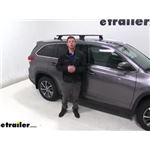
Adam: Hi everyone. Adam at etrailer.com. Today we're going to be taking a look at the Yakima roof rack system on our 2019 Toyota Highlander.So on this specific system, we have the skyline towers, which are going to be these guys right here, with that nice cap. And the landing pads are going to be the skyline landing pads as well. And that's going to allow you to use your flush-mounted rails of your Highlander to put these on. It's really, really simple.
Really all you've got to do is just undo that cap and it comes off. We actually do have a cap that comes and goes over these whenever you're not using them. Just to show you guys, I'll actually go and grab one real quick.That's the one thing I really do like about this roof rack system. There's not a whole lot to it, and whenever you're not using it .. Look at that.
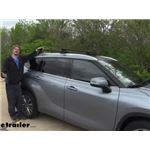
It's like it's not even there. Super cool, super convenient. You can just take it off like that, put your bars on there like this, lock it down into place, and then you're ready to go. It's really a quick system, and what I would definitely recommend to somebody who's got a Highlander.So these specific crossbars that we have right now are called jet stream bars, and they're going to have a nice aerodynamic feel to it. Kind of looks like a airplane wing.
A little bit thicker in the front, a little bit skinnier in the back, helps that air just travel over it a little bit easier and smoother, so you won't have some of that road noise whenever you're going down the road, and also some of that drag you might have. This isn't going to really hinder your gas mileage all too much when it comes to cross bars.But these are going to be made of aluminum and they are the 50 inch crossbars as well. The powder coated finish is going to help it resist against rust and corrosion. And you will have about 165 pounds of carrying capacity on these bars, but always look on your Highlanders owner's manual to make sure that it will be able to handle that much weight.So these cross bars are pretty wide, but not that thick. So a lot of those accessories that are going to wrap around your bars, I think you'll be fine.
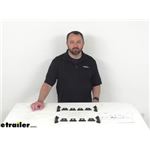
So we're going to do a quick measurement, about three and a quarter inches long and only about maybe an inch thick. But a lot of these crossbars are going to just accept your T track accessories. Right here, all you've really got to do is just take your cap off, just push down on this rubber and you'll be able to slide all your attachments on there.We have a bunch that you can do. I would probably recommend for this vehicle, just a roof mounted cargo basket, just to get a lot of that stuff out of the inside, up and on your roof so your passengers will have a lot more room, just to move around whenever you're going on longer trips.Of course a kayak carrier will be ideal, just because, how else are we going to carry a kayak on this Highlander Probably it has got to be on the roof. So we do have attachments for that as well. There's a bunch of them to choose from, so be sure to pick the one that's right for you. We're going to go ahead and measure just from the top of our roof to the bottom of our bars. Going to be about four inches from the top of our roof to the bottom of the bar, but then it's going to be about five and a quarter inches from the top of our roof to the top of our bar.Also, another thing to think about is just whether our sun roof is going to be able to open and go underneath these bars here. With all that amount of gap, we're going to be plenty fine. We don't have to worry about this not being able to open and us losing the functionality of our sunroof.So there's two different things I need to go over with you guys. One is that these are available in silver as well, so if you like that color a little bit more, maybe it'll go better with your crossbars, or whatever color that your vehicle may be. There is two different colors to choose from, so that's good to know.Also, we do have optional locking cores, so pretty much what locks this bar to our actual vehicle right here does not come with anything that's got to have a key or anything like that. And you can buy those separately. Put that in there real quick, just to give you that added comfort. Other than that, it's actually pretty easy to install. Everything's pretty much in the kit that you need. So let's just go ahead and show you guys how.Alrighty, so we have our front ones already installed, but we have all the equipment, hardware and tools that we need to get to back installed. So that's what we're going to go ahead and do right now. So the first thing we want to do is grab a trim tool. If you don't have one of these, you can use a flathead, if you want. You might make a little bit of a scratch, but there's a little plate here. Put it in the little slots like that and work our way to get this little bracket out. Put that to the side for later.Now what we want to do is we're going to take this portion of our kit. It is going to have an R on it. These are going to mean rear. The other ones on our front had an F on them. And what we're going to do, they're really going to just fit in one slot the best. The other way isn't really going to line up too good. So be true to just do that, get it nice and seated down into place.Then we can take our second portion. We are going to have to take these caps off. They just pop off like that, and we're going to line those up, and then we're going to take a bolt and a lock washer, go down in there, and it's going to thread into the factory hole that they have already provided. Just start threading them down. Try to get it as straight as possible, once you start really torquing them down. Give it a good shake, make sure it's nice and secure, and once you do, you're pretty much done with that. And just for now, I'm just going to put this little cap on here like that. And we can do that same installation process on the other side.All right. So all we really need to do is start getting our towers put up onto our bars. And to do that, first things first, we just need to take our tower here. We're going to have a little piece like this. It's going to have a little bit of teeth on the bottom end here and that's going to be facing a little teeth on the top end of our feet.Just get those teeth lined up, just like that. Snap it into place. Now, take your little T track here. It's going to go down in there. You've got to make sure you line up the bolt with the hole. Then we can flip it upside down. Do our best to tighten it down. Perfect. We can do that same exact thing for the other foot.So before mounting our tires onto our bars, we want to make sure we have them in the right orientation. The rounded portion right here is going to be facing the front of your vehicle, and of course, the more slim edge is going to be facing the back. With that in mind, we can take our towers here. We're going to flip it around like so, and I'm actually going to put this one on backwards and slide it all the way down to the other end. Just fit it within that track, slide that down and then put this one on directly, just like this.All right. So now we're going to do is just replace our cap and then we're going to throw it up on top of our vehicle. To get the right fit.Now the only really thing we need to figure out is just make sure that our cap is going to be open on the end. This is going to allow it to seat down into our little feet here . just like that on both sides.So now's a good time to get the spread from our bars, from our feet all the way to the edge here, nice and even on both sides. And once we do that, you can go ahead and take your tool and just tighten this up. Let it snap real quick, and then you can go ahead and just close this cap, just like that. I want to do the same that on the other side.So now that you have all those steps done, just go ahead and give it a good shake, make sure everything's staying into place, how it should, and if so then you're ready to either load up some of your accessories or just get down the road.Well, everyone that just about does it for our look at the Yakima roof rack system on our 2019 Toyota Highlander.
Customer Reviews
Custom Fit Roof Rack Kit With Y00428 | Y36AR | Y64AR - Y67HB
Average Customer Rating: 4.9 out of 5 stars (50 Customer Reviews)
Extremely quiet, aerodynamic crossbars attach to Yakima towers to create a stylish roof rack for your vehicle. Rubber strips in T-slots push down to load carriers or accessories - no need to trim. Full-length aluminum bars maximize carrying capacity.by: Tim 10/18/2023
One quick phone call and Gwendolyn figured out exactly what I needed for our new car to use my old Yakima rack.
by: William02/28/2024
You guys provide great products and excellent customer service.
Thanks
by: Paul06/01/2023
2018 Toyota Corolla
Yakima Baseline with Yakima CBX 18 Cargo Box fitted on my 2012 Toyota Corolla S Sedan 2012.
Instructions were clear and roof rack was easily installed.


by: Adam K05/14/2023
Pretty straight forward installation. Instructions were easy to follow.
by: MB07/12/2021
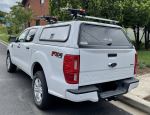
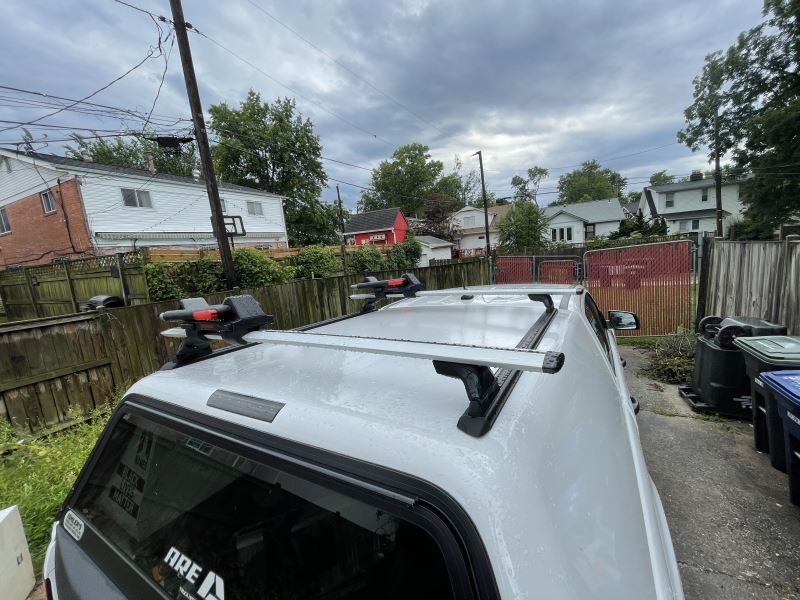
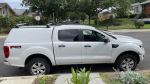
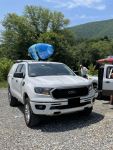
2019 Ford Ranger
The 50” jetstream cross bars were perfect for my 2019 Ford Ranger with my ARE cap. They are paired with the Yakima Skyline towers and appropriate landing pads (protip: call etrailer when you order to ensure you have the correct setup;)
These cross bars are SILENT on my cap. Zero wind noise. My daughter and I installed them on a Friday (I do recommend watching etrailer’s installation video in addition to the paper instructions) and left for a 700 mile weekend road trip the next day to pick up a kayak, paddle with friends downstate then drop her off at summer camp.
Even with empty Yakima Jaylows on top, no wind noise. Even with a boat in the Jaylows, no wind noise.
These are the sweetest rack’s I’ve had. With the Skyline towers and landing pads, they are also easy to take off and put on. Click click done.
They look good, too;)
etrailer customer service for the win, too. When I originally ordered, I did not order all the items I needed for installation. When I realized this, I called and they got me squared away.


by: Nicholas07/11/2023
Order was easy to place and delivered in less than a week as promised. The sales advice was perfect fit despite multiple pieces having been ordered. Used the rack once and very sturdy
by: Bruce06/12/2019
I chose the Yakima roof rack, because It spanned 50 inches, rather than the leading competitor's 47 inches, making it better for tying down 4 ft x 8 ft sheets of building material. It also seemed to be about half the price. It took me about 2 hours to put it all together and mount it on my car. The instructions were all visual and there was one little pic I didn't understand, but the equipment seemed to go together correctly anyway. Now that it's adjusted, it should be fairly easy to remove and replace next time. I did need to put on super tacky gloves to get the covers off. Although it seemed unnecessarily complicated, I would still choose this product again.
by: Mark06/30/2023
Works as expected and feels solid
by: Douglas10/11/2022
Good condition quality. Good and detailed instructions but aittle tedious install.


by: Ginger05/22/2019
Great product - very good quality. I liked the fact that I could keep the risers mounted on my car, but could remove the cross bars. It took me awhile to install - but I'm not very mechanically inclined.


by: Cassidy04/08/2023
Arrived quickly; easy instal!
by: James08/10/2019
2019 Subaru Forester
I’m using these towers in conjunction with the JetStream cross bars. Assembly and setup was easy, all the tools you need are provided, except perhaps a tape measure for mounting. Looks and feels solid and well made. This is my second set of Yakima towers and cross bars. I plan to use this setup for an old roof top hard shell case and for my mountain bike to get to the trail head.
After completing the installation I took it out for a spin to check for wind noise at highway speeds. No discernible noise, I’m very happy about that as I really don’t want to remove these when not needed. For reference these are mounted on a 2019 Subaru Forester Touring with factory raised rails. Plenty of clearance for attaching equipment and gear.
Side note: the gentleman that assisted me on the phone while ordering was very pleasant and helpful, got me the right products very quickly as I was in a time crunch. Two thumbs up!


by: Djones06/18/2018
Easy to install. No noticeable noise from the bars. Seem to be very sturdy.


by: Michael M.06/17/2017
As said in my other review these etrailer guys helped me where the Yakima customer service and sales people couldn't.


by: Richard06/28/2017
Honda
etrailer installation videos were very helpful in selecting the product and first installation, although in practice, minor adjustments to method were required. Now after more than a dozen set ups, mounting the crossbars takes 15 minutes, and taking them off, 10. The system is well made, and when mounted, precise, strong, and reliable. Expensive perhaps compared to alternatives, but well worth the money. Used to carry a 50# sailboard 40 miles to the beach on weekends. ('11 Honda Fit)
One minor shortcoming: rubber sheet glued to base clips where they touch the car body have torn and moved sideways 1/16", but expect will be easily replaced with readily available 1/16" sheet rubber (e.g., shower pan liner) when the time comes.
Used in rain at least once, (sustained 60mph), with no leaks.
by: Earl07/28/2022
The crossbars are light and very strong. They fit perfectly and installed easily.
by: Tricia09/08/2018
2016 Honda Accord
Awesome experience and product! It shipped fast and was easy to install using the directions and a recommended video. Plus, it looks super hot attached to my white Honda Accord Coupe 2016. (I leave it on all year round.) Love it and etrailer!!
by: Phillip09/29/2021
Because of the 'rona-induced supply chain interruptions, I was unable to purchase all of my Yakima components from etrailer, but I did get these, and they are typically excellent Yakima components. Well-made, easy to install, good directions, no problems.
by: Beyhan A.02/21/2019
2018 Honda Ridgeline
I needed crossbars for my new 2018 Mazda CX5, which came with flush side rails. The Yakima crossbars, along with the RidgeLine Towers and the the vehicle specific kit worked great. The installation (10-15 min) is super easy. They look cool, and performed great (I strapped 160-lbs rooftop tent on them!). Removing them is also super easy (10 min tops). Highly recommend.
by: Ivars07/04/2020
Yakima Jetstream cross bars.. nice bars worth the extra money. can be adjusted for pitch/angle of attack to "tune" the air profile.. mine have absolutely no high speed wind noise or whistling.. rubber weather strip underneath further smoothes the bar profile.. quietest roof rack system I have ever owned..
by: Gina 08/04/2021
Lexus
I purchased the Baseline towers with base clip fit kit and jetstream crossbars. They were great quality and the instruction materials included for assembly and installation were great. I was able to assemble and install on my Lexus CT 200 in about an hour. It looks nice too!
by: Joseph10/11/2021
Buick
I have a Buick Envision and it seemed as if it would be difficult to get the correct rack, but it turned out to be easy. I entered my vehicle info and was directed to the Yakima Skyline with flush rails. It was easy to install and they look great. I will be able to take my canoe out with no problem! Joe
by: Christopher10/06/2021
Had the parts I needed when I couldn’t find them anywhere else and they were delivered on time.
25
384
Show More Reviews
See what our Experts say about this Yakima Roof Rack
- How to Determine if Two Malone SeaWing Kayak Carriers Fit 2019 Subaru Outback Factory Roof RackYour kayaks will fit the Malone SeaWing Kayak Carrier with Tie-Downs # MPG107MD, but two of them will not fit your 2019 Subaru Outback's factory roof rack because the crossbars simply are not long enough for both the carriers and your 30" wide kayaks. So to use a kayak carrier you'll need an aftermarket roof rack, and the verified fit to replace the roof rack on your 2019 Outback is from Yakima, and consists of the following part numbers: - Yakima JetStream Crossbars - Silver # Y00428...
view full answer... - Yakima Roof Rack that Fits 2024 Subaru Crosstrek with Raised Side RailsFor your 2024 Subaru Crosstrek has raised side rails you'd want the Jet Stream roof rack part numbers # Y00425 and # Y33TR.
view full answer... - Roof Rack that Can Fit 2023 Jeep Wrangler Rubicon with Sky One Touch RoofThe Yakima Jetstream roof rack part numbers # Y00428, # Y53TR, # Y00226 is a fit for your 2023 Jeep Wrangler Rubicon that has the sky one touch roof and would do a great job to carry a tent and other cargo.
view full answer... - Recommended Roof Rack for a 2024 Honda CR-V w/ Flush Rails Yes, we do have the parts you will need and congrats on the new vehicle. To add a roof rack to the flush rails on your 2024 Honda CR-V you will need the following parts: Yakima JetStream Crossbars - Aluminum - 50" Long - Qty 2 item # Y00425 for Black or item # Y00428 for Silver SightLine Towers for Yakima Crossbars - Flush Side Rails - Qty 4 item # Y64AR SightClip Fit Kit for Yakima SightLine and RidgeLine Roof Rack Towers item # Y44UR This aero bar roof rack system has a 165 lbs capacity....
view full answer... - Can a Roof Rack Be Installed on a 2024 Toyota Sienna?Yes, a roof rack can be installed a 2024 Toyota Sienna. The easiest way is if yours has the raised rails on the top of your roof. If your 2024 Sienna has raised roof rails, I recommend the roof rack by Yakima which includes the following parts: Yakima JetStream Crossbars - Aluminum - 50" Long - Qty 2 item # Y00425 for Black or item # Y00428 for Silver TimberLine Towers for Yakima Crossbars - Raised, Factory Side Rails - Qty 4 item # Y33TR This aero bar roof rack system has a 165 lbs...
view full answer... - Yakima Roof Rack that Fits 2013 Subaru XV Crosstrek with Raised RailsThere isn't an adapter that can convert a Baseline tower to fit raised rails so you would need to go with a Timberline Jetstream setup that fits your 2013 Subaru XV Crosstrek with the part number # Y00428 and # Y33TR.
view full answer... - Recommended Roof Rack for a 2024 GMC Terrain w/ Raised Rails I would be happy to narrow down the options and give you a parts list. To add a roof rack to your 2024 GMC Terrain with raised rails, I recommend the roof rack by Yakima which includes the following parts: Yakima JetStream Crossbars - Aluminum - 50" Long - Qty 2 item # Y00425 for Black or item # Y00428 for Silver TimberLine Towers for Yakima Crossbars - Raised, Factory Side Rails - Qty 4 item # Y33TR This aero bar roof rack system has a 165 lbs capacity. I recommend adding the Yakima...
view full answer... - How to Determine Correct Roof Rack For 2024 Kia TellurideI'm going to go ahead and respectfully disagree that we're idiots, Paul. I'm confident we can figure out the combination for a roof rack on your 2024 Kia Telluride, and there are three possible options Kia has for your roof - flush-mounted rails, raised side rails, and a bare roof. I made some diagrams below showing test fits on a Kia Telluride with photos from the nice folks at Yakima so you can see the difference (please note these are just test fit photos, and not exactly how the rack...
view full answer...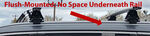
- Does Yakima Roof Rack For 2013 Toyota Prius Require Professional InstallI would tell them they could do it and not to bother with spending money to go to a mechanic or the dealer. Do you have a measuring tape of some sort? If so, that's it regarding the needed tools to install the Yakima rack on your 2013 Toyota Prius. So no tools are needed, it's light as a feather, and all you have to do is some measuring to get it installed. I am 1000% confident this is something you can do on on your own in about 30 minutes without any assistance. The correct fit for the...
view full answer... - Yakima Roof Rack For A 2024 Subaru WRX With A Naked RoofWe do offer a Yakima roof rack for the 2024 Subaru WRX with a naked roof. This is the Yakima JetStream Crossbar setup, and the crossbars are available in silver and black. The complete roof rack will consist of the following parts: Yakima JetStream Crossbars - 50" # Y00428 (silver) or # Y00425 (black) SkyLine Towers for Yakima Crossbars # Y53TR Landing Pad 22 # Y00248
view full answer... - Roof Rack For 2018 Toyota Highlander w/ Flush Mount Rails For Rooftop TentWe have a roof rack and rooftop tent for your 2018 Toyota Highlander with flush mount rails, though the crossbar spread on your Highlander is set at 27-1/2 inches. The reason for that is roof racks install at fixed mounting points on the rails, which means a tent requiring a larger spread won't work. That said, there is still a really nice option for a rack and tent for your '18 Highlander, and let's go ahead and start with the rack you'll need, which is from Yakima: - Yakima JetStream...
view full answer... - Does Roof Rack For 2007 Toyota Corolla Sedan w/ Naked Roof Allow Use of Cargo BasketYes, a roof rack for your 2007 Toyota Corolla sedan with a naked roof will allow you to use a cargo basket, including the Arksen basket you mentioned. You can go with the Yakima as well, and the parts needed that fit your '07 Corolla sedan with a naked roof are the following: - Yakima JetStream Crossbars - Silver # Y00428 or Black # Y00425 - BaseLine Towers # Y28TR - BaseClip Fit Kit # Y06148 & # Y06136
view full answer... - Recommeded Roof Rack And Crossbars For A 2017 Honda CR-V Carrying A Roam Adventure 95L CaseI recommend first adding a set of crossbars like the Yakima JetStream Crossbars # Y00428 with the SkyLine Towers for Yakima Crossbars # Y53TR and the Landing Pad 19 for Yakima SkyLine and Control Towers # Y00245. Then I would add a platform roof rack like the Yakima LockNLoad Platform Roof Tray # Y05047. With this setup you will have no issue attaching your Roam Adventure 95L case to the roof of your 2017 Honda CR-V. Additionally, the mentioned crossbar towers and fit kit will only work...
view full answer... - Availability of Black 50 inch Yakima Jetstream CrossbarsYes we do have 50 inch Yakima JetStream crossbars in black with the part # Y00425 which is a pair of them.
view full answer... - Best Roof Rack For 2024 Subaru Impreza HatchbackThe best roof rack for your 2024 Subaru Impreza hatchback with a naked roof is from Yakima due to how quiet it is as well as its durability. The roof rack that fits your Impreza is made up of the following parts: - Yakima JetStream Crossbars - Silver # Y00428 or Black # Y00425 - SightLine Towers for Yakima Crossbars # Y64AR - Landing Pad 22 for Yakima Towers # Y00248 The JetStream bars are quiet because have what are called "WindRidges" on top that control the flow of the air both over...
view full answer... - Recommended Roof Rack for a 2023 Honda HR-V w/ a Naked RoofTo attach a roof rack to your 2023 Honda HR-V, with no roof rails, you will want the roof rack by Yakima and it includes the following parts: Yakima JetStream Crossbars - Aluminum - Silver - 50" Long - Qty 2 item # Y00428 BaseLine Towers for Yakima Crossbars - Naked Roofs - Qty 4 item # Y28TR BaseClip Fit Kit for Yakima BaseLine Roof Rack Towers - Qty 2 item # Y06159 BaseClip Fit Kit for Yakima BaseLine Roof Rack Towers - Qty 2 item # Y06181 These crossbars have a 165 lbs capacity....
view full answer... - Recommended Roof Rack for a 2023 Chevy Bolt EUV w/ Side Rails Yes, there is a way to mount a roof rack to the side rails of your 2023 Chevy Bolt EUV. You will want the roof rack by Yakima and it includes the following parts: Yakima JetStream Crossbars - Aluminum - Silver - 50" Long - Qty 2 item # Y00428 SkyLine Towers for Yakima Crossbars - Flush Rails, - Qty 4 item # Y53TR Landing Pad 19 for Yakima SkyLine and Control Towers - Qty 4 item # Y00245 These crossbars have a 165 lbs capacity. The skyline towers and landing pads will attach to your...
view full answer...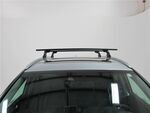

- Parts Needed to Add a Yakima Roof Rack to a 2024 Kia Telluride w/ Flush Rails Yes, we do! There are quite a few different options. To add a Yakima roof rack to your 2024 Kia Telluride with flush rails you will need the following parts: Yakima JetStream Crossbars - Aluminum - 50" Long - Qty 2 item # Y00425 in Black or item # Y00428 in Silver SightLine Towers for Yakima Crossbars - Flush Side Rails - Qty 4 item # Y64AR SightClip Fit Kit for Yakima SightLine and RidgeLine Roof Rack Towers item # Y34UR
view full answer... - Recommended Roof Rack for a 2024 Honda CR-V w/ Flush RailsTo add a Yakima roof rack to your 2024 Honda CR-V with flush rails you will need the following parts: Yakima JetStream Crossbars - Aluminum - 50" Long - Qty 2 item # Y00425 for Black or item # Y00428 for Silver SightLine Towers for Yakima Crossbars - Flush Side Rails - Qty 4 item # Y64AR SightClip Fit Kit for Yakima SightLine and RidgeLine Roof Rack Towers item # Y44UR This aero bar roof rack system has a 165 lbs capacity. I recommend adding the Yakima Same Key System item # Y07204...
view full answer... - Solution For Transporting 4 Various Types Of Bikes On A 2020 Kia SoulI have a solution for you, but since the 2020 Kia Soul can only use a Class 1 hitch receiver, you will be limited to hauling only two bikes on the hitch receiver. A trunk-mount bike rack will be your best option for carrying up to 3 bikes on your Kia Soul. I would look into the Malone Hanger BC3 OS 3 Bike Carrier # MPG2139 which is confirmed to fit your vehicle. It can safely hold 3 bikes weighing up to 33lbs each; the carrier only weighs 15lbs making it very easy to install with one person....
view full answer... - What Roof Rack and Cargo Box For My 2020 Jeep Grand Cherokee?For your 2020 Jeep Grand Cherokee with black/chrome flush factory rails, I recommend installing the reliable Yakima JetStream Crossbars - Aluminum - Silver - 50" Long - Qty 2 # Y00428. In order to install these, you will also need Towers # Y53TR and Landing Pads # Y00244. The weight capacity is 165lbs, but you will want to verify that your vehicle roof can handle that much weight (owner's manual). As far as the cargo box, you will be able to accommodate the largest size we offer and still...
view full answer...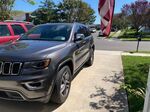
- Recommended Crossbars and Towers for a 2016 Ford Expedition The SportRack Vista XL Cargo Box - Roof Mount - 18 cu ft # SR7018 is not a vehicle specific fit, but rather crossbar dependent. As long as you have round, square, aero, elliptical, or factory crossbars on your Expedition, this'll fit. If not, you can add a set of Yakima JetStream Crossbars # Y00428 with the TimberLine Towers for Yakima Crossbars # Y33TR to your vehicle so the SportRack Vista can be attached.
view full answer... - Can I Put 70" Yakima JetStream Bars On A 2024 Kia Niro PHEVYou absolutely can put your Yakima JetsStream bars on your 2024 Kia Niro PHEV with factory flush rails. To do so you will need the following parts: SightLine Towers for Yakima Crossbars # Y64AR SightClip Fit Kit for Yakima SightLin3 Towers # Y27AR Since the mounting channel on the Yakima crossbar runs the full length of the bar, you can mount virtually any size crossbar on your roof. That said, we recommend a 50" bar # Y00428 for the Kia Niro. So while your 70" bars will still fit, there...
view full answer... - Recommended Low-Profile Crossbar Suggestion For A 2019 Toyota RAV4Without knowing which Thule setup you currently have on your 2019 Toyota RAV4 I won't be able to tell if you if a certain new setup will be shorter or not. What I can say with certainty is that the Yakima JetStream Crossbars # Y00428, with the towers # Y53TR, and the landing pad # Y98FR is an excellent option for your RAV4. When installed, this setup measures 5-5/8" tall, has a maximum weight capacity of 165-lbs, and is 50" long x 2-3/4" wide. I have attached a product review video...
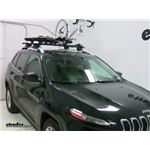
view full answer... - Recommended Kayak Carrier for 2020 Mazda CX-5The only hitch mounted option wouldn't be an actual carrier, but a support like the Malone Axis # MAL32VR. This would require the installation of a trailer hitch like the # 76138 you looked at. More than likely you won't need this to mount your kayaks on your 2020 Mazda CX-5. Your kayaks will fit completely on a roof rack with a kayak carrier like the one seen in the picture below unless they are incredibly long. If that is the case, then by all means you could add the # MAL32VR to help...
view full answer...
- Are There 60" Crossbars for a 2018 BMX X3I do have an option for you but those are both pretty long crossbars for this vehicle, it's not something that you can add easily, or legally for that matter as the crossbars can't stick out further than the side mirrors in most states. That said, we do still have a setup for you such as the one below. Yakima CoreBar Crossbars part # Y00422 SightLine Towers for Yakima Crossbars part # Y64AR SightClip Fit Kit for Yakima SightLine and RidgeLine Roof Rack Towers part # Y62CR
view full answer... - Do Yakima Roof Racks Fit 2023 Acura RDXSo we were able to determine that the 2023 Acura RDX wasn't changed from the 2022 model and we then carried over the fits from the previous year. Sometimes one of the rack manufacturers does this first and since we know they did the correct research we know that other brands will also carry over even if they haven't had a chance to test it like with the Yakima Corebar roof rack part numbers # Y00421 # Y64AR, and # Y49AR that we have listed for your 23' RDX.
view full answer... - Quiet Roof Rack for 2023 Kia Sorento With Flush RailsFor an extremely quiet roof rack that fits the flush mounted rails on your 2023 Kia Sorento I recommend the Yakima JetStream roof rack. You will need the following: -Yakima JetStream Crossbars # Y00425 -SightLine Towers for Yakima Crossbars # Y64AR -SightClip Fit Kit for Yakima SightLine and RidgeLine Roof Rack Towers # Y77UR The JetStream bars use an asymmetrical shape making them very aerodynamic. This combined with the WindRidges built into the bars results in a dramatic reduction...
view full answer... - Parts Needed for Yakima JetStream Roof Rack on 2024 Mazda CX-5 With Flush RailsWe have exactly what you need to install the Yakima JetStream roof rack on your 2024 CX-5. You will need the following: -Yakima JetStream Crossbars # Y00425 -SightLine Towers for Yakima Crossbars # Y64AR -SightClip Fit Kit for Yakima SightLine and RidgeLine Roof Rack Towers # Y39AR You also have the option of adding the Yakima SKS Lock Cores # Y07204 for added security. I have attached an installation video below for your reference.
view full answer... - Is There A Trailer Hitch For 2023 Kia Soul GT Line With Center ExhaustIf you need to carry cargo with your Kia Soul, I do have a few potential solutions for you. I will tell you there is not a trailer hitch available anywhere that will fit the center exhaust model at this time (August 2023). The receiver would go exactly where the exhaust sits and there is no way to work around that. If your goal was to carry a few bikes we could set you up with a trunk mount bike rack like the Malone hanger # MPG2139. This can carry 3 bikes weighing up to 33 lbs apiece...
view full answer... - Recommended Roof Rack for a 2023 Acura MDX w/ Flush Side RailsTo add a set of Yakima Jetstream crossbars to the raised rails on the roof of your 2023 Acura MDX you will need the following parts: Yakima JetStream Crossbars - Aluminum - Black - 50" Long - Qty 2 item # Y00425 SightLine Towers for Yakima Crossbars - Flush Side Rails - Qty 4 item # Y64AR SightClip Fit Kit for Yakima SightLine and RidgeLine Roof Rack Towers item # Y49AR This aero bar roof rack system has a 165 lbs capacity. I recommend adding the Yakima Same Key System item # Y07204...
view full answer... - Recommended Roof Rack for a 2024 Honda CR-V w/ Flush Rails Yes, we do have the parts you will need and congrats on the new vehicle. To add a roof rack to the flush rails on your 2024 Honda CR-V you will need the following parts: Yakima JetStream Crossbars - Aluminum - 50" Long - Qty 2 item # Y00425 for Black or item # Y00428 for Silver SightLine Towers for Yakima Crossbars - Flush Side Rails - Qty 4 item # Y64AR SightClip Fit Kit for Yakima SightLine and RidgeLine Roof Rack Towers item # Y44UR This aero bar roof rack system has a 165 lbs capacity....
view full answer... - Recommended Yakima Roof Rack for a 2024 Hyundai Palisade w/ Flush Roof Rails Yes, it will and congrats on the new SUV. The parts listed below will add a Yakima roof rack to your 2024 Hyundai Palisade: Yakima JetStream Crossbars - Aluminum - Black - 50" Long - Qty 2 item # Y00425 SightLine Towers for Yakima Crossbars - Flush Side Rails - Qty 4 item # Y64AR SightClip Fit Kit for Yakima SightLine and RidgeLine Roof Rack Towers item # Y79AR This aero bar roof rack system has a 165 lbs capacity. I recommend adding the Yakima Same Key System item # Y07204 to prevent...
view full answer... - Recommended Roof Rack for a 2024 Kia Telluride w/ Flush Roof Rails Congrats on the new SUV! To add a roof rack to your 2024 Kia Telluride with flush rails you will need the following parts: Yakima JetStream Crossbars - Aluminum - 50" Long - Qty 2 item # Y00425 for Black or item # for Silver SightLine Towers for Yakima Crossbars - Flush Side Rails - Qty 4 item # Y64AR SightClip Fit Kit for Yakima SightLine and RidgeLine Roof Rack Towers item # Y34UR This aero bar roof rack system has a 165 lbs capacity. I recommend adding the Yakima Same Key System...
view full answer... - How to Determine Correct Roof Rack For 2024 Kia TellurideI'm going to go ahead and respectfully disagree that we're idiots, Paul. I'm confident we can figure out the combination for a roof rack on your 2024 Kia Telluride, and there are three possible options Kia has for your roof - flush-mounted rails, raised side rails, and a bare roof. I made some diagrams below showing test fits on a Kia Telluride with photos from the nice folks at Yakima so you can see the difference (please note these are just test fit photos, and not exactly how the rack...
view full answer... - Recommended Roof Rack for 2024 Kia Telluride With Flush RailsFor an extremely quiet rack that will look good on your 2024 Telluride I recommend the Yakima JetStream roof rack. You will need the following parts: -Yakima JetStream Crossbars - Aluminum - Black - 50" Long - Qty 2 # Y00425 -SightLine Towers for Yakima Crossbars - Flush Side Rails - Qty 4 # Y64AR -SightClip Fit Kit for Yakima SightLine and RidgeLine Roof Rack Towers # Y34UR The JetStream bars have an asymmetrical shape making them very aerodynamic. Combine this with the WindRidges...
view full answer... - Kayak Carrier Recommendation for Hobie Mirage Compass Fishing KayakSince your Hobie Mirage Compass fishing kayak weighs 87 lbs you're either going to have to use a post-style carrier like the Yakima BigStack # Y04041 or use 2 sets of a J-Style carrier like the etrailer J-Style Kayak Carrier # e98878. I recommend going with 2 of the J-Styles simply because it will be easier to load an individual kayak on each one, especially with your heavier kayak. If you don't already have a roof rack then I recommend using a Yakima CoreBar roof rack. The correct parts...
view full answer... - Recommended Roof Rack and Fairing for a 2020 Hyundai PalisadeAlthough the Rola 59762 roof rack isn't a fit for your 2020 Hyundai Palisade, I'd be happy to make a recommendation. The rack you need will depend on what's currently on the roof of your Palisade, if it's a bare roof or has flush mounted side rails. If you have a bare roof, a round-bar roof rack from Yakima would be your most economical option. The rack would consist of the following parts: -Round crossbars, part # Y00409 -BaseLine Towers, part # Y28TR -Round Bar Adapter, part # Y03536 -Vehicle...
view full answer... - Aero Bar Roof Rack that Fits 2023 Kia Niro PHEVI have a roof rack solution that does fit your 2023 Kia Niro with flush bars but the Malone racks require a raised rail like you mentioned so it would not work. Instead you'd need a rack designed to attach to the flush rails like with the Yakima CoreBar roof rack part numbers # Y00421, # Y64AR, and # Y27AR which is a similar aero shaped crossbar to the Malone.
view full answer... - Picking Between 50 and 60 inch Yakima Jetstream Roof Racks for 2021 Kia TellurideGoing with a longer crossbar does give you more space to mount roof accessories and carriers but the longer bars do tend to get in the way a little more and create a little more wind noise. So really it comes down to considering how many things you plan to carry on the roof rack and how wide they might be. Now that said the 60 inch Jetstream rack Yakima offers part numbers # Y00426, # Y28TR, # Y06125, and # Y06165 is the correct rack for if you have a naked roof and the 50 inch rack part...
view full answer... - What Do I Need to Mount a Cargo Box on a 2020 Hyundai Palisade?In order to have a cargo box on your 2020 Hyundai Palisade, you will need a roof rack system with crossbars in order for you to mount the box and cargo. Compatible systems depend on whether your vehicle has a bare roof or flush factory side rails. If your vehicle has a bare roof, I recommend the following parts: - Yakima CoreBar Crossbars - Steel - Black - 60" Long - Qty 2 # Y00422 - BaseLine Towers for Yakima Crossbars - Naked Roofs - Qty 4 # Y28TR - BaseClip Fit Kit for Yakima BaseLine...
view full answer... - How to Transport 3 Bikes 1 E-Bike with a 2018 Subaru Outback WagonI do have a recommendation for you, but with your specific bike rack needs you don't be able to use your 1-1/4" trailer hitch on your 2018 Subaru Outback Wagon to carry all 3 bikes. Either the bike rack is way too heavy and requires a 2" receiver, like the Draw-Tite # 76227, or it doesn't have the attachment option you need, plus the weight capacity for your heavier bike. For your application you'll need to use a hitch bike rack and a roof mounted bike rack. The hitch mount bike rack I...
view full answer... - Recommended Roof Rack System Compatiable With Yakima SkyBox Lo 15 On 2019 Subaru Outback WagonThe Yakima SkyBox Lo Rooftop Cargo Box you purchased will fit the 50" Yakima CoreBar Crossbars # Y00421 you were looking at, and will allow you to open the rear hatch without interference. To install the # Y00421 on your 2019 Subaru Outback Wagon you will need the SightLine Towers for Yakima Crossbars # Y64AR, and Fit Kit # Y32CR if your Subaru is the Touring model. If you do not have the Touring Model you will need the SkyLine Towers for Yakima Crossbars # Y53TR, and Fit Kit # Y00241. Both...
view full answer... - How is Plastic Lock Core of Yakima Sightline Foot Accessed to Install SKS LockThe lock core location for the Sightline feet part # Y64AR is underneath the cover of the foot. So you'd just need to pull the cover off (no tools required) and then underneath it you would see the plastic core that you can remove with a flat screwdriver so that you can install new cores with the part # Y07204.
view full answer... - Equipment Needed to Carry Roof Cargo Box and 4 Pairs of Skis on 2013 Hyundai Santa Fe SportIf you used the Thule SnowPack ski carrier, part # TH7324 that can carry 4 pairs of skis or two snowboards and the Thule Pulse # TH615 with its 16 cubic foot capacity, you'd need roof crossbars that have at least 57 inches of space. If your Hyundai Sport has a bare roof, you can install a Yakima Roof Rack that would offer plenty of space for the ski rack and cargo box mentioned above. The rack would consist of the following parts: 66 Inch Long RoundBars, part # Y00410 BaseLine towers,...
view full answer... - Best Roof Rack for a 2022 BMW X3Thank you for reaching out! The best roof rack for your 2022 BMW X3 is the Yakima JetStream system that uses the following parts: 50" JetStream Crossbars - # Y00425 SightLine Towers - # Y64AR Fit Kit - # Y62CR Lock Cores - # Y07204 (optional) This system installs directly to the flush rails on the roof of your BMW X3 and gives you one of the quietest, sleek-looking roof racks on the market. Not only do you get the 165 lb weight rating, but you also get the most customized fit out there...
view full answer... - Fitment of 2 Rhino-Rack Kayak Carriers # S512-S512X to Transport 4 Kayaks on a 2022 Hyundai PalisadeYes! You can use 2 sets of the Rhino-Rack Kayak Carrier # S512-S512X to transport 4 kayaks on your crossbars. Since one of these sets takes up roughly 20" of crossbar space, you need to have al least 40" of usable crossbar length on your roof rack to accommodate 2 of the # S512-S512X. You do not need to worry about additional straps because the carriers come with all the straps you need. If you need a compatible crossbar system with the length you need, the parts you need depend on if...
view full answer... - Best Roof Rack For 2024 Subaru Impreza HatchbackThe best roof rack for your 2024 Subaru Impreza hatchback with a naked roof is from Yakima due to how quiet it is as well as its durability. The roof rack that fits your Impreza is made up of the following parts: - Yakima JetStream Crossbars - Silver # Y00428 or Black # Y00425 - SightLine Towers for Yakima Crossbars # Y64AR - Landing Pad 22 for Yakima Towers # Y00248 The JetStream bars are quiet because have what are called "WindRidges" on top that control the flow of the air both over...
view full answer... - Yakima Roof Rack that Fits 2020 Buick EncoreYes, we have the Yakima Sightline roof rack that fits your 2020 Buick Encore with flush rails that consists of part numbers # Y36AR and part # Y43UV. I confirmed with Yakima just now that these part numbers fit your Encore.
view full answer... - Recommended Roof Rack for a 2022 Ford Escape With Factory RailsThe roof rack that I recommend for your 2022 Ford Escape with Factory rails is the 2022 Ford Escape Roof Rack by Yakima which consists of: - Yakima JetStream Crossbars # Y00425 - SightLine Towers for Yakima Crossbars # Y64AR - SightClip Fit Kit for Yakima SightLine Roof Rack Towers # Y36AR This would provide you with a roof rack that fits your 2022 Ford Escape and would allow you to use both clamp-on and channel mounted accessories. It has a weight capacity of 165 lbs. and an aerodynamic...
view full answer...
Do you have a question about this Roof Rack?
Info for this part was:

Edited by:
Daron K

Written by:
Alex H
At etrailer.com we provide the best information available about the products we sell. We take the quality of our information seriously so that you can get the right part the first time. Let us know if anything is missing or if you have any questions.
Product Experts Available Now!
Call 1-800-940-8924
Thank you! Your comment has been submitted successfully. You should be able to view your question/comment here within a few days.
Error submitting comment. Please try again momentarily.