
Summer Starts Here - Save up to 70%
To see if this custom-fit item will work for you please tell us what vehicle you'll use it with.
This heavy-duty, aluminum crossbar works with Rhino-Rack legs to create a sturdy roof rack or ladder rack for your naked roof. The square bar has a built-in C-channel for mounting Rhino-Rack Heavy-Duty, contractor-grade accessories.
Features:
[NLA]Rhino-Rack HD Crossbar - Silver - 59" Long - Qty 1:Videos are provided as a guide only. Refer to manufacturer installation instructions and specs for complete information.
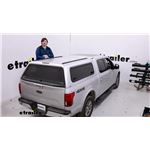
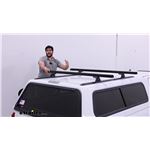
Hi everyone, Aiden here at Etrailer. Today we're gonna be taking a look at and showing you how to install these Rhino-Rack RTC-Style Roof Rack Tracks on our 2019 Ford F-150 with a camper shell. The RTC rails are gonna be a custom solution to add a roof rack to your vehicle. Obviously we've got a camper shell today, but a lot of our neighbors really like using this just on the truck bed rails above a tonneau cover. If your tonneau cover sits pretty far in on the bed rails, this could be a really clever solution to add a roof rack above it so you can maybe mount a tent above the tonneau cover and still have your covered locked storage in the bed underneath. Our neighbor today though wants to use his truck to carry kayaks and with a short bed F-150 and a camper shell, he doesn't have a lot of options to get his boat to the water, but this is going to be a really great solution because it gets everything up on top of the camper shell, covered storage stays there underneath, and he can put crossbars up here, spread 'em out pretty far and get a really easy way to mount up his kayaks.
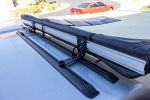
These rails are gonna be 55" long and only about 1/2" tall. The track on top is where you'll mount your roof rack accessories and the towers and there's an opening at the back where you can slide those in or out whenever they're not in use. At the ends, you're gonna get these rubber end caps, which are replaceable if they get damaged, but give this a nice complete look because as the camper shell tapers, this is designed to match that taper and sit nice and low, and give this a more custom fit look. And as for the rails themselves, they're gonna be an aluminum construction so you don't have to worry about rust or corrosion over time with them. The appearance up top is gonna be completely solid.
You won't see any mounting hardware because it's all in a channel underneath the bar, which does give a very nice clean finished look. It does however mean that the install process is a little bit more involved. It's really not too bad, it just means you're gonna have to take a few more measurements and be a bit more precise with marking out your locations to drill. We didn't have any errors with ours. We'll walk you through that process later, but just know that it will be a little bit more involved.
If it is something you're worried about, there are some other options. The RT-Style Roof Tracks from Rhino-Rack are gonna be a little bit simpler in the fact that they rivet into place. It means that you can set the rail up here and once you've determined it's centered and parallel, all you gotta do is rivet it into place, but that's not my preferred method. I do like the hardware that passes through and secures underneath with a hand nut. So for me personally, I'd go with the Yakima kit.
It's gonna be very similar in form and function to this RTC-Style kit from Rhino-Rack, but in that case, it's going to bolt through and the tracks just have spots where when you set this up here and get your positioning, you can mark your drilling locations through it. It takes a lot of the guesswork out of it and I had a lot more confidence when drilling, knowing that it was gonna line up and fit. The one downside there is you'll need an extra set of hands when you do go to fully tighten that kit down. Someone's gotta be up top holding the bolt while you're underneath tightening it up, whereas with this, you could do it with one person on the Rhino-Rack kit. So there's a bit of a trade off there, but the end result is really gonna be the same, either way you go. Underneath this is what the hardware will look like. It's really un-invasive, doesn't stick down very far, and I think it looks just fine, you know, everything's just in a straight line and you could easily remove it if you ever needed to. Like let's say to replace that end cap, you need to just unthread it and pull the rail off real quick, but that process is really easy and whether you go with the Rhino-Rack kit or that Yakima one that I mentioned, the look underneath is gonna be pretty much identical. But as far as that install process goes, there's nothing really left to do, but to show you how to do it, follow along and we'll show you all the measurements we took, how we got it centered and square with our camper shell and how we got it installed. So the first half of this installation is really gonna be just a lot of planning because we're trying to get these rails parallel with one another and centered onto our camper shell. I like to take a little bit more time and do some good prep work here. So the things I've done so far is just clean off the camper shell on the top roughly where these tracks are gonna sit. And I've laid down a piece of painter's tape that spans the most of the width here, and used my third brake light to mark a center point. Finding some point on your camper shell to get a reference of what is centered is a good idea because there's no guarantee that this camper shell is perfectly centered on your truck. So I don't like using any point of reference on the truck itself. I like using some point on the camper shell. So once we've done that, I like to just place the tracks up here and get them roughly in place. And it's important to point out now the proper orientation of them. So there's gonna be a flat side and a curved side. We want that curved side facing towards the outside and there's going to be a square opening that'll be on the tailgate side on the top of that track. Then what I'm gonna do is just use my center point to measure out side to side an even measurement for these rails, and a soft roll tape measure I find is the best way to do that because one, I can get it flush to any curves that might be present on the camper shell, but also I like to double check my measurement to some outside point, like this window here. That's gonna be a good reference point for us because it's gonna be the same on both sides. So I'll take this measurement on both sides and mark out the end here with some painter's tape. So I wanna go back through and mark this with something pretty faint. We found a highlighter shows up pretty well on our blue painter's tape, but these are temporary markings and the measurements I took just to kind of overview them are from the center to the inside edge of the rail, from the end of the rail to a flat spot on our window, and from the outside edge of the rail to another flat spot on our window and got it all centered up how I like. So I'm gonna just mark out those ends. And the reason I'm making this more of a temporary measurement is because we need to take measurements at the front end too. And the reason I'm kind of leaving this as is for right now is because we don't know for sure if those rails are parallel, they might be flared out a bit, and if I bring them in, that might change the positioning back here a little bit or at least the angle that these are set at. The other thing I'm gonna do to ensure that the front is properly positioned is get a measurement from inside edge to inside edge at the back where we already know it's centered and take that same measurement at the front. That's my way of knowing that both rails are parallel to one another. But then what I'll also do is take an outside edge to window measurement at both front locations. That's how I'll know that the rails aren't parallel but skewed to the side one way or the other. That's my way of knowing that it's just centered up on the camper shell. Once I've got all those measurements where I want them, I can go back through with something darker to make those final markings. Now I've taken those measurements at the front side of the camper shell. There's a lot more back and forth on this one, just because I think it's harder to get a point of reference not having the tailgate to stand on. But regardless, we got everything in line with what we took at the tailgate end. I made my temporary markings and got the rear back in line with those temporary markings. So everything in theory should be squared up right now. Now's the point where I can confidently go around, take all of my measurements, both at the front and the back end and go to all the same points of reference I used when making those temporary markings and just make sure everything's the same. I want these rails to be parallel and I want them to be centered on the camper shell. So once I've verified that, I'll make my more permanent markings and we can carry on. And after a lot of measuring, I'd say I'm pretty happy with the positioning. The final thing I'm gonna check, and this is something that I looked at before I even laid the rails loosely in place, is that underneath the camper shell, there's basically an indentation where there's a piece of wood providing support to the middle of the shell. We want these rails as close to the outside edges as they can be because this vertical structure is going to provide more support for them. But we don't want them so far in that they're gonna come into contact with that piece of wood because underneath, there's gonna be hand knobs that secure the hardware and if we're lined up right on the edge of that piece, then it's gonna interfere with the hand knobs. We're looking pretty good right now, it's just kind of a rough guess, but I'd say we're more than clear and we can make our permanent marks to know where we're gonna have the rail set up. Now the other thing I'm gonna do as I'm making these marks is find the track and just make myself a hash or an arrow, something that's centered up with that track because eventually that's gonna be the line on which we're drilling our holes for the hardware to pass through. Next, we need to lay down a piece of painter's tape essentially on the footprint of this rail. And the purpose of this is to be able to draw a line end to end, from arrow to arrow. That's going to give us the guide where this track underneath will sit and allow us to mark out our drilling locations for the T bolts. So painter tape's gonna go down across the whole length and I'll use the edge here on the rail as a straight edge to just mark down the end arrow to arrow. Now if it ends up being a little crooked, I'll go back through. I'm trying to just get this tape as centered as I can so that the line is also a bit more centered. I'm gonna use a similar technique to just make my first line with the highlighter so it's a bit more faint. If I happen to mess up like that, I can just course correct a bit, pick up where it went wrong And just do that for the whole length. And when I'm happy with how that looks, it's a lot easier to just trace over that path and follow it along with something a bit easier to see. Now for the drilling locations, you're gonna mark out seven locations per side. Two pieces of hardware will go in the ends to secure the decorative end caps and five pieces will be in the middle. Try to spread those out roughly evenly. The instructions don't give you any set measurements except for those end pieces. So what I'm gonna do is go to that location where I marked the edge of my rail and my tape measure luckily has a side for centimeters because we're gonna go 1.5 centimeters, 15 millimeters and mark. That's gonna be our first drilling location. And then each subsequent location beyond that should be no more than 280 millimeters or 28 centimeters. Now if you go 28 centimeters at its max, you're not gonna fit all five pieces of hardware very evenly. So I found marking about every 23 centimeters will be the best spot for us to get that even. I'll make two marks and then go to the other end to do my 15 millimeter and my two marks. And that fifth piece of hardware in the middle will just be roughly centered between those two right there. With all those locations marked out, we can actually get to drilling the holes. Now I'm gonna start with a small pilot hole and work my way up to the final size of about 6.5 millimeters or about 1/4". And I'm just going to be very careful that I get things lined up as I do this. (tool buzzes) I'll repeat that down the line, move up the size in drill bit and repeat. (tool buzzes) And personally I like to just vacuum up all the shavings before moving on to the next size because it'll help minimize the amount of dust and fiberglass that's going into the bed. (tool buzzes) (tool buzzes) Before I remove any of the painters tape, I'm gonna test for fitment just by sliding the T bolts into the underside of that track. I'll get all seven in, line them up as best I can and just see if it passes through. If something isn't lined up perfectly, then we can address it now while there's still painter's tape down and we can always patch things up with some extra silicone if need be. But with all the prep work we did, everything should be good. So the easiest way I found is to set it up right next to the track, get the slid in line with all the mounting holes and we can just flip it over, make whatever adjustments we need to side to side and drop it through. Until you have 'em all lined up, it's not gonna want to drop through. They kind of all have to go at the same time, so it can be a little tricky at first. And there we go. So now that we know everything's drilled out properly, we can take this back up, prep the rail, get all this painter's tape out of the way and finish things up. To prep the rail, we need to do a couple things. We'll add our end caps, which are side specific, just match the curve on the end cap to the curve on the rail and the very outer T bolts will feed through there. And we can slide this in. It can be a little tricky to get everything lined up, but there we go. Making sure that T bolt is still in the channel underneath. Right next to it, we're gonna have this paper backing that's going to just get removed, revealing a foam seal underneath, helping us with weather resistance. Now this in our experience with the other one was not the smoothest to peel back. This one feels pretty good so far, but there you go. You might see it tears a little bit. Just take your time with this, isn't sticky or anything so you don't have to worry about any adhesive. I'll work through this on both of them. But one more thing we need to look for are the rubber O rings in our kit. Those will go on the remaining T bolts. No need to put them on the ones in the end because the end cap will serve as a rubber seal that these ones don't have. So just add that to all the remaining hardware and get this backing peeled off. Up top, we can remove all that painter's tape and the kit's gonna come with a number of these butyl tape squares. Those are just going to get added over all of the freshly drilled out holes and serve as further weather protection. So those butyl tape squares will have the brown backing on one side and the backing from the sheet they're on to remove. And let's add that to the closest one here. Now you may notice that those holes that we drilled out aren't prettiest looking. It's just kind of the nature of fiberglass, and that's one of the reasons why I like to lay down painter's tape and work in really small increments with our drill bits. That's gonna minimize the splintering and the cracking we see in that fragile material. So while it might be annoying to take more steps drilling out to the final size, I would strongly recommend it because the smaller those intervals are, the cleaner the drill is gonna be. But luckily, any fracturing is pretty minor here and the butyl tape will cover it up. With all that prep work done, we can get this attached for real this time. And you know, somewhere along the process, those T bolts likely got moved a little bit. So just be sure to adjust them again. Don't just start pushing. And with the butyl tape squares in there now, that will add a little bit of resistance because the openings there are pretty small. So just take your time with it, get everything lined up and pass it through. Underneath we'll find all of those threads poking through, just going down the line. And your kit's gonna come with all these hand knobs to thread on and tighten down. You don't wanna overtighten this, there's no torque spec or anything listed, but you'll feel it. You know, you can only really get these so tight before your grip strength will fail and you really can't turn it anymore. So just get it snug, make sure the rail up top looks nice and flushed to the roof and you'll be set. And with all the hardware tightened down, here's what our finished product is looking like. Of course, everything you saw us do on one side, just repeat on the other. And overall, wasn't too bad. My one complaint with the install process is really just getting that line drawn from front to back to mark out the drilling locations. I think the process could just be easier overall. That Yakima kit that I mentioned earlier is really my preferred install method. But if that doesn't bother you, then I think this is still going to be a very solid system. And that was just our look at it at some of the features and the installation on our 2019 Ford F-150. Thanks for watching.
Average Customer Rating: 4.7 out of 5 stars (38 Customer Reviews)
This heavy-duty, aluminum crossbar works with Rhino-Rack legs to create a sturdy roof rack or ladder rack for your naked roof. The square bar has a built-in C-channel for mounting Rhino-Rack Heavy-Duty, contractor-grade accessories.Exactly what I was looking for I’ll follow up when I get the racks and some bikes and boats on it. Measure twice drill once bolt holes must be exact on the f150
Great tracks. They fit well on my 6-foot 04 Tundra Camper. I paired them with adjustable feet & crossbars from Sherpa Equipment. The combo is perfect. Thx etrailer. The tracks arrived in good condition and on time. Would definitely recommend if anyone is looking for affordable tracks.
Rhino tracks are great - I installed on my truck topper per the great instructions that were included (see photos). The tracks flexed to meet the contours of my topper. All bolts are hidden by track and were long enough to go through topper where special knobbed nuts are used to secure. Total install took about three hours.
etrailer customer service came through to resolve several challenges on this order:
- I initially ordered Yakima tracks. There were long shipping times, so etrailer recommended different compatible tracks from Rhino that were $40 cheaper!
- the initial shipment had not arrived in nearly three weeks with no USPS shipping updates. etrailer sent a second set of tracks via a different shipper that arrived in a few days.
- unfortunately the replacement tracks were incorrect - too long and endcaps were missing.
- while eTrailer was arranging to resend the endcaps, the original USPS order arrived with the correct tracks and all parts.
- eTrailer had me keep the correct tracks and parts, and send me a label to ship the incorrect tracks back to them.
All of these interactions were made with very professional and friendly customer service staff. I felt like I was a valued customer!
Very well packed and supported. Follow up was also good. The extrusion looks a bit thin, but otherwise well made.
Kit was great, except my SnugTop cover required longer T-Bolts for mounting the tracks. The 1.5 inch ones provided were too short. It was a little tough sourcing T/Bolts that would work. It would have been nice if longer T-Bolts could have been an option from Rhino Rack.
I mounted these rails in a non-traditional manner (on top of my truck bed caps so that I could crossbars that spanned over my existing tonneau cover). No one I talked with had actually done this type of installation before. The only problems I ran into were: 1) I had to cut the rails approximately 1/2 inch to ensure the through-bolts did not interfere with existing cap hardware, and; 2) The "Nyloc Nuts" were too wide to use so I just substituted a nut, lock washer and flat washer to compensate. Other than that, the installation took a while but came out great. And the RRRL T600 feet work perfectly with the rails. See the attached photo for the complete installation (with bikes attached) and a second photo with the rack removed by using the quick release feet.
Custom built a mixed Rhino-Rack and Thule bike carrier. Started with the RTC tracks, added Rhino-Rack crossbars, then Thule bike carriers. Customer support was very helpful in getting compatible parts. Took some ingenuity on my part, too, but I love the way it turned out!
Delivered as expected. Works perfectly as usual

Roof rack tracks are great and easy to install. The instructions provided online help and are very detailed. The tracks are of sturdy aluminum. These tracks helped with installation of my Uptop Roof rack.
The rails work great and installed easily. All installation hardware was included.
Easy installation and solid performance
This review is given after 1 week of use. Please take it for what it is worth without knowing the long-term performance of the product.
The good.
The package arrived a few days after ordering without delays.
All parts were properly packaged and all quantities were correct.
The rails seem sturdy and the finish appears that it will hold up over time.
The rails have a clean factory type look. I mounted them on the bed rails of my Jeep Gladiator.
They fit nicely next to my hard tri-fold tonneau cover frame.
The dimensions given online were accurate.
The not so good.
The descriptions online made me feel like this was a "universal" size track. It is not. It seems as though all of the major brands have proprietary T-bolt sizes. I am currently using elevator bolts that I hit with the bench grinder to hold accessories until I can find a good fit.
Easy to install. Works just as expected. Good quality product. Less expensive as than others, just as good in my opinion.
Good track option because the slots allow you to add or remove square nuts as needed. Pretty robust feel as well!
Very solid made. I installed them on my fiberglass camper shell by myself. It took about 1.5 hours. Very straightforward instructions
Great bars, no issues at all and work good.
No issues with the product or service
Very durable, good fit and finish!
Mostly satisfied. Not issue of etrailers and nothing really wrong with the product but do find it funny and a bit dumb that RhinoRack gives you security screws to hold feet to track but the rails are attached with a standard bolt that can be easily seen and accessed by anyone.
Staff is extremely helpful and knowledgeable. Product was priced right and delivered quickly as promised!
These actually came in over 60”. Should have bee 55”. Lucky I had the room for extra length. Maybe mis boxed??
They don’t send all the material you need. I’m short on most components. Counting is not that hard
Fit Perfect
Info for this part was:
At etrailer.com we provide the best information available about the products we sell. We take the quality of our information seriously so that you can get the right part the first time. Let us know if anything is missing or if you have any questions.


Thank you! Your comment has been submitted successfully. You should be able to view your question/comment here within a few days.
Error submitting comment. Please try again momentarily.