
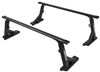
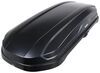
Yakima LockNLoad Platform Rack with RibCage Custom Track System - 60" Long x 54" Wide
Item # Y34HV
Our Price: $2,244.45
Confirmed to Fit
2019 Jeep Wrangler Unlimited
Hard Top
Will this fit?
To see if this custom-fit item will work for you please tell us what vehicle you'll use it with.
In Stock


Need help with installation?
Locate installers near me- All Info
- Q & A (0)
- Videos (1)
- Photos
2019 Jeep Wrangler Unlimited - Yakima LockNLoad Platform Rack with RibCage Custom Track System - 60" Long x 54" Wide
- Platform Rack
- Complete Roof Systems
- Black
- Yakima
- 60L x 54W Inch
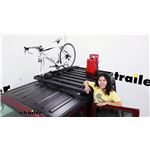
This platform rack's large surface accommodates all types of gear and cargo. Tracks mount to your hardtop and utilize the factory sports bars to let you carry loads up to 330 lbs, even off-road. SkyLine towers make the platform easy to remove.
Features:
- Versatile platform rack with custom tracks lets you carry cargo and accessories on your Jeep's hardtop
- Large, flat surface is perfect for carrying overlanding and off-road gear
- Freedom Panels can still be removed while tracks are installed
- Horizontal slats with integrated channels accommodate clamp-on and channel mount accessories
- Compatible with awnings, rooftop tents, kayak carriers, shovel holders, and more
- Yakima Same Key System (SKS) lock cores (sold separately) deter theft of the rack
- Custom installation on your Jeep's hardtop - drilling required
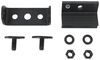
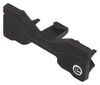
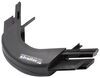
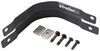
- Brackets attach to tracks and bolt to your factory sports bars to stabilize the system
- Rugged construction designed for off-road use and tested in the Australian Outback
- Durable aluminum with black powder coat resists corrosion
Specs:
- Weight capacity: 330 lbs on-road and off-road
- Platform dimensions: 60" long x 54" wide x 4" tall
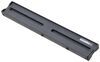
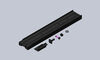
- Track dimensions: 48" long x 2" wide x 7/8" tall
- Weight:
- Platform: 57 lbs
- Tracks: 4 lbs
- Limited lifetime warranty
Carry Whatever You Need

The LockNLoad platform rack is a comprehensive solution for carrying cargo on your off-road adventure. It works with clamp-on and channel mount accessories, so you can use it like a typical roof rack to attach a kayak carrier or an awning. But the large, flat surface is also excellent for overlanding since you can use that space to mount a spare tire, jerry cans, recovery boards, and more. Plus, carrying your cargo on the roof frees up the inside of your Jeep for passengers and additional gear.
A Strong Foundation

Unlike gutter-mount racks that have a low off-road weight capacity, the Yakima RibCage provides a strong foundation for this platform rack so it can handle loads up to 330 lbs. Because it's bolstered by the RibCage, the rack also supports up to 825 lbs when you're parked, making it perfect for rooftop tent camping. On top of this, the rack has been tested in the harsh Australian outback to ensure it's built to hold up on your journey to any remote destination.
Custom Fit Installation
To install the system, attach the RibCage support brackets onto your Jeep's factory sports bars. Then, to create mounting points for the platform rack, you'll need to drill holes into your hardtop and connect the heavy-duty tracks to the brackets using those holes. Lastly, connect the towers to the bottom of the rack so they can secure it to the tracks.
Freedom To Go Topless
You can still enjoy open-air driving after the system is installed. Since the tracks don't interfere with the Freedom Panels on your Jeep, you can take them off any time you want. However, if you'd like to uninstall the whole system to remove your hardtop, you can take off the platform rack and unbolt the support brackets from the tracks. Then, detach the hardtop like you normally would. And if you just need to take off the rack to make a run to the automatic car wash, it's simple and doesn't require any tools. Just remove the towers from the tracks, then take off the rack.
Yakima LockNLoad Accessory Compatibility
8001052 Yakima RibCage Custom Track System for Jeep Wrangler JL Unlimited Hardtop
8000256 Landing Pad 26 for Yakima SkyLine Towers - Qty 2
8005061 Yakima LockNLoad Expansion Pack
8000184 Yakima SkyLine Towers - Fixed, Flush Rails & Tracks - Qty 2
8000163 Yakima SkyLine Towers - Fixed, Flush Rails & Tracks - Qty 4
8005042 Yakima LockNLoad SL Adapter - Qty 6
8005045 Yakima LockNLoad Platform B, 60x54
Installation Details Alternate Instructions


Video of Yakima LockNLoad Platform Rack with RibCage Custom Track System - 60" Long x 54" Wide


Videos are provided as a guide only. Refer to manufacturer installation instructions and specs for complete information.

Video Transcript for Yakima LockNLoad Platform Rack with RibCage Custom Track System Review
Hey, everyone, it's Evangeline right here at etrailer. Today, we have the Yakima LockNLoad Platform with the RibCage kit. This is gonna be a full kit that installs to your Jeep's hard top, and it works from below and above to give you a lot of space, but also a lot of weight capacity for all kinds of accessories. Here in this video, we're gonna go through the different features, the different pieces in the kit, and I'll also show you the process I went through to get everything installed. There are different RibCage kits available here on our site. Depending on your vehicle, there's different mounting points for the JK and the JL Jeeps, for example, and depending on your lifestyle, you can get either the SkyLine Towers or the TrackTowers.
And if you're confused about which one matches which, well, one thing that will help is our fit guide here at etrailer. Put your year, make, and model at the top of the page, and then that will help sort out all the kits that are a fit for you and your car. And for your vehicle, the main difference between the kits available to that are if you want to use the TrackTowers or the SkyLine Towers. I personally prefer the TrackTower kits, and here's why. The SkyLine Towers are designed to be easy to remove, very helpful if you plan on taking your LockNLoad Platform off pretty often.
It's simply a matter of flipping the door down, and then you can lift the system up and out. However, if you have this whole setup on your Jeep and if you're already drilling holes into the hard top to install the track, the chances are you're not planning on removing that system anytime soon. And that's where the TrackTowers come in handy. They are a little bit more low-profile than your SkyLine Towers. They're designed to stay on there, and if you really do need to take them off, it's simply a matter of removing the door and loosening some bolts.
So, it's not impossible to remove. It just isn't as handy as the SkyLine Towers. Plus, the TrackTowers, since they do not have that easy removable feature, they do sit at a lower price, so you are able to get the same amount of features with the whole system, but save a little bit of money with going with the TrackTowers. That's my personal reason. Of course, a lot of people might like the more height and the look of the SkyLine, so that option is available to you if you wanna go that way.
Other than that, though, everything else is gonna be pretty much the same. You're gonna get the LockNLoad Platform with this, and we have the Platform B, which is size 60 inches long by 54 inches wide. I like this larger platform because it fits well on the Jeep Wrangler Unlimited, and that's something to consider, too. This system allows you to still remove your Freedom Panels if you want, and because this sits on a track, you can move your platform wherever you want it to go, too. The reason you might be interested in the LockNLoad is because of its versatility. You do have the sturdiness of the aluminum platform with that black powder coat finish, but what I care a lot about is how I mount my objects. We have these slats running from left to right. The slats all have little cutouts in them, so you can run your T-track-mounted accessories or your LockNLoad-specific accessories. On our webpage, we also have the list of Yakima accessories that will be able to fit with this platform. One example is our Yakima HighSpeed bike rack. This has straps that go around those slats and secure the bike rack to the carrier. So, with a larger space and with that versatility, you can now carry more things and take advantage of that full weight capacity. But if you need to carry other accessories, here's the measurements for the slats. The width of the slat is gonna be 3 1/4" wide, which is pretty wide, and for the height, it's gonna be about 1" tall. So, not every accessory is gonna fit around here, especially those that utilize those U-bolts and wing nuts to clamp down. Another thing to remember, too, is the clearance between your platform and your roof. On our Jeep Wrangler, here, we have about 3 1/2" of space at the highest point, which is pretty good for most accessories. You just have to remember that if you do have those larger hardware in order to clamp things down, you may or may not make contact with the roof or you may or may not have space between the slats to get your clamps around. That's why I recommend, when possible, use channel-mounted accessories like our jerry can holder, here. This utilizes special LockNLoad channel nets that go into the spots on the slats, and that's how it secures. We already talked about getting different types of towers, but whichever choice you do get, you have the option to purchase separately Yakima SKS Lock Cores so you can switch out the end of your tower and replace it with a metal lock core, and that way, you can keep your system secure. But a lot of people use this with their other accessories. If they have other Yakima things, they like to just use one key to secure and unlock all of them. Then, we have our tracks, and I like how Yakima does it with their tracks when they have an opening here to make it easier to install your towers. And once the towers are on there, you can then slide them back and forth. In the case of your platform, you can then slide the whole system back and forth if you want to, although I do recommend doing that while the platform is empty. With this in mind, you do have to drill into your hard top in order to install those tracks. Now, compared to other track systems, I think the process to drill was a lot easier with this. It was very straightforward. We even had little templates we could use so we weren't poking holes in the hard top like it was Swiss cheese. So, process itself, pretty simple. It might seem a little daunting, but definitely stick around later in this video where I show you how I did it. What's holding everything up are these RibCage brackets. You do have to drill the holes in order to get down here to the bracket, but this attaches to the mounting points that are already on your roll bar, so the only holes that are happening are on the hard top. We have a bracket on the front roll bar pushing up against the platform, and then, in the rear, you also have your rear struts in back that's giving you that extra support, there. This system here is what gives you that 330-pound max weight capacity on-road and off-road. With a bunch of different platform racks I've worked with, something that a lot of people compare the LockNLoad with is the Rhino-Rack Pioneer Platform Rack, especially that combined with the Backbone mounting system. That also involves some drilling. It also has some tracks. It has very similar features and, to an extent, a similar look to what we have here. The main differences are going to be the direction of the slats, as well as the accessories you would mount to the Pioneer Platform. There's a lot of really cool accessories in Rhino-Rack's world of platform racks, but Yakima also has some really good accessories, too. A main difference, though, is gonna be that weight capacity. Because the RibCage also installs to your roll bar, you get a lot more stability there. 330 pounds on-road and off-road is pretty impressive. Rhino-Rack also has a high weight capacity, but they lower it for their off-road applications. So, if you are taking your Jeep to pretty interesting places, you really wanna load it up, but you also wanna go off the road, well, using the RibCage would be a better alternative. If you really like Rhino-Rack's accessories, you can still attach them to the LockNLoad Platform. The Pioneer platform is gonna be a larger platform, however, that will then cover your Freedom Panels. So it's really a matter of, where are you taking your vehicle, what are you loading up onto your platform, and is that 330-pound weight capacity that important to you Another thing to consider is, how much effort do you wanna put into installing your platform rack Rhino-Rack does have that cool rack, but it also has a little bit more effort when it comes to installing it onto your Jeep. The same goes for your Front Runner platform racks. ARB is pretty easy, but it still involves a little bit of work to it, kind of similar to what is involved with the Yakima platform rack. I would say, of all the different options, the Yakima platform rack has a bunch of extra tools in there that makes that process a little bit more simple and you're less likely to mess it up. But if even that seems a little too daunting for you, that's okay. We do have a local dealer network, so we can help you find a shop or a dealer near you that can help you get this or whatever etrailer product you want get installed on your car. But if you are curious about that process, well, it's pretty simple. I did do this install over the course of a week mostly by myself, with a little bit of help with lifting up that heavy platform. And I did do it with some time taken to figure out what type of combination of products I liked. I liked the SkyLine Towers, did I like four or six towers, things like that. So, if you're curious, well, let's take a look at that process. What I really like about a lot of the install-heavy items from Yakima is that they are very intentional about their parts design. A lot of the things you're going to need are included with your RibCage set. You have the bars, you have the brackets, you have all the little nuts and bolts, and even the sealant is included. What's not included are going to be some of the tools, which I have laid out here. You're going to need a drill, as well as a 1/4" drill bit. You're gonna need some measuring tape. You're gonna need an open-ended 10mm wrench, as well as a 17mm wrench. You're going to need something that can mark spots. I also use a wrench and some bits that have Torx bits so I can easily install the tools, but you do have a Torx wrench included. Another thing you're gonna need to bring to the table is your plastic pry panel, and I use a box cutter to get access to our parts. And then, for safety, I also recommend grabbing some safety glasses and a Shop-Vac when you drill. Other than that, everything is pretty straightforward. Let's get to it. First, grab your wrench included, and you're going to use this to remove your panels. You have your front panels here by your roll bars and then you're going to have your rear panels behind your roll bars. You're going to use the small end of this wrench to remove the bolts holding that panel in place. There will be 10 of these screws, by the way. On each panel, there's three on the bottom, two on the top. What I do is I use a T25 Torx bit with a little wrench, just because it's a lot easier to reach the bolts on top of with that. But once those screws are removed, you remove the panel by just pulling inward. Ideally, pull at the back, pull inward, and then up a little bit, and that will pull out the clip up top. Do this carefully, but don't be afraid to put a little effort into it. And then, once you're done, hold on to these panels and these screws. You'll be using them again later. Very similar process for the rear panels, although in our case, here, we have a large overlanding set up in the back, so we already have these panels removed. These may need to use that plastic pry piece, though, 'cause they're a little tricky to take off the first time. Now, get your front supports, and these are gonna need to be loosened with the large side of your wrench. Loosen it so that you can easily adjust your front supports. To attach those front supports, you're gonna have these blocks, and then these bolts, and the location for them is gonna be all the way over here near the door. And then, the other hole is over here on the inside. That inside one, super easy to drop in. That outside one, though, I have pretty small hands, and even then I can just barely fit in through underneath that hard top. You're gonna have to get that to drop in. Then, you attach your support. Fit this up in the general spot where you put those blocks and then secure it with your large bolts. Your bolts will go up and hand-tighten into the nut on that support. Now, these are support struts, so you want to push them up against your hard top, and there's a little lip on the top of that that you need to line up, like that. So, as you hold that in place, you can now tighten down your bolts. I am using a T45 Torx bit 'cause it's a lot easier that way. As you secure that support and you tighten down these bolts, you're gonna want these bolts to tighten down to 10 newton meters, and the reasoning for that is so that you are firm up against the roof. And then you're going to tighten down your rear height adjustment to five newton meters. If you don't have a fancy torque tool like this that can tighten down (wrench beeping) to that spec, you can find one here at etrailer. You also borrow one from your local parts shop. And 10 millimeters is gonna be at tight, and then a little bit past that. You're going to drill some holes and you have this handy drill stop included. This will be used first to measure where you put your drill bit in. Have 1/2" of drill bit sticking out. Then, you're gonna grab that drill stop and fit it into the hole of the support bracket that you just installed. So, it'll fit perfectly in that spot and you will use that and hold that up there as you bring your drill up to that hole and drill upwards. (drill whirring) Do that on both sides and don't forget to vacuum up the debris on both holes. (vacuum whooshing) The hole you drilled on each side will be what you align your track to. Don't worry too much about this part, we're just fixing it into place to get our marker points. But to fix it into place, you're gonna need your M8 bolt and a rectangular washer. This is what's going to go in the top, and that lines up with your arrows and will secure to the large rectangular block underneath. Now, you're gonna measure your tracks and make sure that everything is square. To do so, you first measure the front, center, and back sides of the tracks, making sure that you measure on the exact same part each time. I have about 44 7/16" and that's gonna be the same all across the tracks. And then, you're gonna go diagonally as well. So, measuring from corner to corner, I had another person with me just double-check that I was measuring on the exact corner. And if those measurements are going to be the same, too, then you also know it's square. Do not use the roof itself as your base measurement because your Jeep roof is going to taper. You have to rely on the tracks to be square with each other. But once you have those measurements, go ahead and make those marks in those holes, because that's where you're going to be drilling. I know it's tempting to drill straight through the tracks, but you do not want to scratch up those pre-made holes in there. You're going to remove the hardware, the bolt and the washer that was holding that track into place and you're going to rely on the marked holes that you made. You're also going to remove those support struts that you installed earlier. And I know we torqued them out and everything, but you're gonna just have to torque them all again when you put them back. Once these are removed, you'll then have that clear shot at drilling down from the roof. This time, we're gonna use the large end of our drill stop. I'm again reinserting the drill bit, making sure it's between 1/4" to 3/4" past that drill stop. We're going back to 1/2". And let's get started. As you're drilling these holes, your Jeep roof is gonna be made of fiberglass, so take your safety precautions. I don't like how itchy fiberglass gets when it gets on my skin, so I definitely have myself all bundled up with some nitrile gloves, some eyes and breathing protection. But you're gonna use that drill stop to drill all your holes. (drill whirring) After you've vacuumed up all the holes you've drilled, what I do is I vacuum the top and the bottom just so that there's no fiberglass shavings floating around. You're then going to reinstall those support brackets. Remember how you torqued down the rear height adjustment Well, go ahead and make sure that your front height adjustment is 1/16" shorter than the rear. If you don't do that, then it'll be really tricky to get that to fit into that ledge up top. You're gonna reinsert this, making sure it lines up both with the holes for your bolts underneath, but also the hole that you drilled earlier in this install. We're going to reinstall the tracks, so what I do to make this a bit faster and easier is I first put the rubber grommets, and these push in from underneath the track. Once you've done that for all the holes on the track, I then get the bolts, making sure it has a rubber washer on the inside that's gonna fit into all those holes. We'll seal all our holes with the included silicone. This should be enough to cover all the holes, but if you do happen to need more, we have a larger tube of this available here at etrailer. I like to liberally cover the holes with a good bead of this silicone. For safety, I do like to use these black nitrile gloves. That way, I don't get any on my skin. But that's just an extra option for you. Don't forget to double-check for both your rubber washer and your rectangular washer and make sure that these are in the track. Having the bolts in the track makes it easier to drop the track into those holes. Making sure everything lines up nicely and smoothly, push those bolts in. And if it doesn't fully line up, that's why you keep the support arm underneath a little loose. You may need to wiggle that around to make sure that the bolts truly sit. Some of the bolts underneath won't have anything to thread into, so you're gonna have these cabinets that you're going to use, and this will be put on the third and fourth from the rear. Tighten those around the track nuts. You may need to push down from above if you don't get enough thread. And finally, it's time to install our rear supports. On these support bars, we're gonna have RR and RL, so rear left and rear right. We already have the left one installed. We'll install this right one together. We're going to line this up with our roll bar, but while we're down here, let's notice the way it should be oriented. See how this pivots around, and then see how these corners are clipped, or shorter than the other ones. You want those shorter corners facing the front of your Jeep. What I did is I have a person up top with a small Allen key, and he's pushing down on those bolts. So, when I fit the bracket into the bolts from underneath, let's slide them up right there, we're gonna have Joe thread them down. (wrench clicking) We don't have to fully tighten, but enough to secure. Securing it up top will make it a bit easier to loosen that jam nut. We have a 17mm wrench. We're gonna use this wrench to loosen that nut, and then we're going to bring this up. We can adjust our strut up and down by holding on to this 10mm nut at the top, which is different from that jam nut, by the way. We can then lower our strut down to where our holes will line up with our roll bar spots. Make sure that fits, and then, the jam nut will secure it, so bring that back down when you're ready. Secure the strut with your two larger bolts and then tighten down with your T45 wrench or your Allen key. Torque down those M8 bolts to 10 newton meters, and then when that's all done, go ahead and tighten down that jam nut with your 17mm wrench. Now you get to tighten all your bolts down, double-checking every single bolt. Go ahead and use your torque wrench if you do have that. And then, don't forget to put your panels back on. You are able to put these front panels on, but the rear ones for your roll bar, those are going to have to stay off. This is gonna be the installation of the TrackTowers with the SL adapters to the LockNLoad Platform. The TrackTowers are relatively new compared to the rest of the Yakima LockNLoad items and accessories, so there wasn't that much information when I was putting everything together, especially since it gets confusing with the different types of crossbar styles. So, follow along with me. Your setup might look a little bit different, but the general idea will stay the same. Some of the parts are not gonna be included with your different kits, so what I brought to the table was a 14mm wrench, a flathead screwdriver, and a 4mm Allen key. If you have a Yakima roof rack Allen key, you can use that one, too. First, set up your tower. What I use is a flathead screwdriver, but you can use anything flat, like the side of a coin, to turn that plastic lock and remove that end cap. You're then going to set up the channel bolts that will allow you to slide this tower through the track. So, the first step is a channel bolt which goes into the plastic plate, which will go up into the tower. And then, you're gonna put this block on top and loosely secure everything with a nut. To attach the LockNLoad Platform to the TrackTowers, we're gonna use a combination of brackets and plates. Most of this comes from the SL adapter, although this bracket here comes from the LockNLoad kit. The first thing we're gonna do is get our bolt and flat washer. This came with the SL adapter kit. We're gonna put this up underneath our TrackTower. Then, we are going to put this bracket and then this block with a cutout. Have the cutout facing the inside of the vehicle. And to secure it all, we have this nut insert. This is gonna secure to the bolt that we had come up from underneath. Now, in order to fully tighten this whole system down, you are going to need to use the tool included with your kit, and then a 14mm wrench, not included with your kit. Tighten this down to four Newton meters. We have these slat clamps included with the LockNLoad, and they're gonna secure with two M6 x 16 bolts. also included with your LockNLoad. Now, in order to tighten down those bolts, that's where that 4mm Allen key comes in handy. (bolt clicking) When you have all four towers set up like that, you can now install them into your tracks. The tracks included with the RibCage system, it makes this a lot easier 'cause I just slide those channel bolts into the track. And with all four towers into the track, the next thing I have to worry about is where to secure them. Depending on your vehicle, depending on your track system, depending on your platform, your measurements are going to be different. A good rule of thumb is you want your towers further out to support the platform. If they're all on the inside, you don't have enough distribution of weight. Another thing is, are you installing a set of four towers or a set of six towers Then, you'll be able to fit this around. The slats are pretty forgiving when it comes to measurements. What I like to do is make sure I'm farther apart than 27 1/2". I'm currently setting mine to 36 inches, so I measure for the front towers, make sure they're in the same spot, and then when, after I tighten that down, I measure for the rear towers. We're at 36", right here. I'm gonna check that the other side is the same, and then we'll tighten down. Here we have our LockNLoad on our roof, and the easiest way to get it on there is to have other people do it for you. So, I had two of my friends here in the shop lift it onto our Jeep. Very simple process, especially since the towers were already mounted in place, there. They just needed to lift it up and over and onto the slats. Now, it's time to secure the LockNLoad Platform to our pivot slats. We have our brackets, and then we have our hardware. You have three different options for installing this onto your pivot slats. You can either put the brackets both in front of the slats, you can put them in the middle, you can put them on the outside. The most important thing is that the brackets touch two slats, and not just one. So, place that channel nut into the channel. You're then gonna put the bracket on top and fit it into your LockNLoad Platform slat, like that. Then you're gonna put a flat washer and then a nut on top, and then you're going to secure it with a 13mm wrench. (wrench clicking) What I like to do is I like to go back and forth just so I know it's all evenly distributed and I'm not pulling the platform to one side. With all the brackets tightened down, you're then going to just do some tidying up. If you forgot to put back your towers, now's the time to do so. If you're utilizing the Yakima Same Key System Lock Cores, which are a large pack of metal cores, now's also a good time to switch them out so that everything is keyed alike. With all that being said, that's gonna be it for your install of your LockNLoad Platform with your SL adapters on your TrackTowers. I like Yakima products. I think they've always been good to use, really sleek-looking, and they have a lot of quality, both platforms and quality accessories that go on the platforms. They are a more premium brand and they do have a more premium price point, so I do like how they also give you the option of using TrackTowers instead just to make it a little bit more accessible to get a platform onto your Jeep. But if you're looking for one of the best options, something that you don't really have to think too hard about when getting things added onto it and taken off, well, this is a great place to start. Check out all those other accessories, though, here on our website. We have just a quick little sample here, but we have things from the RoadShower to tents to other bike racks that you might be interested in. Now, you saw the whole kit set up, install, and features right here at etrailer. My name's Evangeline, and I hope you enjoy the journey.
0
0
Yakima Accessories
Fit to this rack on your 2019 Jeep Wrangler Unlimited


Info for this part was:

Edited by:
Daron K

Written by:
Alex H

Video Edited:
John S

Installed by:
Evangeline M

Video by:
Ethan H
At etrailer.com we provide the best information available about the products we sell. We take the quality of our information seriously so that you can get the right part the first time. Let us know if anything is missing or if you have any questions.
Thank you! Your comment has been submitted successfully. You should be able to view your question/comment here within a few days.
Error submitting comment. Please try again momentarily.