
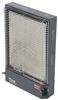
Give your enclosed trailers, ramps, food trucks, and garages a traction boost - ideal for wet or muddy loads. Plus, cleaning up grease and gunk after a day of cooking or working is easy. Drop in or permanently glue down over wood, metal, or concrete.
Features:
Specs:
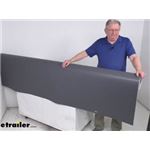
Give your food truck floor some traction to combat slippery food grease while moving from your deep fryers to the cash register. Load and unload your wet and muddy ATV, dirt bikes, lawn mowers, and other ride-on toys easier. This textured, high-traction flooring lets you drive mud-caked tires up your ramp with ease, walk in and out of your trailer without slipping if you're forced to load and unload in the rain, or give you more secure footing when working in the garage. Its small coin-patterned design also gives your trailer or garage floor a bold look.
Polyvinyl material is easy to clean and resists tears, gouges, and automotive chemicals. Maintains the perfect fit and won't expand in extreme heat or contract during cold offseason storage. Cut and drop it in for a temporary installation or permanently glue it down with the appropriate subfloor adhesive (TS76FR or TS86FR sold separately).

Videos are provided as a guide only. Refer to manufacturer installation instructions and specs for complete information.
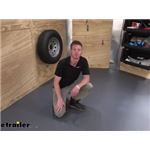
What's going on, everybody Adam here with etrailer. Today, we're gonna be taking a look at some RV vinyl flooring for your RVs, campers, trailers, or your garage. First thing you wanna do is, of course, just clean your trailer. Get everything out of it, everything off of the floor, and you do wanna take some of the trim and stuff that are on the floor and on the walls just so we can get that down. We're gonna put them back on once the vinyls install. So what we did was we swept it out, we blew it out, and then I took a shop vac and vacuumed up all the little cracks.
If you have wood, we don't recommend that you wash it. But if you do have some other type of flooring in your trailer, you can go ahead and hose it out, but make sure to let it sit out maybe a day or two to make sure all the moisture is gone. So that's what we did. And all the while I had this big ol' roll of vinyl out in the sun, so it's gonna be a little more malleable whenever we're trying to cut it into place. So now that that's done, what we wanna do is unroll this and get the shape that we want to make sure it fits.
We're pretty much ready to get going. We have plenty of ventilation. And that's something that we really wanna make sure you do just because the glue is gonna be kinda stinky. And make sure you wear mask, of course. But the options that we have when it comes to the flooring is the small coin, like we have here.
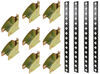
We're also gonna have large coin, some diamond patterns, also marble and checkerboards. So depending on what your rig look like, if it's a trailer or a garage, you can just pick whichever one is best. The reason why we're going with the small coin or the large coin is just because we use this trailer to load up a lot of our toys. Sometimes they're muddy, and sometimes it's wet, so the coin is gonna give us a decent amount of traction compared to the checkerboard or the marble style. They are gonna come in 24, 18, and 12-foot lengths, and the width is gonna be either eight and two inches or eight foot and four inches.
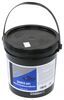
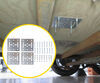
Our trailer is about eight foot wide, so it's a little too wide to get it in the door. But what I'm gonna do is just kinda unroll it on the little ramp and pull it in so we can get it cut to size. Now, the flooring is all rolled out. I kinda folded in the sides just so we're not gonna have any issues with the wheel wells. So now that that's done, kinda grab it. I'm gonna bring it all the way to the front here. And we wanna get it all the way to the edge. I wanted to make sure that it is even on both sides. So you can use either these little wheel wells for reference, but try to get it as straight as you can. And what I'm gonna do is start on one side of the trailer, make sure it's nice and flushed, start making my cuts. And then once that's taken care of, I'll do the rest of the sides. So there's one thing that we're doing today just because I wanna be able to wash this out. And what we're doing is we're taking the caulk off between the wall and the ground so it's gonna sit flushed to that little edge 'cause it does kinda stick up a little bit. And we wanna make sure that it's going to adhese very well to the bottom and stay nice and flat. But we're gonna caulk over top of it to seal it back up again. This is something we talked about with The Source Company, and they have not tested it. But we're gonna go ahead and do it today just to see if it's gonna work and so we can give it a nice seal. One tip when you're cutting, it does come in handy to have some sort of flat edge, whether it's something small like this for the corners, or for the longer runs, you can use something flat like this. The idea here is to get the flooring as pinned into that corner as possible, so then whenever we go ahead and make the cut, it's gonna be right in that corner, and it's gonna be a straight cut. So, especially on the long ones, it's nicer to use a longer straight edge just because it's not multiple different cuts, and you won't see as many differences in the line. So that's just a quick tip to get this done as smoothly as possible. Another thing I found kind of useful in certain situations is to kinda take the trail, push it up against that wall, and bring that knife with it. And this way, it's nice and straight, as you can see, and it just really makes it really smooth and even cut. And if we do end up with some uneven cuts, I do not suggest taking a knife and try to cut it like this. What I found best to do is take it like this and kinda run your blade over the top of it, taking little to hardly any material off of it just because you can always take more material off, but obviously we can't put it back on. So just kinda run it over there a little bit. And then check that out. We are flushed just like the rest. The reason why we are not putting vinyl over this little section is because it's raised. So if we we're to have it go like that, we're gonna have this little air gap right here. It's just not really gonna look the best. It's not gonna look flat. And it will eventually start to maybe pull off a little bit. Some stuff can get down in that little crevice, and we don't want that. So be mindful that if you do have something like this around your wheel wells, be sure to do what we did and not just go directly over it. Well, that went pretty smoothly. One piece of advice that I will give you is if you're cutting off material, cut a little bit less than you think you need just because you can always take off more material and you can't put it back on. But it looks pretty good. So now all we have to do is make the sections behind you, cut those out and, of course, our back little tailgate. Now that the flooring is all cut out and ready to be glued down, that is the next step. We're gonna have two different options for our glue. We're gonna have the 801 and the 601. So the 801 is gonna be for your metal and concrete floors, but can also be used for wood as well. But then the 601 is gonna be a specialized glue just for wood. We're gonna be using both of them today to see how they fare. This is a little bit more easy to deal with. It's going to get tacky in about five minutes, and then we can put down our flooring. The other one, on the other hand, is gonna be a little more sensitive to the humidity and the heat. So both are going to want between 75 and 65 degrees Fahrenheit. And we wanna make sure that humidity is gonna be between 35 and 55%. Again, the wood glue, I would definitely recommend if you're putting 'em on wood floors. And if you are doing more of a multi-surface type of application, you can go with the 801. Both are gonna work well, but you're gonna need a little bit more patience with the 801. Well, now there's nothing else left to do but to get to work. I went ahead and did that side first, and I have found a way that's a little bit easier for this application. It all just depends on what kinda trailer or garage you guys are putting this in. So what I did was did that side, and now I'm gonna do this side with the door so I have a place to escape to whenever I go ahead and roll it over. So let's go ahead and take this, start rolling it back as best we can. Be easier with an extra set of hands, so if you have them, grab them. And if you don't, I did the other side all of my lonesome, and it worked out fine. On the other side, I used the 601 wood glue. But on this side, I'm gonna use the 801 just to see if there's any differences and how it applies. There is differences between the two, but I just wanna see if it's kinda the same concept, same thickness, and stuff like that. So what I'm gonna do now is I'm gonna start right at the material. So I'm gonna bend it back as far as I can and then start putting down the glue all the way along there. And then I'll start working my way from that side all the way back here, and then finish up here, and then go out the door, and it should be good. So let's get to it. Right off the bat, the difference between the two different glues is one's obviously just gonna be a different color and then the 801 is gonna be white. But the 801 is a lot thinner, so it's a lot easier to spread out. I really like that, and it's not giving me near as much trouble as the 601 wood glue. One little tip, one thing I like to do is now that I have everything up against this little crack here, once you do that, stick in and then just start pulling away, just like that. So now that section is good, and now we can just continue and start covering more ground. Well, now that that's done, we're gonna let it sit for a little bit. We wanna get tacky but not glossed over. We don't want it to dry. So keep a close eye on it, wait about 15 minutes or so, and then you can go ahead and roll it back out, and then start rolling on top of it. Now that it's nice and tacky, we can go ahead and start rolling everything back into place. Now that it's all kinda laid out, you wanna take your roller, and we're gonna go one direction, and then you can go ahead and do the other direction. So I'm just gonna do that, just go this way, and then start working my way the other way. The heavier the roller, the easier it will be for you so you don't have to put a whole lot of pressure down on it. Mine's about 70-ish pounds, so I'm putting a little bit more force on it to get it nice and stuck to the glue. If you do get any glue on the vinyl, all you need to really do is take a warm wet rag, just kinda wipe that up, and it takes care of it. So now that the big section is done, all we're gonna need to do now is this and the tailgate right there. So I'm gonna go ahead and get to it. Well, we are completely finished. Now, the glue is just drying and setting. So we wanna make sure that we minimize traffic as much as possible for the first 24 hours. We don't really wanna have any heavy equipment like a side by side or just any heavy toolboxes or cars in here for the first 72 hours. And we don't wanna wash this until about five days or after. We just wanna make sure the glue sets, everything is good, and then you can use your trailer as you did before. Well, it's the next day, and everything's nice and dry, so now we just need to put our accessories back in the trailer. So you may have a deering like this. A lot of them come with the trailers from the factory. So these are a little bit easier to do. You can kinda either feel around or look at the pictures that you took before, and you'll find that these holes are pretty easy to locate. So what you wanna do is take an X-Acto knife and just make a cross, and then take each flap and then start cutting it around, and then this thing will go right into place. And then for the holes, whether it's T-track or a deering like this, what I suggest doing is going down underneath your trailer, take a little drill bit and make some pilot holes so then you can kinda see where they're at. And then you can go and do the rest up top, put your backing plates down at the bottom, and then tighten everything up. Well, this is what it looks like when it's all set and done. We got out E-tracks in. And if you don't have E-tracks in your trailer already, we do have a lot of different size options and color options. I wish I would have put some black powder-coated E-tracks in here, but it is what it is. It still looks fantastic and only took us about two days to get it all done. Whether you're trying to impress your neighbors with a nice, clean garage floor, protect your investment, or just make it a little bit more enjoyable to be in here and clean it out, I would definitely recommend grabbing some flooring. We have a lot of different sizes and patterns to get the look you're really looking for. Again, this was The Source Company RV Vinyl Flooring, and I'm Adam with etrailer..
Average Customer Rating: 4.9 out of 5 stars (35 Customer Reviews)
Give your enclosed trailers, ramps, food trucks, and garages a traction boost - ideal for wet or muddy loads. Plus, cleaning up grease and gunk after a day of cooking or working is easy. Drop in or permanently glue down over wood, metal, or concrete.Delivered super fast and installation was super easy but stressful because you don’t want to mess it up .

I have had this in a bathroom for a year now, and it is holding up beautifully.
We are very happy with our choice of this floor.
It looks great and arrive sooner than I expected.
This is a great product. Better than we expected--very thick and heavy, cleans up easily and looks brand new. Highly recommend!
My order shipped out super fast and arrived in good condition. Looks like high quality flooring material. I highly recommend ETrailer.com
We used this flooring for the inside of a enclosed utility trailer. It was easy to install and has been wearing well. It is for recreational use but has been great. Recommend!
The flooring was delivered quickly and appears to be good quality, I have not laid it yet.
I have been looking for new flooring for a while and found this, fast shipping and looks like a good quality.
Worked great. Watch the video and make your first cuts a little oversized, then trim. Used the multi-surface adhesive and it spread easily.
Flooring is exactly what we were looking for in our vintage airstream trailer
Exactly what I was looking for.
Good product but very slow shipping, about a month.
Looks great
Info for this part was:
At etrailer.com we provide the best information available about the products we sell. We take the quality of our information seriously so that you can get the right part the first time. Let us know if anything is missing or if you have any questions.


Thank you! Your comment has been submitted successfully. You should be able to view your question/comment here within a few days.
Error submitting comment. Please try again momentarily.