
To see if this custom-fit item will work for you please tell us what vehicle you'll use it with.
Thank you! Your comment has been submitted successfully. You should be able to view your question/comment here within a few days.
Error submitting comment. Please try again momentarily.

California residents: click here
Videos are provided as a guide only. Refer to manufacturer installation instructions and specs for complete information.
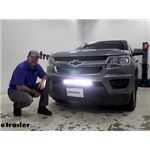
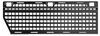
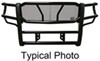
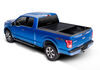
Shane: Hi, I'm Shane with etrailer.com. Today, I'm going to walk through how to install the Aries Single-Row LED Light Bar on your 2019 Chevrolet Colorado.Now with the lights turned off, I'm going to show you the difference between just the headlights and the LED light bar. This is just our lights or our headlights on our vehicle. This is our LED light bar. Now, if we combine them, you can see how much more visibility we're going to get in front of us. This light bar is going to be 20 inches long, it's going to have a rust-proof aluminum housing, the lens is going to be crack resistant Lexan on it's going to be a combined flood beam and spot beam.
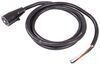
Spot beam bulbs are going to be in the center, which gives you a straight out look. Flood beams are going to be on the sides or on the corners, they give you a lower but wider look so you can see a little bit farther out to this side of what's in front of you.These are going to have a 50,000 plus hour lifespan, 9,800 lumens. It's going to come up all the hardware, all the hardware to get it mounted is going to be stainless steel. It's going to come with a wiring harness. It's also going to come with a switch that gets mounted inside the vehicle to make it easy on and off capability.
Nice black switch, it's going to mount right on your dash, and you can see it matches the interior of the vehicle. It's also going to have a light on it so when it's turned on, that light lights up and tell you it's on. When it's off, the light goes off.Adding a light like this on the front of your vehicle is going to make it a lot easier when you're taking your vehicle off-road, or maybe you're going camping somewhere and you're going down a backroad where it's dark and there are no streetlights. This is going to enhance your visibility when adding it along with your headlights. One thing I really like about this light is the single-row LED lights.
When you compare it to some of the other ones, like the double-row, this one's really nice and slim, it fits very nicely behind the bumper on the Colorado, but still gives you plenty of light to see in front of you. This is where we chose to mount the light to give us the most visibility from the light. Another thing that I really like about it is the slim design really fits well with the Colorado, making it a little bit easier to install. Some of the bigger lights out there, some of the other different brands out there, will not work with the Colorado. This one actually works great.Now that we've gone over some of the features, let me walk you through how to get it installed.
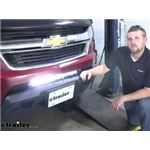
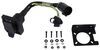
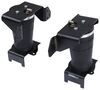
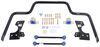
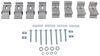
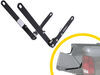
To start our installation, we need to remove our fascia. We're going to start underneath the hood, we're going to use a star bit, we're going to remove the bolts that run across this plastic cover here. In each wheel well, we're going to have three bolts we need to remove using the same star bit. This one, this one, and this one. Then you're going to pull your wheel well liner back, take a seven millimeter socket. We're going to have three bolts right inside that connect our fender to our front fascia, and they run right along here.And underneath, we're going to take our star bit. We're going to have three bolts here. One here, and one here. It's going to be the same way on both sides of the vehicle. Our 10 millimeter socket and an extension, we're going to have two bolts we need to remove. We're going to have this one and then we're going to have one on the other side. Then on each side if you pull the fender or the side of the fascia out, there's going to be a clip right there. Reach in and squeeze it and it'll pop right out.With an extra set of hands, we'll set our fascia aside. Next, you need to bolt your brackets onto the side of your light. You can see how I have it angled here where the bottom lip where the bolt's going to go in is going underneath the light. Your screw, make sure you put the plastic washer on the inside in between the bracket and the light, and it's going to come with a tool to tighten it down. What I did is set it on a table like this, lined up my bracket so it was facing straight, and then tighten these, and then put on my locknuts.And I took my light, I set it inside here, made sure it was centered to the center of the vehicle, I marked right at the edge of the bracket, and then marked inside the hole where my bolt's going to be going through. I did it on each side. Then I took a no-drill mounting bracket. These do not come in your kit, but I highly suggest them, it's going to make it a lot stiffer than trying to mount that light on this plastic. What I did is where my mark was, I set it in like that, centered it on that mark. Actually, you can try to slide it all the way over to this plastic brace here, and then on the bottom side, because you can see how it sticks out, I took a white paint marker and marked a line. And then I'm going to cut this front side off. I did that on both sides.I'm going to drill a hole where I marked for my bracket. Did it on each side. Now I can take this bracket, lay it in place, take a marker on that hole and mark that bracket, and I can drill the hole there, which is where my bolt's going to go through. Set our bracket in place, take our clamp that comes in the kit, come up right behind the plastic piece, and if you reach up behind the bumper beam, you can pop it up like that. We'll feed that end down. Inside the bracket. Make sure we're lining it up. And I'll tighten it into place.Before we put our light, on our ambient temperature sensor will sit right behind our light, and our light kind of gets hot on that backside. So what we're going to do is we're going to pop this off. We're going to flip it over, put it in upside down, like that. I'm going to take a zip tie, I'm going to go all the way around this to hold that bracket in place. We're going to take our two hex bolts, go down through the bracket. Go ahead and pass your bolts down through the holes. And on the bottom, we're going to put a flat washer and a locknut. Then before we tighten it into place, we want to make sure that we pull it all the way forward so that it's even on both sides. Then use half inch socket and wrench and tighten it into place.The plug coming off the light, I ran it right behind this plastic piece, right over this factory wiring. I'm going to run it up and file this right up into the engine compartment. This is going to be my plug. Then I'll connect my wiring harness on and run it straight up. I ran my wiring harness up into the engine compartment behind my driver's side headlight. I ran it behind this bracket, self-tightening screw inaudible 00:08:44 on my relay right here. Your switch that's getting mounted inside, pull the switch off. The three wires, I ran it through the grommet, which is right back there on the firewall to the inside of the vehicle.I mounted my switch here. Normally, you could probably might on up here except he has four-wheel drive on this vehicle and this extra switch takes up the space in here. You can't mount it here because this is where one of the brackets are that hold this dash plate in place. So I put it down here. Right behind here there's an open spot that you can run your wires and plug it into. Probably not going to be able to see it. It's actually part of the dash that this mounts to. So right up there where my wires are coming through the grommet. If you notice, they're coming out to the right side of the steering column, but our switch is mounted on the left side of the dash. You can see right up here where I had my wire ran up next to it, away from the rod that spins and I zip tied it right here to hold it tight, and then I just ran the wires across the side of the dash where I mounted my switch.Once you mount your switch, you're going to come back outside. Ground wire, the black wire is going to go to the negative post, pull the fuse out of the fuse holder, mount the positive wire to the positive terminal, and then add your fuse. Now we can test it out, make sure everything's working correctly. We'll flip on our switch and we see our light's working. Now that we know our light's working, we can go ahead and reinstall our fascia in reverse order from the way we took it off. Once you've got your light installed and re-installed your fascia, everything's working correctly, you're ready to go. That's going to do it for our look at and installation on the Aries Single LED Light Bar on a 2019 Chevrolet Colorado.
Average Customer Rating: 5.0 out of 5 stars (2 Customer Reviews)

This light bar is GREAT. The main reason I bought it, was when living on the third coast in the winter I could spot them hogs on the road.
LOOK at the videos below. That is my chev
Great light so far!
Do you have a question about this Off Road Light?
Info for this part was:
At etrailer.com we provide the best information available about the products we sell. We take the quality of our information seriously so that you can get the right part the first time. Let us know if anything is missing or if you have any questions.


Rich S.
8/20/2021
This ARIES 20 Single Row LED Light Bar has been in service on my 2018 Colorado for over a year. This light bar is just as powerful as it was the day it was installed. I love it. One other thing I like about it, the old saying, out of sight, out of mind. If you need a light bar, this would be a good choice.