
To see if this custom-fit item will work for you please tell us what vehicle you'll use it with.
Thank you! Your comment has been submitted successfully. You should be able to view your question/comment here within a few days.
Error submitting comment. Please try again momentarily.
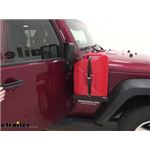
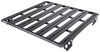
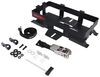
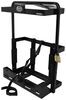
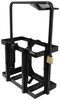
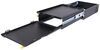
This jerry can mount lets you carry fuel so you can fill up when you're off the beaten path. Works with NATO-style or Scepter fuel cans. Also compatible with a RotopaX fuel mounting panel. Installs behind the passenger's-side fender.
Features:
Specs:
 Alternate Instructions
Videos are provided as a guide only. Refer to manufacturer installation instructions and specs for complete information.
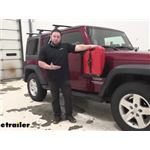
What's up everybody, it's AJ with etrailer.com. Today we're gonna be checkin out this fender mounted Jerry Can holder from MORryde. Now, this is gonna be a passenger side version and we're gonna put it on our 2013 Jeep Wrangler Unlimited. So it's gonna hold it really nice and tight. I can shake the whole Jeep back and forth and you see there's no rattling here, whatsoever, or on the bracket, it's mounted on there, it's not goin anywhere, it's gonna stay with you wherever you go drivin. So I have a driver's side version, as well, if that's what you're lookin for, you can get both of em, put em on there.
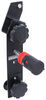
So you see that it mounts right here, there's existing holes, it even goes around the antenna, you don't have to remove it or anything. There's actually a cutout on the passenger side one that goes around the antenna. So, that's gonna be the only real difference is on the driver's side it's not gonna have that cutout. It's able to hold Nato or Scepter style gas cans, up to five gallons. You can see it fits in there really nicely and you don't have to sacrifice your door opening.
That's one of the things I was worried about, but you can see when I open the door all the way there's no contact whatsoever so you don't have to worry about it. Includes a ratchet strap with it, so that way you can keep your gas can tightened down and it's got the holes to run that strap through so you can see the hooks go through here. There's gonna be one on the backside, as well. And then you have the sidewalls that just add more strength to this all, overall, so you don't have to worry about it causing any issues. You have even some rubber stoppers here on the back that just keeps that rattling down too, so that's nice.
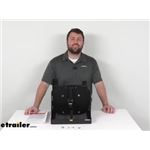
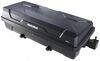
Even if it isn't as tight as we have it and it moves a little bit you don't want to hear the metal on metal. So, you're not going to because there's a foam pad at the bottom and the nubs on the backside. With the gas can removed we have a better look at it. You can see the rubber stoppers I was talking about before and how they stick out a little bit more than these bolts do so that's just gonna prevent that metal on metal contact. You won't have any rattling or touching there.
The gas can will hit here and never mess with these bolts. The same can be said with this mat at the bottom. You can set it down on there and then there's no metal on metal down here so again, no rattling. Now, it does have an adhesive on the back that you can peel off and stick it permanently, but this doesn't stay on here so we're not gonna do that today. We're gonna go from side to side, looks to be 14 inches from here to here. Then from back to front it's gonna be about seven inches from here to here. And let's look at how long it's gonna stick out from the side of the Jeep. Looks like it's a little bit over 8-1/2 inches, but not by much. So that's not too bad, if you look at the fenderwell it's only a little bit further out than that so I don't think you're gonna hit much or have many problems with how far it sticks out. It was not that bad of an install. It's gonna be the same way on the passenger side as it is the driver's side. Again, the only difference is gonna be the cutout for the antenna. You won't have that on the driver's side but, again, it wasn't too bad. We just had to remove some bolts and we had to figure somethin out to get it to work, follow along on how we did it. First step of gettin em installed is we're gonna install the Jerry Can holder to the bracket. Now to do that you look at your instructions. It's gonna tell you the different bolt patterns that work with the Jerry Can. Now we're gonna use, you have these options of these two holes, you see them circular and kinda at an angle at the top and the bottom. We're gonna use the top most holes in both sections that just gives us a little bit more room with our Jerry Can, we got kind of a big one, so we wanna make sure it sticks out away from the mirror. So, these are the ones we're gonna use. I'll hold the bracket up here to the back and, kinda, show ya what I'm talkin about. You see you have the circular holes here and there, that is what we're matching up. Okay, I got it on the edge, here, line up those holes, just like that. So go ahead and do that through. Now come back around, add the washers and the nuts to hold it in place. Hangs on there pretty good so it's not that much of a struggle, but being on the edge of the table just wanna go ahead and get it hand tight. Gonna come back with my wrench and ratchet and tighten it down. With the bracket put together now we can come back to the front of our Jeep. We're gonna move these three bolts, right here, and that's gonna allow us to get a little bit more out of this to pull it apart so when we add our J-nut on here we just have more room to work. So just come here pull it out and set it here on the fender. There we go. With those removed should be able to pull this back just a little bit more and get some more room. Couldn't get much out of it so then we removed an extra one here. Still couldn't get much out of it so we came back up here and removed these here, here, on the side and then two more here in the doorframe which allowed that panel to separate a little bit better, this one and this one down here. With those removed I took a pry bar, wrapped it in a paper towel just to give it some padding, that way it didn't damage anything because we're gonna get in there and pry on it. and we we're able to get this down in here and pry against the Jeep and kinda push it out. We we're able to push it out just enough to get this started on there and then we can further push it on into place. With that latch in there we can unpry it, move this up and now it's on there. We put all the bolts back that we took out to pry this out and you see they're all been replaced except for this one because this one needs to come out anyway. The brackets gonna install it there as well. Now there's one more we need to remove and it's on the inside of the door, here. The one we need to remove, it's gonna be right here. It's the top bolt on the bottom bracket. We're gonna take our Jerry Can assembly here, set it into place, lines up with the holes and use my knee to kinda hold it and they want you to hand tighten the bolts back in to hold it in place. So, I'm gonna get it lined up and get it started. And just to point out this one's the one that came with the kit, the other ones are gonna be the existing bolts that we're on the Jeep. Now we're gonna go back and tighten em all down. If you look at our bracket there's a hole here, that's for a completely optional self-tapping screw, again, it's optional and we're not gonna install it on ours. It's on here nice and tight, I can shake the whole Jeep back and forth, I don't think we're gonna need it. After gettin this installed and replacing all the bolts we're ready to add these few last things. We got these rubber nubs, here, that act as, kinda, protectors when we set our Jerry Can in there that way this doesn't clang on the metal. This is kind of a little buffer for that. You just push it in there, there's a little notch that should catch. Just gotta get it past that initial part, looks like it's almost there. Just gotta pull on it just a little bit more. There we go. Now it's in there. This is a nice mat we're just gonna set here in the bottom. Now, it does have sticky so you can peel this back and actually stick it there permanently, but this isn't gonna stay on here so we're not gonna peel that off, I'm just gonna set it here right in place. That's all there is to it. It wasn't too bad of an installation. There was just a little bit that they, kinda, left out of the instructions, but hopefully you watched what I did, now you figure it out, you don't have to take the time to figure it out like we did. Well, with it installed it's gonna hold the Jerry Can in place. I can shake the whole Jeep back and forth, I'm not afraid of it going anywhere. I think that does it. Thanks for hanging out and I hoped this helped..
Average Customer Rating: 4.7 out of 5 stars (3 Customer Reviews)
This jerry can mount lets you carry fuel so you can fill up when you're off the beaten path. Works with NATO-style or Scepter fuel cans. Also compatible with a RotopaX fuel mounting panel. Installs behind the passenger's-side fender.
Decent product strap holes are small making strap removal difficult. Rubber vibration stop always falls outwhen inserting Jerry can. Drain holes need drilled out bigger. Not an issue unless you use cans Alot like I do.I modified the above issues for heavy every few days use.
Info for this part was:
At etrailer.com we provide the best information available about the products we sell. We take the quality of our information seriously so that you can get the right part the first time. Let us know if anything is missing or if you have any questions.


Gary
10/21/2023
Ok but Im going to change the straps out for a different kind they get hung where metal clasp hooks into them pretty consistent. Drilling bigger drain holes helped and padding back of strap rachet to stop rattling