
To see if this custom-fit item will work for you please tell us what vehicle you'll use it with.
Thank you! Your comment has been submitted successfully. You should be able to view your question/comment here within a few days.
Error submitting comment. Please try again momentarily.
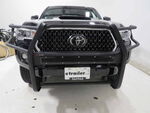
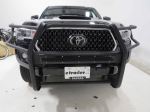
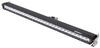
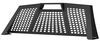
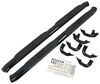
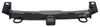
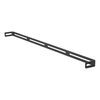
Protect your Toyota Tacoma's front end, and give it an aggressive aftermarket look with this steel grille guard. Middle crossbar has an integrated mesh cover plate so you can add a single-row LED light bar. Bolt on installation with included hardware.
Features:
Specs:
Note: This grill guard may interfere with forward-facing cameras or sensors

California residents: click here
Videos are provided as a guide only. Refer to manufacturer installation instructions and specs for complete information.
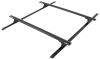
Carla: Hi guys, this is Carla with etrailer today on our 2019 Toyota Tacoma. We're going to be taking a look at the Aries Pro Series Grille guard with mesh like cover plate. This grille guard right here is made out of an inch and a half tubing. So it's going to be really sturdy. It's got it's a carbon steel, rugged, textured, look.What sets this one apart from a lot of other grille guards is, that it's got four points of contact two at the bottom, which are custom plate mounting brackets for your vehicles. For the Tacoma.
And then two up here, which means this is not going anywhere. This is not going to rattle when you're driving around on the highway or anything like that. It also looks really cool. It's going to offer protection full coverage protection, which means it's going to cover your headlights, your front grill and your bumper. All right.
So the first thing we're going to do is take off our front air dam using a 10 millimeter socket. So we're going to go right in here. All right. So there's a series of text bolts right here at the front. So we're going to go ahead and remove those.So there's going to be one on the back here on each side.
Make sure you get those as well. All right. So with all these removed, this part will just calm down and if we can get started on our installation. All right. So the first thing we're going to do is we're going to locate the brackets one for the driver's side, one for the passenger side, you're going to orientate it this way with the bend coming out.
And the three holes on the outside the factory bolt is going to be right here, which is going to Mount up to this bottom hole. And then we're going to use this bolt plate and bolt with hardware to go into this hole right here. So let's go ahead and get started.All right. So we're going to go ahead and take off and loosen the factory bolt with a 17 millimeter socket. With this removed, we're going to go ahead and remove this piece right here and set it aside. All right. So we're going to go ahead and feed this through the hole up here. Make sure you feed the plate first and you can use your hand to go inside here. Make sure you don't drop it inside the frame here. Now you can turn it to stop it from falling and hold it there. And then while we do that, we're going to go ahead and get this bracket on making sure to align.This right here. All right. So if you can see up here, what I had to do to be able to fit this bracket in is lightly pushing that bolt in so that I can make room to push this in and then without dropping into the frame, I'll go ahead and push it out. So with that lined up, so you can see this lines up down here with the bottom hole, and we're going to go ahead and secure the hardware up here. We'll start with our flat washer and then we'll put in our lock washer. And then our nut.Once you get that tightened all the way there. Okay. Just go ahead and hand tight for now. Before we put our factory bolt through the bottom and make sure you put this piece back on and the holes are going to be on the bottom. That in place, we can go ahead and put our factory bolts on the bottom here. So we're going to go ahead and tighten our factory bolt with the 17 millimeter socket first. Okay. Carla: Okay. Now with our 16 millimeter wrench, we're going to go ahead and tighten it. Nope. Carla: All right. So we've got our passenger's side bracket on and we're going to have go ahead and repeat the same process on the other side. All right. So we're going to go ahead and insert this bracket through the bottom hole here. And what I'm going to do is I'm going to push up a little bit on this plastic piece that's behind there. So I can see or free of any of the radiator or AC parts. And I'm going to go ahead and line up the hole and feed it through just like that. All right. So this full plate, we're going to go ahead and feed through the inside here, which is open of this bar so that the bolt can come through the bottom hole, as you can see right here.All right. So once you feed it through, you can see the bolt coming through there. We're going to go ahead and put our bar underneath it. All right. So we're going to go in with our flat washer, lock washer and our nut just like we did before. Now, it can be a little tricky to get your hardware in there with one hand, since you're working against gravity. So it may be helpful to have someone else hold the bar up against the bar there so that you can get your hardware all in there. What I did is I sandwich it altogether and insert it all at once with the passenger side in place.We'll go ahead and repeat the same process back on the other side. So now we're just going to go ahead and tighten those down with the same 16 millimeter wrench on both sides. All right. So now what we're going to do is we're going to go ahead and slide this forward and line up the bottom holes. So as you can see, we got these two, they're going to be up top. And then we have the bottom hole right here, which we're going to line up with our bottom hole on here, just like that.So we'll put our bolt and washer through the outside, and then we'll put our washer, lock washer and nut through the inside, just like that. So as you can see, we've done the same thing on the other side with that in place, we can go ahead and remove any of the plastic protective on it. Like this on this side. And with that like that, we can then go ahead and pivot our grill guard up and line up the holes and finish putting on the hardware. You can use your leg to pull up on it and push down on this Breck.If you have a friend that can help you lift this up and put the hardware through, that's great. Insert the bolt and washer through the outside again, washer on the inside lock washer and nut, same thing on the other hole. Now for the last step here, we're going to use the button head bolt to go right here. We're going to use the washer on the outside again, washer on the inside, lock washer and nut. All right, with all the hardware in place, we can go ahead and tighten up our hardware.All right. So We'll use a six millimeter hex bit on this bolt to tighten it down. The next one we want to do is line up our holes of our plastic air dam to see whereabout you're going to have to cut or trim to be able to put it back on now, because this is a rental car. We're not actually going to go ahead and cut that we wanted to show you approximately where that would be on your Tacoma. All right, guys. So that'll do it for a look at the Aries Pro Series Grill Guard on our 2019 Toyota Tacoma.
Average Customer Rating: 4.5 out of 5 stars (2 Customer Reviews)
Protect your vehicle's front end, and give it an aggressive aftermarket look with this steel grille guard. Middle crossbar has an integrated mesh cover plate so you can add a single-row LED light bar. Bolt on installation with included hardware.
The Grill Guard looks great however it does cause an issue with the Toyota Safety sensor. The grill guard blocks the sensor and this causes the safety feature to not work. After driving for a few moments the sensor will go back on But then will shortly go back off, everything else if great.
Easy installation which only took approximately 1 1/2 hours by myself. Longest part of install was unwrapping the guard from the packaging material. Still had some minor paint scraps and may rust during winter. Shipping was quick, arrived in 5 days and freight company was great to deal with.
Do you have a question about this Grille Guard?
Info for this part was:
At etrailer.com we provide the best information available about the products we sell. We take the quality of our information seriously so that you can get the right part the first time. Let us know if anything is missing or if you have any questions.


Jenny N.
2/7/2022
For this and most after market grills guards they may interfere with forward-facing cameras or sensors.