
Hydrapro Alpha G-1200 Electric Over Hydraulic Actuator for Drum Brakes - 1,200 psi
(0 reviews)
Price: $768.00
In Stock
Hydrapro Alpha G-1200 Electric Over Hydraulic Actuator for Drum Brakes - 1,200 psi
Item # DH34FR
Our Price: $768.00
In Stock


- All Info
- Q & A (0)
- Videos (2)
- Photos
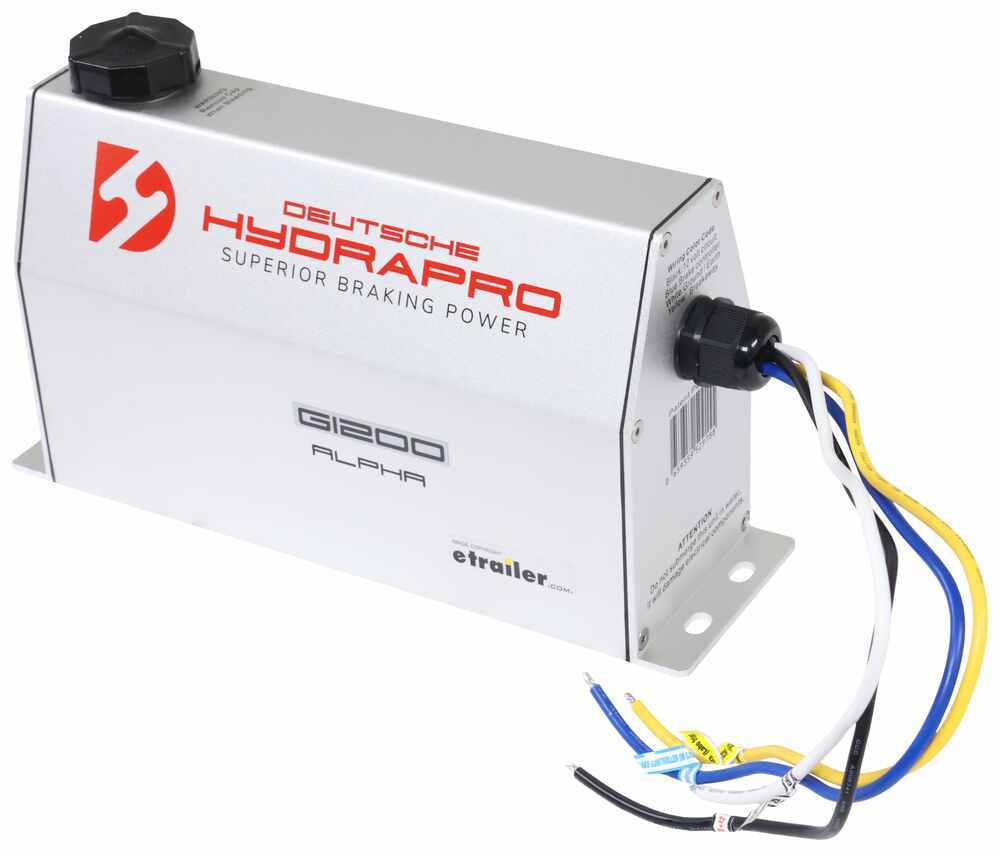
Deutsche Hydrapro Brake Actuator - DH34FR
- Electric-Hydraulic Brake Actuator
- Drum Brakes
- Deutsche Hydrapro
- 1200 psi
Rely on faster braking response and improved control with your heavier 5th wheel, horse, or work trailer. Works with from-the-factory electric brake controllers, so you won't need an extra adapter.
Features:
- Improves hydraulic drum brake performance over a surge-actuated system
- Ensures faster, more consistent brake activation
- Made to last and protect key components for everyday reliability
- Stout, extruded aluminum housing minimizes heat build-up
- Upgraded gaskets and isolated, sealed fluid tank eliminate risk of contamination
- Powerful DC motor and German-made pump
- Installs on your trailer frame or in an enclosed compartment
- Rotating, 90-degree brake line fitting allows for any mounting position
- Meets DOT specifications
- Requires components that are sold separately:
- EOH-compatible factory or aftermarket trailer brake controller
- DOT required battery-powered breakaway device with switch
- 7-Way trailer connector to send wired signal
- Mounting hardware, wires/connectors, and hydraulic lines/fittings
Specs:
- Application: for tandem-, triple-, or quad-axle trailers with drum brakes for GVWR rated over 8,000 lbs
- Maximum output pressure: 1,200 psi
- Dimensions: 10" long x 3-5/8" wide x 6" tall
- Mounting holes center-to-center: 10-7/8" long x 1-5/8" wide
- Power: 12 V DC (minimum 30 amp circuit)
- Current draw at full pressure: 18-24 amps
- Hydraulic port size: 3/16" inverted flare (standard brake line fitting)
- Tank: 15.7 oz - DOT 4 fluid
- Wiring configuration:
- Black: 12 V DC power
- Blue: brake controller
- Yellow: breakaway
- White: ground
- 2-Year warranty
Note: Deutsche Hydrapro's quality assurance bench testing may result in fluid residue in the reservoir when you receive this actuator.
G1200 Deutsche Hydropro - Alpha - Trailer Brake Actuator - EOH - Electric/Hydraulic - Drum
Installation Details

Video of Hydrapro Alpha G-1200 Electric Over Hydraulic Actuator for Drum Brakes - 1,200 psi


Videos are provided as a guide only. Refer to manufacturer installation instructions and specs for complete information.


Video Transcript for Deutsche Hydrapro Alpha G Electric Over Hydraulic Brake Actuator Installation
Hey guys, it's Jake here with etrailer. Today we're gonna be taking a look at, and I'm gonna go over a few details of the Deutsche Hydropro Brake Actuator. Now this brake actuator is designed to control your electric or hydraulic brakes by sending electric signals from your brake controller to the Hydropro. And then the Hydropro will send hydraulic fluid back to your disc brakes on your trailer, applying the brakes. Now the impressive thing about the Hydropro is from the time that you push your brake signal and the Hydropro receives the electric signal from your brake controller, it is going to apply a thousand PSI to your brakes in 0.84 seconds. That is an extremely fast response time, much faster than the competition.
The biggest difference between the kits are going to be the PSI rating. We'll have 1,600, 1,200 and 1,000 rated systems. The biggest thing you want to think about when choosing a system is how long your rig is and how many breaks are they going to have to serve. For example, the 1,600 PSI may be for a fifth wheel toy hauler with three axles. With all that being said, let's go ahead and pull the rig inside and show you how we did it.
Now before we get our brake actuator mounted up and in place, we're going to mount up our breakaway battery and we're gonna be putting ours on the bottom of the shelf. So we got a couple of pre-drilled holes here that we just punched through with a pilot drill bit. We're gonna drill 'em out, grab some bolts and fasten it to this top shelf and then get everything in place. Now we've got our hydraulic hose connected into our actuator. You just simply thread it in, and then use a wrench to gently tighten it.
You don't wanna overtighten that 'cause it is brass. Slide that down into place, make sure our wires fit fine in there, and then we can get our breakaway battery mounted up here on the shelf. Now we're gonna use an assortment of hardware. We'll use a bolt, slide it up through the hole, and we will follow that with a flat washer, a lock washer, and a nut. With our breakaway system mounted up, we're gonna use a couple of self-tapping screws.
We're not gonna have to use four, we'll just use two of them to put one self tapper in each side to secure it to the floor of our compartment. (tool buzzes) Now we've got everything buttoned up inside this bay, we can go underneath our trailer and run all of our hydraulic lines. Now that we've got all our lines run and connected to our calipers, we can start wiring up our system. Now I will say this system is going to be tied with your hydraulic brake actuator and your breakaway system and we're also going to need some extra wires to run up to the front by our kingpin. We've got a duplex wire and then a singular wire. This one's gonna be our brake wire, and this will be for our breakaway switch that will need to connect up by the seventh pole here in a minute. But we're gonna go ahead and make all these connections just 'cause it's a little confusing. We'll make 'em all and then come back and show you where we connected them. These two wires are going up to the kingpin, so one of them will go to one of these black wires coming out of our breakaway switch. And then the other black wire on our breakaway switch is going to eventually need to go into the blue wire on our breakaway system. So that's why we connected the blue wire on the breakaway system to the black wire, and the yellow wire on our actuator to the white wire. So that takes care of our breakaway switch. We ran a blue wire from our kingpin, that's this one here, and we tied it in with the blue wire on our actuator. That is going to be our brake signal. And then we have a white wire coming out of our actuator and a white wire coming out of our breakaway system, tied those together, they will both go to ground and then we have a black wire from our actuator and a black wire from our breakaway system, tied those together, and they will both go to power. Now we're gonna tidy up our wires with some wire loom and some electrical tape. We're gonna tie 'em up in here nice and tight. We are gonna leave these two connections 'til last when we get our breakaway switch set up and tie our blue wire into our seven pole. Now up at the kingpin of our fifth wheel, we tied into the blue wire from our seven pole, and you can see here, basically what we did is you take a razor blade very carefully, cut down through the jacketing, open it up, grab your blue wire. You might want to test it, more times than not, this is going to be your brake wire. But we tied our blue wire that's running to our system into that. So when we're done with this, we'll wrap it back up, put a little bit of wire loom around it, and then tape it. And then our white and black wire from our breakaway kit is coming to our breakaway switch. And once you get up here, it doesn't matter which wire goes to which, they're both black wires, you just need to attach 'em with heat shrink butt connectors. That's one thing I forgot to mention. We used heat shrink butt connectors on everything because the compartment that we have all our electrical stuff in is really dirty so the dirt's getting in there somehow. So we decided to use all heat shrink on everything, especially these that are outside. Now that we've got all that connected, we'll tie some of this up. We can go back in, connect our positive and negative, and then bleed our brakes. When bleeding your brakes, essentially what you want to do is you'll hook up to your truck and push on the brake pedal, and while someone else is filling the reservoir, and then you need to come back by your brake calipers and open this little valve. There's gonna be one on the top and one on the bottom. You'll open up these bleeder valves until you see fluid come out of it and no more air bubbles. And you want to do that with all four of them. Ready Yep, go ahead. (tube hisses) That's good. The very last thing we need to do is test out our breakaway switch. You can actually use this to be able to bleed your brakes if you don't have access to your truck or if it's not with you at the time. We use a tester box to be able to bleed our brakes. So we have the convenience of using brake power just with a tester box. But we'll test out our breakaway switch (machine buzzes) and you'll listen. We heard that our pump came on and everything's working. Once you have everything working properly, you're ready to put your wheels and tires back on your RV. One good indicator that everything is working properly is that your rotors are gonna be more difficult to spin than they should be once you tighten that nut up. We'll give it a spin here, and you can see our brake pads are dragging which means that we have an even amount of pressure on the front and back from our hydraulic lines. And that'll do it for our look at the line of Hydropro Alpha Electric Over Hydraulic Actuator for Disc Brakes.
0
0
See what our Experts say about this Deutsche Hydrapro Brake Actuator
- Will Hydrapro Electric Over Hydraulic Actuator work w Integrated Controller 2010 Chevy SilveradoThe Hydrapro Alpha G-1600X Electric Over Hydraulic Actuator part # DH44FR is compatible with the integrated brake controller of your 2010 Chevy Silverado 2500 without requiring and addition adapter. This is for a disc brake setup. For a drum brake setup you would want the # DH34FR instead.
view full answer... - Hydrapro Alpha Electric Over Hydraulic Actuator For Hydraulic Drum Brake TrailersSince your trailer has drum brakes you will need either the 1,000psi Hydrapro Alpha Electric Over Hydraulic Actuator # DH54FR or you will need their 1,200psi Actuator # DH34FR for tandem, triple, or quad-axle trailers with drum brakes for GVWR rated over 8,000lbs. The higher pressure of the 1,600psi Actuator # DH44FR would damage the drum brakes as it is only for use on trailers with disc brakes.
view full answer... - Parts Needed To Convert Tandem and Triple 7K Axle Trailers From Electric to Hydraulic Drum BrakesI'm assuming you are wanting to switch from electric drum brakes to the hydraulic drum brakes. Here is a list for each trailer. 1st Trailer Hydraulic Trailer Brake Kit # AKUBRK-7 Qty 2 Hydrapro Alpha G-1200 Electric Over Hydraulic Actuator # DH34FR Hydrastar Hydraulic Brake Line Kit - Tandem Axle # HS496-252 2nd Trailer Hydraulic Trailer Brake Kit # AKUBRK-7 Qty 3 Hydrapro Alpha G-1200 Electric Over Hydraulic Actuator # DH34FR Hydrastar Hydraulic Brake Line Kit - Triple Axle # HS496-253 You...
view full answer...
Do you have a question about this Brake Actuator?
Info for this part was:

Edited by:
Lindsey S

Installed by:
Jeff D

Installed by:
Thomas T

Video Edited:
Chris R

Video by:
Jacob H

Written by:
Ryan F
At etrailer.com we provide the best information available about the products we sell. We take the quality of our information seriously so that you can get the right part the first time. Let us know if anything is missing or if you have any questions.
Product Experts Available Now!
Call 1-800-940-8924
Thank you! Your comment has been submitted successfully. You should be able to view your question/comment here within a few days.
Error submitting comment. Please try again momentarily.