
Summer Starts Here - Save up to 70%
Compact smart charger draws power from a wall outlet to automatically charge, test, and maintain (2) 12V lead-acid batteries. Great for motorcycles, lawnmowers, ATVs, snowmobiles, PWC, and other equipment. Saves sulfated batteries as low as 2V.
Features:
Specs:

Videos are provided as a guide only. Refer to manufacturer installation instructions and specs for complete information.
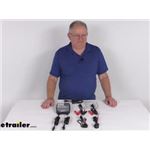
What's up everybody It's AJ with etrailer.com. Today we're gonna be checking out the Optimate 3. It's gonna be a dual battery charger and maintainer. That means you can hook it up to two batteries at once and get them charged up. Let's check it out. Winter's almost over so we've uncovered the golf cart.
I wanna get it up and running again. Tried to start it earlier, I'll show you. Turn on the key, throw it in reverse. The battery's dead. It's sat all winter.
So this is what we're gonna use the charger and maintainer for. We're gonna hook this up to the battery on the golf cart and get it charged up. First thing we're gonna do is plug in our charger in the wall. With the Optimate plugged in, we're gonna grab our alligator clamps. We got the red for positive and black for negative.
They got a good snap to 'em. Seems like they are gonna hold on just fine. We have a side mount battery here in the golf cart. So we're gonna hook up our positive and negative here. And let's check the charger.
With everything hooked up, we can see that our lights are lit up on the front. So right now we have our save light. That means the battery is so low that it needs to do a low voltage to try and build it back up again. So right now it says it's gonna take up to two hours. It's got this light on right now. It's just sending a low current to try and build the battery back up. While we're waiting, let's look at some of the other light functions. You got the power light. This means it is getting power. We have the reverse polarity, so this one's gonna come on if you accidentally hook up the wrong alligator clips to the wrong terminals. It'll flash so nothing will feed back. It'll just warn you to flip 'em around. That way it starts charging. This one's gonna let you know if the battery can be charged or not. This red light will come on if it's just not accepting or holding a charge. And the green one will let you know that it is charged. And we have the charging light down here. This will start like when I pointed to it. It means the battery is going to accept the charge. Looking at the front here, we see that the save light switched over to charge. So that means it got the dead battery to a point to where now it's gonna accept the charge and it is currently charging that battery. Now all these lights on this side are gonna be the exact same. This is just if you hook up a second battery. Now we took a look at it, hooked it up to the golf cart. Now we also need to get the lawn mower up and running for the season, too. So have that plugged in. It's gonna go through the same process as the golf cart does. We wanna get this at least charged enough to move the lawn mower because that's the point of being able to charge two batteries at one time. Then I could hook up the golf cart and a lawn mower and let 'em sit and charge up. We left the charger hooked up to the battery for about an hour. Let's see if that's enough to at least get the lawn mower started. (lawn mower engine starting) (lawn mower engine running) (lawn mower engine running) Now, we had enough charge to get the lawn mower in the garage right behind the golf cart. But since this has two hookups, let's hook this up as well because this has been sitting all winter. I wanna make sure it's got a full charge. So I like that I can hook this up at the same time as a golf cart and let 'em both charge. Now looking at the readouts, you can see it's mirrored so both batteries are charging at the same time. We got power for both of 'em, so it's working just fine. Another option we would have is there's different connectors. If we wanted to permanently mount these onto the terminals on the battery, that way this plug would just be hanging out of the side, we wouldn't have to use the alligator clips. We could plug directly into here and then it would be charging it. So it's probably a good idea if we're gonna be charging the golf cart and lawn mower every year, it'll be way quicker this way. You can also permanently mount the charger to the wall. I know it's sitting on the golf cart seat right now today but we have four places here to run screws through. Get your own hardware and attach it to the wall so it's just up and outta the way. We've left this hooked up to the lawn mower battery for a little bit now. You can see it's no longer charging. This light has gone out. This light's gone green which means the battery's good to go. It's fully charged. Now if this lit up here, this would mean the battery was not accepting a charge and cannot be charged. Overall, I do like this charger. I like that you could hook up two batteries at the same time. So when it comes time to, winter's over, you're getting the lawn mower and golf cart back out again or at least thinking about it again. You can hook 'em both up. You don't have to wait two days for each one. You can hook 'em both up. Then they'll be done and ready for the summer. Well, I think that does it. Thanks for hanging out and I hope this helped.
Info for this part was:
At etrailer.com we provide the best information available about the products we sell. We take the quality of our information seriously so that you can get the right part the first time. Let us know if anything is missing or if you have any questions.


Thank you! Your comment has been submitted successfully. You should be able to view your question/comment here within a few days.
Error submitting comment. Please try again momentarily.