
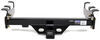
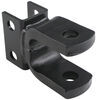
Torque Multiplier Lug Nut Tool with Extension Bar and Handle
(5 reviews)
Price: $121.74
In Stock
Torque Multiplier Lug Nut Tool with Extension Bar and Handle
Item # PT87RR
Retail:$183.32
Our Price: $121.74
You Save: $61.58
In Stock


Need help with installation?
Locate installers near me- All Info
- Reviews (5)
- Q & A (0)
- Videos (1)
- Photos
Performance Tool Automotive Tools - PT87RR
- Torque Wrench
- Wrenches
- 1 Inch
- 24 mm
- 27 mm
- 30 mm
- 32 mm
- 33 mm
- 3/4 Inch
- 38 mm
- 1 Inch Drive
- Performance Tool
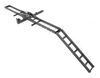
- 1" Square drive input
- 1:58 Gear ratio produces 2,350 ft/lbs 3,200 nm pounds of torque
- Great for emergency roadside tire removal, replacement, or repairs - no power tools needed
- 6-point sockets included: 24-mm (15/16"), 27-mm (1-1/16"), 30-mm (1-13/16"), 32-mm (1-1/4") 33-mm (1-5/16") 38-mm (1-1/2")
- 4-point sockets included: 1" and 3/4"
- Also includes extension bar, handle, and handy storage case
M208 Performance Tool Torque Multiplier Lug Nut Tool
Installation Details
California residents: click here


Video of Torque Multiplier Lug Nut Tool with Extension Bar and Handle


Videos are provided as a guide only. Refer to manufacturer installation instructions and specs for complete information.

Video Transcript for Performance Tools Torque Multiplier Lug Nut Tool Review
Hi there RV and camper owners, today we're gonna be taking a look at Performance Tools Lugnut Torque Multiplier. This lugnut torque multiplying set is designed to give you an easy way to break the lug nuts loose on your big rigs. With something like this here you're gonna have lug nuts that are torqued upwards of 400, 450, even 500 pounds. Sometimes even a little bit higher than that. With just your regular tool, you might be broke down down on the side of the road with a flatter or you need to take it off for any other type of repair. 500 foot pounds is an awful lot.
A torque wrench that goes that high is likely extremely expensive. They're very large tools and you don't wanna have to necessarily carry them with you 'cause that's such a big torque wrench, with something like this here, this is a much smaller package and you're gonna get a mechanical advantage of 58 to one with this tool, to help you break these lug nuts loose. Starting at 15, 16, seven inch going up to an inch and a half that's gonna be the most common lug nut sizes that's out there for something that's this large. So you'll have everything that you'll need to be able to hook up to it there you'll have your torque multiplier as well as an extension and a handle because with this, we don't even need to use our torque wrench or a regular wrench to break it loose. You can just use the quick handle here, which is great for getting those lug nuts off using this tool.
We'll show you how that works here in just a minute. You also do get some adapters. This one here takes a one inch size and drops it down to a three quarter, next to our sockets we do also have a one inch extension here to give you a little bit extra length. This extension that we talked about here is designed for taking the lug nuts off after you break them loose. So you could put your socket directly onto there or you could use this extension if you want to, and then place the handle on the other side.
So after you get your lug nuts broke loose you can take them off with these setup. So let's go ahead and just start using this thing and show you how this works. We got ourselves a motor home here today. It has dual rear wheels. This is a big boy, and it's got some big torque.
We're gonna start here at the lug nuts. It's got caps on it and there's a couple of different styles out there for removing the caps. The most common styles for your caps are gonna either be a press on crimp style or a threaded style. If you see these little bumps here, this more often than not indicates that it's a press on style. And if it is, you can just pull them right off of there, there are tools available, 'cause sometimes these do get stuck and it's a kind of like a rubber pair of pliers that grips on these that way it won't damage them. And let give you the grip you need to get them off of there. If you have chrome caps like this, but it doesn't have any crimps. Then there's a good chance that it is a threaded cap. And normally if they're threaded ones you're only gonna have maybe two to four on there. They're usually in a straight across from each other pattern like a plus or an X. There is usually a slight difference between the ones that do thread and the ones that don't. So just pay attention. They might not have like a crimp like this, but they usually have some sort of mark on them to indicate them. And those ones will thread off and reveal just a regular lug nut behind it. And the cap will thread off. And typically once that happens, once you've threaded those off the center cap here in the middle then will come off and that's actually, what's covering up the rest of your lug nuts to expose those. So this is just the pull off style here, so we pulled those off. There is one more style that you may have and it has a center nut here in the middle for your center cap. And when you take that center nut off it comes off to reveal your lug nuts as well. So now we've got that off of there. We're gonna go ahead and show you how this works more often than not. This is gonna be extremely tight and it's usually easier to break the lug nut loose while it's on the ground. But once you broke it loose, you wanna stop there. We don't wanna really go any further. So first you wanna identify which size sockets the correct one. So I just pulled them out until I found the one that fits starting with smaller going up to make sure we get the snuggles to fit. It looks like it's is gonna be a 33 millimeter for this particular one. Other than to look at is on the lug nut. You usually find your torque spec written on the lug nut. If it's one of these extremely high, large RVs like this, and we can see here that this one does have a torque written on it here. It says 450 dash 500 foot pounds. So we know how much we needed towards these two. And then also letting you know upfront it's gonna be pretty tight, taken it off. So now our sockets on there, this tool is going to then go on like this with the one inch shank going into our socket. And this arm here is designed to actually hit against a lug nut. So that way the tool, once it starts turning it's gonna hit and that'll stop the tool. So we can just work in here at the back without having to hold the tool. It's got its own little stop there. So I'm gonna go ahead and remove this cap 'cause we don't want the tool to come around and damage our nice chrome cap. So now we're just gonna turn our handle here. This just slides on the end and we're just turning it down till it touches on our nut there. So now that we've got this on here we've got it to where it's hitting on this lug nut. If we look here on the top, we can see that we're getting that mechanical advantage because it's gonna take 58 full turns here to make one full rotation here, but we don't really need to make a full rotation in most instances, we're just trying to break it loose. So it's easier to take off. Now I do have a slight injury on my right hand. So you're gonna see how easy this is that I can do it with one hand. And here we can see ever so slightly. It's turning it in a counterclockwise direction the same direction that we are turning the handle. And that's breaking our lug nut loose. And I mean, I'm just turning it with one hand am putting hardly any effort into it. At this point, it has to be loose because it's so easy. There's almost no force whatsoever. The amount of force I was feeling wasn't a lot but you could feel that there was a bit of force behind it. So now that there's no force on this we know the slug nuts broke loose. We can repeat this on all the remaining lug nuts until they're all broke loose then we'll lift it up and then finish removing those. Before we do that, just wanted to show you here. As you can see, we can easily turn this by hand now it did all the hard, heavy lifting for us. Now, in some instances, depending on the amount of corrosion and stuff you've got on here your threads might be fighting that corrosion. So it might not be quite as smooth as this one, but in our case, we do have that extension that we talked about and this allows you to get a little bit of a mechanical advantage using the socket the extension and the handle here. And then you can just zip it off like this. You get the, I would say this is probably close to a foot of leverage to easily get that off. That'll help you fight over any corrosion that might be on those threads. Now we've only got this one loose, 'cause I was taking it off this far, but if you're just breaking them loose you don't wanna go any further than to the point where they are just loose and then move on to the next. So we're gonna get to that point now and then we'll go ahead and show you how to lift the vehicle. Before we lift it, since we're working in the front of our RV we wanna make sure we have the back wheels chocked. If you we're working here in the back on the back wheels, you would wanna make sure you had the front wheels chock. If you need some wheel chocks, we've got plenty of different shapes and styles here at etrailer so you can get the best one for you. Now, at this point we would use our leveling jacks to raise our motor home up. In some instances, your leveling jacks may not extend far enough to get the wheel off the ground. We do have blocks available here at etrailer to help extend your motor home up higher. You'll also want to make sure that you place jack stands underneath the frame of your RV once it's in the air 'cause you don't wanna be working under it just trusting the hydraulic jacks supporting it. We wanna have a mechanical stand that's going to ensure that we're safe. Now we're up in the air. We can go into the rest of these lug nuts, get our tire off and get it either repaired or replaced. Get our new one back on here. And then we'll torque these back down. So now we're back on the ground again. We've got all of our lug nuts, loosely installed. We can go ahead and tighten them back down with our tool. Now in order to use a torque wrench with this, you will need some adapters. And with this being a 58 to one ratio you're not gonna be torquing it very hard. So even though I'm tightening this down with this, as soon as I feel a little bit of resistance I'm gonna stop it because this is a very powerful tool. We don't want to over-tighten our lug nuts. So I'm feeling a little resistance there. That's a good time to stop. 'Cause it may not feel like it's a lot of resistance to you cause it's almost nothing. But with 58 to one, we only need here at this handle about eight foot pounds of pressure to give us 500 foot pounds down here. So we're gonna go ahead and loosen this up and then we're just gonna check and see how close we we're using a large tour crunch that is designed for applications like this. So now we're gonna go ahead and check it with our torque wrench and warm that same nut there. And I've got it set to 500 foot pounds And we weren't quite all the way to 500 but it definitely is pretty tight. Let's see how far we have to go to clicks. So we we're pretty close. I'd say we only went about a quarter of a turn there. So there's a good chance we had hit around 400 to 450 with our initial tightening, with this. So we did most of the work and then we finished it off with our torque wrench to make sure we we're safe. So now that we've got these torqued down, we can go and put our caps back on and we're done in the event that you don't have a torque wrench like that, that can torque them down. This does have the capability of getting the lug nuts plenty tight for you, but you do wanna make sure that they are torqued appropriately to keep you safe. So if in an emergency situation you're using this to go back together but you can't torque it. I do recommend going to your nearest repair facility to ensure they are properly torqued. And that completes our look at Performance Tools Lugnut Torque Multiplier..
Customer Satisfaction Score:
94% were satisfied with this product
6% of customers were not satisfied
- Arrived Damaged
- Missing parts
Customer Reviews
Torque Multiplier Lug Nut Tool with Extension Bar and Handle - PT87RR
Average Customer Rating: 5.0 out of 5 stars (5 Customer Reviews)
by: Gabriel C02/01/2024
Thank you guys for your fast response, I recieved my order in a few days. From the time I ordered until now they were in contact with me. Excellent job guys keep up good work.
by: Bruce 09/13/2022
An awesome substitute for my 1" impact wrench!
by: August 08/10/2022
by: Marvin 05/04/2023
by: William 03/03/2021
5
5
See what our Experts say about this Performance Tool Automotive Tools
- How To Set Correct Output Torque On Torque Multiplier Lug Nut Tool with Extension Bar and HandleThe Torque Multiplier Lug Nut Tool with Extension Bar and Handle part # PT87RR has a 58:1 torque ratio so every 1 ft. lb. of torque applied to the tool will result in 58 ft. lbs. of force exerted. For example, if you set a torque wrench to 8 ft. lbs. and used this on the multiple it would exert around 464 ft. lbs. Please note, there will be some variation in torque due to both the accuracy of the torque wrench and multiplier.
view full answer...
Info for this part was:

Video Edited:
Jacob T

Video by:
Dustin K

Updated by:
Wilson B

Updated by:
Michael B

Written by:
Matthew S

Edited by:
Daron K

Installed by:
David F
At etrailer.com we provide the best information available about the products we sell. We take the quality of our information seriously so that you can get the right part the first time. Let us know if anything is missing or if you have any questions.
Product Experts Available Now!
Call 1-800-940-8924
Thank you! Your comment has been submitted successfully. You should be able to view your question/comment here within a few days.
Error submitting comment. Please try again momentarily.