
Electric Brakes w/ Dust Shields - Self-Adjusting - 12-1/4" - Left/Right Hand - 10K - 10 Pairs
(192 reviews)
Price: $2,281.91
In Stock
Electric Brakes w/ Dust Shields - Self-Adjusting - 12-1/4" - Left/Right Hand - 10K - 10 Pairs
Item # ETBRK210A
Our Price: $2,281.91
In Stock


- All Info
- Reviews (192)
- Q & A (0)
- Videos (2)
- Photos
etrailer Accessories and Parts - ETBRK210A
- Dealer Pack
- Trailer Brakes
- etrailer
Self-adjusting electric brakes measure 12-1/4" x 3-3/8". Brake pads are made of durable friction material for improved braking. E-coated backing plates resist rust. Dust shields protect from debris. Fit 15" or larger wheels.
Features:
- Electric brakes are easier to install and offer more user control than hydraulic brakes
- Require only an electric brake controller (sold separately) - no actuator or hydraulic lines necessary
- Automotive-grade friction material is molded to brake shoes
- Pads are fully bonded - not riveted - to shoes for long life and more braking torque
- Less chance of cracking and crumbling that can lead to mechanical lockup, thanks to tapered edge and circular grinding
- Self-adjusting brakes do not require periodic manual adjustment like standard brakes
- Fine-tooth brake adjustment gears allow for a more precise setting
- Dust shields protect from debris while you're towing
- E-coated backing plates resist wear and corrosion
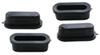
- Adjuster plugs (included) cover access holes to keep dirt and grime out of the assemblies and off of the shoes
- Left-hand (driver's-side) brake assemblies and right-hand (passenger's-side) brake assemblies included
- Ideal for building multiple trailers
- Mounting bolts and hardware (BRKH12251010) sold separately
- QAI and CSA certified
Specs:
- Quantity: 10 left-hand and 10 right-hand assemblies
- Application: most standard hub-and-drum assemblies, including Dexter, Lippert (LCI), and AL-KO
- Dimensions: 12-1/4" diameter x 3-3/8" wide
- Mounting flange bolt pattern: 7 bolt
- Wheel size: 15" or larger
- Axle rating: 10,000 lbs
- Limited 1-year warranty
Self-Adjusting Brakes Don't Require Routine Adjustment
Standard electric brake assemblies require manual adjustment of the brake shoes over time to provide longer-lasting and more efficient braking performance. With self-adjusting brakes, the brake shoes are always properly aligned, so there's no need to manually adjust the brakes after the initial adjustment. As a result, you get optimum performance without having to take the time to continually perform this type of maintenance.
Thoroughly Tested for Safety
These brake assemblies meet the requirements for certification by the Canadian Standards Association (CSA). The CSA creates standards, which when complied with ensure a safe and quality product. These brake assemblies underwent extensive testing to measure stopping distances when braking. These brakes have also been tested by QAI for braking performance in a complete automotive setup and under real-world conditions to provide the most realistic scenario for the everyday driver.
Automotive-Grade Friction Material
Each shoe on these brake assemblies is lined with automotive-grade friction material for improved stopping performance and longevity. The friction material is fully bonded onto the surface of the brake shoe. This lining is custom-molded for a perfect fit. The edges are tapered to ensure long-lasting performance. This taper, along with the circular grinding that the lining undergoes, helps to prevent cracking and crumbling. This durability helps to prevent mechanical lockup, which can occur when brake shoes are excessively worn or broken.
The friction material is also SAE-N certified, which means that it is an environmentally safe product that complies with California and Washington regulations regarding the composition of brake pads. As a result, this material not only provides high-performance braking that can endure the test of time, but it is also environmentally friendly and safe for use throughout the United States and Canada.
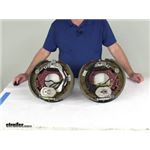
B1210E-11 AxleTek 12-1/4" x 3-3/8" LH Self-Adjusting Electric Brake Assembly - Drivers Side - 10K Axles - Dust Shield
B1210E-12 AxleTek 12-1/4" x 3-3/8" RH Self-Adjusting Electric Brake Assembly - Passengers Side - 10K Axles - Dust Shield


Video of Electric Brakes w/ Dust Shields - Self-Adjusting - 12-1/4" - Left/Right Hand - 10K - 10 Pairs


Videos are provided as a guide only. Refer to manufacturer installation instructions and specs for complete information.


Video Transcript for etrailer Self-Adjusting Electric Trailer Brake Kit Review
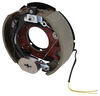
Speaker 1: Today we're gonna be taking a look at the self adjusting 12 and one quarter inch diameter electric trailer brake kit with dust shields for both the left and right hand side for 10,000 pound axles, part number AKEBRK-10. Here's what our brakes are gonna look like, now the really nice things about this set is the fact that it's gonna be a complete unit, we're not gonna have to worry about replacing springs or individual pieces, it's just gonna be a simple bolt on design.Our brakes our a self adjusting design which means that once we have them set initially we're not gonna have to crawl underneath our trailer and mess with adjusting the brakes because they're gonna do it for us, which is really a nice thing because it's one less thing that we have to worry about. The way we're gonna make our initial adjustment is gonna be at the plug back here, it's gonna keep all that dirt and debris out from the inside of our brakes, we're gonna have a fine toothed gear to get our brakes set how we like them and set the initial tension.Our pads are gonna be bonded, not riveted, so we're not gonna have to worry about those rivets gouging into our drums and we're gonna have a nice tapered edge that's machine cut rather than snapped off so we don't have to worry about any kind of chipping or breaking on the edges here which is gonna give us more braking torque and give us a long lasting brake pad. Our brake assemblies are gonna be a 12 and one quarter inch diameter and they're gonna be three and three-eights inches wide. They do have a seven bolt mounting flange so make sure to check your trailer and make sure they'll match up and they are designed to work with 10,000 pound axles. Just keep in mind that the mounting hardware is sold separately, but you can pick it up on our website at etrailer.com.Now that we've seen what our brakes look like and gone over some of the features let's show you how to get them installed.
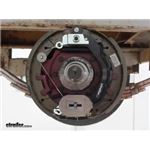
In order to get our new parts on we're gonna have to take our old parts off. We're gonna start by taking off our oil cap. Now we have already drained our oil and if you haven't it would be a good time to go ahead and pull the cap and get as much oil out as you can so you don't make a big mess. In order to get the nut off we're gonna have to bend these tabs out of the way so that we can spin it off. We're gonna take a flathead screwdriver and a hammer and tap them out of the way.
Take a large pair of channel locks and loosen that nut up and start pulling everything off. Remove the outer nut and then the retaining washer then the inner nut and we can pull the flat washers that was behind it off and then finally you can start working our drum back and once we have enough room we can pull the bearing out.Now would be a good time to go ahead and inspect the bearing for any kind of wear or any scoring or major heat marks before we get too far into it. We'll go ahead and clean it off and make sure that our bearing's in good shape. Now with our outer bearing and all the nuts removed we'll go ahead and grab our drum and we're gonna start working it off the spindle so we want to be careful because it is rather heavy. Make sure you have a firm grip on it and you can remove it and set it aside for now.
With the drum off now would be a good time to go ahead and inspect the spindle and all the other components on the inside, cleaning it off, making sure there's no major wear on the spindle or anywhere else. On the backside of our brake we're gonna have our electrical wires. We're gonna go ahead and cut them so that we can remove the brake and not have to worry about it hanging up. Just want to make sure you give yourself enough slack so we can reattach the new ones.On the outer side of our brake assembly we're gonna have several bolts that are holding it in place, we're gonna have three on each side and there's actually gonna be one directly behind the magnet here at the bottom. Now there is a bolt so there is a nut on the backside but to help out I'm gonna take a five-eighths socket and I'm gonna break them loose and let them free spin so it's not so tough getting them off.
Now if you can't break the bolts loose on the front side you can take a large ratchet or breaker bar and break the nuts loose on the backside, making it a little bit easier for those nuts to come off.Then I'm gonna take an 11-16ths wrench and hold the nut on the backside while I use a five-eighths socket to remove the bolt. We'll repeat that for all the remaining hardware. The last bolt at the bottom of our brake assembly is gonna be rather hard to get to but since we're replacing our brake assembly you can take a flathead screwdriver and coming in to where the magnet is you want to pop that clip out that's holding the magnet in place that way we can pull the magnet off and have a little bit more room to work with. It still may be a little difficult to get to but with the magnet out of the way it'll be a little bit easier. Now with all the hardware removed we can remove our brake assembly and it may be stuck on there pretty good, just grab a hammer and give it a few taps on the backside and it'll break it free and we can remove it.We'll go ahead and clean off the axle here, you don't need to make it spotless you just wanna get the big debris off so it's not gonna interfere with us putting our new assembly on. We can take our brake assembly and go ahead and slide it over the spindle and the axle. I want to mention that there is a sticker that's gonna tell you that it's right hand and also right at the top of our brake assembly it's gonna be stamped into this piece of metal right here. However if both of those are worn, the sticker's missing, or you just can't find it the easiest way is gonna be looking at the brake shoes themselves. With the magnet on the bottom you'll notice that the shoes are gonna be two different sizes, the smaller one is always gonna be going towards the front of the trailer so we know this is gonna be the right hand side because we're working on the right side and the smaller shoe is facing towards the front.Since our hardware holding our brake assembly on is pretty worn and rusted you can see that's covered in rust and half the threads are rolled over it's really not gonna be safe to use those so we're gonna be replacing it with a new hardware kit. You can just line up the holes on our backing plate and on the axle and we're gonna put our bolts in place and then we can get the rest of the hardware in. One thing to keep in mind is you want to watch your wires, make sure they're out of the way and they don't get pinched in between the backing plate and the brake assembly.Now just like what came off we're gonna be putting on a lock washer and then a hex nut to hold the bolts in place. Just gonna get all these on there hand tight so we don't have to worry about the assembly shifting or falling down. We're gonna get ready to connect the wires coming off of our brake assembly to the wires that are running up front. We're gonna go ahead and strip back the ends of our wires and they give you plenty of wire here on the brake assembly so we're gonna make sure that we have enough that's not gonna get tangled up but that we also have enough slack so the suspension can still move.We're gonna have two yellow wires coming off the end, now it doesn't matter which one we connect to but we're gonna take a butt connector, now these aren't included in the kit but you can pick some up on our website, and we're gonna crimp our butt connector in place onto each one of our wires. We're gonna take each one of our yellow wires and I'm actually gonna strip back a little bit more since they're thinner wires.Now since I stripped off more than normal what I'm gonna do is I'm gonna twist my wire together, I'm actually gonna fold it in half because it is a rather small gauge wire and that butt connector will grab onto it a little bit better so I'll do that for each one of my wires then we can make our connections in our butt connector. These are heat shrink butt connectors so I'm gonna take a heat gun and shrink them down, I just want to mention if you are using an open flame like a torch or a lighter you want to be extra careful not to burn or charr the wires or the connectors themselves. Now since this connection is on the outside I'm gonna take some electrical tape and I'm gonna wrap up my connectors to help protect them a little bit better.Now I'm gonna take a couple zip ties and tie the excess cable around the axle again just making sure that I leave myself enough room for the suspension to flex. Just want to make sure that the wires aren't gonna rub or chafe against anything and they're gonna be nice and out of the way. With our wire connections made we can come back and tighten up our seven bolts holding our assembly on the axle. Again I'm gonna be using a five-eighths socket to hold the head of the bolt and an 11-16ths wrench to hold the nut on the backside. I'm just gonna go around and snug them all up before I tighten them all the way. Now for the one that's behind the magnet you're gonna want to take a five-eighths wrench and kind of sneak it in underneath the spindle here to where you get ahold of it and then on the backside you're gonna want to take either a ratchet wrench or a socket and snug up the nut on the backside. Now that we have this side done we'll go ahead and repeat that for the other side.Before we put our drum back in place we want to make sure that our spindle is nice and clean because we don't want any dirt or debris or anything else getting in the way preventing our drum or the seal from seating properly. We can clean any kind of debris that got in the hub, clean that out, we're gonna start putting our bearings and all the washers back in place. We're gonna remove our cap to fill our oil and we can fill our hub back up. Once it's full we can replace the cap and then we can adjust our brakes.On the back here we're gonna have a couple plugs, just take a flathead screwdriver and we can pop them out so that we can access the gear to make our initial adjustment for our brakes. We can either get a brake adjustment tool or a flathead screwdriver and we're gonna want to turn that gear until the brakes are adjusted the way we want. Make a couple turns then we can spin our hub and see how much drag and how much movement we have. Once our brakes are adjusted we can go ahead and put our plug back in place.That'll finish up your look at the self adjusting electric trailer brake kit with dust shields for both the left and right hand side for 10,000 pound axles, part number AKEBRK-10.
Customer Reviews
Electric Brakes w/ Dust Shields - Self-Adjusting - 12-1/4" - Left/Right Hand - 10K - 10 Pairs - ETBRK210A
Average Customer Rating: 4.7 out of 5 stars (191 Customer Reviews)
Self-adjusting electric brakes measure 12-1/4" x 3-3/8". Brake pads are made of durable friction material for improved braking. E-coated backing plates resist rust. Dust shields protect from debris. Fit 15" or larger wheels.by: David05/13/2024
The product was fine but the way they packaged it for shipping was terrible. It came pretty beat up and I had to straighten out the back plates on a couple of them.


by: Mark11/04/2023
The brake assemblies are of excellent quality, fit and finish are very good, with the exception of the adjustment ports which do not align with the star wheel making for an award adjustment.
The assemblies, installed on a tandem axle trailer with 10K axles, perform well, but seem to be a little low on braking power, you can stop the trailer and tow unit using the trailer brakes but even unloaded will not lock. Considering how the performance improved with use a re-evaluation is warranted after being allowed to settle in.
I highly recommend this product.
by: Michael02/22/2024
Packaging was terrible parts were banging around in the box, magnet nocked off and pad were chipped hope the work haven't installed yet
by: Colleen 05/10/2024
Just what we need to finish the job on time and get our customer back on the road safely. Great Price on the set and Super FAST DELIVERY !!!!
by: Walter 07/28/2023
E-trailer makes it very easy to order your brakes and trailer parts they have you in the computer you can go for a couple years and not buy anything and they can tell you with seconds what you bought last, makes it very easy would recommend them to anyone. As for quality of the brakes you get about a year on them I run 5 days a week $85,000 miles a year. If you don't run them as hard as I do with the weight I carry they could possibly last two or three years even more. Self adjusting works great, put them on you don't have to mess with them.
by: Harry12/04/2023
brake shoe damaged
by: Jon F.05/30/2019
Works just like they should and appear to be very good quality. The price is excellent and the best price around for a quality part. I purchased two left hand and two right hand brake assemblies to replace old busted brakes on my dual tandem dump trailer. I called to order and spoke with Christina J who was extremely professional and got my order out the same day I ordered even though I was close to the cut off time for shipping. The items arrived the very next day but unfortunately the brake shoes had been damaged in shipping and were not usable due to less than ideal packaging. I called etrailer and spoke with Benjamin A, he was very helpful and had me send a couple pictures of the damage while we were on the phone and within minutes had another replacement set sent out to me that same day and arrived the very next day. I am extremely happy with my customer service experience and this level of service is hard to find these days. The brakes are working good and I’m happy to have given my hard earned money to etrailer. This was my first purchase from them and I wish I would’ve worked with them sooner. I will be a repeat customer!


by: Michael05/09/2024
First look there as good as the name brand will be installing them this weekend will make a new review after that but they look
by: Michael 11/13/2023
Delivered when promised , and extremely cheaper than I could have purchased locally, E-trailer has definitely acquired another customer
by: Patricia 08/09/2023
The electric brakes that I ordered was put on a 32 ft. van horse trailer. The brakes were always a problem, these worked great and a perfect match. We have had problems with the magnets and wiring on other brands but these wired up easy and the magnet is doing its job. Thank You, Patti Harrell
by: Ryan08/19/2023
They look like they’re good brakes, but the magnets are absolutely garbage they barely work Super weak magnets
by: Blaine 05/06/2024
Great product and super fast delivery
by: Clayton 08/08/2023
Good brakes. I’ve had them on my equipment trailer for a year. They seem to be holding up pretty good.
by: Josh 02/14/2024
GREAT CUSTOMER SERVICE!! QUICK SHIPPING. OVERALL GREAT COMPANY TO DO BUSINESS WITH. THE PRODUCT WAS WHAT I NEEDED THE FIRST TIME.
by: Paul 01/10/2024
Well made assemblies, best choice instead of repairing original. Wise to change whole assemblies
by: Curt07/23/2023
Product is fine and a fair price but packaging sucks. Box was big enough for 15 brake assy but I only ordered 4. They were beat up and thrown around inside the huge box. Don't you have a bow that fits the item
by: Juan 02/28/2024
Good service and quick


by: Wallymortar09/29/2021
In my experience, finding trailer parts are more difficult than finding parts for other equipment, e.g. vehicles and machinery. I had questions before I ordered to be sure I was ordering the right parts for my application and etrailer reps handled my questions professionally and expeditiously.
by: matt kearns07/15/2016
great part to replace that worn out rusty old brake assembly


by: John08/15/2020
I received my order quickly and correctly. Awesome company to purchase trailer parts from. Great quality.


by: Allen01/18/2023
The only issue I have is with the packing of the order. The brake assemblies were not packaged very well at all. They were loose in one big box with a little bit of paper inside. They had bounced around enough that one of the magnets had come off the bracket. Luckily the little clip that secures the magnet was still in the box and I could put it back on.
by: Curtis 10/07/2023
Good part, but doesn't come with me bolts, which i found out is $50 dollars more,,, for bolts really


by: Joe02/04/2022
Perfect fit easy to install, work like when trailer was new.
25
177
Show More Reviews
See what our Experts say about this etrailer Accessories and Parts
Info for this part was:

Edited by:
Lindsey S

Updated by:
Wilson B

Written by:
Alexander C
At etrailer.com we provide the best information available about the products we sell. We take the quality of our information seriously so that you can get the right part the first time. Let us know if anything is missing or if you have any questions.
Product Experts Available Now!
Call 1-800-940-8924
Thank you! Your comment has been submitted successfully. You should be able to view your question/comment here within a few days.
Error submitting comment. Please try again momentarily.