


Save space in your cargo area by transporting your portable waste tank on this ladder-mounted rack. Durable, heavy-gauge aluminum is lightweight and rustproof. Arms conveniently pivot out of the way so that you can access your ladder.
Features:
Specs:

Videos are provided as a guide only. Refer to manufacturer installation instructions and specs for complete information.
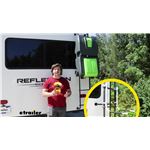
Hi, everyone. Aiden here with etrailer. Today we're gonna be taking a look at this mounting system for your Bedford waste tanks. This is going to mount to your ladders and give you a hook on the back of your sprinter van or your motorhome or your 5th wheel, and give you a place to mount up that portable waste tank. So if you're not around one nearby and you need to use the portable system, you can and you've got a place to keep it that's not inside your rig. Let's check it out.
So like I said, this is just the mounting bracket. So it's these two L-shaped brackets that clamp onto your ladder and it's the included cam buckle strap up top. The tank you will need to pick up separately if you intend to use it, but that's what this is designed for. On a big 5th wheel like this, it may not make a lot of sense because we have a waste tank on here, but you might not always have sewer on site at your campsite. In that case, you need to take this somewhere so you can safely dump that tank.
And if you don't want to bring your whole rig with you to that dump site, you might have better luck just bringing a portable container like this just in your truck bed. But I think where this is gonna really shine is something like a sprinter van where you probably don't have a waste tank on the unit and clamping something like this on the ladder outside is gonna be your easiest way to get a bathroom where you're going. Now the arms can support 50 pounds of weight and you can mount them really wherever works best for your rig. Now these ones I probably mounted up a little bit high, but I wanted to make sure we had plenty of clearance underneath our taillight or above our taillight rather because this is so offset. That was one of the obstructions I had to keep in mind.
But we could really slide these clamps up and down wherever made the most sense for our rig. In with the tank unloaded, you can get a better look at what these arms are actually gonna look like. They're made of aluminum, so leave them back here. You don't have to worry about rust and corrosion over time. And they've got this base on the bottom which has ridges and it's a little bit grippy.
So whatever tank you put on here, it can set on those ridges and not slide around as much. When paired up with a proper strap, it's gonna keep things really secure like you saw. Now leaving this clamped onto the ladder, it is gonna be a little bit in your way if you need to actually use the ladder, but in that case, you've got pins at the top that you can pull, rotate these out to the side and re-pin it into this stowed position. Now I wouldn't drive around with it like this because at least on our 5th wheel today, it's sticking out then past the side of the rig and I just wouldn't want that. Realistically, if you're driving somewhere, you probably have the tank up here and this will allow us to still use the ladder and not have to remove those clamps from the ladder either. But that's really all there is to it. It's a pretty simple product. And installation is also pretty simple. So if you wanna see what those clamps look like, then follow along and we'll show you how to get 'em installed. Now install is pretty straightforward, so long as you've got one inch diameter tubing on your ladder, it's just gonna clamp around wherever it makes the most sense for you. So for us, we're placing it above our taillight here and with it being so offset, license plate's not a concern. And all of my clamps except for this bottom one are installed. So we'll just walk through what that bottom one looks like. So I'm placing my clamp just above this rung here so it can kind of rest on it a little bit. These clamps can go pretty much wherever, but I'm going for just above this rung so it can kind of rest on top. Then I'm going to pass my included hardware from the outside in. So bolt first, try to keep my hands out of the way so you can see a bit better. And then my hand will be in the way for this, a lock nut if I can get my hand in there. So this will be your combination of hardware for both sides and you'll tighten that up using a 10 millimeter wrench and the included Allen key on the bolt side. Now as we tighten this down, it's just important to mention that you have both pieces of hardware loosely in before tightening. That way we don't unevenly snug that clamp down. Once both racks are tightened down though, give it a good shake and just make sure that you didn't leave anything loose and at that point you can load up your tank and hit the road. That'll do it though for our look at and the installation of this Bedford waste tank storage bracket here on our RV ladder. Thanks for watching.
Info for this part was:
At etrailer.com we provide the best information available about the products we sell. We take the quality of our information seriously so that you can get the right part the first time. Let us know if anything is missing or if you have any questions.


Thank you! Your comment has been submitted successfully. You should be able to view your question/comment here within a few days.
Error submitting comment. Please try again momentarily.