
Putco Wiring Harness for H8 and H11 Halogen Bulbs
(1 reviews)
Price: $11.84
In Stock
Putco Wiring Harness for H8 and H11 Halogen Bulbs
Item # P230008HD
Retail:$30.31
Our Price: $11.84
You Save: 61%
In Stock


- All Info
- Reviews (1)
- Q & A (0)
- Videos (1)
- Photos
Putco Accessories and Parts - P230008HD
- Vehicle Lights
- Wiring Harness
- Halogen Light
- Putco
- H11
- H8
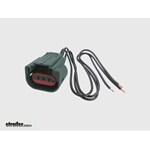
Get ultimate protection for your high-wattage bulbs with this heavy-duty harness. Thick-gauge wiring resists heat and helps bulbs burn brighter. Recommended for use with H8 or H11 halogen bulbs.
Features:
- Thick-gauge wiring helps bulbs burn brighter
- Designed for use with H8 or H11 bulbs
- Heatproof design offers protection from temperatures as high as 480 degrees Fahrenheit
- Pig-tail harness replaces factory plug by splicing into vehicle's wiring
- Connected plug is made of hard, insulated plastic
- 1-Year warranty
Although it is not required that you purchase a wiring harness to use your new Putco halogen lights, it is recommended. The wire used to make this harness has a thicker gauge than the wire in your vehicle's factory harness; the thicker wire is preferred for higher-wattage bulbs. The result is bulbs that burn more brightly with a greater measure of safety - no melted wires and no heat-related damage.
230008HD Putco Standard Wiring Harness - H8, H11
California residents: click here
Video of Putco Wiring Harness for H8 and H11 Halogen Bulbs


Videos are provided as a guide only. Refer to manufacturer installation instructions and specs for complete information.

Video Transcript for Putco Halogen Bulb Wiring Harness Review
Today we're going to be installing one of the Putco light sockets, part number P239008HD. In addition to the light socket we'll also be using some heat shrink butt connectors, part number DW05743-5. This socket fits 9008 bulbs as well as H13 bulbs. Now there are a lot of different bulb styles used on vehicles, but the installation process will be much the same for any of those sockets. If the wire gauge you are using is a little bit heavier than ours, you'll need a heavier gauge butt connector, so check out part number DW05744-5. So this is the part that we are going to be replacing down here. Sometimes this plastic gets brittle over the years and it might break when you're just getting it out. We've got a bad pin connection inside so what we're going to do is we're going to remove it and then splice in right here. The first thing we need to do is pull the lamp out of our headlamp assembly and disconnect it.
So we're going to twist the whole fixture and pull out the assembly. This grey portion is the part that we're replacing, the black is the actual base of the bulb, so we're going to remove that. We're going to come in and leave as much slack as we possibly can to splice into. Here we go. Alright, once we've got some access to our wires, we need to strip back about a quarter of an inch. I'm going to take these fresh stripped ends, twist the copper strands together, it will help them go into the butt connector easier.
Also if you're comfortable using a soldering iron, you can get a better connection if you use a soldering iron and heat shrink rather than butt connectors, but butt connectors will still work. Put the butt connector into place, put your crimp in, and lock it down. Okay, so we've got our butt connectors installed now on the factory wire leads. So it's time to grab our old socket as well as our new socket so we can color match everything and get it wired up correctly. So here's our new socket, here's our old socket and we've laid them out, as you can see, in the same orientation. So now we're going to do is match up the color codes. The left wire on our new socket used to go to the brown wire with the blue tracer.
The middle wire will go to the black wire with the green tracer and the far right wire will go with the yellow wire with the black tracer. Again, just remember that you match up the wires by position according to the old connector that we cut off earlier. Our butt connectors here are heat shrinkable, so if we apply heat to the ends, the material will cinch up around the wire. We've got to be careful not to get it too hot and damage the wiring and we're kind of in a tight space here, so we're going to be very careful not to over work it with too much heat. You can use a heat gun, if you got one, but most everybody has a lighter of some sorts in their house that you can use to accomplish this job as well. Just make sure you dont apply too much heat and that you keep the lighter moving so you don't burn anything. Now we're just going to come back over everything with a little bit of electrical tape and wrap it back up.
We'll go ahead and re-install our bulb for the last time, put it back in place. And that's it for the installation of part number P239008HD from Putco and be sure to check out the links for replacement sockets for other bulb types. .
Customer Reviews
Putco Wiring Harness for H8 and H11 Halogen Bulbs - P230008HD
Average Customer Rating: 5.0 out of 5 stars (1 Customer Reviews)
Get ultimate protection for your high-wattage bulbs with this heavy-duty harness. Thick-gauge wiring resists heat and helps bulbs burn brighter. Recommended for use with H8 or H11 halogen bulbs.by: David01/19/2018
Good, quick customer service.
Not knowing if this item would work, I took a risk and ordered and it was exactly what I needed. One Honda dealership wanted to sell me an entire electrical harness for a broken fog lamp... cost? $900. This was less than $10 and was able to splice it in and was happy to have it working again. Thanks etrailer.com!
1
1
See what our Experts say about this Putco Accessories and Parts
- Which Relay Harness is Recommended for the Vision X H11 Halogen Headlight Bulb VX-HH11The harness you will need for the Vision X # VX-HH11 Halogen Headlight Bulbs is the Putco # P230008HD. I have linked both items to this page for your convenience.
view full answer...
Info for this part was:

Written by:
Lindsey S

Video Edited:
Dustin K

Updated by:
Jason W

Updated by:
Noah M
At etrailer.com we provide the best information available about the products we sell. We take the quality of our information seriously so that you can get the right part the first time. Let us know if anything is missing or if you have any questions.
Product Experts Available Now!
Call 1-800-940-8924
Thank you! Your comment has been submitted successfully. You should be able to view your question/comment here within a few days.
Error submitting comment. Please try again momentarily.