
Summer Starts Here - Save up to 70%


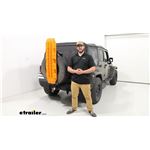
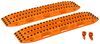
Take up to 5 Maxtrax recovery boards on your next overlanding adventure with this heavy-duty spare tire mount. Installs onto your rear-mounted spare tire. Mounting hardware included.
Features:
Specs:
Note: Designed to suit vehicles with easy access behind the spare tire mount.
Videos are provided as a guide only. Refer to manufacturer installation instructions and specs for complete information.
Hi, Matt with etrailer, and today, we're talking about the Spare Tire Mount for your MAXTRAX Recovery Boards. So a reason why you want to go with a spare tire mount for your recovery boards is for a few reasons. Usually people place them on top of their roof if they have a roof platform, but in some cases, some people might not have a roof platform or you don't have a roof platform because like we have today, we have a soft cover. Another reason is if your roof platform is already being used up by other accessories, especially if you have something like a rooftop tent, which is gonna take up a majority of your roof so you won't be able to fit these on top of there. So this is gonna be a great solution to place your recovery boards on your vehicle, so let's check it out. The way this is actually gonna mount to your spare tire, if we take a look at the side here, we're gonna have this ratchet and strap that goes all the way across your tire that's gonna be on top of your tread and where your recovery board sits, we're actually gonna have these rubber gaskets so it's not applying pressure to that sidewall so it won't damage anything.
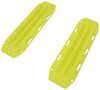
We're gonna have these hooks that grab onto your handles, securing your recovery boards to your tire, and that's also gonna be ratcheted in place, giving you this really good snug fit. You probably notice we have these additional hooks that are sticking out and these really aren't cinching them into place. What they're really doing is just allowing your boards to rest on them, just kind of alleviating some of that weight. And this is actually gonna have some extra space at the end. Right now, we have two recovery boards on here, but this can fit all the way up to five recovery boards.
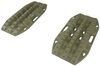
And you're gonna be able to fit different types and varieties whether you have the MKIIs, the Minis, or the XTREMES. Now if you have a different brand of recovery boards, you don't know if they'll fit, I can give you the measurement from hook to hook. Let's see if that'll fit your width. And that's gonna be about 10 and 3/4 inches wide. Just to clarify, this will fit other vehicles too.
The two requirements you're gonna have is you need to make sure you have a spare tire on the back of your vehicle. And the second one is gonna be having the correct tire size. So you can't have a tire size over 37 inches in diameter. And that's gonna be due because we have the strap that wraps all the way around. If you have a larger tire size, that strap won't be able to reach all the way across and you won't be able to get a good snug fit on here.
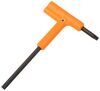
And while I'm talking about these straps, we're gonna talk about this rear strap we have in the back. And what this one's doing is it's applying pressure to this additional strap and hooks, pulling your boards to your tire. When the time does come where you need to take off your boards, you're actually gonna grab that strap that I was just talking about and loosen it up. Now if you notice the fitment we're getting right now is pretty weird and actually getting in the way of this ratchet. And that's because we do have an aftermarket tire mount. So if you have just a standard one that comes stock with your Jeep, you might not have this issue. Another thing to think about too is if you have this fully loaded with five boards, what's gonna happen is this is actually gonna pull this ratcheting strap forward, so we might not get that weird fit. So it might depend on the amount of boards you're carrying too. But once you release this, you'll be able to loosen this up and that's pretty much what's keeping your boards in place, keeping everything tight. And it's not falling off right away, and that's because we do have these hooks holding in place for the time being. Just make sure all these are out of your way. So now I can take my boards and use them. With your boards removed, there's really nothing holding this strap in place. So what I would recommend doing is just kind of grabbing it for the time being, kind of just loosely putting it together because you don't want this to fall off when you pull forward. And what you can do is just put this in this spare bag we have on the back. And you can use that for a couple other reasons too. This bag's gonna be great if you have any other accessories that go with this. Anything like your linking and fixing kit for your boards or if you have the tool to remove your traction teeth on your boards as well. Taking a closer look at that bag, this is gonna be 12 and 5/8 inches tall and it's gonna be 11 inches wide. So that's gonna give you plenty of room to store those extra accessories I was just talking about. And if you have anything else that is smaller, you can probably throw that back in here too. The way this is gonna secure down is, you can probably hear it, we have this hook and loop on the back. And you're gonna have two locations you can use. You can use this bottom one, the one we're using right now, for if you have this not maybe quite as full, if you have just a few items in here. And you have the second option of using that second spot, which is gonna allow you to store a little bit more in here too. The way this is gonna be mounted on the back is this is gonna be attached to these nylon straps which will be stitched together holding it into place. And these straps are gonna connect to where these hooks sit using these buckles. You'll be able to adjust this some just by just moving where this buckle sits. And we're gonna have this rubber gasket that this is all leaning against. I was talking about that earlier, that's in place so it doesn't damage anything. You don't have either your boards rubbing up against your tire or even this hook pressing against your tire either. Earlier, I talked a little bit about the width of the hooks and if you're using different recovery boards, whether or not yours would work with this. And if yours do, then we can get the measurement of how much usable space we have. So going from the back all the way to right in front of that rubber cap, we're gonna have about 3 and 1/4 inches of space we're working with. There are a few cons with this design. The first one is if you do have a backup camera, it's most likely gonna block that because a lot of backup cameras are right in the center of your vehicle and so are these boards. Another thing that's gonna block is if you have a taillight or a third taillight of the top of your vehicle. And if you do use your backup or your back window to backup a lot, that's definitely gonna obstruct some of your vision. And the major drawback is the way this secures. Now this does feel very sturdy for what it is and I definitely do trust it, but compared to some of the platform options, it won't be as secure because those options rely on metal brackets to hold down their boards. And going off that, those brackets will often be compatible with padlocks, so even have some extra security so no one can come by and take your boards. And if you are off-roading or doing some overlanding, there's gonna be those cases where if you do get a flat tire, you're gonna have to use your spare. After when you use that spare, you won't be able to mount this up anymore. But there are plenty of benefits to what we have today. Like I mentioned earlier, if you do have a Jeep with a soft top to it, you won't be able to mount any platforms to it. Or if you just don't own a platform rack, then you won't be able to mount your boards to the top of your roof. So mounting it to the back of your vehicles going to be the next best thing because you definitely don't want to store these in the back of your Jeep or your vehicle, especially when you are using them, they're gonna get pretty dirty. Along with that, we're still gonna get plenty of clearance underneath our tire. It doesn't come below where a tire actually sits. And the actually installing process is pretty simple for the most part. Now the instructions can be a little bit confusing, but if you're a little bit confused by that, just stay tuned and we'll walk you through the process. We're gonna start with the main strap and that's gonna have your hooks, this bag, and these rubber gaskets on it. What we're trying to do is put this on the center of our tire, just laying it on top. You want to try to make sure this gasket is on the front rather than on top of your tire. With that done, we're gonna run this strap all the way across on top of your tread, making sure it doesn't get caught up underneath your hitch if you have one, to the top. Try to make sure that's centered up here and we're gonna run this strap through that center of the opening. Pushing it through. Make sure nothing fell off. Just get a rough estimate of how tight you need it. It's not a bad idea just to strap it in place for the time being so it doesn't fall off again. And that's just gonna use a hook and loop. And then we can start ratcheting this into place. (components clicking) I don't have to do mine all the way quite yet because things do shift and this is a good point where you can check if everything's centered up. (component clicking) We can grab our boards now and the main goal, what we're trying to do here, is to make sure we have this in the right location. So if I show you what this is gonna look like in the wrong location, this is hanging down a little bit too low. So when we are driving or off-roading, this is most likely gonna hit the ground or make contact with the ground. We want this to sit above our tire. I'm just gonna push this up to the next set of holes and make sure everything's lining up. And then I can grab my second set of straps. Your second strap is gonna come in three different parts, so we're gonna have the bottom hooks, and you can tell they're the bottom hooks because they look different from the top hooks. So side by side, the bottom ones have a little bit more of a shift or an angle to them, and the top hooks are straight. They're both gonna go on in the same way. That process is just gonna look like finding the end of your strap, we have this loop. And you're just gonna run it through that loop till it goes all the way through and sits just like this. And you'll do the same process for both sides. And the top side is gonna be the side that is closest to your ratchet. When you place it on your tire, you want to make sure you try to get this as centered as you can. In some cases, it can be kind of difficult because if you have any type of mounting system like we have, that can get in the way. But just do the best you can, roughly place it where you need it to go. At this point, I don't think it's a bad idea just to connect to some holes, just to hold this up so it doesn't fall down. And we're just gonna try to get this through these openings. Make sure you connect both of your handles just like this. And right now, it's gonna be pretty loose because we haven't tightened anything up. But then we're gonna repeat that process on the bottom. And when you have those bottom hooks, you want to make sure that the angle we have is gonna fit correctly into these bottom holes. Now you want to make sure it doesn't look like this, that's gonna be not giving us a good fit. So once you have both of them in place, then we can start ratcheting our boards down. (component clicking) With everything cinched down, give it a good shake test, make sure everything feels good and you're comfortable with it. It's not a bad idea just to double check this other ratchet that goes around your tire to make sure that's pretty tight too. If it feels pretty good, then you should be good to hit the trails. But that's just a look at the installation and some of the features of the MAXTRAX Spare Tire Mount. Thanks for watching.
Info for this part was:
At etrailer.com we provide the best information available about the products we sell. We take the quality of our information seriously so that you can get the right part the first time. Let us know if anything is missing or if you have any questions.


Thank you! Your comment has been submitted successfully. You should be able to view your question/comment here within a few days.
Error submitting comment. Please try again momentarily.