
Curt Trailer Hitch Receiver with Standard Drawbar - Custom Fit - Class I - 1-1/4"
(1 reviews)
Price: $182.95
In Stock
Curt Trailer Hitch Receiver with Standard Drawbar - Custom Fit - Class I - 1-1/4"
Item # C111583
Retail:$304.95
Our Price: $182.95
You Save: $122.00
In Stock


Need help with installation?
Locate installers near me- All Info
- Reviews (1)
- Q & A (0)
- Videos (2)
- Photos
CURT Trailer Hitch - C111583
- 1-1/4 Inch Hitch
- Class I
- 2000 lbs GTW
- Concealed Cross Tube
- CURT
- 200 lbs TW
- Custom Fit Hitch
Perfect for light-duty towing, this custom, vehicle trailer hitch receiver features fully welded, gloss powder coated steel construction. Standard drawbar included.
Features:
- Custom fit is designed specifically for your vehicle
- Precision, robotic welding maximizes strength and improves fit
- Bolt-on installation - no welding required
- Complete hardware kit and installation instructions included
- Lifetime technical support from the experts at etrailer.com
- Gloss black powder coat finish over protective base coat offers superior rust resistance
- Sturdy, square-tube design
- Standard drawbar included
- Pin and clip sold separately
- Assembled in the USA
Specs:
- Receiver opening: 1-1/4" x 1-1/4"
- Rating: Class I
- Maximum gross trailer weight: 2,000 lbs
- Maximum tongue weight: 200 lbs
- Limited lifetime warranty
etrailer.com Technical Support
At etrailer.com we're committed to the products we sell, and to our customers. Our experienced and knowledgeable staff are available via both phone and email to address your questions and concerns for the lifetime of your hitch. The technicians at etrailer perform hitch installations on a daily basis, making them a valuable resource for do-it-yourselfers. The one-on-one, personal service you'll receive comes straight from an expert in the towing and automotive field. We've installed it, we've wired it and we've towed with it, so whatever your question, we can answer it.
11158 Curt Class 1 Trailer Hitch Receiver
45521 Curt Standard Ball Mount - 7-1/4" Long
Installation Details


Video of Curt Trailer Hitch Receiver with Standard Drawbar - Custom Fit - Class I - 1-1/4"


Videos are provided as a guide only. Refer to manufacturer installation instructions and specs for complete information.


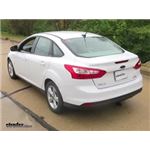
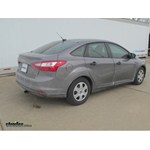
Video Transcript for Trailer Hitch Installation - 2014 Ford Focus
Today in our 2014 Ford Focus, we'll be installing the Curt class one trailer hitch receiver, part number C11158. Here's what the hitch looks like installed. As you can see it's nice and hidden up underneath our bumper cover here. The only part hanging down is our class one, inch and a quarter receiver, and our safety shame 00:00:20 loops right here. Now our hitch has a nice finished-off appearance with this welded on collar at the end of it. Gives it a classy look, and doesn't take away from the aesthetic purposes of the car. This hitch has a two hundred pound max towing weight capacity, and a two thousand pound max gross trailer weight capacity.
You want to consult with the owner's manual of your Ford Focus, and see what the vehicle's capable of, so you don't exceed the values of the hitch, or the value of the car, and cause damage to either one. Off to the side of our receiver here, we have our industry standard half inch diameter hitch pin hole. Now, if you're using this hitch for a non-trailer application, such as for a bike rack, or cargo carrier, Curt does require the use of a stabilization strap, to help support the load. We have those available separately on our website if you need to purchase one. Now for a few measurements, to better assist you in choosing any hitch mounted accessory you may need, such as a bike rack, or a cargo carrier. You're looking at about eleven inches, from the ground to the top of the class one, inch and a quarter receiver opening.
And about five inches from the center of the half inch diameter hitch pin hole, to the rear most point on the back bumper. The first thing we need to do, in order to install our hitch, is temporarily lower our exhaust. In order to do that, we have two exhaust hangers, one on each side of our muffler. Each one is held in place with two, thirteen millimeter bolts. We'll move those. Now we'll take two of our small bolts, put our conical tube washers on them, with the teeth facing away from the bolt-head, going towards the hitch.
We can raise our hitch into position, and temporarily install two of these bolts, so we can mark and drill our other hole that we need. We'll just snug these down a little bit so our hitch is flush against the frame of the vehicle. With our hitch in position, we'll make a mark right in the center, with the paint marker, or a marker. We'll do this on both side. With both our marks made, we can remove the hitch now and drill our holes.
Now we'll make a small pilot hole, right where we made our mark. Now we'll enlarge our pilot hole to the final size of fifteen thirty seconds. We'll do the same for the other pilot hole too. Now that our holes are drilled, we need to enlarge this access hole here, between the two bolt holes. This is on both sides of our vehicle by the way. Just so our carriage bolt will be able to fit through. Use a rotary tool to enlarge it slightly. Now we'll take one of our pole wires, clear 00:03:30 through the hole we drilled, and come out our access hole here between our two threaded bolts that already exist in the frame-rail. Now we'll take our spacer plate, install it on the pole wire, insert it in the frame-rail, thread our carriage bolt on. Push it in the hole, and pull it on down. We'll do the same on the other side of the vehicle. With an extra set of hands, we'll raise our hitch up, over the exhaust, and install it with the phalange 00:04:15 nut on the bolt that we just dropped through the hole that we drilled. Now the bolt with the conical tube washer on, that we used to hold the hitch up originally, will go through our exhaust hanger, rear hitch, and thread it back into the weld nut. We'll do the same, for all four of the small bolts that hold the exhaust on. Now let's snug down our hardware. Now we'll torque all of our hardware TO the amount specified in the instructions. I just want to point out that our larger bolts, get a lot more torque than our smaller ones, so make sure you torque them to the amount specified properly. That completes our installation of the Curt class one, trailer hitch receiver, part number C11158, on our 2014 Ford Focus.
Customer Reviews
Curt Trailer Hitch Receiver with Standard Drawbar - Custom Fit - Class I - 1-1/4" - C111583
Average Customer Rating: 4.0 out of 5 stars (1 Customer Reviews)
Perfect for light-duty towing, this custom, vehicle trailer hitch receiver features fully welded, gloss powder coated steel construction. Standard drawbar included.by: Tom H.05/27/2014
Straight forward instructions and videos made installation of the hitch and wiring harness uncomplicated. It took a little longer to install than advertised but mostly because of doing most of the work on ramps and jack stands. I am very pleased with the outcome.
1
1
See what our Experts say about this CURT Trailer Hitch
Info for this part was:

Edited by:
Dan D

Written by:
Lindsey S

Video Edited:
Joshua S

Video Edited:
Jacob T

Video Edited:
Chris R

Updated by:
Laura H

Updated by:
Wilson B

Updated by:
Kristina F

Updated by:
Isabelle B
At etrailer.com we provide the best information available about the products we sell. We take the quality of our information seriously so that you can get the right part the first time. Let us know if anything is missing or if you have any questions.
Product Experts Available Now!
Call 1-800-940-8924
Thank you! Your comment has been submitted successfully. You should be able to view your question/comment here within a few days.
Error submitting comment. Please try again momentarily.