
To see if this custom-fit item will work for you please tell us what vehicle you'll use it with.
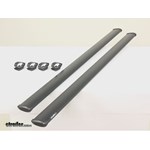
These crossbars combine the strength of steel with an aerodynamic shape to create a heavy-duty yet quiet roof rack for your vehicle. Full-length bars maximize cargo carrying capacity and work with most clamp-on accessories.
Features:
Yakima CoreBars - 60" Long - Qty 2:Videos are provided as a guide only. Refer to manufacturer installation instructions and specs for complete information.
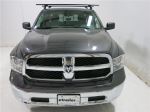
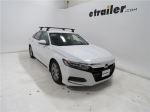
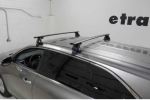
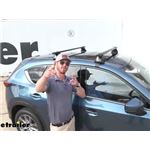
How's it going It's Ethan here at etrailer.com, and today we're going to be taking a look at, and showing you how to install the Yakima Jet Stream Roof Rack System on our 2022 Ford Edge. With the Edge here, we don't have any sort of raised rails, any sort of flush rails, but if we do want to get anything longer or larger like rooftop accessories, whether that be kayaks, roof boxes, baskets, skiing/snowboard carriers, anything like that up onto our roof, we're first gonna need a roof rack system. So the process if we're getting it on this roof can be a little bit tricky, but we'll walk you through that. when we get to the install section, This is just gonna be a look at how that system fits on this car. First thing we'll notice are these crossbars. So on the top here, we can see that we do have this rubberized strip that goes all the way along the top.
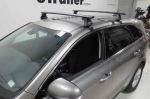
We can use this channel for our T-track accessories, and we don't have to trim this up to fit those in, which is really nice. On the front here, we can take a closer look at the shape of the crossbars. They're called the jet stream, that's for that aerodynamic design. So that taper from front to back is gonna help cut down on wind noise, and drag and maintain a nice fuel efficiency along the way. We're working here with our 60-inch crossbars, which I think are actually a really nice fit.
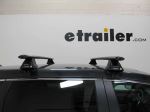
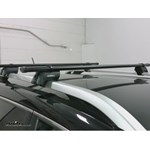
We don't extend past the width of the vehicle. It might be to the point we're getting in and out. If you're taller, you might hit your head on the side, but I think if we go any wider, that would be more of a problem. For now, I think it's a really good size, and a solid fit. As far as how much height you're gonna be adding onto your vehicle overall, it's really low profile, so it's not gonna be too bad.
Keeping in mind though, that as you start loading up rooftop accessories, that number's gonna change. So from the end here, we're going to be adding close to five inches, but as we get more towards the middle, that number's gonna go down to more like four and a quarter. So that's how much height you're gonna be adding if you're worried about storing these in your garage when you're not using them. As far as that overhang we mentioned on the last section, just in case you wanted to get an idea of how much we're gonna be sticking out. From either side, it's gonna be about six inches.
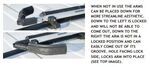
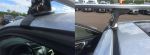
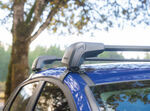
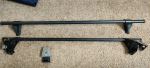
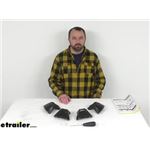
Again, I think that's a really nice width overall. Not gonna be super worried about hitting my head, but we can use this overhang, as well as the rest of the crossbars to mount clamp accessories for our rooftop items. And we have tons of room from the roof to do so, so I'm not gonna be worried about those clamps making contact with my roof. As it stands, this roof rack is designed for 165 pounds worth of weight capacity. Keeping in mind that your roof also has a different weight rating, so make sure you check the owner's manual to find out what that is. Go by the lowest rated component just to be safe. 165 pounds should be plenty. That's pretty much the standard as far as roof rack accessories typically go anyway. Also, we do have a nice aluminum design, so they're lightweight, easy to work with, with that black powder coat finish. So they're gonna be really durable. You're gonna have them up on your roof in the elements, so it's nice to know that they're made really well and they're gonna hold up. Coming down below our crossfire now, we'll take a look at our towers. Right here, is where you can upgrade to metal lock cores, which I would definitely recommend. You can lock those up to keep these end caps on in place and then no one can get in here, and look at this hardware, and just loosen things up, and take it out 'cuz there's no security keys inside. But this system is nice because you can adjust the pitch, and the tow settings to accommodate different areas of different types of roofs. In our case, it was actually pretty simple, but it is a really nice option to know that it's there if you need it. On the bottom of our towers, you can see these pads here, and how well they fit along this ridge on the inside of our roof. So it's really nice. It's custom fit, and it's designed for this roof specifically. Here are our clamps. You can see that we still do have the option to open up our door if we want to. It's not gonna interfere with opening or closing the door at all because it is designed again to fit this car. Overall, as far as the install goes for this roof rack system, it can be a little bit daunting at first. There are a handful of measurements. There's a lot of numbers that can be a little bit confusing, but if you take your time, lay it out, and understand what each of those measurements, and numbers are and what they correspond to, it's actually really easy and it's really nice. It fits our system here really well. So if you take a look at how we did that right now, we'll walk you through it. For the install, the first thing we'd like to do is set everything out. Make sure we have everything that we're gonna need, and that we know what it is. So we have our two crossbars. We have our towers. We have the base and the adapters as well. We have our end caps for the towers, which you might have to remove. We have the tool that's provided. We have our fit kits respectively with the front and the rear. The front is gonna be 102, the rear is gonna be 139. So make sure, like I said, you have everything that you need, and we'll get started. So to remove the end cap, you need to pop the face off. Next thing, you see this security tab right here, this gray tab, pull that out. You'll see that gives us access to this bolt down here. So we wanna pull that out till it clicks. The next step is we're going to put the seat in just like this. That will also snap into place. Now we'll put our adapter on to that bolt that we just exposed to the bottom. Slide that onto the the bolt there. Flip it upside down. And now that we have that exposed in this channel here, we'll use the provided tool to tighten this down. We want this base at the top here to be level with the seat. So as soon as this metal plate is level with the seat here, then you should be good to go. You're gonna repeat that process for the next four towers. And then our next step will be to prepare our crossbars. So if you have the rubber strip, and the channel underneath your first step is going to be removing that. In our case, we do not. So our next step will be taking this end cap off so that we can prepare it again for our towers. So you just kind of lift up on this tab underneath here until the end cap comes off. Now because you've already lined up our plate underneath, everything should slide in underneath super easily and if it doesn't, we might just need to loosen that up just a little bit. And now we'll slide on and again, we'll repeat that process for the next three. From here, we're going to set our M1 measurement, which is our front crossbar. It's gonna be the inner edge of the driver's side tower to the inner edge of the passenger side tower. That's gonna be M1, and we're going to look for 41 and one eighth. So you see we have this ruler underneath our tower. We're going to go for 41 and one eighth just like right there. And then next, we'll be setting our pitch setting. For our P1 setting for our pitch, we wanna make sure that the security door still is let open, so we have access to that bolt, and we're going to go A, B or C. In our case ours is B, so it's right in the middle. So we'll get that bolt lined up in the middle, and tighten that down We wanna make sure we go until we hear that tool click. So it's got its own torque spec built into the tool, and once we hear that, we're good to go. We're gonna repeat that process using the same measurements on the other side of the same crossbar. So 41 and a half here for our M1 measurement. Line this bolt up in the middle for our pitch. Get that on B. Tighten it down until we hear that click in the tool. (tool clicks) Just like that. We're gonna do a similar process now on our rear cross bar. So we're gonna look for our M3 measurement, which is going to be 39 and seven eighths. So we'll slide our tower to about where we need it to be. And our pitch, our P2 measurement is also going to be B. So again, we're going to line this bolt here in the middle up with B, which is also in the middle, and then tighten that down, and we'll also repeat this process on the other side. Our next step is to put the bases on our towers. So you see we have this arrow here and our case, we want to make sure that that is facing outward. So what we need to do is line this up, and you'll hear it click into place. (tool clicks) And we'll repeat this process for the remaining three towers. Our next step on our front crossbar will be to set our toe setting for T1. In this case it's two, which means that this needs to be in the middle here. In our case, it already is. And if you are installing this for this vehicle, you shouldn't need to move it. But in the event that you do or we do on the rear crossfire, we'll need to loosen this bolt up here. Adjust this notch accordingly, and then tighten it back down. For our install, all of the tow settings for the rear and the front crossbars are all at two, which is right in the middle. So we don't really have to change much, just make sure that they're all the notches for the tow settings are at two, and the middle section, tighten those down and we'll close our security tabs on each of the crossbars and the towers. And now we'll get the front crossbars loaded up. Getting the front crossbar loaded up is pretty straightforward. Now that they have the pads on the bottom, they should protect your roof a little bit. Just be careful. Set the other side roughly in place where we need it to be. And then we'll come back with our M2 measurement and line things up. For that measurement, we have our provided that tape measure, we're gonna measure from the front of the base to the painted corner here before we have on the windshield. We want that number to be 14 inches. So we need to slide our base down just a little bit. And right around here looks pretty good. Maybe just back here, a fraction of an inch. And then we'll go to the other side, get the same measurement and match those up. After we get our front crossbar set up, we'll need to grab our fit kit for the clips that we need to fit into place. So they're the smaller ones or the 102s in our case. To get our clips on, first, we need to open our door 'cuz our clips are gonna mount to the inside right here. We'll open up the security door exposing this bolt here, slide the clip up underneath into that slot. Once the clip is in, we want to tighten down this swing bolt here. You'll see the clip start to lower. We want to turn that until we get it underneath where we want it to make contact with the inside of the car here. Same thing kind of with this dry bolt. In our case, we're already pretty flush, but we do just want to tighten that until we get that to a point where we're comfortable with how it's making contact with the inside of the car here. Now we'll get our rear crossbar set up. Didn't mention this for the first one, but it should be at least common knowledge. At this point, hopefully that the rounded part goes in the front and the taper goes the end. But same process 'cuz we have those pads. It should protect our roof a little bit. We'll get it roughly set in place, and then we'll come back with our M4 measurement to make sure that we have everything in line. For our M4 measurement, we want to go from the leading edge of one of the crossbars to the leading edge of the other one, and we want that number to be 32 inches. So from the leading edge to the front crossbar to the rear crossbar, 32 inches. That right there looks pretty good. So we'll get that same measurement on the other side. Now, we're gonna get our rear clamp set up. These are gonna be the longer ones or the 139s. So put those in place on a rear cross box. Don't forget to open your door first, but from here, it's going to be essentially the same exact process as with the front clips. Just line these up. If we're a little bit far away here, we're gonna need to tighten down the swing bolt, and then we'll tighten everything else up. Put the dry bolt. But once we get to this point, like I mentioned, it is just about the same process as the front. From here, we should be ready to go. Just make sure that you go double-check all of your connections. Make sure that everything is tight. Give it the shake check. Shake test and make sure that nothing is loose or out of place. And then your last tip is just going to be to replace our end caps, speed them in. (end caps rattling) From the bottom first, snap those into place. Same thing with the crossbars, just replace hand caps. Do this for all four sides, and that's it for the install. Overall, the Yakima Jet Stream Roof Rack System is one of my favorite just because of the adjustability and versatility that it offers. With the towers we have in place, you can get a couple of different crossbar shapes and sizes on there as long as you get their corresponding adapters. If you have a really aggressive roof shape style, you could accommodate that too with the pitch and tow settings. We got kind of lucky with our vehicle here. We didn't have to change a whole lot with that as you saw in the install if you wanted to figure out how to work with your vehicle. But the overall design, the functionality, the build quality of the system is one of my favorites. Again, you can use it with a ton of different rooftop accessories. So again, this was just a quick look at the Yakima Jet Stream Roof Rack System. How it works, how it fits, and how to install it on our 2022 Ford Edge.
Average Customer Rating: 4.8 out of 5 stars (147 Customer Reviews)
These crossbars combine the strength of steel with an aerodynamic shape to create a heavy-duty yet quiet roof rack for your vehicle. Full-length bars maximize cargo carrying capacity and work with most clamp-on accessories.Excellent solution for my 2023 Chevy Silverado. In the past, I have had rails installed on the roof of my pickup trucks, but I find the BaseLine towers to be a better solution, since they don't permanently change the truck. Plus, they are much more solid than SkyLine system on the rails.
Follow the instructions, and you can't go wrong on the self installation
Really easy to install & work as specified. So happy with the customer support/service at etrailer.
Your notice of schemes was a lot better than the yakima site provided. They did not suggest the scheme you did.
But when the products arrived, the instructions were by yakima. Generally worked as instructed except the tower to tower transverse mounting dimensions needed to be tweaked for a perfect fit.

Love my Yakima roof rack!! It exceeds my expectations.great product. Also thank etrailer for the tec support! great staff always there to help thanks again!!
Ackage came 2 days early the install was somewhat easy (did it by myself)
Did not get to mount anything to it but seems really sturdy. One thing I can say is mark out your mounting points with provided stickers then put up and make adjustments to the roof rack.
Customer service was excellent, they called me to tell me one item was backordered and how long it would be. Package was shipped with enough packing material. Install was pretty easy, some of the Yakima measurements in the manual are a couple inches off but no big deal. This will be used to carry a box for when the family takes trips. Can pile all the luggage up top and have more room in the car. I would recommend the Yakima corebar roof rack and etrailer! Their price was lower than 2 other sites I checked.
I ordered the wrong set up for my car, but the excellent customer service specialist set me up and expedited my roof rack that fit perfectly. I highly recommend calling and speaking with the knowledgeable staff about your needs. I'm super happy with the experience overall!
Was skeptical at first because I needed the posts as well for my 2011 Honda Element. The Honda crossbars were not adequately weight rated and is why I opted for Yakima. Couldn't be happier with my choice as this assembly has served me well throughout the year.
Solid build quality and easy installation on my '21 Mazda CX-5.
So far so good. Purchased these towers to use on a 2022 GMC Canyon with HD bars that I already had, primarily to carry my canoe. Yakima's fitting instructions worked perfectly and the whole system seems really solid.
Love it! We've made several long trips with full luggage loads.
Well packaged and on time
Perfect. Perfect. Easy to install and high quality. Confident in this product. Excellent instructions. Used with towers of course! Towers and crossbars have demonstrated to be strong and durable with several trips with kayaks.
I have not bought car roof racks for decades--back when there were those very useful rain gutters. So I was shocked with the high prices. But what you get today is much more carefully engineered with a complicated construction. This Yakima version even comes with a manual 3.5 mm hex driver which turns out to be a torque wrench too. You use it 16 times, torquing to its limit, in installing the two cross rails on the four towers. Years ago you installed the towers where you wanted them on the rain gutters and adjusted the cross rails by sight. No more. You must go on line to Yakima. You must get the precisely engineered dimensions for your exact vehicle. You even adjust the towers for the roof slope and any toe-in of the roof line. Pay attention to the precise instructions. The result is very solid. I wish that I had more space between the cross rails. There is room for another 6 or 8 inches given where the door openings on my 2019 Toyota Highlander are spaced. But then the rear base clips would be different and that logistics would add yet more to the price. I am confident that I can secure a 4 X 8 sheet of plywood on the cross rails. And I will find my vehicle in the mall parking lot easier with those good looking rails. While I am happy with the end product, I wish the vendors had given more explanation of the fixed dimensions of today's installations. That would have helped make my on-line shopping less frustrating. Part of the problem is that Yakima and Thule do not provide cross rails for my LE Highlander's existing tower bases. And I could not get 60 inch cross rails on any of the versions that fit my LE's bases.
Item was as described and shipping was fast. Overall very satisfied with trailer. Will definitely order my stuff from them
I want to thank the staff at eTrailer for their outstanding support. After my roof rack order got off to a shaky start the customer service staff stepped in and made it right; 100% RIGHT. I cannot thank them, and eTrailer, enough. Regarding the roof rack itself, I have now installed it and can vouch that the installation was a breeze. All parts fit and the instructions were correct. For the record, this is not my first purchase from eTrailer (I've bought hitch items from them before) and it won't be my last. They have ALWAYS given great service, their web site works, their products and descriptions are good, etc., etc. Thank you!
Great product fast shipping
Great! Easy to install!
The 60" CoreBar Crossbars will be much more useful to us than the original 50" bars placed on our shell at the factory. The only issue I had was that there were no instructions with the bars. It took a little while for me to figure out how the old bars came off and how to put the new ones on but I'll consider that a learning experience.
I did a lot of research before purchasing my roof rack. I came across this website and liked the prices, and after much thought, decided to get the Yakima CoreBar crossbars. I received my roof rack within a couple days of ordering! It's extremely sturdy and doesn't make hardly any wind noise. I love it and it looks great on my car, couldn't be happier with my purchase!!
The instructions were different for another set of bars. Was a pain to get right...all the measurements on Yakima were off...I figured it out on my own...should have got Thule or nicer bars ..end caps were not good either...flawed fit... otherwise will do just not happy with the product perse or instructions...delivery good...will see how they do.
George J.
Like to say thank you .
The roof rack for my 2022 trail boss looks great.
etrailer.com And Yakima roof racks has a VERY good product .
I would have given you guys more stars if I could.
Shipping Time , boxing of the product and the way everything went together was
A #1. Easy and fast.
Also, removal just as fast.
Thanks again.
One year later and everything works well. I had a problem early on where the rubber protection for one of the j clips from the base towers came off. Contacted etrailer and they sent me a whole new assembly direct from Yakima. Thanks for the prompt response and service!
Product was packaged well, arrived in perfect condition.
Instructions easy to follow. Installation took less than (1) hour. I did it alone & I’m 76 yrs. old.
Is very sturdy. Looks good on my 5 door Subaru.
The feature that impressed me the most in dealing with your company was how I was able to track my package inside your facility with the name of the employee handling the item before it even shipped. Very organized. Would definitely recommend you to others & purchase from you again.


Do you have a question about this Roof Rack?
Info for this part was:
At etrailer.com we provide the best information available about the products we sell. We take the quality of our information seriously so that you can get the right part the first time. Let us know if anything is missing or if you have any questions.


Thank you! Your comment has been submitted successfully. You should be able to view your question/comment here within a few days.
Error submitting comment. Please try again momentarily.