
Summer Starts Here - Save up to 70%
To see if this custom-fit item will work for you please tell us what vehicle you'll use it with.
Thank you! Your comment has been submitted successfully. You should be able to view your question/comment here within a few days.
Error submitting comment. Please try again momentarily.
Install your fifth-wheel trailer hitch in half the time with this -specific bracket kit. Requires no drilling and provides a custom fit for your . Includes everything you need for installation.
Features:

Videos are provided as a guide only. Refer to manufacturer installation instructions and specs for complete information.
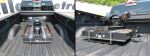
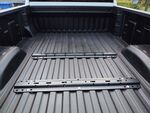
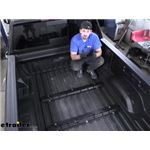
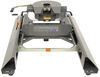
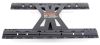
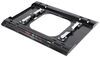
Connor: Hey everybody, Connor here today at etrailer.com. We're going to be taking a look at the Curt custom fifth wheel install kit here for our 2020 Chevy Silverado 3,500. So this is what our rails are going to look like installed in our truck bed here. As we can see, we have a nice matte finish here, which is really going to help them not stand out so much in the truck bed. If you have a spray in bed liner like this customer here, it's really going to look really nice and just give it a clean finished install look. So this install kit here, it's going to be an excellent option for this truck.
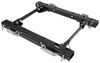
There's going to be a few reasons for this. Number one, it's going to be a custom fit, so essentially what that means is we're not going to have to do any drilling into the truck's frame whatsoever.The only drilling we have to do is through the top of our bed floor here to bolt the base rails through to the frame brackets. So that's going to be one of the reasons I really liked this kit. Another one is it retains the industry standard rail spacing that most fifth wheel hitches use such as Curt draw tightened reeks. Basically, this is going to allow us to switch fifth wheel hitch as needed without having to re-install using a different install kit.
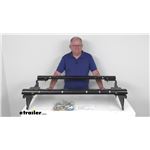
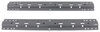
So if we take a look at these slots here in these rails, there's going to be three on each side, basically different fifth wheel hitches are going to use different spacing.Some of them use the outside ones, but most of them are going to use the inside ones. Another great thing, if you need to tow a gooseneck trailer, we actually sell gooseneck plates here, which use these two holes closest there. And that's all going to retain the industry standard spacing, which is essentially the distance they are from one another and the distance left to right between these two slots. So we actually have a Husky fifth wheel hitch here, which are going to work perfectly with these Curt rails. It's super easy to install.
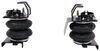
We're just going to take our base here. There's going to be pegs on the bottom that are going to align with the center pegs here and our rails just as we talked about.Do you see Everything's locked in the place. Now we would take our locking pins and secure them through these oblong holes here to hold the hitch base in place. So here's what our pins look like, which secure the hitch base to the rails here. Keep in mind, these are not going to be included with your install kit, but more often than not, they are included with the actual fifth wheel hitch itself.
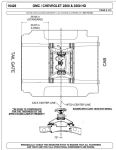
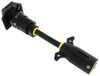
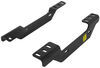
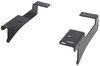
So a common question we often get asked here at etrailer is, "Does the install kit have a weight capacity" The answer to that question is going to be no. The install kit or the base rails aren't going to limit you to any sort of weight. The weight cast capacity is going to come from the hitch itself. The install kit will be able to handle anything that truck can. So long as you are under the weight capacity as of your truck, which I do recommend you checking before you order your fifth wheel hitch and install kit, you shouldn't have any issues.Now I have a quick measurement here for you. A lot of people are towing a fifth wheel trailer. They're going to be sacrificing a lot of their bed space, but we do still have this area here behind the cab in front of our fifth wheel hitch. And a lot of people like to install toolboxes in this spot here, but you can run into some compatibility issues depending on the dimensions of your toolbox and what fifth wheel hitch you're using. We're using a sliding fifth wheel hitch, and most of it sits behind this rail here. So just to give you a little dimension here, the distance from the edge of the rail to the backside or the front side closest to the cab of the truck bed, that's going to be about 25 and a quarter inches. So again, this is going to be helpful if you want to install a toolbox in your truck bed with a fifth wheel hitch.So in regards to installation, this is definitely going to be something that you can do at home by yourself. We don't need any special tools and you really don't have to have a ton of mechanical knowledge to be able to install the kit since it is a custom fit and there's no drilling into the frame required. However, do keep in mind. Some of the bolts we're kind of hard to get to, so it's really just going to take some time and patience. I'd also advise you to make sure you don't wear any good clothes because the bottom of these trucks are super greasy, so you're going to get dirty. So now that we've gone over some of the benefits and features of our fifth wheel install kit, let's jump into installation and show you how it's done.So the first step of our installation here, we want to clear our truck bed out, so we have a nice clean surface to work with. Next thing, we're going to do is for actually going to be placing one of the base rails that come with our kit inside the bed here. Now we're going to roughly measure just where that base rail is going to sit here. Our measurements, our first set of measurements here are going to be from the edge of our bed here, this little lip we have here and then forward to the cab. Now we have a nice diagram for this in our instructions that pretty clearly shows this. However, the measurements they provide are not really feasible on a tape measure here. So the measurement they give us is going to be dependent on your bed length. If we have a standard bed, which we see here, we're going to need to measure from the edge of our bed here forward about 20 or 28.94 inches exactly.Now, if you need to translate that to a measurement that we could find on a tape measure, that's going to be 28 and 15/16 inches. So that's how far we are going to measure. However, we need to keep in mind that if you have a truck with a factory bedliner which we see here, we need to go ahead and add about an eighth of an inch for the thickness of the bedliner. So right now, for this particular application, a short bed with a bedliner, we're going to be measuring 29 and 1/16 inch inches in from the edge of our bed to here. So once we have our measurements here, we need to get a little bit more precise. In order to do that, it's best to measure on top of the corrugations of the bed here. Now it's going to be good practice to measure in three separate spots.So we know the rail isn't going to be tilting on us and it's going to be not parallel with the end of our bed here. So what we're going to do is we're going to measure. We're going to come one end because our base rail once we center it left or right, it's probably not going to sit fully on these outside rails. So what we're going to do is we're going to measure on this corrugation here on this corrugation here and then in the center here. So let's go ahead and start. We've already got it where we think it needs to be, but just as a double check here, precautionary, it's definitely going to be good to measure twice, drill once. Just going to go ahead and mark everything again and what you can use here, if you have a paint marker, even a pen is sometimes just to mark that place there. That way, if our bed rail gets shifted while we're in here drilling around, we'll know where it needs to go back to.Now, once we have the correct measurements from the edge of the bed, the next thing we're going to do is we're going to try to center the rail inside the truck bed left to right. The best way to do this is we don't actually want to measure at the actual inside of the bed here due to all these corrugations, nor do we really want to measure here at the wheel wells because those are obviously rounded. So what you're going to see here, there's going to be a line here just about two inches out from our wheel well here. We have this nice flat edge here, as well as the lip here to help our tape measure stick on. So there's going to be one on each side and they're going to be an equal distance apart from the end of our bed. So we can use these as our measurement point here.So we measured it out here and got our center point, which we marked here with a white paint marker. And then we just roughly align that with the center of our square hole here. However, we're not ready to start drilling yet because I want to be more precise here with our center measurement. And before we do actually start drilling, I'm just going to triple check everything again, since we're going to be drilling holes in the bed of our truck, but in order to get a more precise measurement from the center of our bed to make sure we did a good enough job here, we're going to measure outward from the edge of our rail to the edge of this bed, this little line here that we measured earlier. We're just going to make sure that's the same on both sides. We're going to go ahead and drill out our pilot holes here in these holes that line up with the corrugations in our bed here now.Just because it does line up here, you can see there's only one set of holes here that's actually going to line up with the top of this. We do need to make sure that we are using the correct tool as per the instructions as well. So if we look at the diagram that they provide, and we're careful that we identified the rearward most rail, which we have here, they're going to say to use the third hole in from the outside. So we have one set of holes here, one set of holes here, one set of holes here. So these are the ones we're going to be using. So we're just going to go ahead and take a paint marker here and just do as best we can to mark the center of the holes. This is going to help us when we're drilling out our pilot holes that we look for that white dot before we start drilling in here, because it can get kind of confusing when you have so many different holes here.And then for the center hole here, we actually don't use both of these. We're only going to be using the rear hole here on the rear well. So let's go ahead and mark that as well. Then, it's a good idea to go ahead at this time because the next step would be to mark our pilot holes. So we're just going to go ahead and double check all our measurements here. So the next step here is we're going to go to each of the white marks we've made on each of the holes we're going to be drilling out and this isn't required, but it's going to help you to ensure that your drill bit doesn't walk on you, but we're going to be using a center punch hole tool here, and we're going to align that with each of the white paint marks we've just made. We're going to try to center this as best as we can in each of these holes here. And again, it's not required, but it's going to help when we come back to our drill bit, so it doesn't walk on us.Just place that about as close as we can get to the center. It looks pretty good. Then, we'll just go ahead and punch our hole in there. We're going to repeat this for all of the holes that we will be using. Now, we're going to come back with an eight inch drill bit, and we're going to drill a pilot hole into each of these holes that we've just marked out here. Now keep in mind, we need to be very, very careful when we're first drilling our holes here. It's going to be good practice to drill as shallow as we can. We just want to barely penetrate the top of the bed wall here. And then what we're going to do is we're going to go up underneath and make sure there's nothing in the way when we finally drill out our holes. So again, I'm going to be as best as I can here, not to show the drill bit all the way through. Once the hole is drilled, we're just going to pierce it just enough so we can let some light shine through.So we're going to go ahead and repeat this for the rest of our holes here. So the next step of our installation here, we need to come inside our wheel wells here. As you can see, we have this fabric wheel well liner. We're going to need to take this out because our side plates are going to be resting on the side of our frame here, and we're going to need a good way to access that to get in there.So you may just be able to get away with removing a few of these fasteners and peeling it up, or you may have to take it out entirely. It's really up to your preference here. In order to give you guys the best view possible, I think it's going to be better for us if we just take it all the way out. So we're going to be using a Torx bit here. It's going to be a T-15 Torx bit. We're going to have several of these screws here that need to come out, as well as a few of these plastic nuts here, which can be removed with a 10 millimeter socket. So let's go ahead and get these out now. Keep in mind, we will have to do this on both sides.So now once we have all our fasteners removed, we did have to remove this little mud flap down here. There's only a couple of Torx bits holding it in. We can go ahead and just pry our wheel well liner out. And as we said, chances are you're probably not going to be doing this step at home. It's not actually hard to get out. So if you want to give yourself a little bit more room to work, that's certainly a good idea as well, but we should just be able to peel it up to work, but it will give us a little bit more room here if we take it out completely. You want to take one of our frame brackets here. There's obviously going to be two in the kit. The side with the longer flanes here at the top and the two holes is going to be facing towards the rear here.So we're going to get the correct frame bracket, and we're just going to roughly set it into position on the frame here. You can see here, we're going to have an oblong hole here that's going to line up with this hole here at our frame bracket. Then, we can go ahead and just scoot it back here. We're going to have two bolts here. I believe that's where the U bolts go for this kit. So it is going to be elevated to about right like that. But we're just going to get it in the rough position now up underneath. That way, we're going to go up underneath the truck and see if our oblong holes on the top here are going to line up with the pilot holes we just drilled earlier in the bed. So in order to get the frame bracket in the correct position here, we went ahead and took one of our U bolts. We didn't put the nuts on either of them. We just went ahead and stuck that in there and wrapped it around our frame.And on this other side, we just use a carriage bolt, which is going to hold itself in the opening in the frame behind it. So now we can go underneath the truck here and see if our holes lined up. So we're actually over here on the driver side. We did install the passenger side rail first, but there's going to be a heat shield on the way, so you're not really going to be able to see the holes line up like we want you to be able to. So we just went ahead and came over here to the driver side. As you can see here, you can see the holes poking through the oblong holes, so we know everything is lined up. And actually on the driver side, you can actually sort of fit your hand underneath the frame bracket there and you actually should be able to feel that pilot hole if you stick your finger through that oblong hole.So that's just another way to verify that everything is lined up correctly. So once we've verified fit with our side plates mocked up into position, we can go ahead and take those off. We're going to come back up into the bed of the truck here. We're actually going to be removing our base rail here and setting this aside. So we're actually going to be drilling our smaller holes here out to the final size of 9/16 of an inch using a step drill bit.Now it's not required, but for these larger sizes, these are a little bit more attainable, but in order to prevent over drilling the hole here, whenever you're using step drill bit, I like to go ahead and take a piece of electrical tape and I like to wrap it around the next coil up so I can ensure that I don't go there and it stops. So 5/8 inch, I don't want to go to there. So I'm going to go ahead and just tape that off. That way when I am drilling, I know when to stop. So I'm not going to rely on the electrical tape to stop me, but that's just sort of going to be my guide visually when I am drilling these out. So we're going to start with the center hole here. Going to make sure we have our safety glasses and gloves. Now we can begin slowly drilling these out.So we'll just take one of our carriage bolts that come with our kit here. Just make sure it slides freely in and out of the hole. Now we're going to go ahead and repeat this process for our other four holes here for the rear rail. So now that we've exposed the metal of our bed here, we want to come back with a paint stick, a paint marker, whatever you want to call it, color really doesn't matter either. We're going to be using black though to match the bedliner. You want to just try to get some paint on the inside of this bare metal here that we just exposed by drilling. Just don't want to have any rust issues with that over time as it rains.So we'll just go ahead and repeat this for the rest of the holes here. So the next thing we can do is go ahead and set our frame rails into position here, but we're going to be using a square hole spacer in a reverse fish wire technique for one of the bolt holes in the frame. But just to sort of give you a good visual outside of this, now we're going to have two different types of square hole spacers in our kit. The ones we're going to be using for this next step are going to be the thicker ones here, which you can see compared to the smaller ones here. So just make sure we have the thicker square hole spacers for the step as it can be easy to confuse the two, since they are square hole spacers. We're actually going to install the side plates on to the frame of our truck here.Now, if we take a look here on either side, it doesn't matter what side you're working on, the driver side is going to be a little bit easier. So we're going to show you that. So it gives you a little bit more idea of what we're doing here. So this oblong hole we see here, it's going to be directly in front of this overload pad here or directly behind rather. So this is the first one we're going to be working with.What we need to do is we're going to be using what is called a reverse fish wire technique. And it's actually super easy. We're going to take our larger 5/8 inch diameter carriage bolts. There's only going to be two in the kit here. We're going to be using the spacer block that we just talked about here, the larger spacer block. We're going to take the coiled end of our bolt leader, slide that through the spacer block and thread on our carriage bolt here. And once that's on, we can go ahead and take the carriage bolt, we're going to slide it through that hole here. Then, we're going to take our spacer block, just shove that in there as well once we get the bolt through.Now, we can take our bolt leader, we pull it back through here. Now we want to hold onto our bolt leader here because we don't want to lose it inside the frame, but we can go ahead and get our frame bracket ready. Now set it up on the tire like so. Get it close to where we need to be. We're going to take the end of our bolt leader, we're going to fish it through that hole there, so it's going to line up on our bracket here. Now, we're going to have one hand on the bolt leader. We're just going to position this up on the frame. Now we're going to have to lift up a little bit on our frame bracket. So align that hole and we can get a hold of our bolt leader and pull it through Just like that. And now before we pull our bolt leader off, we're going to be using this frame bracket here. I'm going to pin our bolt here so we don't have to worry about it jumping back inside the frame there.We're going to take our flange nut, just going to loosely thread that on to hold it in place. So now we're going to take our 1/2 inch U bolt and two of our 1/2 inch flange nuts here, we're going to install this. We're going to come inside the frame of the vehicle here because if we look on the driver side here, this isn't going to be present on the passenger side. But for the driver's side, we're going to have this wiring harness here that's going to be butted up against the side of our frame rail here.We need to install our U bolt here behind this, so it's sandwiching the frame and then we can turn it into position to line up with our frame brackets here. So what we're going to do now is we're just going to go ahead and install this sort of sideways just so we can sneak it behind that wiring harness as best as we can. It looks like we may need to come in front of that little push connector here first. And then once we get it up high enough, we should be able to turn it to line everything up.Then, we can bring it out to align it with the holes in our frame bracket here. Now we can come on the other side here, loosely install our flange nuts. Once we have this side secure, we're not going to tighten anything down yet. We'll just go ahead and repeat this process on the other side. So now we're going to take five of our 1/2 inch carriage bolts. We're going to take the rail that we mocked up earlier. We're actually going to go ahead and align all the holes up, so we can insert our carriage bolts into position here. Now you may need to fiddle with the rails a little bit. There's definitely going to be some adjustments we can make to get everything to line up, but we're just going to go ahead and insert all of our bolts here for now.Now it's time to just go ahead and loosely install our hardware, securing the base rail to the truck bed here. Now for this, we're going to need five of our 1/2 inch flange nuts. We're going to need four of our U shaped spacers, and then we're going to need one circle hole spacer. The circle hole spacer is going to go into the center bolt hole here. Now depending on your setup here, but for this truck, all of these spacers should be installed underneath. Basically, we just want to make sure that when we tighten down the rail, it's not going to crush the ribs on our bed here.So we need to have metal to metal contact in all places, which is essentially what these spacers are for. What we did here to give you guys a better view of what we're doing, we went ahead and removed our spare tire. However, this won't be required for you guys at home. So what we're going to do now is we are going to get the center hole here, our center bolt, we're going to be using a U shaped washer, a square washer, and then our hex nut. So we're going to place the U shaped washer over here, trying to align it with the corrugations of the bed, all add up with our square hole washer and then our hex nut.We want to make sure we just keep a nice, good grip on that while we're tightening it down, so our U shaped washer doesn't slip out on us. We'll leave that there for now. And then we'll work our way over to one of these side holes. So we're going to be using the same combination of hardware over on this side as well, but the order is going to be a little bit different. We're going to first place the U shaped washer over, then we're going to follow this up with a square hole washer and our flange nut.We may need to push up on the bracket a little bit in order to get enough of our bolt to come down so we can thread on our nut. And now we're just going to repeat this process for our other bolts. So to make things easier for you over here on the passenger side, I'm going to go ahead and recommend you guys do this at home. It's just going to make things a lot easier when you need to tighten those bolts up. But we went ahead and remove two bolts from our heat shield here. You're going to need a 13 millimeter socket. This far one up here is going to be pretty easy to get to, but you're going to need an open-ended bridge in order to reach the one over here. So this is going to be trapped pretty much on top of the frame below our bracket here.So we needed a box wrench or an open-ended wrench to go ahead and remove that, and then we just went ahead and bent this down. There's only two bolts. And as you can see, it's going to give us a lot more room to work here and tighten our bolts up. So now we're going to take a 19 millimeter box wrench here. We're not going to torque that our hardware real tight now. We're just going to snug everything up here. And at this time, it'd be a good idea to go ahead and keep an eye on your U shaped spacers up there to make sure they don't fall out. So as you can see here, we already have the base of our fifth wheel hitch in the bed here, as well as our second frame rail here. And the reason for this is you're going to need to use the actual fifth wheel base that you're going to be using when you're towing your trailer.Because that way we're going to ensure that we get a perfect fit between our two rails and you are going to be able to easily remove and install our fifth wheel hitch here. So what we did here is we obviously like we said, we went ahead and installed our fifth wheel hitch as well as the rail. The tabs on our fifth wheel hitch are going to help us align our rail in the rough spot we need to. Now we should be able to insert both sides of the locking tabs into these little slots on the rails. And then once we do so, we can go ahead and make our final adjustments here to the rails before we start to drill. So the first thing we need to do is we need to go ahead and push this rail here towards the other rail as tight as we can get it.And then what we're going to do is we're going to make sure that it's centered left to right. So we're just going to do the same thing as we did for the forward most rail here or the rearmost rail, whatever you want to call it. But we're going to measure from this little channel here, this indentation or groove in the bed to the edge of our base rail. And we just want to make sure it's the same on both sides. We're going to go ahead and mark out the square holes that we need to drill our holes through.So we're again, just going to be using a paint marker here. We're going to be using the third hole in, the same thing as we did back at the other rail. So just a little visual mark here. That way, when we do get the drilling, we don't mess up and drill out the wrong hole. Now for this rail here, we're going to be using in the center portion of it, we're going to be using the hole closest to the cab of our truck here. And now again, in order to prevent our drill bit from walking, we're going to be using a punch tool here.So now we're back up underneath our truck here and we're not actually going to be able to see the alignment of our pilot hole with the oblong holes in our brackets, but what we can do is we can actually reach up there with our fingertips and feel through that hole there for the pilot hole we drilled. So now that we have these two holes aligned with our brackets underneath, we can go ahead and drill out the rest of the holes with our pilot hole here and an 1/8 inch drill bit. So now that we have all of our pilot holes drilled, we can come back with our step drill bit and enlarge all the holes to 9/16 of an inch.And then as we did on the other rail, we're going to go ahead and come back with a paint marker and cover up all the bare metal through the holes we just drilled. Now that we have our holes drilled, we've covered the bare metal with some paint. We can go ahead and install our base rails here and feed our hardware down through the holes. Once we have the rest of our hardware in, we can go underneath re-install some of our fasteners. The hardware sequence is going to be a bit different than the one we just installed before that. Just to show you what the difference is, it's mainly going to be these circle holed spacers here. So there's only going to be three of these in the kit. They're going to look different from all the rest of the spacers, but these are going to replace the U shaped spacers towards the three bolts closest to the cab of the truck.So the three bolts closest to the cab of the truck are going to use the circle hole spacer here, then they're going to be followed up with a square hole spacer and then a hex nut. But aside from that, the sequence in type of hardware should be the same for the rest of the bolts. So just to show you the sequence of the hardware and the type of hardware we're going to be using for this rail closest to the cab. For the three bolts closest to the cab here, we're going to be using the circle hole spacer first followed up with our square hole spacer. And then for the ones, the two on the backside that go into the brackets, we'll just be using the same combination of the U shaped spacer, the square hole spacer, and the flange nut that we've used thus far. So this one's kind of hard to get to as well as the back two, so you're really going to have to maneuver yourself up under the vehicle as best as possible here.And another little tip is that you're going to need something up into the bed of the truck pushing down on these carriage bolts here because what's going to happen is when you go to thread your nut on, you're just going to try to push the carriage bolt back up through the hole and you're never going to be able to get that nut threaded. So you're going to need to place a heavy object, or if you have a friend nearby that can stand in the bed of the truck there and hold these bolts down, the bolt heads down while you tighten the nuts below.So now that we have all of our fasteners installed, we can go ahead and torque everything down to the specifications provided by the manufacturer. However, please keep in mind, there's going to be different torque specs for our U bolts, our 1/2 inch carriage bolts and our 5/8 inch carriage bolts. We also need to make sure that we torque the base rails to the frame brackets, and then the frame brackets last to the frame. Now, with our hardware all torqued down, we can go ahead and re-install everything we removed to help us access our bolts, such as the heat shield, the spare tire and the fender well lining. And that's going to do it here for our look and installation of the Curt custom fifth wheel install kit here for our 2020 Chevy Silverado 3,500.
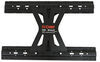
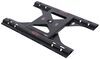
Average Customer Rating: 4.6 out of 5 stars (108 Customer Reviews)
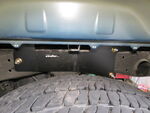
Install your fifth-wheel trailer hitch in half the time with this vehicle-specific bracket kit. Requires no drilling and provides a custom fit for your vehicle. Includes everything you need for installation.Installed on a 2021 GMC Denali DRW. The installation instructions and video need to be updated they are somewhat miss leading as to the difficulties of install. The driver side front rail nuts are almost Impossible to install because of gas tank. They will be impossible to torque without dropping the gas tank. Your will also have to remove the dual rear wheels to torque the frame plates Took almost 5 hours to install. Other than that have yet to use hitch.

Great product and easy to follow instru ctions.
Installed these bed rails on my 2020 Silverado Duramax 2500HD. Heavy duty rails and of good quality. Install time was around 3 hours. Definitely remove spare tire and heat shield. I did find it very difficult to torque 2 of the nuts on the driver's side front rail. Everything else no problem. I did spray some undercoating on the frame rail ends and nuts. Just did that for extra protection and it will make it easier to see if there is any movement when towing.
Perfect fit, did not have to drill any holes in frame to mount it, has held up great so far, as a professional installer it went so much better than a hitch and rail kit that fits multiple vehicles.
I installed myself on my 21 GMC Sierra 2500HD, Denali, Duramax. Took me around 3hrs to do with basic shop tools. Over all the unit itself is very nice. Heavy well treated metal, bolts are all good quality. Not one single alignment issue. Sucks that the truck manufacturers can’t make some sort of pre setup locations as it was some tight finger tip spots. But that’s not to the fault of This item at all.
Great install! Had no issue with the installation of this unit. Directions were easy to follow. Great product and will be trying it out real soon 3975CK Crossroad Cameo 5th wheel!

Allen

3/22/2023
Great, no issue with the unit, works as it should! Installation when I installed was easy.
I ordered this to install in my 2020 Silverado 2500. The install was easy and took close to 2 hours. Have not pulled my fifth wheel yet so really no idea how this will hold up. Everything was in the box nothing missing. Shipping took 2 days to get to my house. Very happy so far with everything I have ordered fro you.
This went in perfectly, very happy with the installation.
Didn’t receive the rails and etrailer didn’t even know it until I contacted them. I had to postpone my appointment to have it installed. They didn’t seam to care
Installed this on my old truck so now it being installed on my 2023 GMC Denali. Show not in stock and not available until Dec. Needed it quickly so I called Curt and they had them in stock. Made my order through Etrailer because I knew they were reliable. Made the purchase and received it in 5 days including the weekend. Could have purchased it elsewhere, but knew they would get it for me quickly. Thank you Robert S and everyone else that worked on the order.
E-trailer has detailed instructions and videos for anyone to install there on hitch.
Awesome works great
Missing most of the hardware the Two of the three boxes were totally destroyed

Jenny N.
3/27/2023
Oh no, this is very unfortunate. Customer Service will be in touch with you so we can have the missing hardware shipped out.
The hitch looks strong enough but the installation was difficult for a man over 65 with big hands installed on my 2021 Chevy 2500.there were some very hard to get at places to get spacers and nuts on bolts took me 6 hours by myself probably would have been quicker and easier with two people.haven’t tried it yet will let you know how well it works.
did a great job on the install and assisted after the install when I had questions as this was my first 5th wheel hitch.
product arrived around noon today (3-20-24) Box was in excellent shape and intact.
Fast delivery,easy install,great service!! Thanks etrailer
High quality materials. Installation was fairly easy; however I have a mechanic with a lift in his backyard shop that made access to the truck easy. Would not hesitate to make this purchase again.
Wasn't to bad to install. Dropping the spare helped. The bolts above the fuel tank was the hardest. The instructions were not bad either. But I'm a cnc tech so no worries. My only issue with the rails is no split washers or self locking nuts. I've already ordered them to replace the originals. I don't like the idea of them loosening up. Even a little. I also looking at building some custom cross braces. Don't like just attaching to the bed.
Works great, when 5th wheel attachment or gooseneck is not attached. The rails do not get in the way of using truck bed.
Tricky to install with plastic bed liner. But when finished. Great product
I received my rail kit on time and everything appears to fit my truck as I was told it would
Arrived fast, good instructions and quality kit.
I received this product in great shape,easy to order from and quick. I am installing this product when the weather breaks her in the northeast

Dennis
1/21/2023
Put a lot of miles on with this product. No issues towing with this model
Deliver was on time, arrived in good condition, all material ordered seems to be complete and in place.
I would give it a 3 star review. The product itself was perfect. The package arrived in tact, but 2 parts were missing. Upon contacting you, I was told they would send out replacements. I was hoping they would overnight them since I had an appointment 2 days later for the installation of the 5th wheel rails. But they were sent standard usps mail. So I had to cancel the appointment. I ended up installing them myself, which took more than 6 hours, which the directions said 1 1/2 hours for a novice. Also, the measurements on the directions said 28 15/16" from the tailgate to the front edge of the rear rail. I drilled the pilot hole, and it wasn't even close. It ended up being 28 1/2" and I even have spray in bedliner. So I have mixed emotions about the purchase. They are installed, and seem very sturdy.
Do you have a question about this Fifth Wheel Installation Kit?
Info for this part was:
At etrailer.com we provide the best information available about the products we sell. We take the quality of our information seriously so that you can get the right part the first time. Let us know if anything is missing or if you have any questions.


Jenny N.
10/21/2021
You are correct that the bolt location is difficult to access. I reached out to Curt who advised that depending on the application and installer, it can be easier to remove the wheels for additional working room.