
To see if this custom-fit item will work for you please tell us what vehicle you'll use it with.
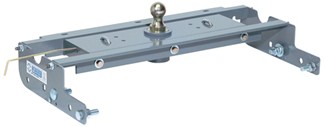
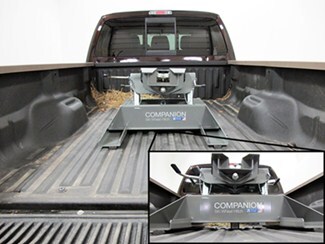
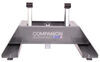
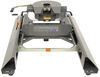
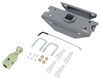
Install the Companion fifth-wheel hitch in your truck bed with this custom kit. Better than a traditional mounting kit, this setup doubles as a gooseneck hitch when the fifth wheel is removed, and the underbed design allows for full bed access.
Features:
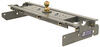
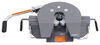
Not only does this kit provide you with a sturdy, custom base for installing your Companion fifth-wheel trailer hitch in the bed of your truck, but it also doubles as one of the most recognizable gooseneck hitches on the market. This fifth wheel installation kit actually is the Turnoverball gooseneck hitch from B&W.
Gooseneck Specs:
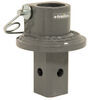
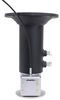
With the B&W Turnoverball underbed gooseneck trailer hitch you get the best of both worlds. When you go to tow a gooseneck trailer, the Turnoverball creates a sturdy, dependable connection with your trailer. And when you're done towing, you can stow the ball upside down in the hitch to get full bed access and a clean appearance. When you're ready to tow your fifth wheel trailer, just install the Companion in the ball hole in place of the gooseneck ball and lock the post in place using the built-in handle. You can remove the fifth wheel when you're done towing, leaving your truck bed open once again.
Simple, Custom Installation
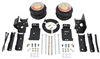
This kit is custom designed for your vehicle. The mounting brackets bolt to existing holes in your truck's frame. While some modification is required - you will need to cut a 4" diameter hole in your bed for the hitch ball and drill holes for the built-in safety chain loops - there is no need to weld onto or to drill into your frame.

California residents: click here
Videos are provided as a guide only. Refer to manufacturer installation instructions and specs for complete information.
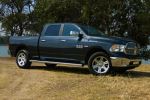
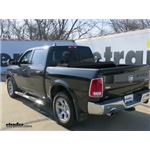
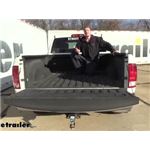
Speaker 1: Today on our 2017 Ram 1500. You're going to be taking a look at, and I'm going to show you how to install the B & W Custom Under-bed Installation Kit for B & W Companion 5th Wheel Trailer Hitches, part number BWGNRK1309-5W. This 5th wheel installation kit is designed to let you install your B & W Companion 5th Wheel Trailer Hitches. The adapters are part number BWRVK3500, or part number BWRVK3400. The under-bed design of this kit allows for full bed access, and when you are ready it's under five minutes to convert your empty truck bed into a 5th wheel hitch. We'll start off by unlocking our B & W hitch and installing our 5th wheel adapter.
We have ours pre assembled, but you can adjust the uprights here depending on your truck and trailer combination. Speaker 1: At this point, the hitch is ready to attach to your trailer. There's a little clip here that you release, basically it's a safety pin. Then you swing the handle out and you can watch the jaws open. Now you're ready to back onto your trailer.
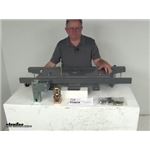
Once you're secure on your trailer, you can reinstall the clip. Since this 5th wheel installation kit doubles as a gooseneck hitch, when you're not towing your fifth wheel, you can remove it. This frees up the hole to reinsert the hitch ball when you need it. Now we'll go ahead and show you how to install the custom under-bed kit for the B & W Companion 5th Wheel Trailer Hitches. This hitch is not going to require any welding or drilling.
It's going to come with all necessary hardware to get it installed. It's going to have a nice gray powder coat finish to resist any rust or corrosion. Speaker 1: You're going to have a single spring loaded safety pin and your U bolts for your safety chain hookups in the bed of your truck are also going to be spring loaded. That's going to help when not in use to keep them nice and close down inside the corrugation. You can see our safety chain U bolts fit nicely in the lower corrugation and our center section doesn't come up any higher than the raised corrugation.
That's given us total bed access. What's nice about this hitch is instead of having the pin release lever on the side in the fender well, it's actually in the bed of the truck.It's going to come with this little tool right here. Simply put it in and turn it, to release it. First thing we need to do to start our installation is we need to measure for our hole in the bed of our truck. You need to make sure you follow the instructions for the bed size that you have. Also, keep in mind if you have a bed liner, plastic bed liner, you can either take it out or you're going to have to cut that section out of there. If you have a spray in bed liner, depending on how thick it is, you're going to need to take into account and add that onto the measurement. We'll measure from the back edge of our bed, make sure you don't go from the tailgate, to our measurement in the instructions and just put a small dot. Speaker 1: Then what we need to do is we're going to go in between our wheel wells and center that. Let's see. Next thing we want to do is drill a small pilot hole. You can use any size small drill bit for the pilot hole. We're going to move up to a 4" hole saw bit. Now you can run this straight down on the bed if you want. One thing that we've found that helps, we took a piece of plywood, put a four inch hole in it. This is going to help keep your blade from kicking around. This is a good, clean cut. All I have to do is cleanup our shavings. Now we're going to take a file and we're just going to go around the hole and knock off the burrs. What I suggest because we have open metal, you take some spray paint, and you use the same color as the bed or a clear coat and cover up that bare metal to prevent any rusting down the road. Speaker 1: Our pin release handle is going to come in through the bed right here on the top. What we need to do is we need to measure for that. We need to follow directions precisely. Our hole's going to be in this area, so I'm going to start in this lower corrugation. We're going to measure per the instructions per our bed size. What I need to do, I'm going to measure from the center this way, 4 3/4, and then from the center this way 2 3/4. You can see our 2 3/4 is here, center line. Next we're going to take a 3/4" hole saw unless you have a drill bit that's 3/4", and we're going to drill out the hole there. We're just going to do the same process that we did with this hole. Go ahead and cleanup our shavings. Make sure we get any burrs off and then we'll paint that bare metal.The next thing we're going to need to do is we need to remove our wheel well liners. It's not necessary, however, it will make it a little bit easier when putting the cross members on the frame of the truck. We'll go ahead and start with an eight millimeter socket. We're going to have some eight millimeter bolts that we need to remove. You're going to have two on the inside wall. We're going to have one underneath. If you have this trim panel on, you're going to have one here. Speaker 1: We'll just start slowly pulling out our edge like this. Just like that. We'll just leave it sit right on top of the wheel for now. We're going to do that same thing to the other side. Next we're going to take one of our bolts. We want to be able to hand thread this in. Sometimes when they put the powder coat on, these it gets down in those threads and we want to make sure that that's clean so that we don't get a cross thread issue.Next, we're going to take a panel tool like this, or you can use a flathead screwdriver. You see how this wire, now we're on the driver's side, this wire that runs up on top of the frame, our cross members, one of them has to sit here and the other one sits in front. We're going to need to remove, the fastener, so we can move this out of the way. We'll have one here on the outside of the frame. Again, we're on the driver side. Just pop that off. Then we're going to have one right up here. Once you get your wiring unclipped and loosened up, you see that air tube right there. That's also going to have to be removed. This air tube you can see it's just a slide clip. You just slide it off. We'll let that hang. Then this cross member here, that tube actually runs right on the inside of it. We want to go ahead and remove that from there also. Speaker 1: We'll just let this hang for now. Our wiring that ran across our driver's side frame rail runs right across this cross member here. It's fastened by little plastic clips that just sit right on the top of this cross member. We want to pull those up, and we want our wiring to sit in this gap, to make sure that it's not going to get pinched when we put our cross piece in for our hitch. We'll just pull these it out the same way. Pull them down in there like that. Next we're going to put this rear cross member in for our hitch. You can see it's got a notch in it. What we want is we want it to sit like this, the notch facing the back of the vehicle. What we're going to put it in is on our passenger side, we'll go ahead and pull off our liner and we'll set that aside. You see where our spring is We want this hole right here on our frame. Again you want a notch to the back. We're just going to slide it in like this. Speaker 1: Next we're going to take the crossbeam for our hitch and our wiring that we took off that notch, the wiring is actually going to run through there. When we get it back, we're going to slide it over top of this cross member. Then we're going to flip it where the notch is facing down and the wiring is running through it. It may be a little bit hard to see. Let me rotate it up. You can see here where our wiring is running through that notch. This cross piece is sitting on the cross member for the frame of the vehicle. There's a side going back. We're just going to leave it sit like that for now.Next we're going to install our front cross member can. You can see it's a piece of angled steel. One side of it's got holes in it. What we're going to do is we want the V to face down, holes towards the back of the truck. We're going to go right up between our suspension and our shaft. Feed that just like that. We want to go up on top of driver's side frame rail. Then expand it to our passenger side. Just like that. Push it back and then rotate it up. Speaker 1: Next we're going to put in our center section. Before we do that, I want to point out something because it might be kind of hard to see once we're in there. Once we get it up there, we're going to put hardware in to attach it to the back cross member that we previously installed. You can see there's five holes here. We're only going to be putting it in the two end holes and this very center one. When we put it up, you can see the distance from this hole to the edge is shorter on one side.This is going to be towards the front of the vehicle. We're going to be using a 1/2" by 2 1/4" long hex bolt with a lock washer, and then a flat washer on top like this. We'll go ahead and set three of them up like that. Now we'll get our center section in place. Now because of our exhausts, the way it is, we're going to take the center section. We're going to flip it like this. We're going to slide it in over the top of our exhaust this way. This is toward the front of the vehicle. We're going to take this edge and slide it up and over, like that. What we want to do is we went on to get it lined up with our hole that we have cut in the bed of the truck. Speaker 1: The next thing we want to do is come up to the bed of our truck and we need to pull our center section up. If you don't have a lifting device which most people may not have, like a hoist for a motor or something like that. What you can do is grab a few blocks of wood. You just want to make sure it's going to be higher than the bed of the truck here where your straps are going to be going. Let me show you how I'm going to do it, if you're by yourself. Both hooks, you're going to hook them right onto the pin. We're going to take just a 2" x 4", we'll run it across like this. Pull it up tight. Speaker 1: Now it's holding it in place, you can go down, put your hardware in place just like that. Next we'll take our 2/14" bolt. You want to make sure that the head is facing toward the rear of the truck. We'll slide it through like that. Then we're going to put on our flat washer, our lock washer, and then our nut. We're just going to hand tighten for now. Per our instructions it says to only install the two center bolts from our center section into our front cross member. You see this plate right here, that goes through our hitch pin. This bolt will not slide in. Now since we have a bolt in here, we have it attached to the back. We're going to go up top. We're going to loosen that so we can slide that pin out, to move this plate, to get our bolt in place. Now you can see our hitch is staying in place now that we removed our strap and removed our boards.Now what we need to do is we need to slide our pin over so we can get our other hardware underneath in. Slide it in like that. Go underneath and get this bolt installed. Again, we're only hand tightening these for now.Next you'll need your U bolt. Now we're going to install these. You have your coil spring here. We want to go in front of it, but we want to stay inside the cup. We're going to take our U bolt. We'll take our U bolt, you want to stay inside the cup We're going to go in front of the spring, and put it right around our frame rail.Next we're going to install our passenger side, inside side plate. You look at how it's kind of a weird angle. You got two holes here and you got two holes here. This is actually going to be installed like this inside of the frame rail. The U bolt that we put in is going to go through these two holes. These two holes are going to line up with our center section and cross members. What we'll do is we'll take our U bolt. We're going to slide it out to where the ends of the threaded part of the bolt is even with the inside edge of the frame. We'll slide this into place and then slide our U bolt into this. Slide our U bolt out into this. Slide the center section of this piece up. Line up our hole, and slide our U bolt into place. We'll secure it into place with a lock washer, and then a nut. Speaker 1: On our driver's side, we're going to have two plates like this. These are actually going to be combined. This one's going to go in first. Then this one is going to go on top. Essentially when we're done, they're going to sit like this, because we have air lines, fuel lines and everything else over there that's why these are cut out like this. Let's get our first one in place. Get my U bolt slid back, and to kind of maneuver this so that I can get it up against my hitch. We're going to line up our U bolt just like that. We're just going to set it there for now. Slide this up. Speaker 1: We'll use the same combination of hardware lock washer and then a nut. Next we're going to take two of our 1 1/2" hex bolts, and we're going to secure our two side plates together. We'll slide one on these two holes. On the other side we'll put a lock washer and the nut. As you can see here I had the head of the bolt toward the center of the vehicle or towards the front of the vehicle, and we're putting the nut on the outside, nut and lock washer. We'll just hand tighten for now. Next we're going to take one of our 2 1/4" bolts. We're going to put it on a flat washer. We're going to feed it from the inside of our center section and out through our side bracket. Once we get it through, we'll put on a flat washer, a lock washer, and a nut. Speaker 1: We'll do that same thing with the other side. Now we'll take another one of our 1 1/2" bolts. We're going to come from the inside and it's going to go on the outside hole. You're going to do that same thing on the other side. We have one more to put in and it's right behind these hard lines up in here. I can't get my hand up in there to get the bolt in. What I did is I took a piece of tape and just taped a skinny screwdriver around the head of the bolt. Just to hold it on there now, 'til I get the nut and bolt on the other side. Then I can pull the screwdriver and tape off. Then we'll use the same combination here.Next we're going to install. We're going to have a bolt and a plate. We'll have two of them. One's going to go here, one's going to go here. You're going to have to maneuver these around a little bit to get them in there. They will go. There was an open section right up in here. This whole inside is open. We take it, slide it in. Kind of slide the end of the bolt up in there. Just kind of rotate it around until you get it to fall through.This one I think I'm going to wait. I'm going to keep it out for now. Set it in there. You notice our dual exhaust, we're going to have a bracket, we have to put it in here. Looks like this. Now the instructions, they tell you it may be easier to take down the exhaust on the one side there. I'm going to try to do it without it. I'm going to slide this. We want our three, you can see there's three tabs, we want them facing down. These are going to go up to the inside of our hitch in our center section. Then we're going to kind of slide this up in here like this. I'll get my two 1 1/2" bolts and I'll attach this to the inside of the center section first. That'll hold it in place. Speaker 1: Now we can rotate our bolt and plate into place there. We'll have a large flange nut for each one. What I determined is my nut not going to sit up in there and I can't move this anywhere with my exhaust pipe. I'm going to have to move this in order to torque this bolt down. I'm going to pull this hanger and pull it off of this hanger, and then pull it off the most rear hanger. That should give me enough room to move it so I can get a socket on it. I want to spray just a little bit of silicone spray, just something to help them slide off a little bit easier.We'll take our crowbar. We're going to wedge it right up in between them like this. You're going to kind of push up on one down on the other. It's actually going to catch the lip. It'll give you enough to pop that off. Just like that. As far as this front hanger, it's just two long pins. You can just take the bottom with your hand and just push it off. It comes off pretty easy. Now that we have all of our hardware installed, we're going to go ahead and tighten and torque all of it. We're going to start with our two flange nuts in the back. We're going to torque those to the specifications in the instructions. Speaker 1: We're using a 15/16 socket to do that. Next we're going to tighten our center section to our rear cross member. We're using a 19 millimeter socket for this. You're going to repeat that for all remaining hardware attaching our center section to our cross member. Next we're going to tighten and torque our center section to our front cross member. Next we're going to torque our U bolts. What you want to do here is not just tighten one end, we're going to alternate. We'll do five or six turns on one side, then we'll go to the other end. Once you get one side done, you're going to do the same thing to the U bolt on the other side. Next we're going to tighten our two side plates together. We're going to torque them to the specifications. This is one with the nut and the bolt. You may need to use a wrench on the other side if the head of the bolt is spinning.Now we need to drill out for our safety chains. It's going to be advisable to get a long drill bit. Over on the driver's side there's quite a few things that are in the way and you're not going to be able to get a drill up in there. We're going to take a hole punch and we're going to mark the center of each one. Now we're going to take this small, long drill bit. We want to get our hole started from down here first. Speaker 1: Next what I'm going to do is I'm going to come up to the bed of the truck and I'm going to drill them out the rest of the way. Now, per the instructions these are going to be drilled out to a 1/2". If you have a 1/2" drill bit you can use it to drill these out the rest of the way. Keep in mind when you're coming up from the bottom, the hole may not be exactly centered. What I'm going to do is I'm going to use a step bit to do it. That's what we want. We want them to move freely. Once we're done doing the other side, we'll go ahead and clean them off with a small file. Then we'll spray them down with some black paint to cover up the bare metal.Go ahead and drop our U bolts next to our holes. You're going to take your Christmas tree like spring. You want this wide end going up towards the bottom of the bed like that. We'll grab our U bolt and then we'll add on a nut. We'll do the same thing with this one here. Then we'll tighten them down just where the U bolt is flush with the bottom of the nut, 19 millimeter socket. Speaker 1: We're going to do the same thing to the other side. Now we need to reinstall our air tube here. Again, these clips are just pop in clips. I'm going to put one here. We're going to relocate it onto this cross member. Do something like this. You just want to make sure, keep in mind that your axle moves so you want to have enough so that it doesn't pull it apart. Once you have your air line installed, reinstall your exhaust, your spare tire, your fender liners, and then you're ready to go.That'll do it for the look at and installation on the B & W Custom Under-bed Installation kit for B & W Companion 5th Wheel Trailer Hitches, part number BWGNRK1309-5W on our 2017 Ram 1500.
Do you have a question about this Fifth Wheel Installation Kit?
Info for this part was:
At etrailer.com we provide the best information available about the products we sell. We take the quality of our information seriously so that you can get the right part the first time. Let us know if anything is missing or if you have any questions.


Thank you! Your comment has been submitted successfully. You should be able to view your question/comment here within a few days.
Error submitting comment. Please try again momentarily.