

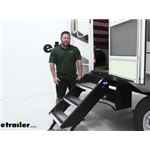
How To Install MORryde Strut Assist On MORryde StepAbove RV Steps
Question:
is there a video of instruction on how to replace struts on my MORryde step above steps that are broken.
asked by: Garry W
Expert Reply:
While we do not have a video on how to replace the strut assist on your MORryde StepAbove RV Steps # MR28RR, I would be happy to walk you through it.
Before we begin, you'll want to follow the below preparation steps:
Step 1: Remove the step’s transition strip from between the threshold of the existing door and the floor.
Step 2: If your unit has a door strut that prevents it from fully opening, remove the strut prior to step installation.
Step 3: To clear the area for the hinge of the strut step, a notch must be cut in the trim around the door frame prior to installation. From inside the unit, measure 22-1/8" up from the floor and mark the trim. Completely cut away the trim using a standard utility knife or a vibrating Dremel tool.
Step 4: Loosen the bolts of the stop brackets and adjust the brackets so that the step swings completely through the door frame.
Now for the installation:
Step 1: With the hinge resting on the ground, turn the step assembly upside down so that top treads are facing away from you. With the top of the treads facing the doorway, turn the step slightly sideways, lift the entire assembly, and place the mounting base onto the floor of the doorway’s interior.
Step 2: With the flanges of the floor mounting plate resting flat on the interior of the entryway floor, slide the step
assembly towards the doorway until both of the flanges are tight against the backside of the threshold.
Step 3: Keep the flanges of the floor mounting plate snug against the back of the threshold, slide the step assembly left or right until the flanges of the wall mounting plates are flush with the inside edge of the door flanges.
Step 4: Anchor the flanges of the floor mounting plate in place with the (4) supplied #10 x 1-1/2 screws.
Step 5: Lower the step assembly through the entry door and adjust the feet so the steps are level.
Step 6: From the outside of the unit, raise the steps into the doorway, ensuring that the stop brackets do not pass
beyond the door flanges. Adjust the stop brackets so they contact the door flanges when the step is raised into
the fully upright position. Ensure that there is enough space between the stop brackets and the door frame so as not to scrape or bind on either side.
Step 7: Fully raise the steps so that the stop brackets are firm against the door flanges and close the door to ensure proper latching.
Step 8: Enter the unit by way of the steps and secure the flanges of the wall mounting plates to the interior walls on both sides using the (8) supplied #10 x 1-1/2 screws.
If you have any other questions, feel free to come back and I'd be happy to help you.


(click to enlarge)

(click to enlarge)

(click to enlarge)

(click to enlarge)

Product Page this Question was Asked From
MORryde StepAbove RV Steps for 27-3/4" to 30-1/4" Wide Doorways - 4 Steps

- RV Steps
- Towable Camper
- Fold-Down Step
- 23-1/2 Inch Wide Step
- 26-1/4 Inch Wide
- 4 Steps
- 8 Inch Drop/Rise
- Ground Contact
- Aluminum
- MORryde
more information >
Featured Help Information
Instructions
Miscellaneous Media

Continue Researching
- Shop: Replacement 2 Piece Ball-Stud for MORryde StepAbove Strut Assist RV Steps
- Q&A: MORryde StepAbove Fold-Down Step Strut Replacement
- Shop: MORryde StepAbove RV Steps for 27-3/4" to 30-1/4" Wide Doorways - 4 Steps
- Shop: MORryde StepAbove RV Steps for 23-3/4" to 26-1/4" Wide Doorways - 4 Steps
- Shop: MORryde StepAbove RV Steps for 21-3/4" to 22-1/4" Wide Doorways - 2 Steps
- Video: Review of MORryde Replacement StepAbove Gas Strut - MR56DR
- Shop: MORryde Locking RV Storage Box - 10" Deep x 25-3/4" Wide x 10" Tall - 1-1/2 cu ft
- Shop: MORryde StepAbove RV Steps with Strut Assist - 27-3/4" to 28-1/4" Wide Doorways - 4 Steps
- Shop: MORryde StepAbove RV Steps with Strut Assist - 23-3/4" to 24-1/4" Wide Doorways - 4 Steps
- Video: MORryde Locking RV Storage Box Manufacturer Demo
- Video: MORryde StepAbove RV Steps Review MR26RR
- Q&A: Are etrailer Electric 12" Brakes a Replacement For Dexter 12" Trailer Brakes?
- Video: Review of MORryde RV and Camper Steps - MR29UR
- Q&A: Are The etrailer or Dexter Brakes Going To Be Better For Dexter 6,000LB Axle?
- Shop: RV Jack Pads
- Search Results: mr88rr
- Video: Review of MORryde RV and Camper Steps - Motorhome - MR28RR
- Shop: Suspension Enhancement
- Video: Lippert SolidStep Locking RV Storage Box Review and Installation
- Search Results: 23~458
- Search Results: carbon monoxide and propane
- Search Results: 25~742
- Q&A: Initial Adjustment of Self-Adjusting Trailer Brake Assemblies
- Q&A: How to Determine What Generation of MORryde Steps You Have?
- Search Results: 4 step rv
- Search Results: 4 step
- Search Results: storage boxes
- Video: Review of MORryde RV and Camper Steps - Motorhome - MR88RR
- Shop: Mud Flaps
- Shop: Front Mount Hitch