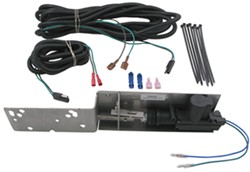
Installation Instructions for Powered Pop and Lock Tailgate Lock for a 2000 Dodge Dakota SLT 4x4
Question:
How difficult is it to install the electric pop and lock PAL8100 on a 2000 Dodge Dakota SLT 4X4 with power locks. I like the idea of a power locking tail gate system but want to make sure I have the skill level needed to install it before I spend the extra money.
asked by: Rick H
Expert Reply:
Installation of the Pop and Lock powered lock # PAL8100 is not very difficult at all, especially if you have experience with automotive projects, wiring, or both. Below are the Pop and Lock text instructions:
1. Remove the black plastic bezel. Squeeze the top edge of the bezel down until it releases. Tilt the bezel away at the top and pull it up to release the bottom.
2. Lower the tailgate – FROM THIS POINT UNTIL COMPLETION DO NOT CLOSE THE TAILGATE.
3. Release the rod ends from the scissor links, remove the three screws holding the handle bracket and lift it out of the tailgate.
4. Test the system by bolting the POWER LOCK to the handle bracket with two screws, connect it to the short
and the long wiring harness and take it forward into the cab to test wire it.
5. WIRING: Remove the drivers side kick panel and locate the harness leading to the drivers side door. Locate the gray
wire and the tan wire. Attach the blue connector taps to them and squeeze them shut with the pliers.
6. Connect the long wiring harness to the blue connector taps and test the system. Lock and unlock the doors using the
power door lock switch. The locking mechanism of the power tailgate lock should lock and unlock the handle. The Lock
Pawl should drop into the notch of the Lock Bolt to hold it in the locked position. Reverse the wiring if the operation is out of
phase. You can now unplug the wires from the blue connector taps.
7. Feed the round bullet connectors on the end of the short wiring cable into a drain hole at the bottom of the tailgate and up
the tailgate to the handle opening. Connect them to the wires of the power tailgate lock.
8. Place the power tailgate lock inside the tailgate with the actuator on the drivers side. To get it in, you will have to insert it
with the actuator and the mounting plate facing up. Once inside, flip it over 180 degrees so that the mounting plate is flush with the rear wall of the tailgate.
9. Replace the handle in the tailgate. Align the holes of the handle with the specified holes for the power lock, and the tailgate and reinstall the three mounting screws.
10. Connect the rod ends into the scissor links and snap the plastic bezel into place.
11. Route the end of the short cable from the tailgate between the bumper and the truck bed.
12. Connect the short wire harness to the long wire harness. Locate the connector so that you can reach it to remove the
tailgate. Coil and tie the extra length of the short wiring harness inside the tailgate. Do not attach it to the truck.
13. Route the long wire harness along the frame rail and the existing wiring on the drivers side of the truck. Use cable ties to
attach the harness to the existing wiring underneath the truck. Follow the existing wiring under the cab and up the firewall to
the grommet at the hood-release cable.
14. Pull the wires through the grommet and lead them to the blue connectors you attached to the wiring in Step 5. The system is now fully installed. CLOSE THE TAILGATE. Perform a final check and reverse the wires if necessary.

Product Page this Question was Asked From
Pop & Lock Custom Tailgate Lock - Power - Black
- Vehicle Locks
- Tailgate Lock
- Keyed Alike
- Vehicle Specific
- Power
- Black
- Pop and Lock
more information >
Featured Help Information
Instructions

Continue Researching
- Article: Ram Trailer Tow Prep Package
- Article: My Trailer Hitch Doesn't Fit
- Article: Brake Controller 7- and 4-Way Installation Kit (ETBC7)
- Q&A: Wiring In Pop and Lock Tailgate Lock on a 2011 Dodge Dakota
- Q&A: 2001 Dodge Dakota Pop & Lock PL8100 Wiring Installation
- Q&A: How to Tell if a Vehicle has a Tow Package or Not
- Q&A: Does Pop and Lock Tailgate Lock PAL8100 Fit 2008 Dodge Dakota Club Cab
- Q&A: Can Pace Edwards SwitchBlade Hard Tonneau Cover Handle Going Through Car Wash
- Q&A: How Does the Pop and Lock Tailgate Lock Work on a 2005 Dodge Dakota
- Q&A: How to Tell if My 2010 Dodge Dakota Has the Factory Tow Package
- Article: Best Vehicles to Flat Tow Behind an RV
- Article: Tow Dolly vs Flat Towing vs Trailer Towing


