

Replacement gears for Lippert Landing Gear Instructions and Diagram
Question:
I have the lead and follow replacement gear kits for the Lippert Landing gear on my 2006 Cougar 5th wheel. I have seen U-tube videos on how to do it, but is there a diagram or instruction manual on the process? I will be doing it away from civilization so I wont be able to pull anything up or call for assistance if I have a question. Im hoping something will come with the kits but I want to make sure. Thanks
asked by: Tony F
Expert Reply:
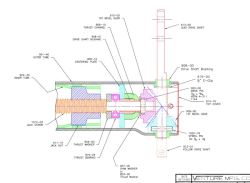
Repair kit # LG-146059 contains 2 pins and the drive shaft all of which are for the top of the jack. To help I have included the written instructions below and also a diagram that points out the parts mentioned in the written instructions. The instructions cover removal of old parts and install of new parts.
Disassembly:
1. Remove 914-10 Top Cover (pry it up with screwdriver). Set aside to reuse.
2. Rotate Drive Shaft until 1020-08 Spirol Pin is vertical. Drive pin out with a hammer and punch. (Pin will fall and probably land on 905-10 Centering Plate. Retrieve pin and discard.)
3. Use a screwdriver to pry 919-00 E-Clip off of Drive Shaft. Discard clip.
4. Slide Drive Shaft out of bushings and 909-00 Bevel Gear. Discard shaft.
5. Remove 909-00 Bevel Gear and two 908-00 Drive Shaft Bushings and discard.
6. Pull up on 910-00 Bevel Gear to disengage it from 920-00 Drive Pin. Discard gear.
7. Slide 920-00 Drive Pin from hole in 1012-03 Jack Screw. Discard pin.
8. Remove 907-00 Shim Washer from 1012-03 Jack Screw and discard.
Reassembly:
1. Apply grease to new 907-00 Shim Washer and slide over end of 1012-03 Jackscrew
until it lies on top of 906-10 Thrust Channel.
2. Slip new 920-00 Drive Pin into hole in 1012-03 Jackscrew (just above washer). Center
the pin.
3. Apply grease to the bottom of the new 910-00 Bevel Gear and slide down onto end of 1012-03 Jackscrew. Align slot in bottom of 910-00 Bevel Gear so that it will allow 920-00 Drive Pin to seat up inside of gear, and gear will sit on top of 907-00 Shim Washer.
4. Tap top of 910-00 Bevel Gear with hammer to make sure everything is seated properly.
5. Apply grease to teeth of 910-00 Bevel Gear.
6. Apply a bit of grease to two new 908-00 Drive Shaft Bushings and insert them into holes in 901-40 Outer Tube. (Grease is used simply to hold bushings from falling out while assembling.)
7. Take the new 909-00 Bevel Gear and seat it in place as shown in diagram, meshing the teeth with the teeth of the 910-00 Bevel Gear. (Note that this gear goes in the side of the leg that is bulged out.) Roughly line the hole in the gear up with the hole in the bushing, and align the slot in the bottom of the gear such that it is vertical (for ease of driving the pin in).
8. Take the new Drive Shaft (913-00 or 913-01, depending on which leg you are rebuilding), and begin to slide it through the bushings and the gear. Make sure it is oriented correctly regarding the bulged-out side of the leg, as shown in the diagram, and that you are inserting the shaft from the bulged-out side. Hold the gear against bushing, moving it around as you push on the drive shaft until things line up and shaft goes into and through gear.
9. Push shaft through to second bushing so that both ends are supported, but you still have access inside the leg to the groove on the shaft.
10. Take the new 919-00 E-Clip and use pliers to push it into the groove and then tap it until it securely snaps around the shaft.
11. Continue to insert shaft all the way until E-Clip is up against the far bushing. Rotate and adjust shaft until hole lines up with slot in 909-00 Bevel Gear.
12. Use a hammer to drive the new 1020-08 Spirol Pin through the gear and into the drive shaft. Use a punch to drive pin just below surface of outer diameter of gear.
13. Apply grease to teeth of 909-00 Bevel Gear.
14. Depress “legs” of 914-10 Top Cover and insert it back into top of 901-40 Outer Tube. Tap on it to seat it fully.


Product Page this Question was Asked From
Lead Jack Repair Kit for Stromberg Carlson Landing Gear

- Accessories and Parts
- Camper Jacks
- Trailer Jack
- Hardware
- Repair Kit
- Stromberg Carlson
more information >

Continue Researching
- Shop: Landing Gear Set w/ Handle - 36-1/2" Lift - 8,000 lbs
- Shop: Landing Gear Set - 36-1/2" Lift - 8,000 lbs
- Shop: Stromberg Carlson Manual Landing Gear Set - Weld On - 34-7/8" Lift - 8,000 lbs
- Shop: Lippert Components 32" Lead 5th Wheel RV Landing Gear Drop Leg w/Snap Pin
- Search Results: lippert camper jacks
- Shop: Lippert Landing Gear - Inside Mount - 5,000-lbs - 19-3/4" Travel - Power Jack
- Shop: Lippert Scissor Stabilizer Jacks w/ Handle - 24" Lift - 10,000 lbs - Qty 2
- Shop: Replacement Lead Leg for Keystone Montana 5th Wheel Landing Gear
- Shop: Trailer Hitch
- Q&A: Bracket Dimensions of the etrailer RV Landing Gear System # RVLG-8HDL
- Article: Trailer Wiring Diagrams
- Search Results: landing gear
- Video: etrailer Landing Gear Set Review
- Video: etrailer Camper Jack - Landing Gear - RVLG-8000 Review
- Q&A: How to Measure to Pick Out Replacement Landing Gear for a Trailer
- Article: How to Measure for Travel Trailer and Fifth Wheel Steps
- Shop: Fifth Wheel Hitch
- Search Results: lc142178
- Article: 4 Steps to Choosing Your 5th Wheel Pin Box
- Shop: Suspension Enhancement
- Search Results: jack
- Q&A: Determining The Correct Replacement Landing Gear Set For A 1997 Forest River Sierra
- Q&A: How to Choose the Correct Replacement Landing Gear for 5th Wheel Trailer
- Shop: Trailer Wiring
- Search Results: trailer jack
- Article: Most Popular Wheel Bearings
- Search Results: 5th wheel landing gear
- Shop: RV Jack Pads
- Q&A: How to Know if Landing Gear Set # RVLG-8HDL Will Fit 2001 Sunnybrook 31BWFS
- Article: Trailer Tire Sizing