
Part Numbers: AA1501278,AA15914
California residents: click here
Videos are provided as a guide only. Refer to manufacturer installation instructions and specs for complete information.
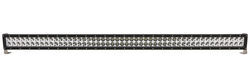
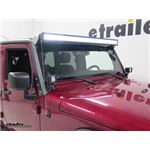
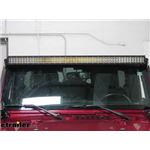
Speaker 1: Today on our 204 Jeep Wrangler, we're gonna take a look at and I'll also show you how to install the Aries 50" Double-Row LED Light Bar, and the Aries Surface Mount LED Work Lights. Now here's what our light bar is gonna look like installed. As you can see, the double-row LED gives us a really nice, clean look, but also provides a lot of light. This is gonna illuminate the trail or road ahead of you and ensure you're able to see where you're going.Now, they put a lot of good technology into the light to make sure it's long-lasting, you're not gonna have to worry about issues down the road with it. Now, you can see we've mounted ours with the Aries windshield mount. It kind of comes up and allows us a good attachment point, and the light fit in really, really well between those brackets.
But for other applications, they're gonna provide you with brackets to secure the light to and also give you some adjustment. There are a couple holes there, so it's gonna be very typical things kind of like what we see with other lights out there. However, I do like the adjustability on this one and the greater angle adjustment we have as compared to some of the other lights out there. I think this is gonna give you the most flexibility.Now, Aries is installed Cree LEDs, they're grade A Cree LEDs, so some of the highest LEDs available out there on the market. And they use an excellent system as far as giving us some floodlight here on the outside of both sides and then a good spot beam right there in the middle, so it's really gonna illuminate everything around us.The housing itself is a very rugged aluminum.
That's gonna alleviate any concerns or issues that we have in regards to rust and corrosion. And then also because although the LED lights don't use as much power and aren't as hot as incandescent, they do generate some heat. You can see the fins on the back here designed to cool those. These fins are gonna take that heat out and allow them to cool them much quicker than if it didn't have them, and it'll ensure those LEDs last for a very long time.The coating is UV resistant, so we don't have to worry about it fading or getting kind of that powdery look to it. And it also has a Nomar finish, so as trees or stuff might rub on it as we're going through, we're not gonna have to worry about them causing any issues with that coating.And the lens on the front is a Lexan material, so unlike glass if a rock we're to come up and hit this or something like that, we're not gonna have to worry about the cracking.
Now these reflectors are designed to be extremely efficient. When we compare these reflectors to other reflectors that we see on other styles of light, they're not nearly as efficient as pushing that light out forward. These run a 96% efficient rate. So any of the light that we're creating, we'll be using.Now, these are an instant on and off type of LED, so we don't have to worry about any kind of warm-up time, waiting for them to come on. You hit the switch, they're gonna come on immediately.
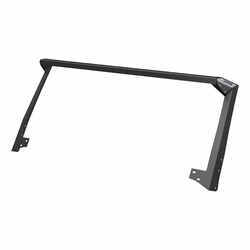
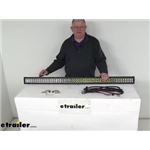
Aries has also ran this light bar through numerous tests, and it meets or exceeds all of those standards, so you can ensure that you're gonna have good dust-proof, water-proof, shock-resistance, even salt water when we get out on the roads in the winter if you live near the beach. They've tested for all those elements, so it really is gonna last a very long time for you.Now, the light bar is gonna offer a total of 100 LEDs. The first 20 on the side here on both sides, those are gonna be the peripheral area. The 60 in the middle are gonna give us that spot beam, so not only can we see the things around us, but what's coming.Now, it's been my experience with light bars that the features that we've talked about that this light bar has, we generally see on the higher-end types of light bars, the grade A Cree LEDs being one thing. Those are very good and very efficient kind of higher-end style LED, and the very efficient reflectors. You typically see that once you start moving up the scale. I think overall, it's gonna give you a very good light bar. It's been tested really, really well in all different kinds of environments. And you get it at a pretty cost-effective price.You can see their windshield mount bracket here is gonna use the three bolts here on the side and the two in the front are little spotlight brackets here. We're just gonna use the two in the front. Now, we're able to stack these so we can get them both mounted on there. It's gonna look like a really nice setup once we get it installed.So, we're gonna start by getting those bolts removed so we can get our bracket in place. For these bolts, you'll wanna use a 40 or a T40 torques bit. Now, the fourth one down here on the bottom you're not gonna need to take that one out. It won't be used for this application.Now, we're gonna be using the three holes here on the side of the bracket. In those holes, we wanna use one of our new provided bolts and also the . See the flat washer there That's gonna go through. But between that, see we've got these black spacers. Those are gonna go on there, and that's gonna prevent this metal from making connect with the Jeep. And we're gonna put that same bolt and spacer at every location, so all five of them here. Of course, we're stacking the brackets on the front, so we'll do that here in just a minute.And you can see we're stacking those, you don't have to put anything between the two brackets, but you do still wanna use the same bolt with washer and spacer on the back side.Now, we'll go through. We're gonna get all five of our bolts snugged up and we're gonna torque those down to the specifications that are listed in the instructions.Once we have these torqued down properly, all five, we're gonna head over to the driver's side and you're just gonna do that exact same thing there.Now, to install our lights, we're gonna need to loosen this bracket up just slightly. Use a 5mm. That'll allow that to come down. It's just kind of tucked in there for storage. Allow that to come down then we'll snug it back up, just a little firmer to work with. You wanna pass the plug through. I kind of like to keep that kind of tucked up like that. It's just a little cleaner look when we wanna ride it where it's going.Now, in our bracket you can see the elongated square hole there, the rectangle shaped hole I suppose. That's where you carriage bolt is gonna sit down, and that'll prevent it from moving while we're trying to tighten it.Now if you're mounting it to a slotted hole like that I highly recommend that you put a flat washer on before your lock washer. If it's going into a standard round hole and it's not too big of a hole then you can just use the lock washer. But even so, we'll place our lock washer on and also the provided nut. Now, the flat washer was not provided with the light kit. The bolt, lock washer, and nut were.Then we're gonna use a 1/2" wrench. We can get that snug down. You might have room to get a socket in there as well. This ratcheting wrench just seems to work pretty well.Now with the help of an extra set of hands, we're gonna get our light bar lifted up into position. We're gonna be installing it on the Aries bracket. It's kind of a neat setup. You're not gonna need additional brackets, our bolts are actually gonna go through the oblong holes right into the end of the light bar.And as we thread our bolt in, you can see I've got a little extension there just to help me, we're gonna have that black spacer in place as well just get it started in there in here. You can see, we'll just come over here to the other side and do the same thing there.Now we can adjust the angle of our light and we can finish snugging down our hardware. You can see we routed our wire just around the back side here. We're able to get it sucked in. It looks pretty nice and neat as it comes down, and we'll run it out right there so it's . We're also putting in the little spotlights, we'll just put a zip tie on those to hold them together and eventually tuck it right in underneath that cowl.Now, to get this removed if you do wanna do it in this manner, you're gonna use a T30 Torx bit to loosen these. You should be able to lift up on them just a little bit. And you don't really wanna put it down in this area, you want it to go through that gab that exists on that backside. That'll alleviate pinching the wires causing issues. Now we'll lift up on it and we'll feed those through.As you can see there with those tighten back in place, your wires aren't gonna be pinched, see we can still move those in and out a little bit. That's the ideal situation, you certainly don't want these to be in an area where you're gonna tighten the steel down on them and cause issues. We're just gonna keep those together using a little zip tie there, and we can trim off our excess.Next up, we'll put our covers in places. It's gonna kind of block that hole of for your adjustment. So definitely make sure you've got that adjustment made before you put these on. And we're just gonna line up the holes in that bracket. We're gonna take the small self-tapping screws and you get those threaded in. You'll wanna use a T20 Torx bit for those. And of course, you'll wanna put one on all four locations. All right with that one on, we're just gonna head over to the other side and do the same thing there.Now, on each of the lights they've got that protective film on them, so we're just gonna pull that off of there.Now when hooking up your lights, traditionally you're gonna use a relay harness just like this that's provided with the kit. Essentially what this does is it provides you with a switch that's gonna be mounted inside your vehicle. That's gonna control the relay. So all the power that we need for the lights goes directly through the relay, not through the switch. This is just meant to open and close the relay.As you can see, you've got the dual plugs there. Those are gonna plug into the two lights. They'll both be controlled off of one switch. And then, we'll just need to hook up power and ground. So it's a pretty simple, straightforward situation. Hardest part really is going to be getting this into your dashboard and drill in the hole you'll need there.Now the customer here has decided to go with a wireless system, it's called The Trigger. It's basically a bank that provides you with a relay system that works through Bluetooth.Now the Aries lights that we're working with today have plugs designed to go directly into the relay harness, makes it a nice water-tight connection for you so you don't have any issues. But since with are using The Trigger system, we're gonna use one of the Trigger pigtails to make our connection here. So we'll be deleting the plug. You just use some side cutters and cut those off. And we'll color match our wires and get everything put back together. And once we have that nice and secure, we'll continue on with routing our wires.And that's gonna complete our installation of the Aries LED Light Bar and Work Lights using the Aries brackets on our 2014 Jeep Wrangler Unlimited.
Ask the Experts about this Off Road Lights
Do you have a question about this Off Road Lights?
Info for these parts were:
At etrailer.com we provide the best information available about the products we sell. We take the quality of our information seriously so that you can get the right part the first time. Let us know if anything is missing or if you have any questions.
Jeep Wrangler Unlimited Accessories


Thank you! Your comment has been submitted successfully. You should be able to view your question/comment here within a few days.
Error submitting comment. Please try again momentarily.