

2020 Hyundai Santa Fe Roof Rack by Yakima
Roof Rack Includes:
Yakima BaseLine FX Roof Rack for Naked Roofs - JetStream Aero Crossbars - Aluminum - Black - Qty 2
BaseClip Fit Kit for Yakima BaseLine Roof Rack Towers - Qty 2
BaseClip Fit Kit for Yakima BaseLine Roof Rack Towers - Qty 2
Part Numbers: Y59UV,Y06151,Y06154
Our Price: $586.00
In Stock


Yakima BaseLine FX Roof Rack for Naked Roofs - JetStream Aero Crossbars - Aluminum - Black - Qty 2
part number: Y59UV
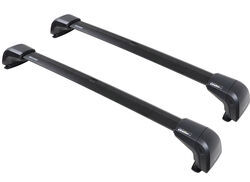
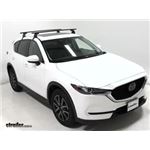
This aerodynamic, flush-mount roof rack lets you carry gear and cargo on your vehicle while maintaining a clean, factory look. Crossbars work with channel-mount and clamp-on accessories. Installs on your vehicle's naked roof.
Features:
- Integrated crossbar and tower system lets you carry cargo and accessories on your vehicle's naked roof
- Pair with fit kit to create a complete roof rack
- Flush design provides a streamlined, factory look - no crossbar overhang
- JetStream crossbars with top channels accommodate channel-mount and clamp-on accessories
- Work with cargo boxes and baskets, kayak carriers, fishing rod holders, and more
- Push-down rubber strips in top channels allow for easy attachment of channel-mount accessories
- Sleek towers with matte finish are weather resistant
- Custom installation on your vehicle's naked roof with Yakima BaseClips
- Aerodynamic, lightweight aluminum crossbars resist corrosion and reduce wind noise
- Yakima Same Key System (SKS) lock cores (sold separately) deter theft of the rack
Specs:
- Quantity: 2 crossbars
- Crossbar dimensions:
- Front: 44-3/4" long x 6" wide x 4-3/4" tall
- Rear: 44-3/4" long x 6" wide x 4-3/4" tall
- Weight capacity: 165 lbs
- Always observe your vehicle's maximum roof load capacity
- Top channel dimensions:
- Overall: 7/8" wide x 7/16" deep
- Channel opening: 7/16" wide
- Weight: 13 lbs
- Limited lifetime warranty
8000167 Yakima BaseLine FX LG - Roof Rack Cross Bars for Naked Roofs
BaseClip Fit Kit for Yakima BaseLine Roof Rack Towers - Qty 2
part number: Y06151
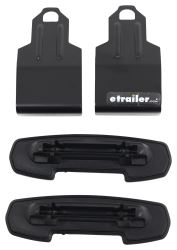
These custom clips and pads let you mount Yakima BaseLine towers on your vehicle with a naked roof. Clips attach to hooks in tower assemblies, and pads clip to bottoms of towers.
Features:
- Custom-fit mounting clips and pads allow you to mount BaseLine towers on your vehicle with a naked roof
- Padded, stainless steel clips provide secure grip on your door jambs
- Snap onto DropHooks inside towers
- Protect door jambs from scratches and abrasions
- Powder coated for durability and rust resistance
- Molded rubber pads fit the contours of your roof
- Clip onto bottoms of towers
- Protect roof from scratches and abrasions
Specs:
- Quantity: 2 clips and pads
- Limited lifetime warranty
DropHook System Installation
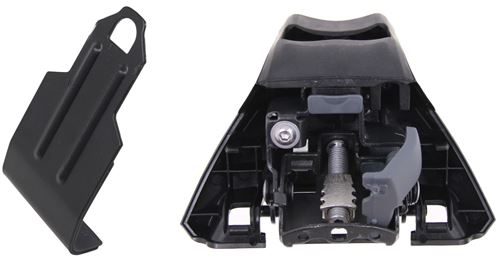
Custom-fit BaseClips let you mount BaseLine towers to your vehicle with a naked roof. To install, remove the tower's cover, open the gray door inside the assembly, and attach the clip to the DropHook inside.
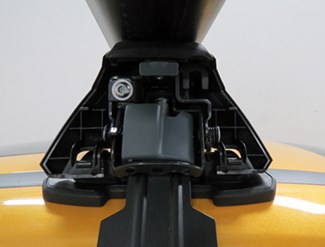
The clip adjusts on 3 axes during installation to ensure a perfect, secure fit on your door jamb. Once the tower and clip are seated correctly, simply tighten the clip down, close the door, and replace the cover.
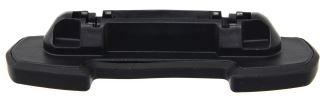
The included molded rubber pads protect your roof from scratches and abrasions. The pads easily clip onto the bottoms of the towers and are specifically designed to fit the shape and contour of your roof.
8006151 Custom Base Clips and Pads for Yakima Base Line Towers
BaseClip Fit Kit for Yakima BaseLine Roof Rack Towers - Qty 2
part number: Y06154

These custom clips and pads let you mount Yakima BaseLine towers on your vehicle with a naked roof. Clips attach to hooks in tower assemblies, and pads clip to bottoms of towers.
Features:
- Custom-fit mounting clips and pads allow you to mount BaseLine towers on your vehicle with a naked roof
- Padded, stainless steel clips provide secure grip on your door jambs
- Snap onto DropHooks inside towers
- Protect door jambs from scratches and abrasions
- Powder coated for durability and rust resistance
- Molded rubber pads fit the contours of your roof
- Clip onto bottoms of towers
- Protect roof from scratches and abrasions
Specs:
- Quantity: 2 clips and pads
- Limited lifetime warranty
DropHook System Installation
Custom-fit BaseClips let you mount BaseLine towers to your vehicle with a naked roof. To install, remove the tower's cover, open the gray door inside the assembly, and attach the clip to the DropHook inside.
The clip adjusts on 3 axes during installation to ensure a perfect, secure fit on your door jamb. Once the tower and clip are seated correctly, simply tighten the clip down, close the door, and replace the cover.
The included molded rubber pads protect your roof from scratches and abrasions. The pads easily clip onto the bottoms of the towers and are specifically designed to fit the shape and contour of your roof.
8006154 Custom Base Clips and Pads for Yakima Base Line Towers
Video of Yakima BaseLine FX Roof Rack for Naked Roofs - JetStream Aero Crossbars - Aluminum - Black - Qty 2


Videos are provided as a guide only. Refer to manufacturer installation instructions and specs for complete information.


Video Transcript for Yakima Roof Rack Installation - 2019 Hyundai Santa Fe
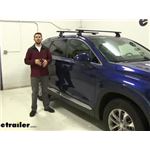
Colin: Hey, what's going on guys It's Colin here at etrailer, and today we have a 2019 Hyundai Santa Fe. We're going to do a test fit of the Yakima JetStream roof rack system. Now, this is a roof rack that Yakima has designed to mount to the naked roof of your Hyundai Santa Fe. So meaning you don't have any type of raised side rails are flush-mounted side rails. It's just completely naked. You're just going to have a fit kit from Yakima that you can see right here, where we have a hook in the door jam, and then a pad sitting on top of our roof clamping it down.
The hook does have rubber padding as well underneath it to make sure it doesn't harm or scratch the finish of your Hyundai Santa Fe. When you get this entire roof rack system mounted, it's going to be a great accessory to be able to get your rooftop accessories loaded up, whether it's a cargo box, a kayak carrier, maybe even just a bike rack.It'd be nice to be able to get those items on your roof so you don't have to try to store them in your vehicle, create more space on the inside. Or frankly, for something like a kayak where you can't fit it inside your vehicle, you're still going to be able to haul it to and from your destination without needing a truck or a trailer. Now, this roof rack system consists of three different parts. You're going to have the Jetstream crossbars up top.
These are going to be 50 inches long. You can see they have a nice aerodynamic shape to them. It's going to help cut down on wind noise and drag, especially if you compare it to the Yakima's Roundbar system or another square bar system. So, you won't have as much of that noise and drag that you would have with those crossbars systems.We're also going to have this nice black color to it. These are also available in silver, so if you think that color would match your Santa Fe more, just check out our website.
We have them in both colors. Now, on top of our Jetstream bars, you can see we have this nice rubber strip, and what we can do with that is remove the end cap from our crossbar, and we can insert T-slot accessories onto our crossbar. We just push down on that rubber strip and then slide it along to the location that we desire on our Jetstream bar. Then we can tighten it down, so there's no pulling the rubber strip out or cutting it to length. We just push down, slide it across and tighten it down, and then we're done.
Now, the middleman between our crossbars and our fit kit is going to be the baseline towers, so you can see when I take this end cap off, what's going on in the inside.We have our fit kit hook coming up in there, and we pull up this little gray tab. You can see that's where we tighten it down. That's where it clamps down onto our roof. Then we have our rubber pad which is underneath our baseline tower, sitting below it. Again, the rubber pad and the rubber coating on that fit kit hook is not going to harm or scratch the finish of your vehicle, so it's going to be around for a long time. If you ever do want to take it off, you can just undo the two bolts right here and here, for all four of the baseline towers. Then you can just remove it from your roof. When you're all done, you've got to close up that tab. We have a nice end cap right here to cover everything up. Now the baseline towers do have an option.You can add on some Yakima lock cores or same key system. That will be able to provide more security for your roof racks and no one can just come up and just pull the end cap off like you saw I did like that. That way there'll be a lock cylinder on there that you can lock it up so they can't pull it off and remove your roof rack. From the top of our roof to the bottom of our Jetstream bar, it's going to be three inches. That should be plenty of space to get your clamp-on accessories underneath your gesturing bar without risking damaging the top of your roof. If we go from the top of our roof to the top of our gesturing bar, it's going to be four and one quarter of an inch. You just want to keep that in mind that we have that added height to our roof.So for any low clearance situations, you just want to make sure you're going to Fit still. Although with the Santa Fe, it doesn't sit as high as a lot of other vehicles do, so you shouldn't really run into any issues. We're all going to have a weight capacity of 165 pounds for the entire system, so that should be more than enough to get your accessories loaded up. But be sure you double-check with your Santa Fe's owner's manual. Make sure your roof can handle that weight before you load it up to that. Now that we've gone over some of those features, let's show you guys had to get this assembled and installed on your roof. Now, we've got the front crossbar installed. We'll show you how to assemble and get the rear one installed. It's going to be the same process for both. Just make sure you follow the instructions or this video.I'm just going to flip the crossbar over first. What we need to do is assemble our baseline tower kit. What we're first going to do is take our black plastic piece, and it's going to go into this slot right here. We'll just push down on it till it clicks into place. Our silver piece right here, you can see there's threads on the inside. It's going to thread onto that screw that's on the inside, so just kind of get that lined up properly, get the hole lined up, and then the bolt where we're going to tighten it down is actually going to be in there. We need to pull that little tab up, and then we can have access to the screw. We'll just begin threading it on, and I'll show you a side angle right there. You can see that silver piece getting farther down.You want to make sure you go until the top of that silver piece in line with the black tabs on that plastic piece. inaudible 00:05:16 Just like that. Now, we've got the pad that we're going to put onto this bracket right here. You can see the plastic piece, and how it's going to fit on. You want to make sure that the arrow right here is facing towards the outside, so up, right there to the outside of the legs. We'll just push until it clicks on and again, make sure that arrow is facing the outside. You see it's pointing up. So we're all good right there. Now when you get your Jetstream crossbar, you're going to see that there's a rubber strip covering the entire channel. I went ahead and cut this section off down to the measurement that it specifies in our instructions down to, which is going to be 36 1/4.I have a cut down to there so I can insert my tower. What's going to happen is, this silver piece with the two black tabs on each side is going to go into the channel on our gesturing crossbar. Once we go like that, we'll just raise it up, get that in there. If you feel that it's too tight right here, what you need to do is either loosen or tighten up that bolt. We'll just loosen it up. He saw a move right when I took a little bit of that pressure off, and then we can get it all the way into the channel, and then move it into place. What we want to do is get the edge of our tower right at 36 1/4, right there.Now we'll begin tightening it down. Now, we have two different bolts we'll need to tighten down. Right up here, the one where we tightened up that silver piece into the channel, we need to make sure we adjust it to the correct pitch. This one's going to be controlling your pitch. This one's going to control your toe, and basically what your pitch is, is the angle that we tighten it down. When you see closer, you might not be able to see it on camera, but there is three lines right there. We need to make sure we line it up with the correct one. From the front of the crossbar, which is on this side, to the back of the crossbar, it's labeled A, B, and C. We need to make sure that we're on the correct letter, which in this case is B, which is the center. So we'll go ahead and tighten that down. If you we're on A or C, all you would do is just tilt the entire tower over into where that bolt was lined up with the correct line, and then you would tighten it down from there.With that tightening tool, when you hear those couple of clips, you're going to be good. Now over on our toe, this one needs to be two, which from the front to the back, it's one, two, three. You can see we're already at two, so we'll just insert our tool. Just make sure that it's tight. We can feel it is. Now we're ready to throw it on the roof, so we'll just get it in place. Does it have to be in the correct spot right away we'll get our measuring tape and make sure we get it in the correct spot. Now, for our crossbar spread, we have this included tape in our kit, and we're going to measure from center to center of each crossbar. In the instructions it specifies 32 inches. You want to make sure you get it as close to that as possible. You just skid it back a little. There we go. Make sure you get the other side as well, and be sure to double-check both sides before you tighten anything down, just so your roof rack is properly sitting on your roof.Now, you can see that our pads are sitting right on this channel right here, and that is where they're supposed to go. Don't worry, it is still a security platform for the pads to be sitting. We're also going to have pressure going around from the hook right here, all the way up into here, so there's not going to be too much weight on top of this actual channel. Now we'll get our hooks in place into our baseline towers. First, I want to point out, you can really see this nice rubber padding that the hooks have, so you're not going to have to worry about it harming or scratching the finish of your vehicle like we talked about earlier. Another thing I want to point out, is that the two hooks for your rear crossbar, they're going to be a different size and shape than the ones out front. How you can tell the difference, is that there's a number engraved on the bottom right here.This one is B74, and the front ones are going to be be B41. So. Just make sure you get the appropriate hooks for the appropriate crossbar. With our side doors open, we just flip up that gray tab, and then the hook will slide up. This little hole right there is going to hook onto that bracket. Now we've got to pull down enough, we can get it under our door jam like that. Now, first what we need to do is tighten up this bolt on top left, right here. That's going to adjust the angle of our bracket right here. So right now our hook is sitting like that, but it's just sitting in the channel like so. What we need to do is, tighten this down until that bracket angles itself all the way down. The hook is now going down, as you can see. You want to go down until it makes contact with the vehicle. Then just go a little bit more. You don't want to go too tight, so a couple of rotations.Then, from there we already have the other side installed as well. We'll begin tidying it up. There's a little bit of tension on the hook now. We're just going to give it a couple of turns. Then we're going to go to the other side, and give it a couple of turns as well. The reason you want to do that, you want to make your way back and forth doing a couple rotations on each side, so that you get the roof rack pulling evenly on both sides and not more towards the passenger side or more towards the driver's side. Now, we've gone back and forth a couple of times. We'll finish up this side. We already have our driver's side fully tightened down. The tool is going to let you know when it's fully torqued. When you hear those clicks right there, you know it's fully torqued, so we'll just put that little tab back down, and then we can close our door. From there we'll just get both of our end caps on for our crossbar, and then far baseline tower like you saw earlier.From there, when you got everything installed and tightened down, go ahead and give you a roof rack a good shake back and forth, front to back, make sure everything is secure. From there, you're going to be ready to load up your favorite rooftop accessories, and then hit the road. Well thank you all for watching. That'll do it for our test fit of the Yakima JetStream roof rack system on our 2019 Hyundai Santa Fe.
Customer Reviews
Yakima BaseLine FX Roof Rack for Naked Roofs - JetStream Aero Crossbars - Aluminum - Black - Qty 2 - Y59UV
BaseClip Fit Kit for Yakima BaseLine Roof Rack Towers - Qty 2 - Y06151
BaseClip Fit Kit for Yakima BaseLine Roof Rack Towers - Qty 2 - Y06154
Average Customer Rating: 4.8 out of 5 stars (1644 Customer Reviews)
This aerodynamic, flush-mount roof rack lets you carry gear and cargo on your vehicle while maintaining a clean, factory look. Crossbars work with channel-mount and clamp-on accessories. Installs on your vehicle's naked roof. These custom clips and pads let you mount Yakima BaseLine towers on your vehicle with a naked roof. Clips attach to hooks in tower assemblies, and pads clip to bottoms of towers. These custom clips and pads let you mount Yakima BaseLine towers on your vehicle with a naked roof. Clips attach to hooks in tower assemblies, and pads clip to bottoms of towers.by: Howard11/09/2023
From start to finish, the folks at etrailer -- and I spoke to several people there, so it was a consistent corporate vibe -- were fantastic to deal with.
There were delays in getting my product that were on the supplier side and out of eTrailer's control, yet etrailer folks kept me up to date and also worked on a customized solution.
My goal was to be able to carry my surfboard on the roof of our 2019 Hyundai Santa Fe to the beach more than 3 hours away. But the particular model we had had no existing racks, no recessed areas, nothing to fix racks to. Not even the dealer had a solution. I was sh*t out of luck.
But etrailer hooked me up. The racks did take me a while to put on, but most of that time was fine tuning to reduce “hum” while driving. I’m very happy with them.
Thanks to etrailer, I have gone surfing and can go surfing whenever I'd like to.

by: Ian 07/02/2023
Mazda
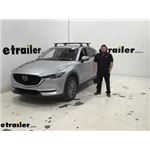
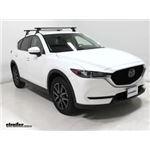
Solid build quality and easy installation on my '21 Mazda CX-5.
by: Eric05/31/2022
Mazda
The roof rack came packaged nicely and the instructions were simple to follow. I installed it in about an hour and we have already used it this past Memorial Day weekend. My wife loves the way it looks on her Mazda. Much better than the factory rack
by: Robert04/22/2022
Standard Yakima Equipmemt. Availability is sketchy but etrailer.com had it in stock!
by: Stephen07/07/2020
2019 HyundaiSanta Fe
I waited several weeks for roof rack to arrive after ordering online. I am accustomed to Thule racks, but could not find any towers/bases to fit the 2019 Santa Fe. Once here, the Yakima rack mounted with ease and I look forward to hauling kayaks or basket on the roof.
Thank you etrailer.
by: Doug06/07/2022
etrailer came through with speed and quality. A couple of other websites that I looked at could not supply all the needed equipment ("on backorder") in a timely manner. As you know, getting "most" of the roof rack is the same as getting "none" of the rack. So I was very pleased to see that etrailer could send me everything quickly. It is exactly what I needed.
by: Kevin M.08/29/2020
Work exactly as they should and hold everything securely to my vehicle without interfering with the car’s normal operation. etrailer had best prices based on my research.
by: Keith08/24/2021
I have truly enjoyed this system. It allows our family of five plus our dog to stretch out in the car while our gear is secured on the roof. It takes a bit to mount it but I want it secure and it does fine with a roof box at interstate speeds. I absolutely recommend this system.
by: Michael 08/10/2021
The Yakima roof rack system is great. Highly recommend!
by: Michelle10/02/2021
Great addition to my new car! It allows us to go on all our outdoor adventures. Thank you!
by: Matt S10/20/2019
Good product. A little tricky to set up but everyone can do it
by: David 02/28/2024
by: Gordon09/05/2020
2020HyundaiSanta Fe
Good quality products.
by: Karen11/17/2023
2016 Land Rover Discovery Sport
Great!
by: Anthony06/10/2020
Great product. Easy to build.
by: Matthew 11/23/2021
by: Matthew 11/23/2021
by: Peter12/08/2022
by: Peter12/08/2022
by: Kelly09/18/2022
by: Jeff09/14/2022
by: Michelle09/07/2022
by: Derek 09/05/2023
by: Dwight 01/10/2022
by: Grant 02/01/2024
25
505
Show More Reviews Ask the Experts about this Roof Rack
Do you have a question about this Roof Rack?
- Recommended Roof Rack and Kayak Carrier for a 2003 Toyota RAV4
- Lucky for you, Yakima does make a set of crossbars that are designed to work with vehicle's that have a bare roof like your RAV4.
Check out the Yakima BaseLine FX Roof Rack for Naked Roofs # Y59UV with the BaseClip Fit Kit for Yakima BaseLine Roof Rack Towers # Y06185.
These crossbars measure 44 3/4" long, has a 165 lb dynamic weight capacity, and has an integrated top channel for roof mounted accessories.
Since you also are looking for a way to transport some kayaks, I'd recommend
view full answer... - Can the Yakima BaseLine Crossbars Handle the Weight Capacity of a Roof Top Tent
- The weight capacities listed on cross bars like the Yakima BaseLine FX Roof Rack for Naked Roofs # Y59UV are the dynamic capacity, meaning while the vehicle is in motion.
When you're parked and using your tent, the weight capacity is easily going to double or triple because the weight will be static over the axles.
So with that being said, the BaseLine crossbars will easily be able to handle the weight of the two adults and the roof top tent.
It's also worth mentioning that most, if
view full answer... - Length/Width of Yakima BaseLine FX Roof Rack Crossbars For 2019 Hyundai Santa Fe w/ Bare Roof
- Hi John; great choice going with the Yakima roof rack for your 2019 Hyundai Santa Fe with a bare roof, and the crossbars themselves are 2-3/4" wide x 1-1/8" tall for the Yakima BaseLine FX Roof Rack # Y59UV.
That should allow you to clamp any accessory on them as they are standard size crossbars. To complete the set up for your' 19 Santa Fe you'll also need the BaseClip Fit Kit # Y06151 and # Y06154.
view full answer... - 2023 GMC Acadia Roof Rack and Cargo Box Recommendations
- The absolute best roof rack for your 2023 GMC Acadia with the bare roof is the Yakima BaseLine FX because it has a nice factory look but is also more robust so you get a great looking system that's also stronger. Here are the parts you'll need:
- BaseLine FX Crossbars # Y59UV
- Fit Kits # Y06138 and # Y06132
- Lock Core Kit # Y07204 (optional)
If you were planning on using this for a cargo box then I highly recommend the Yakima SkyBox NX 18 # Y45AV. I really like this box because
view full answer... - Roof Rack Recommendation for a 2019 Hyundai Santa Fe
- Yes! We definitely have a great roof rack available for your 2019 Hyundai Santa Fe. The parts you need depend on if your vehicle has flush factory rails or a naked roof.
If you have flush factory rails, I recommend the following setup:
- Rhino-Rack Vortex Aero Crossbars # RRVA126B-2
- RCL Legs # RRRCL4
- Custom RCP Fit Kit # RR66QJ
If you have a bare roof, I recommend the following:
- Yakima JetStream Crossbars # Y00425
- BaseLine Towers # Y28TR
- BaseClip Fit Kit - Qty.
view full answer... - Roof Rack that Fits 2019 Hyundai Santa Fe SEL with Naked Roof
- Yakima has their BaseLine roof rack part numbers # Y06151, # Y06154, # Y00409, # Y28TR, and # Y03536 as a confirmed fit for your 2019 Hyundai Santa Fe with a totally naked roof. This will give you a round crossbar roof rack that will be compatible with most roof rack accessories.
view full answer... - Black Aero Shaped Roof Rack Recommendation for 2019 Hyundai Santa Fe
- Rhino Rack has an aero bar roof rack in black that fits your 2019 Hyundai Santa Fe XL that has a naked roof. For that you'd want the part numbers # RRVA137B-2, # RRRLKVA, and # DK360. I attached a picture of what this rack looks like installed as well as an install video that shows the rack installed on a similar 2018 Santa Fe.
view full answer... - Do Yakima Roof Racks Fit 2023 Acura RDX
- So we were able to determine that the 2023 Acura RDX wasn't changed from the 2022 model and we then carried over the fits from the previous year. Sometimes one of the rack manufacturers does this first and since we know they did the correct research we know that other brands will also carry over even if they haven't had a chance to test it like with the Yakima Corebar roof rack part numbers # Y00421 # Y64AR, and # Y49AR that we have listed for your 23' RDX.
view full answer... - Is the Part #Y06154 the Same as the Yakima Baseclip 154?
- Yes, the BaseClip Fit Kit for Yakima BaseLine Roof Rack Towers - Qty 2 # Y06154 is the same as the Yakima Baseclip 154. The clips will be compatible with the Yakima Baseline Towers # 800146.
view full answer...

Yakima Accessories
Fit to this rack on your 2020 Hyundai Santa Fe


Info for these parts were:

Video by:
Zack K

Video by:
Jacob T

Video by:
Aidan B

Video by:
John S

Video by:
Ethan H

Test Fit:
Andrew K

Test Fit:
Colin H

Test Fit:
Hayden R

Test Fit:
Adam E

Expert Research:
Jameson C

Video Edited:
Joshua S

Video Edited:
Dustin K

Video Edited:
Chris R

Written by:
Daron K

Updated by:
Brian T

Updated by:
Michael B
At etrailer.com we provide the best information available about the products we sell. We take the quality of our information seriously so that you can get the right part the first time. Let us know if anything is missing or if you have any questions.


Thank you! Your comment has been submitted successfully. You should be able to view your question/comment here within a few days.
Error submitting comment. Please try again momentarily.