
Part Numbers: SS98GV,33055
Thank you! Your comment has been submitted successfully. You should be able to view your question/comment here within a few days.
Error submitting comment. Please try again momentarily.
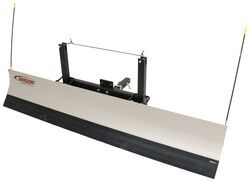
82 x 14 Residential plow with thick rubber cutting edge self-adjusts up and down to smoothly clear a path on any terrain. Aluminum blade stays in straight-ahead position, and makes plowing your driveway as easy as pulling forward or backing out.
Features:
Specs:
Snowplow Installation
Front or rear mount? Versatility is the SnowSport LT's middle name.
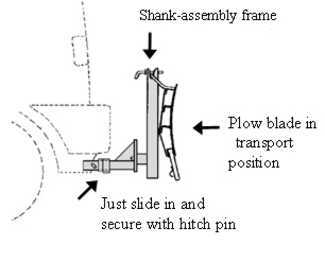
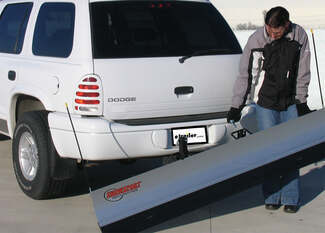
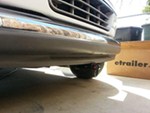
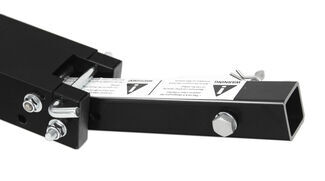
Installation is quick and simple - just slide the included shank assembly into your 2" hitch receiver and secure with pin.
Once the plow frame is connected, attach the blade by lifting one end at a time onto the frame's holders. The lightweight aluminum blade construction makes lifting or adjusting an easy, one-person job. Secure the blade in either the transport or plowing position with the plow's snap pins. The low-profile design won't block your headlights, and the transport position is secure enough for highway travel.
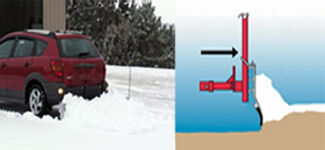
If using with a rear-mount receiver, simply lower the blade to plow position and back up as usual. For a front-mounted plow blade, just drive forward with the blade in the plow position. The unique design takes the hassle out of plowing: This device has no hydraulics or complicated wiring. The push frame on the shank assembly allows the blade to move along the grade of the terrain for easier, more efficient plowing. The heavy-duty rubber cutting edge is effective yet turf friendly, collecting snow and squeegeeing slush without digging into the ground.
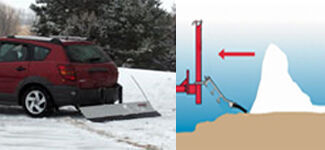
When you are ready to reverse your driving direction, the blade lies back, skimming over the surface of the ground until you change direction again to plow.
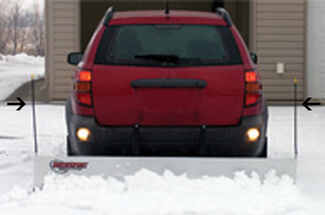
Handy blade markers extend vertically from the ends of the plow to help you see where you are plowing.
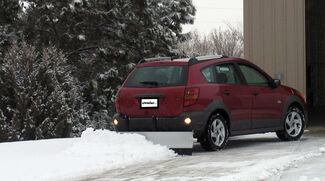
With the SnowSport LT, plowing snow is as easy as backing out of your driveway. Once you are finished plowing, simply lift the blade, refasten it in the transport position and head off for work or errands.
California residents: click here
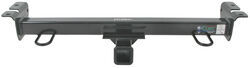
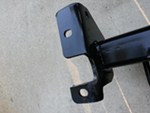
Easily attach a variety of accessories to the front of your vehicle with this fully welded, corrosion-resistant trailer hitch receiver. Perfect for winches, spare tire carriers and more.
Features:
Specs:
At etrailer.com we're committed to the products we sell, and to our customers. Our experienced and knowledgeable staff are available via both phone and email to address your questions and concerns for the lifetime of your hitch. The technicians at etrailer perform hitch installations on a daily basis, making them a valuable resource for do-it-yourselfers. The one-on-one, personal service you'll receive comes straight from an expert in the towing and automotive field. We've installed it, we've wired it and we've towed with it, so whatever your question, we can answer it.
Videos are provided as a guide only. Refer to manufacturer installation instructions and specs for complete information.
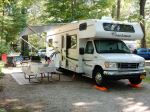
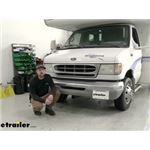
Hey everybody, Ryan here at etrailer. Today on our 2003 Ford E-series Cutaway van we're gonna be showing you how to install the CURT front mount trailer hitch receiver. But before we get into that, let's just take a minute, check this out and make sure it's gonna work for you. Whenever you're over the road, storage is precious. It's more or less, you're trying to make do with what you got and a lot of people overlook being able to keep things on the front of their RV when they're traveling. And having a hitch up here is really gonna open up your opportunity.
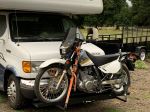
So what we see a lot of people doing nowadays is flat towing. So we'll pull a vehicle behind the motorhome or another trailer with their car on it. And so that takes up everything back there. But up here with a hitch now you can carry your bikes around. If you have some bikes for the family, put a bike rack or maybe a spare tire carrier or a good example what our neighbor's doing here today they have a scooter that they're gonna be using.
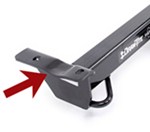
So they'll have a carrier up here where they can put their scooter or other goods. Maybe a cooler, generator, things along those lines. The hitch is gonna have a two-inch by two-inch receiver tube opening, which is pretty much standard size and a lot of different things are gonna work with it. It's gonna use the standard 5/8 pin and clip. One does not come included with it though.
If you need one, not a big deal, you can grab it here at etrailer. And a little bit further off to the sides there are gonna be some hooks on the hitch. If you need to use those for whatever reason, if you need to tow or to pull something those are always available to use. As far as the weight capacities go, it's gonna have a 500-pound maximum gross tongue weight rating. So that's the amount of weight pushing down on the hitch.
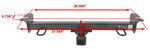
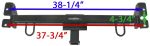
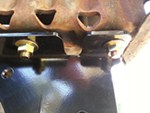
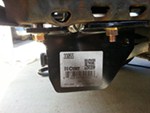
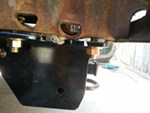
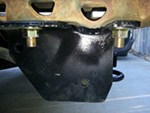
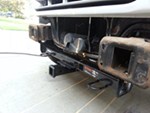
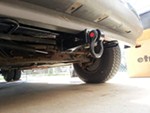
The standard capacity there. and a lot of different cargo carriers and bike racks and things will work with it. It's gonna have a 5,000 pound gross trailer weight rating, which probably isn't important to a lot of people. But the amount of weight pulling on it, so whatever your trailer, something you might have on it if you're gonna be shovelling it around, moving it around in your yard or something. And then it also has a 9,000 pound line pull and what that means that's really targeted to use with like snow plows and, or I'm sorry, winches, things like that where the vertical line pulls is pulling on it. So that information's there if you need it, but for those of you using those different types of accessories and things, this is gonna get the job done. We can grab a couple of measurements and these will help you figure out what type of accessories will work. From the ground to the top inside edge of the receiver tube opening, that's gonna be about 14=1/2 inches. So if you can find an accessory that has a slight rise in the shank, probably not a bad idea. But it's high enough off the ground too that that'll straighten on the work as well. From the center of the hitch pin hole to the edge of the rear bumper, that's about six inches. And you can use that to help figure out that if any folding type accessories you might have can be stored upright and not hit the front of the vehicle. Other than that though, if you're trying to open up and expand on your storage and what you can do with your vehicle this is something you really can't go wrong with. As far as the installation goes, wasn't too bad. Everything's pretty easy to get to. You will have to enlarge a couple of holes in the frame so definitely recommend having a a sharp drill bit and some type of grinding bit that you can use. It'll really speed things up, but that's really the most complicated part about it. You can't do this on the ground as well, but if you'd like to see how it's done feel free to hang around. We'll go ahead and install it together now. To begin our installation, we're gonna be here at the front of our Ford. Now I did jack our vehicle up off the ground a little bit just to give us a little bit of extra space to work and if you do that make sure you're safe about it, shop the tires, use the appropriate equipment, but I feel like this definitely can be done on the ground too. I'd just be a little bit tighter. But with that said, we're gonna be working first off just right underneath the front of our vehicle. So right underneath, if you have this plastic flash guard we're gonna need to remove that. And so on each end of it there's gonna be a plastic push pin fastener that you need to pull out. So you can use a trim tool or a screwdriver and work underneath the head of it. I'm able to pry it out and I already took the other side out. So once you get that removed or both of them rather, this should drop down and we can set it out of the way. If we look at the frame we're gonna have two attachment points that we're gonna use to secure our hitch. We're gonna have this elongated hole here and then this small one closest to the front bumper, but we're gonna have to enlarge this one, that way our bolt and hardware can actually pass through there. So I'll take my drill bit and get it opened up to the proper size. (drill buzzing) With that the hole enlarged, now we can open up this one a little bit too and that's because we're gonna be using that as an access hole to get our hardware up in the frame. So our spacer block fits just fine, but the head of the bolt is too big to pass through there. So I'm going to come in with a grinding bit and open this up a little bit on each side. Stopping every now and again until we get it just big enough for the bolt head to pass through. You could do this with a hand file, probably take you some time. So if you had a power tool like this, it definitely helps speed things up. (drill buzzing) Just big enough to get the head of the bolt through there. You don't wanna push it all the way up in place just yet. Just make sure it'll actually be able to go through there. And since we expose some bare metal, I'm just gonna take some spray paint, put a light coating on it to help protect against any rust. Take one of your fish wires, run that through that opening there and you want it to come out of the hole that we enlarged. A lot of times we'll have to reach up in there and help it out. And you're gonna put on a spacer block and then thread on carriage bolt and you can feed the hardware one at a time up into the frame (metal clanking) and drop it down. And I'm gonna carefully remove this one. They only give you two fish wires, so be careful not the mess this up. So unthread this one and then take another spacer block, another carriage bolt, and we're gonna reverse fishwire this one. So we'll put the head of the bolt in first and then the spacer block, drop it down. And I think I'm gonna move our pull wire to this bolt being that it's a little bit tighter over here. I feel like it'd be beneficial to leave it on over here. That way if you go to put the hitch up and this bolt pushes up into the frame, you know it's not gonna be stuck up there. So that's my thought. I'll just put that one right back on. Now with the help from Kevin here, we're gonna take our pull wires, feed them through the corresponding holes in the hitch and then we can raise this up into position. (metal clanking) We'll hold it flat against the frame and then you can take a flange nut and we wanna get a least one started on each side. That way the hitch will support itself. (metal clanking) You can put the other flange nut on the other bolt and then come back with a 3/4-inch or 19 millimeter socket and slide everything down. (drill buzzing) Once all the hardware is snug don't forget to come back and torque it all down to the amount specified in the instructions. And that'll finish up our look at and our installation of the CURT front mount trailer hitch receiver on our 2003 Ford E-Series Cutaway.
Average Customer Rating: 4.7 out of 5 stars (55 Customer Reviews)
82 x 14 Residential plow with thick rubber cutting edge self-adjusts up and down to smoothly clear a path on any terrain. Aluminum blade stays in straight-ahead position, and makes plowing your driveway as easy as pulling forward or backing out. Easily attach a variety of accessories to the front of your vehicle with this fully welded, corrosion-resistant trailer hitch receiver. Perfect for winches, spare tire carriers and more.This hitch came quickly and I believe was priced fairly for what you get. Unfortunately, as some other have posted, this hitch is intended for my vehicle (1996 Ford E350 RV) but did not fit correctly. I had a problem with the front holes not being spaced far enough apart for the bolts to fit. The rearmost bolts go into a oversized and slotted hole in the underside of the frame so there was no problem with those, but the front holes in the frame have to be drilled out to 17/32" for the supplied 1/2" bolts per the included directions, and I couldn't get the bolts in both sides. The bolt holes in the hitch needed to be approximately 1/4" further apart. Also, there is a relief cut out of the hitch that I assume is to miss a bump on the under side of the frame. This cut out is in the wrong location to miss the bump in the frame. I went ahead and torched the slot for the bolt a little longer on one side and made the cut out for the frame bump bigger on both sides. A little grinding, a little touch-up paint, and back on she went. Had to notch the lower plastic valance just a little bit to clear the receiver, which was expected. Actually had to cut it a lot less than I thought I would. The two safety chain loops sit right under the valance, but I don't for see the need to hook anything to those, so I opted to not hack up the valance at this time. I intend to put a bike rack on the front, and also use the hitch to get drug onto the beach at Pismo from time to time. Hopefully the cuts I made don't weaken the hitch for that purpose. The directions call for this to be a 20 minute install. Granted, I took off the bumper, but even if I hadn't, and the hitch was fitted correctly, I find it hard to believe anybody could get this done in anywhere near that time. As another reviewer said, now that it's on, I'm a happy camper, but it was a little bit of a job to get there.
The hitch is good quality but the hole pattern did not match my 2011 E150 Ford Van. The rear bolts fall in the access hole. I have to drill 3/4 holes in the frame instead of 17/32". I have to remove the whole front bumper because the accesshole is to small for the 1/2 carriage bolt.

Worked great for hauling my motorcycle on the front of my motorhome. Lets me pull my boat and have transportation when I get where I'm going.

Robert H.

6/25/2021
Its working out great and lots of people ask me about it.
Had to remove front bumper, drill a couple of holes and bolt everything back on. I did wedge a piece of Styrofoam atop the bolts to prevent them from popping out. Installed the bumper and then the hitch, which I tst fit first. Everything looks great, no cutting on bumper plastic.
One of the best products I have ordered!
1 hour install included removing the valance and all but two holes lined up due to some minor previous frame damage after using a little yankee ingenuity all fit like perfect didn't require removal the bumper at all and the fish wire technique worked perfect and recommend using blue lock tight. I highly recommend the Curt front hitch for a 2005 E350 Ford Econoline! Think I will leave the valance off like the look!
Product shipped on time. Installation was straightforward. Using a Swagman Dispatch bike Rack with this front hitch on my Chinook RV--works well.
20 min install, remove bumper if you don't have a grinding tool.
Great front hitch .. Easy fit .. Remove front bumper "4bolts" makes the installation a breeze.. Fitted on my own in 1/2 hour ..
Ford E450 c class motorhome
Product seem adequate. The instruction were not accurate. See pictures.
Easy order process.
Correct hitch and fit.
Would recommend etrailer.
i believe in spreading the word if something is either bad or good, but like a lot of people when something is good we simply start enjoying it and forget to pass along to others. the internet has been helpful with the "reviews" most companies have which has kept me from purchasing or purchasing depending on how the reviews were.
to the point; i have purchased several items from etrailer and have been truely amazed by both the customer service and the ease of purchasing.
the most recent item i purchased was a front receiver hitch for my van. even to me this is risky, how many people put receiver hitches on the front of their vehicles and an older one at that ('99). not only did etrailer have one, but there was a video on how to install it, really! the best part is it shipped the day i ordered it (sunday) and when i got it i saw that it was made in the U.S.A. frankly, i would have paid twice the amount if i would have known that.
i could go on. if you need something that this company carries and you are like me (want to get the best price), you'll look around on the internet, etc. but i assure you, you won't be dissapointed with the price (i got free shipping on a thing that weighs 40+ pounds), the customer service and the speed with the delivery.
highly recommend and i will look to this company before i go anywhere else.
thank you etrailer, you've earned my business by doing the right thing.
respectfully,
dave

David
7/28/2014
I stand behind what I said a year ago and the receiver is something I cant live without!I carry my bike rack on it, push my boat up my driveway with it and will soon be mounting a special lift to hold my motorcycle!Glad you care, thanks again,Dave
the hitch arrived in excellent condition. altho the instructions state will fit e350 cut back rv it did not. my rv has a sway bar on the front-unk if stock or add on. fitting the hitch required extensive fitting and shimming, the bumper had to come off, two more holes drilled and two enlarged. the left (drivers) side rear hole would not accept enclosed bolt because there is a rise in the frame just above the hole and very limited room. I had to get longer bolts to fit thru the shims (one and a quarter longer) and used one half inch bolts on three of the mount holes. the fourth (rear drivers) would only accept 5/16 due to the restricted room and limited ability to enlarge hole more. the fit, even with adjustment, is very close. we are talking 1/16 to the steering arm. now that it is on im a happy camper but please do not underestimate the trouble. with or without sway bar should be included in ordering specs.

John B.
7/28/2015
doing well. just bought another curt product=receiver hitch gizmo that has the rack on top and can tow trailer with bottom. nice finish, quick service. happy camper-can take the boat and the junk!!! now will you please talk to the fish gods and get some production my way.
The Curt front receiver went on my 2007 Lazy Daze RV (Ford E450 chassis) without a problem. The forward holes in the frame must be enlarged but this was done easily. I would recommend you hold the receiver in position with a floor jack and carefully mark the location for the hole enlargement. A slight offset from the original hole centers worked the best for me. The bumper had to be removed to install the frame bolts and spacers since there were no access holes large enough in the frame. Once the bumper was removed (four bolts and a one person easy lift off) the frame bolts and spacers were easily installed without using the fish wire. The receiver fits below the plastic air dam without modification and you hardly notice it's there. Great product, great price!

Greg V.
12/26/2014
Front receiver works great for backing the boat down on those narrow landings. Its a little more work hooking and re-hooking the trailer but with a little space planning before hand everything works fine.
I was a little surprised with the snow plow. I thought it was going to be hydraulic/electric. It does okay, going on flat and slight declines. Inclines not so good. I also. Bought a rear trailer hitch. Very pleased with it.
Summer storage in the driveway requires shade in hot central California. This 95 Firan Telstar has 10K miles so I have to keep it cool, 'cause it is cool.
Perfect fit. Pro tip, loosen bumper no need to take it off. Guide wire and hardware fits in the gap. Also one man job made easy with floor jack to lift hitch and bumper( with wood block ) into place.

Frank
6/20/2021
Still working as new.. also what a great addition.. when I look at new class C’s it’s a must.
Carol, the product does fit great. Was very difficult to drop in the four bolts as the opening in front of the Van frame is too small. I have to use a 1.5inch grinder to open up the hold for bolt to drop in. The fish wire work great. your instructions should add a note that partial removal of front bumper may be required in order to expose chassis frame to drop in bolt. Second, Four bolt pattern on Receive does not match up with holes in vehicle frame, had to use reamer to elongate passenger front bolt hole. Total time for install was 4.5 hours and a few swear words. The Vehicle i had issues with is a RV on a 2006 Ford E350 van frame. Gerry Savaglio
Well built product, came with the hardware to install. The only problem is the cut out for the bumps on the frame were off by 7/8 of an inch. I had to extend the opening on the mounting flange so that the unit would mount flush on the frame. Not too much of a problem.
Richard
6/25/2014
What bumps?
Because there was information here that this Curt hitch would fit a Ford E450 based RV (and it was cheaper than the Draw-Tite hitch), I purchased the hitch for my RV. However, because of the hump in the vehicle's frame as others have described, the Curt hitch would not fit flat against the frame of my 2003 E450 without cutting the hitch to enlarge its slot on its mounting flange. Regrettably (because the quality of the hitch looked to be superb), I returned the hitch to etrailer and am now waiting for the Draw-Tite hitch to arrive. I will write a review of that hitch once it arrives.
Great hitch!
It's so convenient to carry bikes up front, leaving the rear accessible.
Heavy duty, powder coated, and excellent hardware.
Watch the video for the best directions. The paper one suggested the wrong hole. Be prepared to do minor grinding/expansion of holes to get things to fit perfectly. Clever use of the included fishwire makes pulling the bolts through a snap.
VERY happy with the hitch and end result! Keep up the great work!
Easy installation and fit perfectly on my 2005 Ford Class C RV. Make sure your drill bit is sharp. Used it for a carrier that hauled my KTM 400 EXC. Worked great and I had good visibility over bike. The bike did block the airflow and you could hear the radiator fan kicking on but the temp stayed in the normal range. etrailer's installation video is a big help as well.
Front mount 2" receiver hitch was a little tricky to install as the slotted frame hole had to widened a little to allow the bolt heads to slip thru....Once that was done everything bolted right up and now a can move my trailer and boat around and actually se where they are. Installed on 2003 Lazy Daze Motorhome on a Ford E450 chassis.
I installed this on my the front of my 2008 Four Winds Majestic 28 motor home. It's on a 2007 Ford E450 Chassis. As described it required making 2 frame holes larger. I had to losen, but not remove 4 bumper bolts to access inside of frame. The hitch was shipped quickly, showed up packaged perfectly, and was followed up by an email offering assistance if needed. The quality is great and and the holes lined up perfectly. I was able to install it by myself in about 45 minutes. I will buy from these guys again!
The package arrived quickly. The installation movie was a great help. I had the same issue they showed in the movie on my 1997 ford club van. I had to use a dremel tool to widen the holes in the frame to insert the bolts. Hitch works great. I'm using it to hold my bike rack when I pull my trailer.
Ask the Experts about this Snow Plow
Do you have a question about this Snow Plow?
Info for these parts were:
At etrailer.com we provide the best information available about the products we sell. We take the quality of our information seriously so that you can get the right part the first time. Let us know if anything is missing or if you have any questions.


Brooke M.
9/28/2023
It looks like this hitch isnt a fit for a twenty eleven Ford van. We do have part # 31053 that is a confirmed fit for the van you have.