
Agri-Cover SnowSport HD Utility Snowplow for 2" Hitches - 84" Wide Blade
Curt Front Mount Trailer Hitch Receiver - Custom Fit - 2"
Part Numbers: SS48GV,33055
Retail:$2,107.95
Our Price: $2,014.88
You Save: $93.07
In Stock
Thank you! Your comment has been submitted successfully. You should be able to view your question/comment here within a few days.
Error submitting comment. Please try again momentarily.


Agri-Cover SnowSport HD Utility Snowplow for 2" Hitches - 84" Wide Blade
part number: SS48GV

84 x 18 Heavy-duty plow with thick rubber cutting edge self-adjusts up and down to smoothly clear a path over concrete, gravel, and grass. Side scoops catch more snow with each push. Aluminum blade can be manually angled to either side.
Features:
- Heavy-duty, user-friendly plow allows for quick and easy snowplowing with no controls or hydraulics
- Adjustable, 3-position blade allows you to manually change plowing angles
- Blade can be positioned straight ahead, to the right or to the left
- Side scoops keep snow from spilling out, increasing capacity
- Self-adjusting plow frame allows up and down movement over rough terrain
- Safe for use on grass, concrete, gravel, brick and other uneven surfaces
- Practical design does not block headlights in either plow or transport position
- Effortless installation on the front or back of your vehicle
- Designed for use on 2" front or rear trailer hitches (sold separately)
- Durable construction
- Rust-resistant aluminum blade
- Long-lasting, heavy-duty rubber cutting edge
- Complete kit includes plow blade with blade markers, 3-position shank assembly, push frame, and hardware
- Made in the USA
Specs:
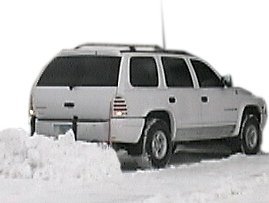
- Application: SUVs, trucks and minivans with a 2" front- or rear-mount hitch receiver
- Must have 8" to 14" clearance under the receiver
- Overall blade dimensions: 96" wide x 18" tall x 3" thick
- Rubber cutting edge dimensions: 6" tall x 1" thick
- Blade weight: approximately 129 lbs
- Plow mounting frame: 31" wide
- Warranty:
- 1-Year for plow parts
- 3-Year for rubber cutting edge
Snowplow Installation
Installation is quick and simple - just slide included shank assembly into your 2" receiver and secure with pin.

Then lift the blade, one end at a time, onto the frame's holders and fasten with snap pins.
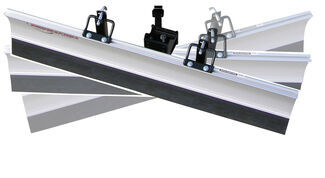
The SnowSport HD blade is mounted on an angled, 3-position shank assembly, allowing you to plow to the left, to the right or straight ahead.
How to Plow
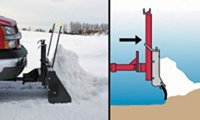
To plow, lower the blade and begin driving; no wiring or hydraulics are needed. The unique push frame on the shank assembly allows the blade to move along the grade of the terrain for easier, more efficient plowing. The heavy-duty rubber cutting edge is effective yet turf friendly, collecting snow and squeegeeing slush without digging into the ground.
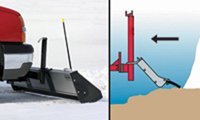
When you reverse direction, the blade lies back, skimming over the surface of the ground so that you can easily take another pass.
Once you're finished plowing, just lift the blade and refasten into the travel position. The blade is secure enough to travel at highway speeds, and the low-profile design keeps it from blocking your vehicle's headlights. Removal for storage is quick and easy. The plow can be used on the rear of your vehicle, making it a cinch to back out of your snow-packed driveway.
80660 Agri-Cover SnowSport HD Snowplow for 2" Hitches - 84" Wide Blade
California residents: click here
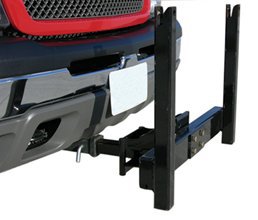
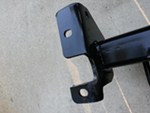
Curt Front Mount Trailer Hitch Receiver - Custom Fit - 2"
part number: 33055
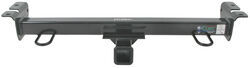
Easily attach a variety of accessories to the front of your vehicle with this fully welded, corrosion-resistant trailer hitch receiver. Perfect for winches, spare tire carriers and more.
Features:
- Front-mount hitch provides attachment point for hitch-mounted accessories
- Winch, spare tire carrier, snowplow, cargo carrier and more
- No more blindly backing trailer in - just hook it up and drive it forward
- Custom fit is designed specifically for your vehicle
- Precision, robotic welding maximizes strength and improves fit
- Easy, bolt-on installation - no welding required
- Complete hardware kit and installation instructions included
- Lifetime technical support from the experts at etrailer.com
- Gloss black powder coat finish over steel resists corrosion
- Sturdy, square-tube design
- Assembled in USA
Specs:
- Line pull: 9,000 lbs
- Vertical load: 500 lbs
- Gross trailer weight: 5,000 lbs
- Receiver opening: 2" x 2"
- Pin hole diameter: 5/8"
- Limited lifetime warranty
etrailer.com Technical Support
At etrailer.com we're committed to the products we sell, and to our customers. Our experienced and knowledgeable staff are available via both phone and email to address your questions and concerns for the lifetime of your hitch. The technicians at etrailer perform hitch installations on a daily basis, making them a valuable resource for do-it-yourselfers. The one-on-one, personal service you'll receive comes straight from an expert in the towing and automotive field. We've installed it, we've wired it and we've towed with it, so whatever your question, we can answer it.
33055 Curt Front-Mount Trailer Hitch Receiver
Video of Agri-Cover SnowSport HD Utility Snowplow for 2" Hitches - 84" Wide Blade


Videos are provided as a guide only. Refer to manufacturer installation instructions and specs for complete information.


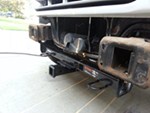
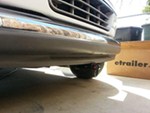
Video Transcript for Curt Front Mount Trailer Hitch Installation - 2003 Ford Van
Hey everybody, Ryan here at etrailer. Today on our 2003 Ford E-series Cutaway van we're gonna be showing you how to install the CURT front mount trailer hitch receiver. But before we get into that, let's just take a minute, check this out and make sure it's gonna work for you. Whenever you're over the road, storage is precious. It's more or less, you're trying to make do with what you got and a lot of people overlook being able to keep things on the front of their RV when they're traveling. And having a hitch up here is really gonna open up your opportunity.
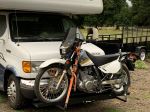
So what we see a lot of people doing nowadays is flat towing. So we'll pull a vehicle behind the motorhome or another trailer with their car on it. And so that takes up everything back there. But up here with a hitch now you can carry your bikes around. If you have some bikes for the family, put a bike rack or maybe a spare tire carrier or a good example what our neighbor's doing here today they have a scooter that they're gonna be using.
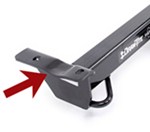
So they'll have a carrier up here where they can put their scooter or other goods. Maybe a cooler, generator, things along those lines. The hitch is gonna have a two-inch by two-inch receiver tube opening, which is pretty much standard size and a lot of different things are gonna work with it. It's gonna use the standard 5/8 pin and clip. One does not come included with it though.
If you need one, not a big deal, you can grab it here at etrailer. And a little bit further off to the sides there are gonna be some hooks on the hitch. If you need to use those for whatever reason, if you need to tow or to pull something those are always available to use. As far as the weight capacities go, it's gonna have a 500-pound maximum gross tongue weight rating. So that's the amount of weight pushing down on the hitch.
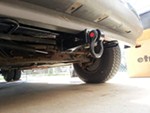
The standard capacity there. and a lot of different cargo carriers and bike racks and things will work with it. It's gonna have a 5,000 pound gross trailer weight rating, which probably isn't important to a lot of people. But the amount of weight pulling on it, so whatever your trailer, something you might have on it if you're gonna be shovelling it around, moving it around in your yard or something. And then it also has a 9,000 pound line pull and what that means that's really targeted to use with like snow plows and, or I'm sorry, winches, things like that where the vertical line pulls is pulling on it. So that information's there if you need it, but for those of you using those different types of accessories and things, this is gonna get the job done. We can grab a couple of measurements and these will help you figure out what type of accessories will work. From the ground to the top inside edge of the receiver tube opening, that's gonna be about 14=1/2 inches. So if you can find an accessory that has a slight rise in the shank, probably not a bad idea. But it's high enough off the ground too that that'll straighten on the work as well. From the center of the hitch pin hole to the edge of the rear bumper, that's about six inches. And you can use that to help figure out that if any folding type accessories you might have can be stored upright and not hit the front of the vehicle. Other than that though, if you're trying to open up and expand on your storage and what you can do with your vehicle this is something you really can't go wrong with. As far as the installation goes, wasn't too bad. Everything's pretty easy to get to. You will have to enlarge a couple of holes in the frame so definitely recommend having a a sharp drill bit and some type of grinding bit that you can use. It'll really speed things up, but that's really the most complicated part about it. You can't do this on the ground as well, but if you'd like to see how it's done feel free to hang around. We'll go ahead and install it together now. To begin our installation, we're gonna be here at the front of our Ford. Now I did jack our vehicle up off the ground a little bit just to give us a little bit of extra space to work and if you do that make sure you're safe about it, shop the tires, use the appropriate equipment, but I feel like this definitely can be done on the ground too. I'd just be a little bit tighter. But with that said, we're gonna be working first off just right underneath the front of our vehicle. So right underneath, if you have this plastic flash guard we're gonna need to remove that. And so on each end of it there's gonna be a plastic push pin fastener that you need to pull out. So you can use a trim tool or a screwdriver and work underneath the head of it. I'm able to pry it out and I already took the other side out. So once you get that removed or both of them rather, this should drop down and we can set it out of the way. If we look at the frame we're gonna have two attachment points that we're gonna use to secure our hitch. We're gonna have this elongated hole here and then this small one closest to the front bumper, but we're gonna have to enlarge this one, that way our bolt and hardware can actually pass through there. So I'll take my drill bit and get it opened up to the proper size. (drill buzzing) With that the hole enlarged, now we can open up this one a little bit too and that's because we're gonna be using that as an access hole to get our hardware up in the frame. So our spacer block fits just fine, but the head of the bolt is too big to pass through there. So I'm going to come in with a grinding bit and open this up a little bit on each side. Stopping every now and again until we get it just big enough for the bolt head to pass through. You could do this with a hand file, probably take you some time. So if you had a power tool like this, it definitely helps speed things up. (drill buzzing) Just big enough to get the head of the bolt through there. You don't wanna push it all the way up in place just yet. Just make sure it'll actually be able to go through there. And since we expose some bare metal, I'm just gonna take some spray paint, put a light coating on it to help protect against any rust. Take one of your fish wires, run that through that opening there and you want it to come out of the hole that we enlarged. A lot of times we'll have to reach up in there and help it out. And you're gonna put on a spacer block and then thread on carriage bolt and you can feed the hardware one at a time up into the frame (metal clanking) and drop it down. And I'm gonna carefully remove this one. They only give you two fish wires, so be careful not the mess this up. So unthread this one and then take another spacer block, another carriage bolt, and we're gonna reverse fishwire this one. So we'll put the head of the bolt in first and then the spacer block, drop it down. And I think I'm gonna move our pull wire to this bolt being that it's a little bit tighter over here. I feel like it'd be beneficial to leave it on over here. That way if you go to put the hitch up and this bolt pushes up into the frame, you know it's not gonna be stuck up there. So that's my thought. I'll just put that one right back on. Now with the help from Kevin here, we're gonna take our pull wires, feed them through the corresponding holes in the hitch and then we can raise this up into position. (metal clanking) We'll hold it flat against the frame and then you can take a flange nut and we wanna get a least one started on each side. That way the hitch will support itself. (metal clanking) You can put the other flange nut on the other bolt and then come back with a 3/4-inch or 19 millimeter socket and slide everything down. (drill buzzing) Once all the hardware is snug don't forget to come back and torque it all down to the amount specified in the instructions. And that'll finish up our look at and our installation of the CURT front mount trailer hitch receiver on our 2003 Ford E-Series Cutaway.
Customer Reviews
Agri-Cover SnowSport HD Utility Snowplow for 2" Hitches - 84" Wide Blade - SS48GV
Curt Front Mount Trailer Hitch Receiver - Custom Fit - 2" - 33055
Average Customer Rating: 4.7 out of 5 stars (73 Customer Reviews)
84 x 18 Heavy-duty plow with thick rubber cutting edge self-adjusts up and down to smoothly clear a path over concrete, gravel, and grass. Side scoops catch more snow with each push. Aluminum blade can be manually angled to either side. Easily attach a variety of accessories to the front of your vehicle with this fully welded, corrosion-resistant trailer hitch receiver. Perfect for winches, spare tire carriers and more.by: Kevin I.10/06/2014
1996 Ford E-350
This hitch came quickly and I believe was priced fairly for what you get. Unfortunately, as some other have posted, this hitch is intended for my vehicle (1996 Ford E350 RV) but did not fit correctly. I had a problem with the front holes not being spaced far enough apart for the bolts to fit. The rearmost bolts go into a oversized and slotted hole in the underside of the frame so there was no problem with those, but the front holes in the frame have to be drilled out to 17/32" for the supplied 1/2" bolts per the included directions, and I couldn't get the bolts in both sides. The bolt holes in the hitch needed to be approximately 1/4" further apart. Also, there is a relief cut out of the hitch that I assume is to miss a bump on the under side of the frame. This cut out is in the wrong location to miss the bump in the frame. I went ahead and torched the slot for the bolt a little longer on one side and made the cut out for the frame bump bigger on both sides. A little grinding, a little touch-up paint, and back on she went. Had to notch the lower plastic valance just a little bit to clear the receiver, which was expected. Actually had to cut it a lot less than I thought I would. The two safety chain loops sit right under the valance, but I don't for see the need to hook anything to those, so I opted to not hack up the valance at this time. I intend to put a bike rack on the front, and also use the hitch to get drug onto the beach at Pismo from time to time. Hopefully the cuts I made don't weaken the hitch for that purpose. The directions call for this to be a 20 minute install. Granted, I took off the bumper, but even if I hadn't, and the hitch was fitted correctly, I find it hard to believe anybody could get this done in anywhere near that time. As another reviewer said, now that it's on, I'm a happy camper, but it was a little bit of a job to get there.


by: Stephen09/26/2023
2011 FordVan
The hitch is good quality but the hole pattern did not match my 2011 E150 Ford Van. The rear bolts fall in the access hole. I have to drill 3/4 holes in the frame instead of 17/32". I have to remove the whole front bumper because the accesshole is to small for the 1/2 carriage bolt.
by: Robert H06/24/2020
Worked great for hauling my motorcycle on the front of my motorhome. Lets me pull my boat and have transportation when I get where I'm going.


Robert H.

6/25/2021
Its working out great and lots of people ask me about it.
by: Alan04/06/2021
Had to remove front bumper, drill a couple of holes and bolt everything back on. I did wedge a piece of Styrofoam atop the bolts to prevent them from popping out. Installed the bumper and then the hitch, which I tst fit first. Everything looks great, no cutting on bumper plastic.


by: Terry 05/04/2024
One of the best products I have ordered!
by: Dan06/09/2022
2005 FordVan
1 hour install included removing the valance and all but two holes lined up due to some minor previous frame damage after using a little yankee ingenuity all fit like perfect didn't require removal the bumper at all and the fish wire technique worked perfect and recommend using blue lock tight. I highly recommend the Curt front hitch for a 2005 E350 Ford Econoline! Think I will leave the valance off like the look!


by: David E.06/09/2015
Product shipped on time. Installation was straightforward. Using a Swagman Dispatch bike Rack with this front hitch on my Chinook RV--works well.


by: Maddkeso04/24/2024
20 min install, remove bumper if you don't have a grinding tool.
by: Dan 10/11/2014
2003 Ford E-450
Great front hitch .. Easy fit .. Remove front bumper "4bolts" makes the installation a breeze.. Fitted on my own in 1/2 hour ..
Ford E450 c class motorhome


by: Dick M09/24/2022
2006 FordVan
Product seem adequate. The instruction were not accurate. See pictures.


by: Jim S08/06/2020
Easy order process.
Correct hitch and fit.
Would recommend etrailer.


by: Rory12/14/2010
2015 Chevrolet Blazer
Snowsport PlowEtrailer.com does it right from start to finish. On top of having a great web site, the staff are the best.
Keeping in mind, I ordered this in December, about 5 days before our first big snow, here in Ohio. Within an hour of ordering my SnowSport HD plow, I was upgraded to special priority shipping, that was a nice surprise! The plow arrived in about two days, in three boxes, as I ordered the front hitch at the same time. I feel bad for my UPS carrier, these boxes were not for the faint of heart. The assembly went smoothly, the manufacturer uses high end parts and everything is well marked and the instructions are easy to follow. I estimate it took me two hours to get everything put together, with a coffee break in between. I am impressed with the construction, wow. Heavy duty is right!
We had four inches of snow yesterday. I opened the garage door and went to work, two pushes to clear the parking spots, and one easy push down the two hundred foot gravel driveway. Like butter.
I was done. It took less then 15 minutes. I put this blade on my 2003 rear wheel drive, not 4x4, Chevy Blazer. I backed into the garage and it looked like I had just put the blade on, this blade could last a long time. I love it. I cant wait until we get a foot or more of snow, my wife wants to plow next time. Plus I have cable chains comming from Etrailer, they should be here any day. Just in case my two wheel drive has tracktion problems in the deeper snow. Thanks a bunch, Etrailer!


by: david01/21/2013
1999 FordVan
i believe in spreading the word if something is either bad or good, but like a lot of people when something is good we simply start enjoying it and forget to pass along to others. the internet has been helpful with the "reviews" most companies have which has kept me from purchasing or purchasing depending on how the reviews were.
to the point; i have purchased several items from etrailer and have been truely amazed by both the customer service and the ease of purchasing.
the most recent item i purchased was a front receiver hitch for my van. even to me this is risky, how many people put receiver hitches on the front of their vehicles and an older one at that ('99). not only did etrailer have one, but there was a video on how to install it, really! the best part is it shipped the day i ordered it (sunday) and when i got it i saw that it was made in the U.S.A. frankly, i would have paid twice the amount if i would have known that.
i could go on. if you need something that this company carries and you are like me (want to get the best price), you'll look around on the internet, etc. but i assure you, you won't be dissapointed with the price (i got free shipping on a thing that weighs 40+ pounds), the customer service and the speed with the delivery.
highly recommend and i will look to this company before i go anywhere else.
thank you etrailer, you've earned my business by doing the right thing.
respectfully,
dave

David
7/28/2014
I stand behind what I said a year ago and the receiver is something I cant live without!I carry my bike rack on it, push my boat up my driveway with it and will soon be mounting a special lift to hold my motorcycle!Glad you care, thanks again,Dave
by: john b07/20/2014
1991 FordVan
the hitch arrived in excellent condition. altho the instructions state will fit e350 cut back rv it did not. my rv has a sway bar on the front-unk if stock or add on. fitting the hitch required extensive fitting and shimming, the bumper had to come off, two more holes drilled and two enlarged. the left (drivers) side rear hole would not accept enclosed bolt because there is a rise in the frame just above the hole and very limited room. I had to get longer bolts to fit thru the shims (one and a quarter longer) and used one half inch bolts on three of the mount holes. the fourth (rear drivers) would only accept 5/16 due to the restricted room and limited ability to enlarge hole more. the fit, even with adjustment, is very close. we are talking 1/16 to the steering arm. now that it is on im a happy camper but please do not underestimate the trouble. with or without sway bar should be included in ordering specs.

John B.
7/28/2015
doing well. just bought another curt product=receiver hitch gizmo that has the rack on top and can tow trailer with bottom. nice finish, quick service. happy camper-can take the boat and the junk!!! now will you please talk to the fish gods and get some production my way.
by: Greg V.06/27/2013
2007 Ford E-450
The Curt front receiver went on my 2007 Lazy Daze RV (Ford E450 chassis) without a problem. The forward holes in the frame must be enlarged but this was done easily. I would recommend you hold the receiver in position with a floor jack and carefully mark the location for the hole enlargement. A slight offset from the original hole centers worked the best for me. The bumper had to be removed to install the frame bolts and spacers since there were no access holes large enough in the frame. Once the bumper was removed (four bolts and a one person easy lift off) the frame bolts and spacers were easily installed without using the fish wire. The receiver fits below the plastic air dam without modification and you hardly notice it's there. Great product, great price!

Greg V.
12/26/2014
Front receiver works great for backing the boat down on those narrow landings. Its a little more work hooking and re-hooking the trailer but with a little space planning before hand everything works fine.
by: Robin G.11/18/2014
2011 Honda Ridgeline
We installed this on our 2011 Honda Ridgeline and a week later it snowed... And snowed.... And snowed.. 5 feet in 24 hours ( we live on the lake near Buffalo) and it's still snowing... This wasn't good, it was AWESOME! It was an easy install and assembly and worked absolutely perfect! We have a tough driveway and this kept it clear with no issues, no problems and we used it all day and night! When you spend that much on something you've never even seen before you can have reservations... It's worth every penny. It's solid ( more than we thought it would be) and does the job with ease. No .. It's good, but...... It's exactly as advertised and etrailer not only had the best price, the communication with my order was exceptional. Now... If only the town could send a plow down my street.....


by: Excellent10/15/2017
2011 Nissan Xterra
I had a few hiccups while assembling (over tightening things early, I think) but once I got it together it’s been awesome. Clears easily and efficiently. Have used to clear as much as 14” of snow (that required pushing off to the side more often) but once you get used to the technique this thing is a lifesaver. I can clear a 300’ long driveway in 15 minutes or so for an average 4-5” snowfall.


by: David05/11/2022
2022 Ford F-250 Super Duty
Summer storage in the driveway requires shade in hot central California. This 95 Firan Telstar has 10K miles so I have to keep it cool, 'cause it is cool.


by: Frank06/19/2020
Perfect fit. Pro tip, loosen bumper no need to take it off. Guide wire and hardware fits in the gap. Also one man job made easy with floor jack to lift hitch and bumper( with wood block ) into place.

Frank
6/20/2021
Still working as new.. also what a great addition.. when I look at new class C’s it’s a must.
by: Gerald10/31/2022
Carol, the product does fit great. Was very difficult to drop in the four bolts as the opening in front of the Van frame is too small. I have to use a 1.5inch grinder to open up the hold for bolt to drop in. The fish wire work great. your instructions should add a note that partial removal of front bumper may be required in order to expose chassis frame to drop in bolt. Second, Four bolt pattern on Receive does not match up with holes in vehicle frame, had to use reamer to elongate passenger front bolt hole. Total time for install was 4.5 hours and a few swear words. The Vehicle i had issues with is a RV on a 2006 Ford E350 van frame. Gerry Savaglio
by: Forrest B.10/23/2012
1998 FordVan
Well built product, came with the hardware to install. The only problem is the cut out for the bumps on the frame were off by 7/8 of an inch. I had to extend the opening on the mounting flange so that the unit would mount flush on the frame. Not too much of a problem.
Richard
6/25/2014
What bumps?
by: Justin12/13/2018
Ford Edge
It does what it's supposed to do, puts the snow from my driveways into piles not on my driveways. Got it over some of the other variations because it doesn't have electronics or wiring to break when its -30.
-Cutting edge that came with mine has been decently strong for running on gravel driveways.
-Light enough I can mount/unmount whenever I need to.
-Doesn't tear up lawns, which is where I have to push most of the snow I move.
--Needs a through eyebolt for quick connect back dragging rather than the ratchet strap idea they sell.
--Side panels are the weak link of the system
they cut in hard and make the plow jumpy while turning
the nubs on the back are also not deep enough to allow the plow to free stand when storing
and as hard as they are they get jammed right up with any sort of twig/leaf debris you might be plowing up
---I'll be replacing these with some sort of steel or aluminum panel with a tubing edge once they start to fail.
-- The sliding parts aren't powder coated so they'll need to be repainted every year or two or its going to rust right out.
Overall though it does what I wanted it to do, and paid for itself by saving me a lot of hours not having to shovel or snowblow. And even if my vehicle were ever to go down I could toss it on the back of another vehicle to get the snow moved.
by: James J. 2014 Honda Pilot01/25/2018
2014 Honda Pilot
It arrived in about 3 days, in 3 packages. I researched online extensively before choosing the SnowSport HD. Price at etrailer was about 10% cheaper than other sites. I already had the front hitch on my 2014 Honda Pilot, so all I had to do was assemble the plow and go play.
I had watched multiple videos of using and assembling the product, before ordering. All the time shoveling my driveway with a shovel as I had to get in and out and keep the driveway, ice free for visitors.
Everything was in the boxes, not a single bolt or washer missing. Assembly was as simple as I expected. I completed assembly without assistance in about 90 minutes, at a normal pace. Neither my cordless (nor corded) drill would screw the 3/8 self tapping screws to connect the two blade pieces, but it was not difficult to do them with a ratchet.
I set the height correctly for the front hitch, and I have a 6 inch hitch drop/riser that that should give me good plowing with the back hitch (have not tested yet, but expect good results)
The design is very well thought out, it is a quality product that will probably last the rest of my life (home use). I recommend it to others, and I would buy it again.
I ordered the plow as we finished getting about 10 inches of snow over a couple of days. The temperature stayed below freezing and there was still about 6 inches of snow to play in, when I had the plow mounted. Based on some reviews I had concerns that it might not do well, pushing piles of snow, or the snow that had been sitting for days. I was pleasantly surprised to be pushing even snow the city snow plow had mounded in front of the neighbors driveway. I plowed the neighbors from the street and about 80 feet in, without difficulty, three passes in a couple minutes and the job was done.
I live in a 1950s ranch home, with a single car garage (in basement) near Pittsburgh PA, my Honda Pilot fits in the garage with just inches to spare going through the door. The 7 foot blade is just a little narrower than the side view mirrors. So I can drive in and out. I have the blade and mount in the garage, and they are light enough that I can mount the blade front or back while in the warm garage and drive out to plow snow. Pull back in the garage, remove the blade and drive into to town to go to the office for work.
I am so excited to have this plow that, it probably will not snow more then a trace for a couple of years... Fate denying me the opportunity to play with it for a long time.
by: Carl04/21/2015
2003 Ford E-450
Because there was information here that this Curt hitch would fit a Ford E450 based RV (and it was cheaper than the Draw-Tite hitch), I purchased the hitch for my RV. However, because of the hump in the vehicle's frame as others have described, the Curt hitch would not fit flat against the frame of my 2003 E450 without cutting the hitch to enlarge its slot on its mounting flange. Regrettably (because the quality of the hitch looked to be superb), I returned the hitch to etrailer and am now waiting for the Draw-Tite hitch to arrive. I will write a review of that hitch once it arrives.
by: Glenn05/26/2015
1999 FordVan
Great hitch!
It's so convenient to carry bikes up front, leaving the rear accessible.
Heavy duty, powder coated, and excellent hardware.
Watch the video for the best directions. The paper one suggested the wrong hole. Be prepared to do minor grinding/expansion of holes to get things to fit perfectly. Clever use of the included fishwire makes pulling the bolts through a snap.
VERY happy with the hitch and end result! Keep up the great work!
25
73
Show More Reviews Ask the Experts about this Snow Plow
Do you have a question about this Snow Plow?
- Hitch Recommendation for a 2003 E-150 Van that Accommodates the Bumps in the Frame
- It's possible you might not be trying to install the hitch into the right holes. The cut out portion of the mounting flange of the Curt Front Hitch part # 33055 should align with the hump in the frame. However, we had one customer have a similar experience and the cut out portion of the hitch would have had to have been enlarged by 7/8 of an inch for the hitch to fit flush.
If you think this is the case for you I would recommend you return that hitch and get the Draw Tite Hitch part
view full answer... - Can Replacement Install Hardware for Curt Front Hitch # 33055 be Ordered
- We sell replacement hardware for all of the hitches we carry with the part # RHK. You'd just need to select the hitch manufacturer from the drop down menu and then enter the part number for the hitch that you have and we'd send you what you need.
view full answer... - Can you Overload a Front Mount Hitch on a 2007 Ford Van E-450 RV Cutaway
- The Curt Front Mount Trailer Hitch, part # 33055, is in fact the highest tongue weight capacity available for your 2007 Ford Van E-450 RV Cutaway.
As for loading the hitch over its tongue weight capacity, that is something that I do not recommend doing. One problem you would have with that is, as you said, the high possibility of hitch failure (whether the hitch breaks, bend, or is ripped from its bolts).
Another possible problem is tipping or sagging your motorhome in the front.
view full answer... - Recommended Front Hitch for Fleetwood Tioga 31 Class C Motorhome on Ford E-450 Chassis
- The Curt Front Mount Trailer Hitch Receiver part # 33055 is what I recommend for a Fleetwood Tioga 31 Class C Motorhome on Ford E-450 Chassis.
view full answer... - Front Mount Hitch Receiver for a 2004 Coachman Roadmaster on a Ford E-450 Van Chassis
- Whether the Ford E-450 van chassis is a 2002, 2003, or 2004 (or anything in the 200 to 2007 model year range) it will take front mount receiver # 65001. So no worries, we got you covered!
The Curt hitch, # 33055, is indicated as a fit for the E-350 but not the E-450. There can be some subtle differences between the two. That is why I recommend 65001 because it does fit the E-450 for sure. I have linked a video showing an example installation for you.
view full answer... - Does Curt Front Hitch, # 33055, Require Any Cutting Of Front Air Dam On A 1999 Ford Van
- The Curt Front Hitch, # 33055, on a 1999 Ford Van does not require any cutting of the front valance (air dam), but you do need to remove the front valance from the bumper.
Also, the two front holes in the frame rails need to be enlarged. Then, you will use the fishwire (included) to install the 4 bolts and spacers into the holes in the frame. Then, you just need to attach the hitch to those bolts and torque to 75 ft. lbs.
I am sending a video link that will show you how to use the
view full answer... - 2005 Ford E-450 RV Forest River Front Hitch for Carrying Bike Rack
- Yes we have the Curt front hitch part # 33055 as a fit for your 2005 Ford E-450 RV. You could mount a bike rack in this like with the Hollywood Racks Trail Rider # HR200Z for a high quality and cost effective platform style bike rack.
view full answer... - 2005 Forest River Sunseeker Class C Front Hitch Recommendation
- Your 2005 Forest River Sunseeker Class C motorhome would be built on a 2005 Ford E450 Cutaway chassis so the correct front hitch would be the part # 65001.
You will need to enlarge a hole in the frame and then use a pullwire (included) to get the hardware to line up properly. These are pretty standard hitch install steps that wouldn't be too hard at all.
view full answer... - Front Mount Trailer Hitch Receiver For a 2003 Ford E-450 RV Cutaway Chassis
- The Curt Front Mount Trailer Hitch Receiver # 33055 is the part you are looking for to fit your 2003 Ford E-450 RV Cutaway chassis.
I recommend using a etrailer Rubber Hitch Cover # 22282 to cut down on the whistle that often comes from having an open receiver tube. If you are using this for a carrier the Curt Anti-Rattle Hitch Clamp # C27UR will allow you to remove the excess play so your carrier isn't rattling around while you drive.
view full answer... - Front Mounted Trailer Hitch Receiver for Motorhome on 1990s Ford E-350 Econoline
- We have a potential solution for you, though the part you referenced is a multi-fit hitch for the rear of some passenger vehicles and will not work with your motorhome on an E-350 Econoline. You never mentioned what year your vehicle was but based on my research it is very likely to be a 1990s model.
For that, the hitch that fits is the Curt Front Mount Trailer Hitch Receiver # 33055.
This hitch will fit a 1991 through 1998 Ford E-350 Econoline, and I have added a link to the installation
view full answer... - Front and Rear Trailer Hitch Receivers for 1998 Ford Econoline E-150
- Curt front-mount hitch # 33055 fits on the Ford E-150, E-250 and E-350 vans from 1991 through 2007 model years but this hitch does NOT fit on the rear of any vehicle.
For a rear mount hitch for your 1998 E-150 you can click on the linked page that displays all 1-1/4-inch and 2-inch hitches that are compatible with various versions of that vehicle, such as the Draw-Tite 2-inch hitch # 75703 which fits full-size vans including the Superwagon.
view full answer... - Recommended Front Mount Trailer Hitch for 2002 Class C Motorhome with Ford E-450 Chassis
- The Curt Front Mount Trailer Hitch Receiver part # 33055 is what I recommend for a 2002 Ford E-450 Cutaway Chassis which is used on Class C Motorhomes. It provides a 2" receiver tube which will be great for bike racks and cargo carriers so long as the total weight is under 500 lbs.
view full answer... - Highest Capacity Bike Rack for Mounting on a Motorhome
- The only bike rack capable of being mounted behind a motorhome and able to accommodate two 63 lbs e-bikes and your sons 30 lbs bike is the Thule T2 Pro XTR Bike Rack for 4 Bikes - 2" Hitches item # TH69TX. The Thule can carry up to 160 lbs but you have to have the full extension installed to reach this capacity. The extension is included but it is also removable.
view full answer... - Is There a Front Mount Trailer Hitch Receiver For a 2002 E-350 RV Chassis or 2012 Subaru Outback?
- We do have the Curt Front Trailer Hitch Receiver # 33055 which will fit your 2002 Ford E-350 RV chassis. While there are no custom fit units for your 2012 Subaru Outback you may be able to have one fabricated using the 2" Weld On Receiver # E17. To determine this you will want to visit a local fabrication shop so they can verify if one can be fabricated.
view full answer... - Front Mount Hitch Receiver Recommendation for a 2007 Thor Four Winds Majestic 28A Motorhome
- For your application I recommend installing the Curt front mount hitch receiver on your 2007 Thor Four Winds Majestic 28A:
- Curt Front Mount Trailer Hitch Receiver # 33055
This bolts up to the frame at the front of your motorhome so you can expand your cargo carrying space. If you let me know what you plan on using the hitch for I'd be happy to make an additional recommendation for you!
view full answer... - Front Mount Trailer Hitch for 1994 Ford Club Wagon
- The Club Wagon is simply a different name for the Econoline of the Ford van, and we do have a front mount trailer hitch that fits a 1994 Ford Club Wagon, so long as it is the E-150, E-250, or E-350 model, which it should be.
For that, the correct fit is the Curt Front Mount Trailer Hitch Receiver # 33055.
I have added a link to the installation instructions as well as a link to an installation video for you to take a look at.
view full answer... - Front Mount Trailer Hitch Receiver For a 2006 Forest River Lexington 255DS E-450 RV Cutaway Chassis
- The Curt Front Mount Trailer Hitch Receiver # 33055 is confirmed to fit the Ford E-450 RV Cutaway chassis that is under your 2006 Forest River Lexington 255DS.
I recommmend using either the etrailer Rubber Hitch Cover # 22282 or WeatherTech BumpStepXL Hitch-Mounted Bumper Protector and Step # WT81BS1XL to fill the receiver hole and eliminate the whistle it often creates. The step is great as it will give you that added reach when cleaning your RV.
view full answer... - Will Curt Front Hitch, # 33055, Fit A 2007 Ford E-450 Chassis For A Motorhome
- I have the Draw-Tite Front Hitch, # 65001, which will fit on the 2007 Ford E-450 Chassis.
The Curt Front Hitch, # 33055, only lists fitment up to the E-350 van. I called the supplier (Curt) to see if it will fit your 2007 Ford E-450 Chassis and they said that you would have to do a couple of measurements to see if it would fit.
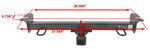
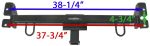
The measurement of the mounting holes from center to center on the front hitch is 38-1/2 inches. On your van chassis if you measure across from frame rail
view full answer... - Bolt Hole Spacing of Curt 33055 Front Mounted Receiver
- The Curt # 33055 you mentioned isn't a fit for the 1991 F-250, it's a fit for the E-Series Vans, which Curt confirms. Unfortunately, they don't offer a front mounted hitch for your truck.
The bolt hole spacing I was able to obtain is as follows:
• Side to side bolt hole spacing for front-most holes closest to the receiver, 37.969 inches, center to center
• Side to side bolt hole spacing for rear-most holes closest to the engine, 38.469 inches, center to center
• Hitch drop or vertical
view full answer... - Front Hitch Needed for a 2000 Ford E-450
- The Curt Front Mount Trailer Hitch Receiver # 33055 that you referenced fits Ford Vans (up to an E-350), but since your Chateau is on a 2000 Ford E-450 you would need to go with the Draw-Tite # 65001.
Installation instructions and a photo showing the mounting hole locations for the Curt option have been added for you to check out. I am doubtful that the Curt will fit but you can use the photo to check your vehicle for a fit.
view full answer...
Info for these parts were:

Expert Research:
Mike L

Expert Research:
Michael H

Expert Research:
Jeff D

Expert Research:
Jameson C

Expert Research:
Adam R

Written by:
Lindsey S

Updated by:
Adele M

Updated by:
Wilson B

Updated by:
Kristina F

Updated by:
Isabelle B

Video by:
Andrew L

Video by:
Ryan G

Test Fit:
Shane T

Test Fit:
Thomas T

Video Edited:
Sue W

Video Edited:
Chris R
At etrailer.com we provide the best information available about the products we sell. We take the quality of our information seriously so that you can get the right part the first time. Let us know if anything is missing or if you have any questions.


Product Experts Available Now!
Call 1-800-940-8924
Brooke M.
9/28/2023
It looks like this hitch isnt a fit for a twenty eleven Ford van. We do have part # 31053 that is a confirmed fit for the van you have.