
Part Numbers: SS48GV,31038
Thank you! Your comment has been submitted successfully. You should be able to view your question/comment here within a few days.
Error submitting comment. Please try again momentarily.


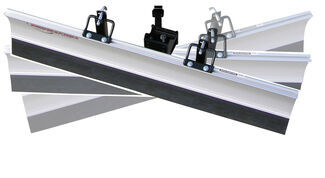
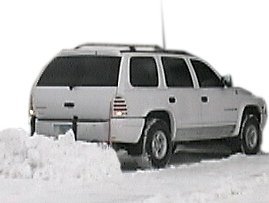
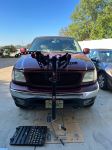
84 x 18 Heavy-duty plow with thick rubber cutting edge self-adjusts up and down to smoothly clear a path over concrete, gravel, and grass. Side scoops catch more snow with each push. Aluminum blade can be manually angled to either side.
Features:
Specs:
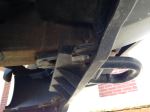
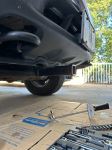
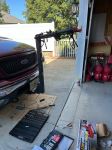
Installation is quick and simple - just slide included shank assembly into your 2" receiver and secure with pin.

Then lift the blade, one end at a time, onto the frame's holders and fasten with snap pins.
The SnowSport HD blade is mounted on an angled, 3-position shank assembly, allowing you to plow to the left, to the right or straight ahead.
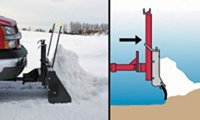
To plow, lower the blade and begin driving; no wiring or hydraulics are needed. The unique push frame on the shank assembly allows the blade to move along the grade of the terrain for easier, more efficient plowing. The heavy-duty rubber cutting edge is effective yet turf friendly, collecting snow and squeegeeing slush without digging into the ground.
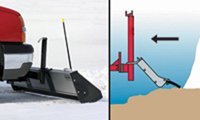
When you reverse direction, the blade lies back, skimming over the surface of the ground so that you can easily take another pass.
Once you're finished plowing, just lift the blade and refasten into the travel position. The blade is secure enough to travel at highway speeds, and the low-profile design keeps it from blocking your vehicle's headlights. Removal for storage is quick and easy. The plow can be used on the rear of your vehicle, making it a cinch to back out of your snow-packed driveway.
California residents: click here
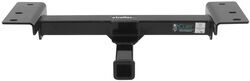
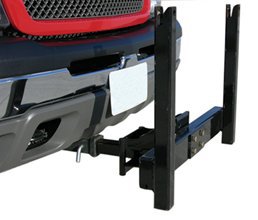
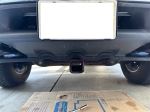
Easily attach a variety of accessories to the front of your vehicle with this fully welded, corrosion-resistant trailer hitch receiver. Perfect for winches, spare tire carriers and more.
Features:
Specs:
At etrailer.com we're committed to the products we sell, and to our customers. Our experienced and knowledgeable staff are available via both phone and email to address your questions and concerns for the lifetime of your hitch. The technicians at etrailer perform hitch installations on a daily basis, making them a valuable resource for do-it-yourselfers. The one-on-one, personal service you'll receive comes straight from an expert in the towing and automotive field. We've installed it, we've wired it and we've towed with it, so whatever your question, we can answer it.
Videos are provided as a guide only. Refer to manufacturer installation instructions and specs for complete information.
(upbeat rock music) (upbeat rock music continues) Narrator This video is to be used in conjunction with your owner's manual to help you with the assembly and mounting of your new SnowSport HD Plow. You will need a receiver plow mount hitch installed on your vehicle before starting the plow assembly. Follow the written instructions for the mount kit for your particular model of truck. Next, you will want to gather the tools shown on the list: torque wrench, impact or ratchet with 9/16-inch and 3/4-inch socket, drill with 3/16-inch and 5/16-inch drill bits, number 3 Philips driver bit, 3/4-inch box wrench, 5/16-inch open end wrench, 3/16-inch Allen wrench, bubble level, and protective eyewear. Make sure your vehicle is parked on a level grade and you're ready to get started. Step 1.
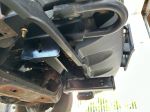
Insert interceptor into receiver and secure with the hitch pin. The interceptor can be installed with the big leg turned either up or down as needed for proper push frame clearance, shown turned up in this video. Bolt the push frame to the proper hole pattern on the interceptor using 4 half-inch by four-inch bolts with flat washers and lock nuts. Leave bolts snug tight for now. Step 2.
With the bolts snug tight, level the push frame horizontally, then check push frame for vertical plum. If plum, tighten all four bolts and proceed. If not plum, refer to the shimming procedure in step number 2 of your owner's manual. Step 3. Align the end of the rubber edge with the matching channel of the bottom section of the aluminum blade.
Slide the rubber edge into the channel until it's centered on the aluminum blade. Take the top half of the blade and connect the tongue-n-groove joint with the bottom half. Slide the top section until it's centered on the bottom section. Step 4. At each end of the blade, insert two square nuts into each channel, flat side facing out.
These nuts will be aligned with the holes at the top and bottom of the slide hinges. Place each slide hinge on the blade and align the edge of the hinge with a factory mark on the blade. When both hinges are properly aligned, they should measure 22 1/2 inches apart. Turn the 3/8-inch by 3/4-inch hex bolts with flat washers into the nuts that we're previously slid into the channels on both the top section of the blade and the bottom section of the blade. Double check to make sure each slide hinge is lined up with the factory mark. Then, tighten the hex bolts on the top section first, then tighten the hex bolts on the bottom section. Using a 5/16-inch bit, drill a hole through the blade in each factory punched hole on the slide hinge. Turn a 3/8-inch by 1-inch self-threading bolt into each drilled down hole and tighten. Step 5. At the tongue-n-groove joint, drill a 5/16-inch pilot hole at the factory mark in the v-groove at each end of the blade. For a 96-inch wide blade, there will be an extra hole drilled, and bolt installed per side. See step number 6 in your owner's manual. Turn a 3/8-inch by 1-inch self-threading bolt into each pilot hole and tighten. Using a torque wrench, tighten all six bolts in each slide hinge to 31 foot pounds. Step 6. At the bottom of the blade, double check that the rubber edge is centered. Then using a 3/16-inch bit, drill a pilot hole at each of the four factory marks in the v-groove. Be sure to only drill through the first layer of aluminum and into the rubber. Using a number 3 Philips bit, run a self-drilling screw into each of the four pilot holes. This prevents the rubber-cutting edge from moving. Step 7. Now, hang the blade on the push frame in the transport position and insert the keyhole pins. Insert two square nuts into the top channel. With a hex nut turned onto the stud of the blade marker, align the blade marker with the hole on the lift handle and bolt the marker and handle to the blade using one of the square nuts in the channel. Turn a 3/8-inch by 3/4-inch bolt into the other hole on the handle and thread it into the second nut that was slid into the channel. With the handle flushed with the blade edge, tighten both bolts connecting the lift handle to the blade. Repeat at the other end. Step 8. Attach the rubber box end to the blade using the metal cap plate and four 3/8-inch by 2 1/2-inch self-threading bolts. Tighten these bolts until the rubber end begins to compress to the blade. Insert a fifth bolt to tighten the bottom of the rubber end to the bottom of the metal cap plate. Secure this bolt with a flat washer and lock nut, tighten all bolts equally, and repeat at the other end. The installation of the plow is now complete, and your plow is ready for the winter season. (upbeat rock music).
Average Customer Rating: 4.8 out of 5 stars (74 Customer Reviews)
84 x 18 Heavy-duty plow with thick rubber cutting edge self-adjusts up and down to smoothly clear a path over concrete, gravel, and grass. Side scoops catch more snow with each push. Aluminum blade can be manually angled to either side. Easily attach a variety of accessories to the front of your vehicle with this fully welded, corrosion-resistant trailer hitch receiver. Perfect for winches, spare tire carriers and more.I got to say I'm one of the picky shoppers. I must see all reviews thoroughly, check it out from every angle and see multiple pictures before even being convinced to buy something online. I'm a welder and I was thinking about fabricating my own. After considering all the time for mounting breaking ,the plates drilling slotted holes. Steel price and then powder coating. This right here was an absolute supreme option all the work is done guaranteed to fit. So I took the Gamble and bought it and are not disappointed with their quality. Just like everything says I put it together in 45 minutes me and my 13 year old son. It is quite heavy lifting overhead to bolt up. Recommend having another person help you lift one side while fastening the bolt. The hardest part was getting the bolt to go through the sq punch out with the spring coil wire attachment that pulls the bolt through the frame. End result I'm extremely happy I did not have to cut any plastics or modify anything on my truck whatsoever. My truck is a 2001 Ford F-150 four-wheel drive crew cab. Now I have me my 9,000 lb winch on the front of my truck.
Installed this hitch on my 2000 Ford F150 4x4. It fit perfectly. No facia needed to be removed and no frame drilling was necessary. I simply removed the tow hooks and skid plate and bolted up the hitch and reinstalled the tow hooks. I notched the edges of the skid plate to clear the hitch frame (small angle grinder worked fine for this) and reinstalled the skid plate. Installation was simple and straight forward. The attached pictures may be a little dark but I attempted to show the hitch tucked up against the factory facia.
Product fit as it should. Was very easy to install, I did not need to modify anything, just bolt it on!. It fit my winch just fine, looks as though any winch receiver mount will fit just fine. Very sturdy, good welds, solid design. Only downside is that it does decrease your approach angle (if you are a off road guy)... but not by much. etrailer.com was very helpful with my questions, and their answers were accurate.

Steve

10/25/2018
Still mounted, not rusted, looks brand new still. Only used it a few times and it did its job just fine.
2003 F-150 4X4 Lariat. I accomplished installation alone in about 1 hour as a complete newbie. Here are my tips:
1. Read instructions and other comments ahead of time.
2. Spray the tow hook bolts a day or two ahead of time with a penetrating oil spray.
3. There is nothing to hold the factory nut plate (inside the frame rail) when the tow hook bolts are removed. After I removed the first tow hook bolt and loosened the other one for some "working room), I threaded a thin piece of flexible wire through the bolt hole and nut plate, out another nearby hole on the side of the frame rail and twisted it together to keep the factory nut plate in position. Then, I removed the second tow hook bolt and the tow hook. Leave the flexible wire in place for now. Do the same on both sides of the vehicle.
4. You have to temporarily remove the tow hooks completely but I did not have to remove any other trim / fascia.
5. The fish wire is essential. I passed the empty threaded portion of the fish wire through the bolt hole for the new bolt from below and advanced it toward the front of the vehicle. There is enough room once it comes out of the front of the frame rail to thread on the new bolt ... with the new nut plate included ... then pull it into the inside of the frame rail behind the bumper fascia ... then wiggle / "jimmy" it back until it drops into position.
6. Once the new bolt / nut plate was in position, I used a few drops of super glue to tack the nut plate into position through another nearby square hole where the new nut plate was visible. Do the same on both sides of the vehicle.
7. I used a hydraulic floor jack to position the receiver under the vehicle. A little metal lip at the center of the receiver fit right into the notches on the cup of the jack.
8. I carefully raised the receiver into position with the jack. I started a little bit toward the back of the vehicle. This let the front lip of the receiver slide forward into the fascia opening for the tow hook. Once the front of the receiver was through that, I lined it up, raised it and the new bolts (with the super-glued nut plates inside the frame rail) came through the receiver mounting holes perfectly. I put the two new nuts on the two new bolts "finger tight".
9. I raised the receiver a little further but leaving a few mm of space between the front of the receiver and the frame rail ... where the flexible wire mentioned above was coming out. The holes should line up at this point. Leave the flexible wire in place for now.
10. Use one hand to hold the tow hook in position. Thread one of the original tow hook bolts through the the tow hook, the receiver, the hole in the frame WITHOUT the flexible wire and into the nut plate inside the frame rail "finger tight". This will "grab" the factory nut plate inside the frame rail. Now, you can untwist / pull out the flexible wire through the other tow bolt hole and thread that bolt as well. Repeat the process for the other side of the vehicle.
11. Now, all 6 bolts / nuts are threaded in position "finger tight". Tighten / torque them sequentially ... and you're done!
The delivery was excellent. All four packages arrived early. Curt instructions were not clear for my f150. The third bolt spreader was too short but I got it tighten down. The only thing Curt needs to tell you is to insert something in the front hole of eye. It keeps the spreader in line while installing the hitch.

The hitch was a bolt on application, no drilling, a perfect fit. The only thing I had to do was notch the dust pan that bolts to the bottom of the frame, that was a 5-10 minute job. Great product, would definitely buy/suggest this front hitch!
Fit perfectly, easy to install. The fish wire is brilliant! Very stout receiver, good welds and paint. No modifications required on my 2001 F-150 4x4 crew cab. Bought it to move my camper around and for a winch when I am off road.
My factory bolts were not long enough to reach through the tow hooks and the tow hitch mounting plate. I left the tow hooks off for now until I purchase longer bolts. Other wise it fits fine.
Tha product is easy to install with the directions . This was my third truck to put a front hitch on and all worked well.
Scott J.
2/19/2023
Still working great. No problem. I had one on my other truck and the corners cracked. I got another one and sold the truck with it . I have actually purchased 3 front hitches over a 5 year period . All easy to install.
Snowsport PlowEtrailer.com does it right from start to finish. On top of having a great web site, the staff are the best.
Keeping in mind, I ordered this in December, about 5 days before our first big snow, here in Ohio. Within an hour of ordering my SnowSport HD plow, I was upgraded to special priority shipping, that was a nice surprise! The plow arrived in about two days, in three boxes, as I ordered the front hitch at the same time. I feel bad for my UPS carrier, these boxes were not for the faint of heart. The assembly went smoothly, the manufacturer uses high end parts and everything is well marked and the instructions are easy to follow. I estimate it took me two hours to get everything put together, with a coffee break in between. I am impressed with the construction, wow. Heavy duty is right!
We had four inches of snow yesterday. I opened the garage door and went to work, two pushes to clear the parking spots, and one easy push down the two hundred foot gravel driveway. Like butter.
I was done. It took less then 15 minutes. I put this blade on my 2003 rear wheel drive, not 4x4, Chevy Blazer. I backed into the garage and it looked like I had just put the blade on, this blade could last a long time. I love it. I cant wait until we get a foot or more of snow, my wife wants to plow next time. Plus I have cable chains comming from Etrailer, they should be here any day. Just in case my two wheel drive has tracktion problems in the deeper snow. Thanks a bunch, Etrailer!
We installed this on our 2011 Honda Ridgeline and a week later it snowed... And snowed.... And snowed.. 5 feet in 24 hours ( we live on the lake near Buffalo) and it's still snowing... This wasn't good, it was AWESOME! It was an easy install and assembly and worked absolutely perfect! We have a tough driveway and this kept it clear with no issues, no problems and we used it all day and night! When you spend that much on something you've never even seen before you can have reservations... It's worth every penny. It's solid ( more than we thought it would be) and does the job with ease. No .. It's good, but...... It's exactly as advertised and etrailer not only had the best price, the communication with my order was exceptional. Now... If only the town could send a plow down my street.....
I had a few hiccups while assembling (over tightening things early, I think) but once I got it together it’s been awesome. Clears easily and efficiently. Have used to clear as much as 14” of snow (that required pushing off to the side more often) but once you get used to the technique this thing is a lifesaver. I can clear a 300’ long driveway in 15 minutes or so for an average 4-5” snowfall.
Great hitch, fast shipping, easy installation. On my truck I did have to notch a steel protective plate so the hitch would fit. Not a big deal. I'd definitely order from etrailer again!
Scott O.
1/21/2019
Im still satisfied, thanks!
Delivered on time and FREE! Very Satisfied, Thank you Carol!
Installation was quick and easy per the directions. I did have to trim one skid plate but that was no problem and was done quickly.
The front hitch was everything I was expecting. The order process was easy and quick. The hitch showed up in just a few days and was ready for installation. It was obviously well made and solid. The instructions were straight forward and easy to follow. It took me (alone) about 45 minutes to install the hitch behind my pull hooks. And some of that time was spent trying to get the screws and bolts out of the old 2003 truck. I used a small floor jack to lift it up and wiggle into place. Worked very well. Even the bottom skirt fit back on nicely. Obviously on the front, this doesn't get a long haul evaluation. But it has been great around the yard with my short yard trailer. The front hitch does reduce your front end angle of climb some (it will dig in), but not real bad.
I think this hitch is top notch and the instalation kit made the install really easy like
I dont have any actual use data for this review. I purched a HF 12K winch i wanted to use occasionally on the front of my 2001 Expedition but the HF mount was such that the setup required an 8" extension to clear the Expedition big front bumper assembly. I deemed "that" array as too weak and wobbly to support the 80pound winch. I'm 100% sure the CURT receiver is more than adequate for the task, its the extension I have questions about.
It does what it's supposed to do, puts the snow from my driveways into piles not on my driveways. Got it over some of the other variations because it doesn't have electronics or wiring to break when its -30.
-Cutting edge that came with mine has been decently strong for running on gravel driveways.
-Light enough I can mount/unmount whenever I need to.
-Doesn't tear up lawns, which is where I have to push most of the snow I move.
--Needs a through eyebolt for quick connect back dragging rather than the ratchet strap idea they sell.
--Side panels are the weak link of the system
they cut in hard and make the plow jumpy while turning
the nubs on the back are also not deep enough to allow the plow to free stand when storing
and as hard as they are they get jammed right up with any sort of twig/leaf debris you might be plowing up
---I'll be replacing these with some sort of steel or aluminum panel with a tubing edge once they start to fail.
-- The sliding parts aren't powder coated so they'll need to be repainted every year or two or its going to rust right out.
Overall though it does what I wanted it to do, and paid for itself by saving me a lot of hours not having to shovel or snowblow. And even if my vehicle were ever to go down I could toss it on the back of another vehicle to get the snow moved.
It arrived in about 3 days, in 3 packages. I researched online extensively before choosing the SnowSport HD. Price at etrailer was about 10% cheaper than other sites. I already had the front hitch on my 2014 Honda Pilot, so all I had to do was assemble the plow and go play.
I had watched multiple videos of using and assembling the product, before ordering. All the time shoveling my driveway with a shovel as I had to get in and out and keep the driveway, ice free for visitors.
Everything was in the boxes, not a single bolt or washer missing. Assembly was as simple as I expected. I completed assembly without assistance in about 90 minutes, at a normal pace. Neither my cordless (nor corded) drill would screw the 3/8 self tapping screws to connect the two blade pieces, but it was not difficult to do them with a ratchet.
I set the height correctly for the front hitch, and I have a 6 inch hitch drop/riser that that should give me good plowing with the back hitch (have not tested yet, but expect good results)
The design is very well thought out, it is a quality product that will probably last the rest of my life (home use). I recommend it to others, and I would buy it again.
I ordered the plow as we finished getting about 10 inches of snow over a couple of days. The temperature stayed below freezing and there was still about 6 inches of snow to play in, when I had the plow mounted. Based on some reviews I had concerns that it might not do well, pushing piles of snow, or the snow that had been sitting for days. I was pleasantly surprised to be pushing even snow the city snow plow had mounded in front of the neighbors driveway. I plowed the neighbors from the street and about 80 feet in, without difficulty, three passes in a couple minutes and the job was done.
I live in a 1950s ranch home, with a single car garage (in basement) near Pittsburgh PA, my Honda Pilot fits in the garage with just inches to spare going through the door. The 7 foot blade is just a little narrower than the side view mirrors. So I can drive in and out. I have the blade and mount in the garage, and they are light enough that I can mount the blade front or back while in the warm garage and drive out to plow snow. Pull back in the garage, remove the blade and drive into to town to go to the office for work.
I am so excited to have this plow that, it probably will not snow more then a trace for a couple of years... Fate denying me the opportunity to play with it for a long time.
Perfect fit, fast service!
This was the easiest purchase i have ever made. Customer service was top shelf. Product fit right in place no problem at all. Looks
just like photo on net. Installing was a breeze. Fit was perfect, also made in the usa, even better! This will make using my winch and other items very ez.

Dewayne S.
1/27/2015
this product works and performs above my expectations I have put it through some real tests I used it for when seeing many cars out during a snowstorm also my friends out of mud and moving trailers around it works very well its built very well and it installed as easy as they had shown. I have no complaints with this from receiver hitch it is awesome I would recommend it and have to my friends.
Etrailer shipped to me in less than a week (In a really big box).
I bought this hitch to maneuver my travel trailer into camping spots more easily. I installed the hitch yesterday. It fit perfectly. I removed the trim piece on the front end of my pickup but later found out I didn't have to. Took me about a half hour to finish. The fish wire is really cool.
It sits about four inches lower than the rear hitch so I got another ball mount to use on the front that's the right height. This is going to make 'backing' so easy!
Before purchasing this item I read some of the reviews about it. One reviewer said it only took him 30 minutes to install. Being handy, mechanically inclined, I was hoping I would be one of those. Well it took me about 2 hours but that was because of multiple things....1) I was doing it by myself, a little hard to handle by yourself, 2) I thought I had to remove the lower 1 1/2" aero trim, you don't but I started to, 3) I have only used a fish once before in my life, after I did the 1st bolt I figured out how to do the 2nd one easier/quicker.
It really shouldn't take you 2 hours, you are only talking about 6 bolts, maybe an hour on average. I suggest reading ALL the directions BEFORE starting, having someone to help you, unpack the parts taped to the front of the hitch before installing and also, feed the fish wire "backwards" so to speak....feed it in the hole the bolt will go thru first then out the end of the box frame, much easier than the other way.
It was truly easy and I could probably do another one in 30 minutes now....it's not hard. If you need a front receiver hitch I would recommend this one if it fits your vehicle.
This started when I had to buy a new/used truck last fall and it needed to have some upgrade improvements in the towing package wiring system that I require, because I have learned to be very particular and solve a lot of problems before they develop. If you will check my purchases from your company you will see that the first purchase was for some electronic items that I determined years ago were wise on a prime mover (towing vehicle). Trailers are notorious for being piles of problems in the wiring department and the best move I could make was to install circuit breakers in the system, and not on each trailer but on my vehicle. No one is allowed to attach any trailer plug on my truck except in the breaker box. NO EXCEPTIONS. This prevents the trailer from blowing the fuses in the truck. All connections are made with solder on connections. Nothing clamp on as they will work loose and corrode thus not working. My truck presently has three trailer connectors a Round Pin 7 pin, a Round Pin 6 Pin and a 4 pin. All connect through the Circuit Breaker Box. This box is not water proof but is water resistant so the circuits are well protected from reasonable weather. I have my eye on a Trailer Brake in your line and I was pleased when I read the instructions and learned that there should be and was a line installed at the factory for the Brake and one for the Auxillary power to the 6 and 7 pin plugs and so simple to tap into either with solder connections or using the adapter listed. For me the equipment and the instructions make the job so easy to accomplish that it just is not necessary to go to some (Professional).
My hitch arrrived yesterday evening along with the instructions and the rain. Sorry I am 70 and do not roll around on the ground in the rain so the front end hitch is not installed yet. Having read the instructions and previously looked at the frame I feel confident that the 30-60 minutes install time will be very close to right, even for an old dude. This hitch will be used to move a Boy Scout trailer into and out of some tight places when going camping with our Troop. The lock is a lock which you have to have.
Your company:The customer service has been exceptional and I have been kept advised of the status of my orders in a timely manner. I would say this is a 5 star company.
Keep up the good work.
Hitch works great but required some cutting of plastic bumper trim to install.. had to cut out around the tow rings on 99 f150. If you don't have tow rings or hooks already installed, you will need to buy mounting clips. Much cheaper to go to junkyard and get.
Ask the Experts about this Snow Plow
Do you have a question about this Snow Plow?
Info for these parts were:
At etrailer.com we provide the best information available about the products we sell. We take the quality of our information seriously so that you can get the right part the first time. Let us know if anything is missing or if you have any questions.


Daniel C.
2/16/2021
I have had this for about a year and have used it numerous times. It works great. Wish I would have installed it years ago.