
Part Numbers: TLC2222,TLC3216
Thank you! Your comment has been submitted successfully. You should be able to view your question/comment here within a few days.
Error submitting comment. Please try again momentarily.
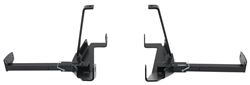
Get the safest and most comfortable ride while hauling your camper with tie-downs that mount on the frame of your pickup. Great for your truck's looks: remove the arms from the brackets and you'll hardly know that the brackets are there.
Features:
If you're looking for the best tie-downs for your camper, frame-mounted is the way to go. The frame is the most solid part of your entire vehicle, so it just makes sense to attach your camper to something that's not going to warp, bend, or twist. Even more importantly, the camper's center of gravity will sit lower and its weight will be spread across the entire bed. This avoids a top-heavy load perched on top of your bed rails that's liable to sway and get pushed around by crosswinds. The camper's not going to shift or slide around while you drive; it's going to stay put, and your truck is going to handle just like it does without a camper.
Quick Tip: If you have a plastic or spray-in bed liner, it's important that you use a rubber mat under the camper to eliminate any sliding or bouncing.
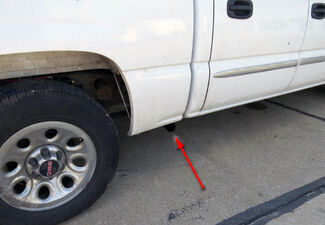
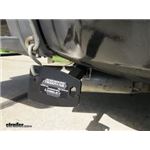
Frame-mounted tie-downs are also a great pick for preserving your truck's good looks. The brackets install on the frame, tucked nearly flush with the underside of the vehicle. Remove the arms from the brackets when you're not hauling your camper, and the brackets will be barely visible.
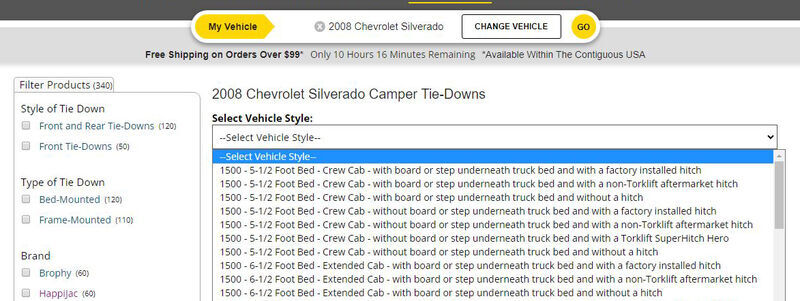
Completely custom to your vehicle, the tie-downs attach to exisiting holes in your frame so that there's little to no drilling and no need for any modifications. Because they're custom, you'll want to use our in-house application guide to make sure you get the exact right model. The tie-downs you need might be different depending on what type of hitch or other accessories you have.
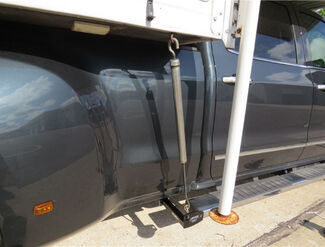
Once the tie-downs are installed, use a set of turnbuckles (sold separately) to secure the camper to the tie-downs. The shank on each arm has 2 pin holes so you can choose how far out they extend, that way the turnbuckles can reach the anchors on your camper without making contact with your truck. Tighten the turnbuckles to the correct level of tension (not too tight!).
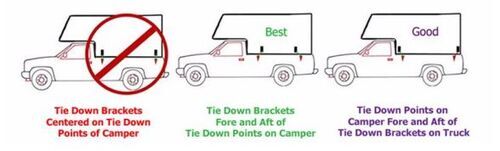
Make sure the anchor points are offset from the tie-downs instead of lined up with them so that they will hold your camper from multiple angles. This is important for keeping your camper from shifting. Two holes in the attachment plate of the tie-downs let you find the best angle for you camper anchors.

Get the safest and most comfortable ride while hauling your camper with tie-downs that mount on the frame of your pickup. Great for your truck's looks: remove the arms from the brackets and you'll hardly know that the brackets are there.
Features:
If you're looking for the best tie-downs for your camper, frame-mounted is the way to go. The frame is the most solid part of your entire vehicle, so it just makes sense to attach your camper to something that's not going to warp, bend, or twist. Even more importantly, the camper's center of gravity will sit lower and its weight will be spread across the entire bed. This avoids a top-heavy load perched on top of your bed rails that's liable to sway and get pushed around by crosswinds. The camper's not going to shift or slide around while you drive; it's going to stay put, and your truck is going to handle just like it does without a camper.
Quick Tip: If you have a plastic or spray-in bed liner, it's important that you use a rubber mat under the camper to eliminate any sliding or bouncing.
Frame-mounted tie-downs are also a great pick for preserving your truck's good looks. The brackets install on the frame, tucked nearly flush with the underside of the vehicle. Remove the arms from the brackets when you're not hauling your camper, and the brackets will be barely visible.
Completely custom to your vehicle, the tie-downs attach to exisiting holes in your frame so that there's little to no drilling and no need for any modifications. Because they're custom, you'll want to use our in-house application guide to make sure you get the exact right model. The tie-downs you need might be different depending on what type of hitch or other accessories you have.
Once the tie-downs are installed, use a set of turnbuckles (sold separately) to secure the camper to the tie-downs. The shank on each arm has 2 pin holes so you can choose how far out they extend, that way the turnbuckles can reach the anchors on your camper without making contact with your truck. Tighten the turnbuckles to the correct level of tension (not too tight!).
Make sure the anchor points are offset from the tie-downs instead of lined up with them so that they will hold your camper from multiple angles. This is important for keeping your camper from shifting. Two holes in the attachment plate of the tie-downs let you find the best angle for you camper anchors.
Videos are provided as a guide only. Refer to manufacturer installation instructions and specs for complete information.
Connor: Connor here today at etrailer.com. We're going to be taking a look at and showing you how to install the Torklift Custom Frame-Mounted Camper tie-downs for the rear of a 2017 Chevy Silverado 3500. So in regards to camper tie-downs, which are going to be used to secure a truck bed camper to your bed, you have a few different options. We have the ones that install inside the stake pockets. And we have the ones that actually mount to the frame, which is what we have here. Now, the ones that mount to the frame are going to be a much better option.
They're going to be easier to use, and they're going to look better. As you can see here, we're going to have the insert installed into the receiver, which means we're ready to go ahead and hook up our truck bed camper, and attach it with our turn buckles here.We have two slots here on either side. We can use either one depending on the setup of our truck bed camper. And then if we remove our truck bed camper, maybe for the winter, we're not going to be doing any camping, so we can go ahead and take it out of our truck bed. The great thing about these tie-downs are we can go ahead and remove this insert here, so we can go back to a factory look.
So another big benefit of the frame-mounted tie-downs as opposed to the stake pocket mounted tie-downs is we're going to have much more adjustability here. Number one, if we take a look at the receiver tube, which is installed on the truck here, we're going to have two different configurations for short bed or long bed trucks. And if we take a look at our insert here, we're going to see two different sets of holes here. Now, again, this is going to allow us to really sort of perfect our configuration that's going to best suit both our truck and our truck bed camper.So the different holes here are going to allow us, if we have a truck, we have a dually truck we're going to have those large rear fenders. And we're going to need more clearance for our turnbuckles so we can get them out away from the vehicle.
That's what this other adjustment hole is going to be for. But if we have a single rear wheel model like we see here, we can go ahead and snug these up. Now, granted, there are going to be some other instances where we may need to use the longer offset on a single rear wheel truck or vice versa. It's all going to come down to what truck bed camper you have, and the turnbuckles you're using. So we're really going to be able to get a nice custom like install.
It's going to be best suited for our truck and truck bed camper. So in regards to installation, these are going to be a custom fit here for our vehicle.They're going to be very, very easy to install, and we're not going to need a lot of mechanical experience or a lot of different specialized tools in order to be able to do this. It's definitely something you can do at home, by yourself, on the ground. So keep in mind, there's going to be quite a few different rear and front camper tie-downs for our truck, depending on the configuration, such as the bed length, the cab size, if you have a single or dual wheel model, as well as a couple other things here. So make sure you use our fit guide to ensure you're getting the proper fit. This particular rear tie down here is going to be specific to models with the Torklift Magnum 30K trailer hitch. So now that we've gone over some of the benefits and features, let's go ahead and jump right into installation, and show you how it's done.So the first step of our installation here, we want to come over to either side of our trailer hitch here. As you can see, we're going to have an L bracket that's attaching our trailer hitch to the bottom of the perch for our lease spring. So we're going to have two bolts holding this on. We're going to have a 7/16 bolt up here. And we're going to have a half inch bolt down here. Now we need to go ahead and remove the nuts, washers and lock washers on both of the ends of the bolt here so we can remove this L bracket. So for this top one here, we're going to need an 18 millimeter socket. Now we're going to use a 19 millimeter socket, and we're going to take off that other bolt there. We'll come around to the backside, grab the end of our bolt here. We're going to have another one up top, and then we should be able to remove this bracket.So now we need to go ahead and fish some hardware down into the spring perch here. Now we can actually already go ahead and use one of the bolts that we have that we're holding our L bracket to the frame here, but we're going to need to install another one here on the other side. In order to do this, we're going to be taking our 7/16 inch bolt that comes with our kit along with our half inch conical tooth washer, going to place that over like so, then we're going to follow that up with our spacer block here. But before we do this, what we want to do is you want to take our fish leader here, our wire leader. We're going to go ahead and insert the coiled end through that hole there. And then we're going to push it through till it comes out the other side. We'll show you that hole next. So here's the hole on the other side here, as you can see, we have our spare tire. It's going to be this large opening here that we can pull our bolt leader out and attach our hardware.We want to make sure that all of our hardware stays combined, meaning that the spacer block and conical tooth washer stay on our bolt. Because the next thing we're going to do is we're going to take the other end of our pull wire here and we're going to fish it through that hole there, making sure that all of our components stay together. So now we'll come out on the other side here. We'll try to pull this all through at once. What we may do is we may go ahead and tape this all together so it stays in place when we're pulling it through. So I do want to make a note here that while we're pulling our bolts through, we're actually going to be pulling this one through first, so our bolt here doesn't get in our way. But, since our customer already had this hitch installed, and we're installing the tie-down bracket second, we don't want to pull that bolt back out, so we're just going to leave it in place.Therefore, it's going to make it little bit harder to get this one aligned, but it will work with this other bolt in place first. And there we go. Now that we have it pulled through, we're going to go ahead and remove our bolt leader here, making sure we don't damage it, because we're going to need to use it on the other side. So now that we have our hardware in the spring perch here, the next step is to go ahead and take our tie-down bracket, and install it on the vehicle. Now keep in mind, we are going to have two different configurations here for our tie-down bracket. There's going to be a short bed configuration and a long bed configuration. Now this particular truck here is going to be the short bed. So what we need to make sure of is that our square tube here, our square cross tube is going to be installed closest to our rear wheel as opposed to the bumper. So we're going to install it like so.Now if we had a long bed, this tie-down bracket would go on the other side so that our square tube is going to be over here closest to our rear bumper. So let's go ahead and install this now. In order to do that, a little trick here, because we need to install hardware on these bolts here, but we don't want to push them back into the spring perch. So we're going to take one of our half inch bolts here, along with a half inch flat washer. We're going to come around to the backside of this trailer hitch, and insert it through one of these two holes here. And the reason we're doing this is, we're going to use that to hold it in place while we secure the top two bolts. We want to be extra careful again that we're not pressing those back up into the spring perch. So if we start with the top one there, that should hold everything in position to where it doesn't fall.We're going to go ahead and put a half inch flat washer, a half inch lock nut, and then a hex nut here to hold it in place for now. We'll go ahead and just tighten that up finger tight. We'll go ahead and install the bottom one now. We're not going to tighten these down just yet. We're just going to use them to help align the bolts up top. So now we're going to take our 7/16 inch hardware. So there's going to be these smaller 7/16 inch flat washers, our lock washers, and we'll follow that up with our hex nut. So let's go ahead and get those on both of those bolts now. So what I like to do is once I get those first two washers on, I like to go ahead and use one to pin the bolt to the side there, so it doesn't get pushed back up when we're installing our nut. Then we can finger tighten all these bolts here to help us with that last one.So I'm just putting some pressure there on the side of our lock washer to hold both of them on the bolt and to hold the bolt so we can get our nut on. Now we're going to come back with an 18 millimeter socket. We're going to snug these two bolts up. Then we're going to use a 19 millimeter socket and wrench to snug those bolts up. You do want to make sure that we alternate back and forth when tightening these down. Now, we're going to go ahead and tighten these first two bolts here down to the specifications in our manual, and then we'll work our way over to these two here. Now keep in mind. These are seven 16 sense bolts. These are half inch bolts, they're each going to have a different torque value. So now finally, we can take our tie down insert here. We can go ahead and insert it into the receiver that we just installed on the truck. Then we can use either hole here, but it's really going to vary depending on our turnbuckle and truck bed camper set up. So it doesn't really matter for now.I would however recommend some adjusting once you get everything set up. So we're just going to go ahead and insert it into the first hole there. Take our little snapper pin here, come around the back side with the keeper to lock it into place. Then finally, we're going to have some stickers in our kit here, which are going to help us. When we have these off inside the vehicle, one's going to be labeled to rear our front. They're obviously going to have a sticker for front that way. When we are ready to get set up, we can easily identify which tie-down insert is for the front or rear. We'll go ahead and just place that on the center of our tie-down insert. Just like that. Now we can go ahead and repeat this process on the other side of the vehicle. And that'll do it for our look and installation of the Torklift Custom Frame-Mounted Camper tie-downs for the rear of our 2017 Chevrolet Silverado 3500.
Average Customer Rating: 4.7 out of 5 stars (3226 Customer Reviews)
Get the safest and most comfortable ride while hauling your camper with tie-downs that mount on the frame of your pickup. Great for your truck's looks: remove the arms from the brackets and you'll hardly know that the brackets are there. Get the safest and most comfortable ride while hauling your camper with tie-downs that mount on the frame of your pickup. Great for your truck's looks: remove the arms from the brackets and you'll hardly know that the brackets are there.
I think it is a great product but expensive. In retrospect I could not do what I wanted with the truck and hitch so I spent the money needlessly. Not any fault of your company. I would have been just as well to leave the stock OEM and not spent the money anyway. Live and learn.
I have purchased many TorkLift products from eTrailer, all of which have performed as expected. The installation instructions are thorough and easy to follow. eTrailer product support and customer service is second to none. Thank you for your continued reliability.
Instructions were straightforward, installation was easy as expected. Didn't need to jack the truck up or anything - just crawl under and bolt on. Easy. Perfect fit for my 2015 GMC Sierra 2500HD
The application took dexterity in fishing bolts/spacers and washers through the frame. That is the price to pay for a drill-less install.
Harry and Harriet Homeowner can install this in their garage without a lift.
The final result is excellent - inconspicuous and strong on our 2015 GMC 3500HD
Front and rear Torklift tie downs worked as advertised. Installation was straight forward on a 2018 Chevy Silverado 3500HD.
Thanks Katherine everything was still in the box just installed the torklift hitch it fit perfectly thank you for your help with my order awesome customer service.
Fit perfect and tie down a heavy truck camper.
Could not be happier with the quick service I received from etrailer and outstanding product I purchased. The install was a breeze with the easy to follow instructions and I am now able to stay wherever it is I am playing! Thanks for the great prices and good service ??
The frame brackets have been working great although the tiedowns took a turn after eight months
Installed easy.
Love them and easy to install
Installation was relatively easy, although it would help to have an extra set of hands. Thought that I was missing a part, but it was just packaged separately and I found it at the bottom of the box!
Everything that I have purchased from etrailer came in on time went together easily no problems at all
Fit well, long term finish and quality leaves plenty to be desired, after 5k miles in a year and being stored indoors finish is peeling and rusty on the edges
Expensive but a great product. Install was easy but instructions were lacking.
Easy to install and work great. Just used them this past 4th weekend. No problems
They work great !!! Very satisfied with the quality of the products and your customer service.
works as described and love it. keeps a clean look during and when not in use
So easy to install, look great on the t ruck
Awesome customer service !
Awesome
The product is well made and easy to in stall
Great people to buy from, customer service can't be beat!!!
Ask the Experts about this Camper Tie-Downs
Do you have a question about this Camper Tie-Downs?
TorkLift Accessories
Fit to this rack on your 2019 Chevrolet Silverado 3500
Info for these parts were:
At etrailer.com we provide the best information available about the products we sell. We take the quality of our information seriously so that you can get the right part the first time. Let us know if anything is missing or if you have any questions.
Chevrolet Silverado 3500 Accessories


Victoria B.
5/4/2020
To help extend the life of your tie-downs and prevent further rust, you can clean off the rust at the edges and cover any bare metal spots with a black, rust-inhibiting spray paint.