
Part Numbers: TLC2222,TLC3217
Thank you! Your comment has been submitted successfully. You should be able to view your question/comment here within a few days.
Error submitting comment. Please try again momentarily.
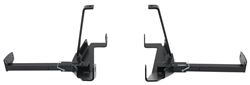
Get the safest and most comfortable ride while hauling your camper with tie-downs that mount on the frame of your pickup. Great for your truck's looks: remove the arms from the brackets and you'll hardly know that the brackets are there.
Features:
If you're looking for the best tie-downs for your camper, frame-mounted is the way to go. The frame is the most solid part of your entire vehicle, so it just makes sense to attach your camper to something that's not going to warp, bend, or twist. Even more importantly, the camper's center of gravity will sit lower and its weight will be spread across the entire bed. This avoids a top-heavy load perched on top of your bed rails that's liable to sway and get pushed around by crosswinds. The camper's not going to shift or slide around while you drive; it's going to stay put, and your truck is going to handle just like it does without a camper.
Quick Tip: If you have a plastic or spray-in bed liner, it's important that you use a rubber mat under the camper to eliminate any sliding or bouncing.
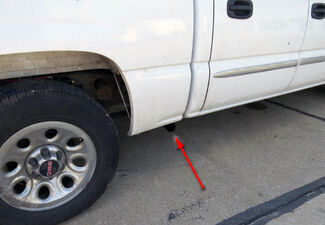
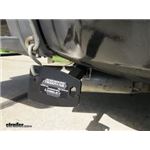
Frame-mounted tie-downs are also a great pick for preserving your truck's good looks. The brackets install on the frame, tucked nearly flush with the underside of the vehicle. Remove the arms from the brackets when you're not hauling your camper, and the brackets will be barely visible.
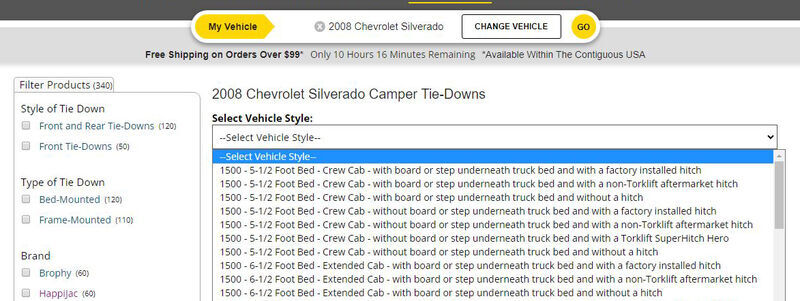
Completely custom to your vehicle, the tie-downs attach to exisiting holes in your frame so that there's little to no drilling and no need for any modifications. Because they're custom, you'll want to use our in-house application guide to make sure you get the exact right model. The tie-downs you need might be different depending on what type of hitch or other accessories you have.
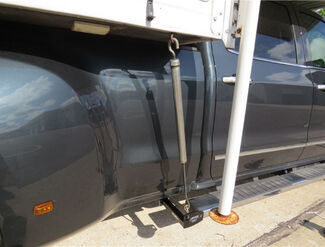
Once the tie-downs are installed, use a set of turnbuckles (sold separately) to secure the camper to the tie-downs. The shank on each arm has 2 pin holes so you can choose how far out they extend, that way the turnbuckles can reach the anchors on your camper without making contact with your truck. Tighten the turnbuckles to the correct level of tension (not too tight!).
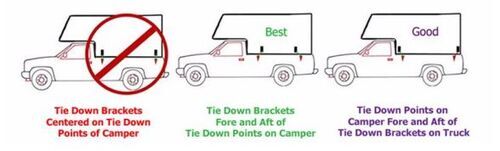
Make sure the anchor points are offset from the tie-downs instead of lined up with them so that they will hold your camper from multiple angles. This is important for keeping your camper from shifting. Two holes in the attachment plate of the tie-downs let you find the best angle for you camper anchors.

Get the safest and most comfortable ride while hauling your camper with tie-downs that mount on the frame of your pickup. Great for your truck's looks: remove the arms from the brackets and you'll hardly know that the brackets are there.
Features:
If you're looking for the best tie-downs for your camper, frame-mounted is the way to go. The frame is the most solid part of your entire vehicle, so it just makes sense to attach your camper to something that's not going to warp, bend, or twist. Even more importantly, the camper's center of gravity will sit lower and its weight will be spread across the entire bed. This avoids a top-heavy load perched on top of your bed rails that's liable to sway and get pushed around by crosswinds. The camper's not going to shift or slide around while you drive; it's going to stay put, and your truck is going to handle just like it does without a camper.
Quick Tip: If you have a plastic or spray-in bed liner, it's important that you use a rubber mat under the camper to eliminate any sliding or bouncing.
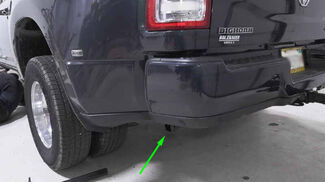
Frame-mounted tie-downs are also a great pick for preserving your truck's good looks. The brackets install on the frame, tucked nearly flush with the underside of the vehicle. Remove the arms from the brackets when you're not hauling your camper, and the brackets will be barely visible.
Completely custom to your vehicle, the tie-downs attach to exisiting holes in your frame so that there's little to no drilling and no need for any modifications. Because they're custom, you'll want to use our in-house application guide to make sure you get the exact right model. The tie-downs you need might be different depending on what type of hitch or other accessories you have.
Once the tie-downs are installed, use a set of turnbuckles (sold separately) to secure the camper to the tie-downs. The shank on each arm has 2 pin holes so you can choose how far out they extend, that way the turnbuckles can reach the anchors on your camper without making contact with your truck. Tighten the turnbuckles to the correct level of tension (not too tight!).
Make sure the anchor points are offset from the tie-downs instead of lined up with them so that they will hold your camper from multiple angles. This is important for keeping your camper from shifting. Two holes in the attachment plate of the tie-downs let you find the best angle for you camper anchors.
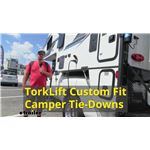
Videos are provided as a guide only. Refer to manufacturer installation instructions and specs for complete information.
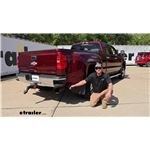
Hey everybody, Ryan here at e-trailer. Today on our 2016 Chevy Silverado 3500 we're gonna be showing you how to install the Torklift frame mounted camper tie-downs for the rear. But before we get into that, let's take a minute, check 'em out and make sure they're gonna work for you. If you plan on using an in-bed camper you're gonna need a way to secure it down, and that's where these are gonna come into play. Being that they are bolted directly to the frame, they're gonna give you a really solid attachment point. That way you're able to hook, you know your turn buckles up to this, up to your end bed camper.
Now with that said, you know, you're gonna want all four corners secured and this particular kit is just for the back, so you get one for each side here on the rear. You can always pick up the front separately. And a lot of times too, you can grab these as a whole kit. With that in mind, something you really need to look out for just to make sure you get what you actually need the first time, is the type of submodel, or what type of options that your truck has on it. You know, is it a short bed, is it a long bed Does it have a factory hitch or an aftermarket hitch Things like that.
And so, make sure to use our dropdown menu to enter that in. With that in mind, these are gonna work with a lot of different configurations in case, if you're curious, our truck today is a long bed. It has dual rear wheels, and a factory style hitch. Something that I notice about these particular tie downs is they're pretty high quality. You know, the finish is nice, the hardware's nice, they fit good, so you really can't ask for too much more there as far as that's concerned.
You know, like the fact that you can actually pull these out if I can manage to get the pin out here, you can pull this pin out, you'll have a couple adjustments which we'll talk about in a minute, but whenever you're not using 'em you know, you can have it set up like this, and it's kind of tucked up underneath the truck a little bit. You know, you're really not gonna be able to see 'em unless you deliberately look underneath here. But if you're just to walk up to the truck from, you know, a few feet away, these are gonna be pretty much completely hidden. There are gonna be two holes kind of pre-drilled into the shank, and that is to allow you to make quick adjustments. So the first one, you know, you'll put your pin through, and that'll set the attachment point out a little bit further from the truck.
Of course you can go in closer to kind of dial in exactly how you want your in bed camper set up. Okay, so if you're curious I'll just give you a couple of measurements. So right now we have this in as far as it'll go, and I'll just go from this small flange down there on our vehicle to the face of this, is gonna be about nine inches. And then if I pull this out further, and set it like that, that will be approximately 13 inches. So this should accommodate just about every situation that you find yourself in. And just outta curiosity too, I go from the ground here, to the very bottom, and that's gonna set it right at about 16 and one quarter of an inch. These are gonna work with a lot of different turn buckles, and in case you're needing a set of those, I like the Fast Guns, they're also made by Torklift, and seem to be a really good, really good match there. But aside from that, you know, not really a whole lot to it. You know, they're well-built, they fit the truck nicely and you really can't go wrong if you're needing a set of camper tie-downs. As far as the installation goes, really not bad at all. Since they are custom fit to the truck they already utilize openings in the frame that are already there so you don't have to drill or really modify anything for that matter. So really shouldn't take up a bunch of your time, or give you a ton of issues. If you like to hang around though feel free to, we'll go ahead, pull 'em into the garage and get started on 'em now. So you begin our installation and we're gonna be here at the back of our truck, and we're gonna be working on the side of it, right where our lease spring pack actually meets up with our vehicle spray. Right here, this is the hole, or one of 'em, that we're gonna use is an attachment point. So what you can do, you can grab the coiled end of your fish wire, put that through, and you're gonna push it to the inside of our truck here. And there's a large hole where we can drop that down through and we'll just let that hang for now, and get some of our hardware prepped. This is the hardware we're gonna use, we're gonna have this bolt, a star washer and this spacer block. So you put the bolt through the star washer, and through the block. And then something that I do, is take some tape and just kind of tape this all together because to be honest with you, when you try to get this through the frame and everything, it kind of can be a pain. Nothing wants to go through, it all wants to get kind of hung up in there. So this is just a trick that I've done to help make it a little more manageable. Thread it onto the fish wire and I usually go about halfway, that way there's still some bend in it like this. All right, and we'll feed this through. The trick is you kind of want everything to stay connected, and kind of be able to get it to all come through in almost one sweeping motion here. So you know, if you need to restart, not really a huge deal. You can always kind of push your hardware back out and readjust everything till we get it to drop down. I was able to get this to drop down, and I'll be honest with you, you're gonna have to fight it for a minute, just there's not a whole lot of room. But my advice would be make sure it's taped good. Like I said, that definitely seems to help, and you know, just kinda lightly work it back and forth until you, you know, you finally get everything to drop down like this. Grab this bracket, a half inch bolt, put the bolt through one of the holes there. You're gonna slide this into the pitch opening, I guess you could call it the support bracket. Drop it through this large hole, and then we're, this is here in the back, take another one of those bolts, drop that through. You can grab our bracket now. And these are side specific, so check your instructions you know, for what one you need. Our pull wire, actually it's gonna sit like this. So this will go up against the bottom of our truck. Take your pull wire, push that through, and we're just gonna work this up. Get everything to drop, drop through there. And with these bolts, you can put on a flat washer. And when you put this on if you use your finger to apply some side pressure to the washer, to the bolt, that'll hold steady, makes it a little easier. So the flat washer split lock washer, and the hex nut, get this in tight here. I'll use that same hardware combo for this attachment point. For this bolt, I remove the pull wire by just some threading it, you know, try not to destroy it 'cause you can use it for the other side of the vehicle once you get over there. And you can take a spacer block and a split lock washer, and I actually again use some packing tape here, taped them together, poked the hole through that, just 'cause you don't have a ton of room to work here. So we'll slide that up over the bolt, take a nut, and we'll get it started and tight. Once you get this nut on you can tighten down the hardware. I wanna mention too, you know, sometimes depending on your particular truck or whatever, it might be difficult to get that nut started. If you're having a hard time, you can always tighten these up to help draw everything up, and that'll buy you a couple extra threads if you need to do that. So, just something I'd mention. But with that said, we can snug these down using a three quarter inch socket. Let's switch out to an 11/16th's. So we'll tighten this one up. And then we will come back with a torque wrench, and torque down all of the hardware to the amount specified in the instructions. With the driver's side all wrapped up you're simply just gonna repeat that exact same process over here on the passenger side. Now in the instructions they say you might have to lower the exhaust a little bit to give you room to work. I've never ran into that. I've done several of these trucks, and I've had the room to get in there. But maybe if you have an aftermarket exhaust system or something along those lines, something you might have to do. And if that's your case, you know, check the instructions, they give you some pointers and things you need to do to make that happen. And that'll finish up or look at and our installation of the Torklift frame mounted camper tied-ons through the rear on our 2016 Chevrolet Silverado 3500.
Average Customer Rating: 4.7 out of 5 stars (3192 Customer Reviews)
Get the safest and most comfortable ride while hauling your camper with tie-downs that mount on the frame of your pickup. Great for your truck's looks: remove the arms from the brackets and you'll hardly know that the brackets are there. Get the safest and most comfortable ride while hauling your camper with tie-downs that mount on the frame of your pickup. Great for your truck's looks: remove the arms from the brackets and you'll hardly know that the brackets are there.Was sent the wrong kit for the rear initially even after talking with 2 different people about my installation needs. The first shipment was late. I did not order from local vendor for same product at the same price because I needed my order quickly. Turns out I paid extra shipping to receive my mounts at a later date and get charged shipping for the wrong rear kit and the replacement kit both ways!!!
The front brackets have incorrect parts not e trailers fault but they are correcting the issue for that i gave 2 stars bc Will was so helpfull but tork lift messed up the parts in the box
These tiedowns are a quality, heavy duty product. If you want to feel confident that your truck camper isn't going anywhere, just spend the $, install these tiedowns and forget about it... Happy Trails!
Kit was complete and easy to install. The eTrailer install video on product page was very helpful. Took about 3 hours to install front and rear kits, and that included a sandwich and coffee break. ( RV dealer quoted me 4-6 hours @ $165/hour). Kit lined up with frame mounts exactly. I recommend a helper if you’re installing with truck in the driveway.

Love these!! They make my camper feel like it’s actually attached to my truck instead of those old junk bed rail mounts!! I’m able to go off road more and get to those good camping spots for my camping [online] channel: Work Less Enjoy Life More”
Fast delivery install just like they said and fit perfect
Instructions were straightforward, installation was easy as expected. Didn't need to jack the truck up or anything - just crawl under and bolt on. Easy. Perfect fit for my 2015 GMC Sierra 2500HD
The camper tie downs fit my truck perfectly. Their size and weight made the installation intimidating, but your videos helped, and your written instructions are very good. I like how your instructions directed me to install the difficult side first (passenger or driver side). Unfastening the "fish wire" from the bolt is not easy - you could include extra fish wire. I have a GMC 3500 dually, stock, and I installed these tie downs as the truck sat on the ground, about a two hour project, and I'm 69.
Front and rear Torklift tie downs worked as advertised. Installation was straight forward on a 2018 Chevy Silverado 3500HD.
Have not received them !!!
Installed easy.
Installation was relatively easy, although it would help to have an extra set of hands. Thought that I was missing a part, but it was just packaged separately and I found it at the bottom of the box!
The wrong equipment was sent the first time but we got it squared away and they work great
Expensive but a great product. Install was easy but instructions were lacking.
High quality product, fully adjustable. Works great.
Arrived in two days and was packed well.
Easy to install and work great. Just used them this past 4th weekend. No problems
My sales rep Noah was extremely helpful and had the knowledge of the product to answer my questions.
Works great. Easy to use.
Awesome
Great product! Shipped quick!!
Fit great. Back ones were easier to put on because more room.
Great product and very easy install.
good
Ask the Experts about this Camper Tie-Downs
Do you have a question about this Camper Tie-Downs?
TorkLift Accessories
Fit to this rack on your 2019 Chevrolet Silverado 3500
Info for these parts were:
At etrailer.com we provide the best information available about the products we sell. We take the quality of our information seriously so that you can get the right part the first time. Let us know if anything is missing or if you have any questions.
Chevrolet Silverado 3500 Accessories


Jenny N.
7/19/2023
I will have our Customer Service team reach out to you as soon as possible.