bing tracking image

How to Winterize Your RV Cover

How to Winterize & Dewinterize Your RV

Air Compressor & Antifreeze Methods

It's that time of year — time to wrap up that last camping trip and pack it in for season, and this means winterizing your RV to withstand the months of freezing temps and lack of use in storage. Even when you drain your tanks, a bit of water will still remain in your plumbing lines. And if this water is left alone to freeze and expand, it can cause major (and expensive) damage to your pipes.Below, we'll walk you through the two main methods of winterization: the air compressor method and the antifreeze method. Then, we'll show you how to reverse the whole process and de-winterize your RV to get it ready for spring.NOTE: It's always a good idea to check your owner's manual for any specific instructions on winterizing or de-winterizing your RV. The information below is a general guide for the majority of RVs but cannot address every specific camper year, make, and model.
Winterizing Your RV with an Air Compressor vs AntifreezeWhich method you use comes down to personal preference. Some people notice and dislike the lingering smell of antifreeze and choose to use the air compressor method. Other RVers still choose to use antifreeze because they like being able to see the pink in the lines and know they're protected. Some campers even choose to use both methods for the ultimate peace of mind. Your owner's manual might have a recommendation; otherwise, you can read up on both methods below and choose the one that will work best for you.

Winterizing Your RV With an Air Compressor

Water can't freeze inside your pipes if there's no water left, which is why blowing out your lines with an air compressor is such a popular winterization method. Basically, you'll drain your RV of whatever water you can, then use an air compressor to blow out whatever vestiges of water remain. WHAT YOU'LL NEED:
Watch video demonstration of an RV winterization using Valterra RV Blow Out Plug

Step 1: Drain the Fresh Water Tank

Start by draining your fresh water tank of whatever water is left inside it. Go ahead and leave this valve open for now. If for some reason your city water connection is still connected, disconnect it now.
Drain Fresh Water Tank

Step 2: Drain & Bypass Your Water Heater

If you haven't already drained your water heater, remove its plug and do that now. NOTE: Never drain the water heater while it's hot or under pressure.Next, you'll need to bypass your water heater. Most RVs these days have built-in bypass systems that just require you to flip a switch or lever. If you don't have an integrated bypass, you can install a water heater bypass kit. If you're not sure where your bypass is or if you have one, check your owner's manual.
Water heater drain plug
Remove your water heater's plug and drain any water left inside
Water heater bypass switch
If your RV has a built-in bypass switch, flip it now
Bypassed RV Water Heater
Example illustration of a bypassed water heater

Step 3: Open Your Valves to Drain More Water

Even though you've drained your fresh water tank, water may still be in your system. Walk through your RV and open your faucets (hot and cold) in the kitchen and bathroom sinks until all remaining water runs out. Flush the toilet, and turn on both your indoor and outdoor shower (if you have one).The goal is to drain the lines as dry as possible before coming in with the air compressor.
Water heater bypass switch
Flushing RV Toilet

Step 4: Attach Your Blowout Plug & Pump In Air

Note: make sure to always leave at least one valve open before blowing in air (ex: make sure your kitchen faucet is on). The air has to have a release point, otherwise it will damage your lines. Attach your blowout plug to your city water connection, and set your compressor to 25-30 PSI. As you pump air into the camper, any remaining water in your lines will be pushed out through the open valves in your camper. You can leave all the valves open, but we recommend moving through the RV and opening each valve in turn, one at a time, giving the compressor a chance to pump air through the lines. Again, make sure to do this for the kitchen sink, bathroom sink, indoor shower, and outdoor shower. Wait until all water has drained from each open valve. Once you're done with this process, go back and close your fresh water tank valve and disconnect your blowout plug
RV City Water Connection
Open RV tub valve

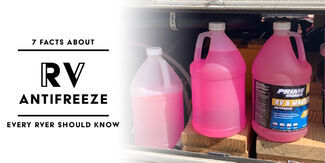
Winterizing Your RV With Antifreeze

The other option for winterizing your RV is the antifreeze method. You can do this as the next step after blowing out your lines, or you can do this step alone. WHAT YOU'LL NEED:
  • RV antifreeze
  • Siphon hose, if your RV doesn't include one
What's Different About RV Antifreeze? It's CRUCIAL that you use RV-specific antifreeze to winterize your RV's plumbing system. It's bright pink and can usually be purchased from your local dealer, RV supply store, or even Walmart. RV antifreeze is non-toxic and safe to use in fresh water plumbing. Automotive antifreeze, however, should NEVER be used in your RV plumbing. It contains ethylene glycol and can be deadly if ingested. How much antifreeze do you need? Most RVs require about 2-3 gallons. As a general guide, estimate about 2 bottles for rigs under 18' long, 3 bottles for those 18-30' long, and 4 bottles for units over 30' long.

Step 1: Drain the Fresh Water Tank

If you've just finished the air compressor method and want to add antifreeze from there, go ahead and skip to Step 3. If you're only using antifreeze, however, you'll need to start by draining your fresh water tank. Also remove or bypass any inline water filters (you should be replacing your water filter each year anyway, but if you don't plan on replacing it, definitely remove it now so it's not damaged by antifreeze).
RV fresh water valve

Step 2: Drain & Bypass Your Water Heater

Next, you'll need to bypass your water heater so that the antifreeze you pump into your system doesn't fill up the water heater, since this is just a waste of antifreeze, and you'll end up using extra gallons you don't need. Most RVs these days have built-in bypass systems that just require you to flip a switch or lever. If you don't have an integrated bypass, you can install a water heater bypass kit. If you're not sure where your bypass is or if you have one, check your owner's manual.
RV water heater drain plug
Remove your water heater's plug and drain any water left inside
RV water heater bypass switch
If your RV has a built-in bypass switch, flip it now
RV water heater bypass graphic
If your RV has a built-in bypass switch, flip it now

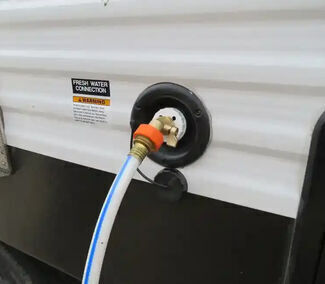
Step 3: Pump Antifreeze into Water Lines

Note: some RV antifreeze must be diluted with water. If yours requires this, go ahead and mix the proper water/antifreeze solution now. How do you actually put antifreeze in your RV? For this step, you'll need to find your water pump (check your owner's manual if you're not sure where it is). Many RVs are equipped with a siphon hose connected to the pump for the purposes of drawing antifreeze into the water lines. Normally, your siphon hose valve will be closed, and your fresh water valve will be open. For the purposes of winterization, open your siphon hose and shut your fresh water valve. This will allow the siphon hose to pull water from the antifreeze bottles once you turn on your water pump and prevent the fresh water hose from trying to draw water from your fresh water tank. Once your hose is inside your antifreeze bottle, your siphon valve is open, and your fresh water valve is closed, turn on your water pump. If you don't have a built-in siphon, you can easily, affordably install a siphon hose yourself. Alternatively, you can use a hand pump to pump antifreeze into your city water inlet.
RV siphon and fresh water valves
The siphon hose and fresh water valves on an RV. Make sure the siphon valve is open and the fresh water valve is closed for winterization.
RV antifreeze and siphon hose
A siphon hose in a bottle of antifreeze

Step 4: Open Your Valves Until You See Antifreeze

Normally the RV rule to live by is "never let the water run." But this is the exception. Back inside the RV, open your valves (faucets) one at a time until the water runs pink, then close it and move to the next one. (If you've already done the air compressor method, you won't have water in your system, so just wait until the antifreeze starts to flow.) Make sure you open both the hot and cold faucets for your kitchen and bathroom sinks. Also turn on your indoor and outdoor shower (if you have one) and flush the toilet. Some RVers recommend starting with the highest drain and working your way to the lowest. Another method is to start with the drain closest to the water pump, then move farther away. Beneath your water pump, you'll have two low point hoses that will also need to be drained. You'll have to crawl under the camper for this and open the valves until you see (or smell) the antifreeze drip out. PRO TIP: For this step, it can help to have a second person outside the RV watching the antifreeze bottles. They can run low pretty quickly, so you'll need someone to switch the siphon hose into a new bottle when one runs out. Once you're finished, turn your water pump off.
RV antifreeze in sink
Pictured: Pink RV antifreeze running from a kitchen sink
RV low point valves
Pictured: The RV's low point valves on the underside of the RV

Step 5: Pour Antifreeze in your P-Traps

Pour a bit of antifreeze into the P-traps of your sinks and in your shower.Tuck your siphon hose inside your RV's storage compartment with your water pump. Shut off the siphon valve and turn your fresh water valve back on for next year.Make sure the water pump is off and remove the screen attached to your city water hookup. In the center is the check valve. Push the valve until water comes out and you see antifreeze.
Pour RV antifreeze in sink
Pour antifreeze in your sink and shower P-traps
RV city water connection
You should be able to see the pink antifreeze inside your RV lines.
Clear RV pipes
Before: Clear water lines prior to winterization
Pink RV pipes filled with antifreeze
After: Pink water lines filled with antifreeze

How to De-Winterize Your RV

De-winterizing your RV is pretty straightforward. Essentially you just reverse the RV winterization process and flush out your system.

Step 1: Flush Out the Antifreeze

Fill your fresh water tank, turn on your water pump, and run water through your entire system: your kitchen sink, bathroom sink, indoor and outdoor showers, toilet. Open the hot and cold taps and wait for the water to run clear instead of pink.Turn off your water pump and connect to city water. Run water through the entire system again.
Flush out RV antifreeze

Step 2: Sanitize Your Fresh Water System

*Note: This step is optional but recommended. Ensure all drains are closed and drain plugs are installed. Mix 1/4 cup bleach per 1 gallon of water. Prepare 1 gallon of solution for every 15 gallons of tank capacity. (Alternately, you can use a freshener designed for de-winterizing RVs.) Add the mixture to the fresh water tank via the gravity fill inlet.Turn on your water pump and let all your faucets run until you smell bleach water. Then, turn the faucets back off and let the water sit for 4-12 hours. If possible, drive the RV around so that the solution sloshes around inside the system.One last time, drain the tank, refill it with clean water, and run water through each faucet again. Your water is safe to drink when you no longer smell bleach in your system. NOTE: We do not recommend using bleach to sanitize your black water tank, as doing so can damage the seals.
Spring Fresh RV Dewinterization Freshener

Step 3: Set Up Water Heater

Take your water heater out of bypass mode and fill your water heater. Turn your hot faucets on and run water through your system. You can also reinstall or replace your filter cartridges now.
RV water heater with bypass mode
We've put together two downloadable checklists for winterizing and de-winterizing your RV. Right click (or press and hold) to save these checklists to your device.
RV winterization checklist
RV de-winterization checklist
Amber S.
About Amber S. As a content writer for etrailer, I might spend my morning loading and unloading a bike on five different bike racks to figure out which is easiest to use. I might be in the parking lot, taking pictures of an impressive RV battery setup our techs came across in the shop and discussing the benefits of the setup with the owner. I might spend an afternoon in a manufacturer training classes for some hands-on experience with new products, and then sit down to assemble all this information into a coherent article.At etrailer, one of our core values is that we are always learning, and I learn something new every day. I start each morning with the goal in mind of taking all of this information and figuring out the best way to answer the questions people ask us (and the ones they don’t know to ask yet), and helping people get the solutions they need to make their lives easier, safer, and more fun. I’m a DIYer at heart, so it brings me great joy to help a fellow DIYer find what they’re looking for, whether that’s a product, an answer, or a community.
Related ContentRelated ProductsWritten by: Amber S.Updated on: 6/2/2021

Steve J.

2/15/2023

Sound info here. Thanks for sharing.

Etrailer Expert

Mike L.

2/15/2023

You're absolutely welcome! We're glad we could help!

Bobby B.

10/14/2021

Super good info. I will definately use your check lists. Thyanks!!!!

Virginia M.

9/28/2021

Is there places or people that will do this. i am a widow and I thought I might could do it but after reading what has to be done I know I cannot do it. My deceased husband always did it but he didn't teach me how so I need someone to do this for me.

Les D.

10/21/2021

@VirginiaM Most RV dealerships with service can perform this task for you. You might ask around if you have family or neighbors who could help you. You might check for social media camping groups in your area as well.


Departments

Towing

Sports and Recreation

Trailer Parts

Vehicle

What our customers are saying:

"In these days of customer "no service" I am usually disapointed when doing business with people I don't know. It was refreshing doing business with you. I'm impressed!"

Randy
Watkinsville, GA

Popular Vehicles