bing tracking image

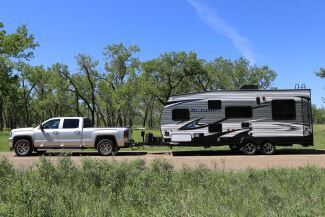
How to Install a Weight Distribution Hitch (With Pictures & Video)

The idea of installing a weight distribution hitch can be intimidating, especially when it's hooked up to something as important as your trailer and vehicle. Depending on your system, you may feel comfortable doing a DIY installation right in your garage, or you may feel better taking your system to a pro.To give you an idea of what's involved in a weight distribution system installation and, by extension, what differs between different system types, we created this weight distribution hitch installation guide.Of course, your specific setup may differ slightly from ours, so you should always follow any manufacturer instructions included with your system. The following is to be used as a general guide.
Watch Now: Installing an Equal-i-zer weight distribution hitch
Watch Now: Installing a Reese weight distribution hitch with chain brackets

Step 1: Take Vehicle Measurements

No matter what type of weight distribution hitch you're installing, the first tool you need is a tape measure. First, you'll need a few measurements of your tow vehicle without the trailer loaded. This will tell you how your level vehicle should sit when no trailer is attached.We'll pick two stationary points on the front and rear of the vehicle to measure. For instance, you can measure the front and rear tires from the ground to the lower portion of the fender well. You can also measure the front and rear bumper.We'll measure these points again after our weight distribution hitch is installed. If the WDH is doing its job, the new measurements will be very close to this first set of numbers. The goal with our WDH is to correct the vehicle sag that occurs when the trailer is hooked up.
Measure Rear Bumper
Measure Front Bumper

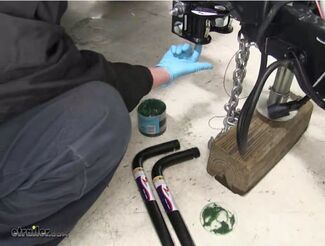
Step 2: Install the Weight Distribution Shank

Remove your old ball mount if you have one, and install the WD shank in its place. Make sure your trailer is level, then measure from the top of the coupler to the ground. This measurement is important for making sure your hitch ball is installed in the right place. For best results, use a level on the side of your trailer.
Install Weight Distribution Hitch
Slide new WD hitch into hitch receiver
Measure from the ground to the top of your coupler

Step 3: Install the Hitch Ball

Slide the hitch ball into the head assembly and secure with a washer and nut. In its final position, the top of the hitch ball should be about 1/8th" higher than the coupler for every 100 lbs of tongue weight. For instance, if you have 800 lbs of TW, your ball should be about 1" heigher than the coupler height. This is to compensate for vehicle squat.
Pro tip: It helps to rotate the shank sideways and temporarily place the head assembly on the shank in order to tighten the ball down. A tool like the HitchGrip can help you handle your heavy head assembly.
Insert Hitch Ball Into Weight Distribution Head Assembly
Insert hitch ball into head assembly
Turn Shank Sideways to Tighten Ball
Place the shank and head sideways to tighten the ball down

Step 4: Install/Adjust the Head Assembly

This step is going to differ between WDH, depending on which type you have. You can adjust the tilt of your WD head assembly—and therefore the angle of the spring bars—to help apply the necessary amount of leverage to lift the rear of the vehicle. Different systems have different ways to accomplish this, and some models will be easier to install and adjust than others.We'll compare the most popular systems below and show you how to install them.
Weight Distribution System - Traditional Washers

Traditional Washer Style

WDH with traditional washers, like the Equal-i-zer, require you to adjust the tilt of the head assembly before installing it on the shank. The traditional washer-style adjustment method lets you adjust the tilt by sliding washers onto a spacer rivet and then inserting the rivet into the head assembly. To bring the hitch ball closer to the trailer, add washers. To bring the ball closer to the tow vehicle, remove washers.These are typically the most difficult systems to install just because accessing the pin and washers can be a bit tedious, since you have to disassemble the head each time you need to make an adjustment. Fortunately, this typically has to be done at initial setup only or if you switch trailers, so once you do get the correct tension, your work is done.It may take a few tries to get the right number of washers for proper adjustment. The more your vehicle sags when the trailer is installed, the more washers you need.You can go ahead and place the washers on the rivet now and insert it in the head assembly. If you find that, after installation, you require a greater or lesser degree of head tilt, you'll have to disassemble the head to add or remove washers. This can make the setup process a bit tedious, but this typically has to be done only at initial setup or if you switch trailers.
Manufacturer tip: To give you an idea on where to start in terms of adding washers, note that for their E2 weight distribution hitch, Fastway recommends starting with 6 washers for longer wheelbase tow vehicles, such as pickup trucks. For shorter wheelbase vehicles, like small SUVS, 5 washers are recommended. Equal-i-zer notes that most setups require 4-6 washers for proper adjustment.
Weight Distribution - Serrated Washers

Serrated Washer Style

An improvement over traditional washers, serrated washers let you fine-tune the tilt of the head with ease. Unlike traditional systems, serrated washer systems don't require you to disassemble the head to make adjustments. Instead, external serrated washers are positioned on either side of the head, so you can easily loosen, adjust, and tighten the washers as needed. The serrated washer style is found on systems like the Reese Strait-Line.
Serrated Washer Weight Distribution Instructions
Reese Block Washer Weight Distribution System
Preset Washer System (*Easiest to install)

Preset washer systems take the guesswork out of finding the correct tilt by providing preset adjustment options for you to choose from. These system types can be found on many Reese round-bar units as well as the Curt TruTrack. Unlike traditional washer systems, preset systems don't require you to disassemble the head to make adjustments or to keep track of unused washers. Just select one of the ready-made settings and adjust until your trailer is level, and you're good to go.To install, slide the adjustment washer onto the head assembly bolt, and slide the bolt into place. If there is a second bolt, such as on Reese's block-style system, place the second block washer on the opposite side of the bolt, in the same orientation.
Reese Block Washer Weight Distribution Hitch
Curt TruTrack Weight Distribution Hitch
All SystemsBefore securing the head assembly, take another measurement from the ground to the top of the hitch ball to make sure it is at proper height (about 1/8th" higher for every 100 lbs of tongue weight). Snug down your system to hold it in place, but wait until the end to tighten everything fully, just in case you need to make adjustments later.

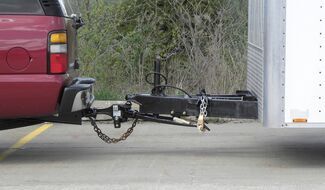
Step 5: Connect Spring Arms and Sway Control

Connect your vehicle and trailer and use a jack to lift them. Then, take a bit of wheel bearing grease like # L10333 and add it to the hole on the head assembly where the spring arm will be inserted. This will help prevent wear and make insertion/removal easier.Go ahead and insert the spring arms. Round arms slide into the head from the bottom and are held in place with clips. Trunnion bars slide into the head from the side or back.The installation process from here will depend on what type of system you have.
Adding grease to the head assembly helps prevent wear and make spring arm insertion easier
Brackets on Trailer Coupler Frame
Pro Series chain and snap-up bracket system

Chain and Bracket Systems

With these systems, your spring bars will attach to your trailer frame via a set of chains held by brackets. After your spring arms are inserted into the head assembly, place your brackets at the appropriate location on the trailer coupler frame (as indicated in your instruction manual).Next, you'll connect your chains to the brackets. For this step, you'll need to determine how many chain links you'll need to achieve the right amount of tension. Most applications need about five links showing, but this isn't a set rule. For a greater load weight, use more links; for a smaller load weight, use fewer links. Sway control devices can also affect the number of links needed.The most important thing is to keep the vehicle level. With the trailer hooked up, get as close as you can to the unloaded height measurements we took in step 1. The spring bars should be level with the frame or slightly pointed downward.Note: If adding or removing chain links doesn't help, you'll likely have to readjust the head assembly tilt (see step 4).Most chain systems use snap-up brackets, in which the chain is lifted onto the bracket, then the bracket is snapped up into a locking position. Systems like the Blue Ox SwayPro, however, have upgraded to auto-locking brackets for easier setup.
Blue Ox SwayPro Weight Distribution Auto-Locking Brackets
Blue Ox SwayPro auto-locking brackets
To install anti-sway friction bars on a chain and bracket system, apply a bit of grease to the mounting points, add the sway bar, and install the safety pins to secure it in place:
Friction Bars on Chain and Bracket Weight Distribution Hitch
Friction bars on chain and bracket hitch
For a dual-cam system like the Reese Strait-Line, you'll need to attach the cams:
Reese Strait-Line Weight Distribution System
Reese Strait-Line Weight Distribution Dual Cams
NOTE: When mounting brackets, make sure there are no wires, tanks, etc. in your way. Don't allow wires or anything else to be pinched in between a bracket and your trailer frame. Some systems, like the Equal-i-zer, provide no-drill, clamp-on brackets that easily adjust to accomodate frame-mounted items such as gas tanks, generators, etc. Other systems sell bolt-on options separately to help accommodate any clearance issues. You can also purchase chain hangers to accommodate frame-mounted items.
Sway Control Spring Arm Weight Distribution Hitch
Sway Control Bracket SystemsWith sway control brackets such as those found in 2-point and 4-point sway control systems, the spring arms will be secured by the brackets, rather than by chains. First, the brackets are mounted to the trailer frame, then the spring bars are loaded onto the brackets with an included pry bar tool and secured in place with a pin.
Equal-i-zer Sway Control System
Curt TruTrack Weight Distribution Hitch

Step 6. Check Your Work

With the trailer still loaded, it's time to check your front and rear vehicle measurements again and make sure your system is doing its job! Compare these loaded measurements to the initial measurements you took without the trailer loaded.The front wheel should stay at basically the same height when the trailer is hooked up. The back wheel should be within about 1-1/2" of its unloaded measurement when the trailer is hooked up (the closer the two measurements are, the better).If the front of your vehicle is pointing upward once your WDH is attached, you need more tension in your system. If the nose points down once your WDH is attached, the WDH is working too hard, and you need to loosen the tension a bit.Check the level you placed on the side of the trailer. If it's too high or low, try repositioning the ball mount higher or lower on the shank.Make sure your hardware is tightened and torqued to specifications.And that's it! You're ready to hit the road.
Is Your Weight Distribution Hitch Working?
Still have questions? Give our experts a call at 800-298-8924, or contact us online. We're happy to assist any way we can!
Save or Share This Idea
Related ProductsWritten by: Amber S.Updated: 5/6/19

Christopher H.

7/23/2022

I have a 2022 Silverado 1500 ZR2 (factory 2" lift) and a 2022 Cougar 25RDS (approx. 7k pounds loaded). When I setup my e2 (10k pound) wdh I can get my front measurements exactly back to unloaded +/- 1/8" easily but the rear of the truck sags about 3.5". What would you recommend to lift the rear back up? The ride is extremely rough and the nose of the truck feels extremely lite. This is the 3rd camper and 4th truck I've put this system on and this is the first time I've been unable get get it properly adjusted. I'm willing to put airbags or sumo-springs on the truck but would prefer to leave it factory so not to lose my daily unloaded driving ride.

David B.

7/26/2022

Hey Chris, hate to say it but no one has anything for the 22 ZR2 yet. The trucks are so far behind that no one can get them in to test fit them and confirm the changes and such. Best I can say for the time being is to readjust your WD hitch and see about adjusting your load around to ride better. When something does come out we will have it updated on our site and you will be able to find it through out fitguide.

Terry T.

1/11/2022

I have a 2020 Ford F250 and I am trying to set up my EAZ Lift Trekker but I think I need a shank with a longer drop. With the hitch mounted in the lowest position on the included shank, the top of the ball is at 24". The top of the trailer hitch coupler is at 20". The truck when unloaded at the wheel wells measures 41.25" on the front and 43.75" at the rear. Do I need an extra-long drop-shank or just hitch up the trailer and try to level out the squat by using the weight distribution? Thanks!

Les D.

1/12/2022

With any weight distribution hitch, the first thing it to get truck and trailer on level ground and compare the height of the trailer coupler and the hitch ball mount. It sounds like you have done this already and found that your truck is 4 inches taller than your trailer. The Camco kit comes with a standard 2 1/2" drop shank. They also sell drop shank 48130 - 5 3/4" drop, and drop shank 48132 - 9 1/2" drop. We do not sell the hitch or optional shanks. After you can properly hitch on level, then you can worry about the adjustments to fix your truck sag.

Francisco

8/8/2021

9.5 front with trailer Rear 9 with trailer 9.5 empty front 10.5 empty rear Is this ok or do I need to adjust. Thanks for the info.

Victoria B.

8/17/2021

These are your measurements with your weight distribution hitch installed? I would want to see that rear measurement a little closer to the 10.5 that it is unloaded. If you can at least get it so that the front and the back are level, that will give you more of an improvement in handling and braking while also helping keep your headlights more level.

Richard C.

7/9/2021

My 2017 ram 1500 hemi sits 2 inches lower in the front than rear,,dealer says this is normal..Now with equalizer hitch 7000 lb. trailer tonque weight 610 lbs. chains in 3rd link the front is 1/2 inch higher the rear is 2 inches lower .truck looks level,but the trailer is 2 inches lower in the front than the rear...Is this right or how can i fix it?

Etrailer Expert

Jon G.

7/12/2021

Yes, the front naturally sitting lower sounds right. What we recommend is trying to make adjustments so that your front and rear are within 1" of their factory ride height. Make sure your loaded trailer tongue weight is 10-15% of the weight of the trailer and then try making different adjustments with the head unit and hangers to see if you can get everything pretty close to normal.

Richard C.

7/9/2021

2017 ram 1500 short box when sitting empty front measure 34 1/4 in. rear 36 1/4 rear is 2 inches higher than the front the dealer says it suppose to be..

Etrailer Expert

Jon G.

7/12/2021

Sounds about right.


Departments

Towing

Sports and Recreation

Trailer Parts

Vehicle

What our customers are saying:

"Easy place to shop. Fast delivery and great products. Very happy with my purchase."

Ed
Boynton Beach, FL

Popular Vehicles