bing tracking image

How to Install a Trailer Hitch

How to Install a Trailer Hitch (Like a Pro)

A trailer hitch, as you've no doubt discovered, is a kind of key that opens a world of possibilities. With a trailer hitch on the back of your vehicle, you can tow a trailer (of course), carry a hitch-mounted bike rack, or load up a hitch cargo carrier to save space in your vehicle.Basically, that little tube on the back of your vehicle = freedom. But first you have to actually install it (or have it installed). This is where folks usually start to wonder—can I install a hitch on my car? How do you install a hitch, anyway? Can I install a hitch myself?Fortunately, for the average handy person, it's entirely possible to install a trailer hitch on most vehicles right from your garage. It's also probably simpler than you think. Trailer hitches are bolted to your vehicle frame, and it really only takes 3 steps:
  • Gathering your tools
  • Preparing your vehicle
  • Attaching your hitch
Exactly which tools you need to gather and which steps you need to take will depend on your vehicle. Fortunately, we've installed hitches on just about every vehicle out there, and all these vehicles star in their very own step-by-step how-to videos here on our site. Just enter your year, make, and model here, watch the video for your vehicle, and determine if the installation process is a job you're comfortable taking on.Or, for a general look at what's involved in installing the average trailer hitch, take a look below!
Trailer Hitch Opaque
Pictured: a trailer hitch bolted onto a vehicle frame
IMPORTANT:ALWAYS consult the instructions provided with your hitch. The guide below should be used as just that—a guide. Your instruction manual will actually be tailored to your vehicle, so be sure to follow it carefully!

1. Gather Your Tools

Save yourself the headache of hunting down your tools as you need them, and just gather them all at the start. The instructions that come with your hitch will list the tools required for installation. However, it also helps to have other tools on hand, depending on your particular installation. Some common installation tools include:
Common Tools for Hitch Installations
*Items with an asterisk may not be required for every installation. Check your instructions for the required tools for your specific vehicle.

2. Prepare Your Vehicle

Now that you've got your shop set up around you, it's time to prep your vehicle.Typically, you want to chock your wheels and jack up your car for easy access no matter what vehicle model you have (wheel chocks and jacks can be found on our website.) Make sure to check for damage or corrosion—never install a hitch on a vehicle with excessive corrosion.Before installing the hitch, it may help to loosely assemble it. Hold the hitch up into position to identify any obstructions (exhaust, paneling, etc) and give you an idea how the hitch is meant to be installed. In many cases, you can use C-clamps to hold the hitch to the frame during the installation.Now what? Well, that depends on your vehicle. For some vehicles, this may be the only prep work you really have to do. Other vehicles may require extra steps.For instance, you may need to remove your spare tire from beneath the vehicle, lower your exhaust, adjust the bumper, remove your heat shield, trim your underbody panel, or enlarge holes in the vehicle frame. Your instructions will specify what kind of steps you need to take or modifications you need to perform prior to installing the hitch. You can also enter your year, make, and model here to find specific instructions and video tools.
Trailer Hitch Parts Labeled
We'll go over some of the most common pre-installation steps below. You may have to complete one, none, or several of these. Even if you're new to this kind of thing, don't let the prospect of modifying your vehicle or removing parts scare you off. Your vehicle will be put back together good as new when you're done (and even better, it'll have a brand new hitch!).

How long does it take to install a trailer hitch?

It depends on your vehicle, your hitch, and your handyman skills, but a typical installation can take anywhere from about thirty minutes to a couple of hours. You should always allow yourself plenty of time so you're not rushed. Hitch installations are often more time-consuming than outright difficult. Honestly, the most difficult thing about many installations is simply the tight spaces you have deal with when working under a vehicle.To get an idea how long an installation will take on your particular vehicle, enter your year, make, and model in our fitguide. Each hitch listed for your vehicle includes an estimated installation time.

2a. Removing Spare Tire (POTENTIAL VEHICLE-SPECIFIC STEP)

Spare tires are often suspended from the bottom of the vehicle, where they won't take up valuable cargo space. They can usually be removed with a crank. There will be a designated crank hole near the rear of the vehicle; open the hatch to access it, then use the crank to lower the tire. This should be pretty easy to accomplish—the spare tire is meant to be easily removed.You can watch this process on video here at 0:32.
Lower Spare Tire
Lower Spare Tire
Spare Tire Beneath Car

You can see the spare tire is right beneath where the hitch must go. But don't worry—you can also see that the tire fits back up underneath the vehicle once the hitch is installed.

2b. Cleaning Weld Nuts (POTENTIAL VEHICLE-SPECIFIC STEP)

Cleaning your weld nuts is more important than you might think. If you don't clean them, your hardware may go in crooked. If you force a crooked bolt into place, you can damage your weld nuts, and you'll most likely have to take your vehicle to the shop to have them fixed. This is a huge headache you don't want to deal with! To make installation easier, we recommend spraying weld nuts with lubricant like WD-40 and cleaning them thoroughly with a tube brush. You can check out a video of that process here.
Weld Nuts
Pictured: Weld Nuts

2c. Lowering Exhaust (POTENTIAL VEHICLE-SPECIFIC STEP)

First (and most importantly), only lower the exhaust when the vehicle is cooled down to avoid burning yourself on a hot exhaust.Liberally spray some WD-40 on the metal hangers that pass through your rubber isolators, then pry off the rubber isolators (a pry bar is definitely the easiest way to do this). You only need to remove the rubber mount from the vehicle frame, not from both brackets. Make sure not to apply too much pressure on the exhaust once it's been lowered.When it comes time to put the exhaust back on, spray down the metal hangers again and slide them back through the rubber isolators. This process can be a little tricky, but it's mostly a matter of just finding the right spot to press the isolator back into place. Make sure you've got good leverage, ensure your holes are lined up with your hangers, and squeeze the isolator and hangers into place until they slide through.You can watch the exhaust removal process on video here or here at 2:35.
PRO TIP FROM THE SHOP: We recommend using a ratchet strap to control the descent of the exhaust as you lower it.
Exhaust Pliers
Exhaust Hanger and Isolator
Prying off exhaust
Ratchet strap on exhaust

2d. Trimming Fascia (POTENTIAL VEHICLE-SPECIFIC STEP)

You may have to trim your rear fascia to accommodate your hitch. This can involve trimming fascia while it's still connected to your vehicle, or you may have to remove the fascia and then trim it.Whatever you end up doing, start by marking or taping off the part of the fascia that must be cut away, according to your instructions. The easiest way to trim the fascia is with a rotary tool. However, you can also use a razor knife. Rather than make the cut with one forceful cut of the blade, make several more shallow cuts along your designated line, gradually deepening the cuts with each pass. For a smooth finish, you can use a metal file to scrape the rough edges of the fascia where you made your cuts, or you can come back to smooth out the edges with your razor knife.Some people get understandably nervous about cutting into their vehicle in any way, but if you take your time and mark your trimming locations beforehand, you'll be fine. And if you somehow do make an unnecessary cut or slip up, you usually won't be able to see it by the time you put the fascia back on your vehicle.You can view this process on video here at 1:35.
Trimming Fascia
Trimming Fascia
Pictured: Yours truly, trimming fascia on a Toyota Highlander in our shop. If I can do it, you've definitely got this!
2e. Removing/Trimming Heat Shield (POTENTIAL VEHICLE-SPECIFIC STEP)A heat shield can be found on the underside of your vehicle above your exhaust, providing a barrier between your exhaust and other parts of your car that you don't want the exhaust to heat up.You may have to temporarily remove and even trim your heat shield to install your hitch. Don't let this intimidate you—again, just take your time and mark your trimming location before you cut, and you'll be fine.Begin by removing the bolts holding the heat shield in place. Then, use tin snips to trim the shield as necessary, per your instructions.You can view this process on video here starting at 1:04.
Heat Shield
Here, you can see the edge of the heat shield above the exhaust. It has been marked for trimming.
Trimming Heat Shield
The heat shield has been temporarily removed and is being trimmed using tin snips.

2f. Removing/Trimming Underbody Panel (POTENTIAL VEHICLE-SPECIFIC STEP)

Remove the push-pin fasteners, screws, or bolts holding the underbody panel in place. Your instructions should include a diagram indicating how to trim the panel to fit.Carefully mark the places you plan to cut. Then use a rotary tool or razor knife to cut through the plastic panel, and use scissors to cut out the foam padding on the panel's underside.You can view this process on video here from 0:43-1:51.
Underbody Panel
Underbody Padding Sealed with Black Paint
PRO TIP FROM THE SHOP: We recommend coming back with black spray paint over the white padding. The paint will act as an adhesive to hold the padding in place around the new cut-out edges of your panel; you don't want the padding coming out as the wind hits it while you drive down the road.

2g. Drilling or Widening Holes in Frame (POTENTIAL VEHICLE-SPECIFIC STEP)

Most hitches these days will install directly into pre-existing holes in your vehicle frame. However, in some cases you may need to enlarge existing holes in order to fit your spacer blocks and bolts inside, or else you may need to drill new holes altogether.To enlarge an existing hole, you can use a step bit or rotary tool, but you can also simply use a pry bar to manually enlarge the hole. Be careful not to enlarge the holes too much, or you will have a loose fit.If your hitch does require you to drill new holes, raise your hitch into place beneath your vehicle and use it as a template to mark the locations you need to drill. Drill a pilot hole first, then follow up with the drill size specified in your instructions. Make sure you don't drill into any components behind the frame, and NEVER drill into the hitch itself, weld it in place, or modify it in any way. These changes cause weakness in the metal and/or vehicle frame, not to mention present a fire hazard we guarantee you don't want to deal with. Use 220-grit sandpaper afterward to smooth down the edges of your freshly drilled hole. You can view the frame-drilling process on video here starting at 7:13.
PRO TIP FROM THE SHOP: Come back and seal exposed metal with a bit of spray paint to help prevent rust and corrosion.
Line Up Hitch Holes
Use hitch as template to mark holes
Drill Hitch Hole
Drill and enlarge holes according to your instructions

2h. Fishwiring (POTENTIAL VEHICLE-SPECIFIC STEP)

A fish wire (or bolt leader) allows you to pull hardware through the vehicle's frame in order to supply an attachment point for your hitch.To thread the hardware into place, thread the coiled end of the fish wire through the vehicle frame and out through an access hole, as specified in your instructions. Feed the wire through your spacer block, and insert the spacer block into the vehicle frame. Next, thread a carriage bolt onto the wire (make sure it's completely threaded onto the coil) and feed it into the frame as well. Gently pull on the wire until your bolt drops through the frame hole. Leave the pull wire attached for now, just in case the bolt gets pushed back into the frame hole.Make sure not to pull too hard if the wire gets stuck; otherwise, the bolt will strip off the bolt leader and get lost in the frame. If you do happen to lose a bolt somewhere in your vehicle frame, the easiest way to get it out is with a telescoping magnet tool.
Fish Wire Bolt
Thread Spacer
Thread spacer block on wire
Thread Bolt Onto Coil
Thread bolt onto coil
Pull Wire through Hole
Pull wire until bolt comes through original hole
You can watch the fishwiring process on video here at 5:31.

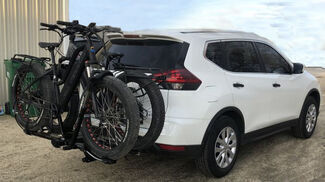
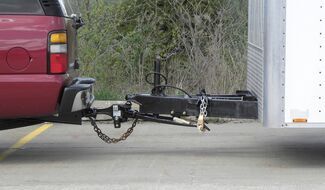
3. Attach Your Hitch & Tighten Hardware

Lift your hitch into place. You may need a second set of hands for this step—trailer hitches can be pretty heavy! You can also use a block of wood or other makeshift lever to wedge your hitch up into place beneath your vehicle.Some hitches bolt to your vehicle's tow hook as well as the frame. If this is the case with your hitch, you can secure the hitch in place at the tow hook before securing the bolts in the frame. This allows the tow hook to support the weight of the hitch while you work.
Tow Hook
Tow Hook
If you used a fish wire, feed the wire through the hitch until the hardware comes through, then remove the wire and attach the washer and nut to your bolt. You can unscrew the fish wire from the bolt, or you can pull it off if you don't mind damaging the coil (you'll only need it once for this install).
PRO TIP FROM THE SHOP: Hand-tightening the nut can be a little tricky, since you want to make sure the bolt doesn't slip back up inside the vehicle frame. Use the washer to push the bolt against the frame to prevent it moving while you tighten your nut!
Secure Hitch With Bolts
Secure Hitch with Bolts
Make sure the hitch is symmetrical. Then fully torque the bolts according to the specifications in your instructions using a torque wrench. This will take a little muscle!
Torque Hitch Bolts
Trailer Hitch Receiver
Reinstall any parts you removed, such as your heat shield, exhaust, or spare tire.And voila! You've now installed your trailer hitch. Enjoy whatever trailer-hauling, gear-carrying adventures await! Still have questions?Give our experts a call at 800-298-8924, or contact us online. We're happy to assist any way we can!
Amber S.
About the AuthorAs a content writer for etrailer, I might spend my morning loading and unloading a bike on five different bike racks to figure out which is easiest to use. I might be in the parking lot, taking pictures of an impressive RV battery setup our techs came across in the shop and discussing the benefits of the setup with the owner. I might spend an afternoon in a manufacturer training classes for some hands-on experience with new products, and then sit down to assemble all this information into a coherent article.At etrailer, one of our core values is that we are always learning, and I learn something new every day. I start each morning with the goal in mind of taking all of this information and figuring out the best way to answer the questions people ask us (and the ones they don’t know to ask yet), and helping people get the solutions they need to make their lives easier, safer, and more fun. I’m a DIYer at heart, so it brings me great joy to help a fellow DIYer find what they’re looking for, whether that’s a product, an answer, or a community.
Related ArticlesRelated ProductsWritten by: Amber S.Updated on: 3/31/2020


Departments

Towing

Sports and Recreation

Trailer Parts

Vehicle

What our customers are saying:

"Excellent service and communication. Expect part to be excellent too!"

Tommy
Tifton, GA

Popular Vehicles