bing tracking image

How to Convert Your RV Water Heater to Tankless

Converting Your RV Water Heater to Tankless

It's the Answer to Your Prayers—Or at Least a Hotter Shower

You've no doubt heard about this " tankless RV water heater" thing, and that's why you're here. It sounds a little bit like magic—unlimited hot water while camping? Really? Yes, really. A tankless water heater could be the answer to your prayers (or to your curses when the water runs cold and you're only halfway through washing out the shampoo). Still, you've likely got some questions, like how do you actually convert to tankless? Should you convert? Are there downsides? Is it worth it? To which I say: read on, fellow camper. We've got the answers you're looking for. In this article:
  • What Exactly is a Tankless RV Water Heater?
  • What are the Advantages of a Tankless Water Heater? What are the Downsides?
  • Can I Replace My RV Water Heater with a Tankless?
  • How to Install a Tankless Water Heater in an RV

What is a Tankless RV Water Heater?

A tankless RV water heater is just what it sounds like—it's a water heater that operates without a tank. How does this work? Instead of keeping several gallons of water in a hot holding tank, ready for use whenever you turn on a hot water faucet, a tankless heater works on demand. There's no storage tank, therefore there's no running out of hot water. The heater turns on when you need hot water and turns off when you don't. And boom—you've got endless hot water as long as you've got a water source and power.

What are the Advantages of a Tankless Water Heater? What are the Downsides?

The advantages of a tankless heater are pretty obvious: there's no tank, and therefore no way to run out of hot water. But there are some other bonus perks as well as a few drawbacks you'll want to consider.
PROS
  • Endless hot water for large families or groups of friends (as long as you have power and water sources) with no "recovery time" between uses
  • More energy efficient, so you'll save on propane or electric
  • Generally take up less space
  • No 20-minute waiting period for the tank to heat when you get to the campsite
  • The ability to run hot water for your indoor shower while simultaneously washing dishes, cooking, running your outdoor shower, etc.
CONS
  • Cost to upgrade
  • Preset hot water temperature - can be inconvenient to change from inside the shower if you want a different temperature
  • Cold "bursts" when you turn off the water then turn it back on. There's no stored water at the ready, so there will be a delay as the water heats up and starts flowing again. Usually not much of an issue at campgrounds, but might waste water when boondocking while you wait for the water to heat up.
A tankless water heater might be best for you if you have a large family or group of friends that camps with you. If you currently struggle to space out your showers so everyone gets hot water, a tankless water heater can solve this problem. Or maybe you're just tired of being limited to 5-minute wash ups and want to relax in a long hot shower at the end of the day. Maybe you want to spend the first 5 minutes just standing there and soaking up your much-deserved hot water. This might especially be true if you're full-timing or camping for weeks on end. On the other hand, one downside to tankless heaters is that it will cost you money to upgrade. Tankless heaters have come down in price in recent years, but you're still swapping a heater you already have for something new. If you camp alone or with your SO and rarely run out of hot water, it may not be worth the cost to upgrade. The other reason you might not want a hot water heater is if you boondock often and need to conserve water. There's a few-second delay when you turn on the hot water tap as the water heats up and makes its way to your faucet or shower. It's not much, and if you're at a campsite with hookups it likely won't be a problem at all. However, if you're boondocking, letting those few seconds of cold water run through can waste valuable H20, and if you take navy showers, the periodic burst of cold water won't be fun. That said, there is a solution if the sporadically cold navy showers are a concern: a water miser. A water miser such as the Aqua View "Showermi$er." Some newer RV water heaters come with water misers included, but if yours doesn't have it, you can purchase one separately—it's truly an ingenious little product! When you turn off the shower faucet and pull the Showermi$er lever, the water will continue to flow but not come out the showerhead. Since the water runs continuously, the water heater runs continuously, and when you're ready for water again, you can open up the Showermi$er and release the flow. I definitely recommend checking one out if you're interested in a tankless heater and frequently boondock.

Can I Replace My RV Water Heater with a Tankless?

Yes! The main concern here is choosing a tankless heater that fits through the water heater cutout currently on your RV. Measure the opening of your water heater cutout (length, width, and depth), then select a tankless heater based on these dimensions. Downsizing? That's fine. If your new tankless heater door is smaller than your cutout, you can grab a door conversion kit to fill the extra space.
Measure RV Water Heater Dimensions (Length, Height, Depth)

How to Install a Tankless Water Heater in an RV

So what exactly is involved in installing a tankless water heater? Honestly, it's pretty straightforward. It's basically a matter of disconnecting all your supply lines, swapping out your heater, and connecting your new lines. But we'll let our expert Ryan show you how it's done. You can also watch an installation on a Starcraft Homestead here.Keep in mind that the following is an example of a general installation; your RV or water heater unit may differ slightly. Always follow any manufacturer's instructions for your particular heater.
Watch now: Our expert Ryan installs a Furrion Tankless Water Heater on a Grand Design 5th Wheel. Installation begins at 15:15.

1. Shut Off Your Hookups & Drain Your Tank

It's time to power down. Turn off your water supply, propane, and electric. Next you'll need to drain the hot water tank. If your water heater's been on, give the water inside enough time to cool before doing this so you don't burn yourself. If you're not sure how to drain your tank, check out our guide here. You may also want to remove your door just to get it out of the way and make for an unobstructed workspace.
Draining water heater

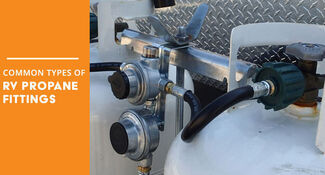
2. Disconnect Your Propane Line

First, let's disconnect the propane supply line from outside your RV. Remove any old sealant, then use a wrench to disconnect the line.
Propane Line Highlighted on RV Water Heater
Disconnecting the propane supply line
3. Disconnect Wiring & Water LinesThe easiest way to finish disconnecting your old water heater is by accessing the heater from inside the RV. However, if you don't have access from the inside, you can pull the heater out far enough to disconnect your lines that way. Option 1: From Inside the RVDisconnect your water lines from the back of the water heater. If necessary, mark the lines "hot" or "cold" so you can tell them apart later. You'll also need to disconnect your wiring (power, ground, and thermostat). Typically the wires will be connected with wire nuts, so you can simply unscrew the nuts and separate the wires.
Water Lines from Inside Access Panel
Disconnect the water lines from inside your water heater access panel
Disconnect Wiring
Disconnect your wires so you can slide the unit out
Option 2: From Outside the RVIf you don't have an access panel or can't get to your water heater from inside the RV, you'll need to pull the unit out the front and disconnect your lines and wiring that way. Start by scraping any sealant from the front mounting flange and unscrewing it from the RV wall. Once the flange is removed, carefully work the water heater out of the cutout. It will only go so far, but all you need right now is enough room to disconnect the wiring and both water lines.
Unscrew Mounting Flange
Unscrew the mounting flange so you can pull the heater out
Disconnect RV Water Heater Wiring
Pull the unit from the cutout and disconnect your wiring
Disconnect water heater lines
Disconnect your water lines
3. Remove the Old Water HeaterOnce your wiring and water lines are disconnected, you can go ahead and pull the water heater unit completely out. Scrape off any sealant, and make sure the now-empty cutout area is clean and dry before proceeding.
Remove Water Heater
Make Sure Water Heater Cutout Area is Dry
4. Slide the New Heater Into Place and Make ConnectionsIf you have an inside access panel, slide the new tankless heater into the cutout. Then you can go back inside to make your new propane, wiring, and water connections. If you don't have an inside access panel, you'll need to make your connections from the outside before sliding the new unit into place. Use an adjustable wrench to reconnect and tighten your propane line and water inlet/outlet hoses. Depending on your tank setup, you might need additional parts such as tees, adapter fittings, and extensions, all of which can be found at your local hardware store. What fittings you need just depends on your lines and your new tank; if they're not designed to fit together, you'll need the appropriate adapters to make the connections. You'll also need thread tape for any connection that doesn't have a built-in seal. Use butt connectors to make your wiring connections. Your water heater might sit flush with your cutout, or it might extend over the sides of the cutout. If it extends over the sides, apply butyl tape to the outside edges of the heater before pressing it into place against the side of the RV. If the heater fits completely into the cutout, we'll add butyl tape in the next step when we install the door.
Water Heater in Cutout Opening
Slide the new heater into place. Apply butyl tape wherever there is a gap and wherever the unit mounts against the wall.
New Adapter for Water Line
Pictured: A new adapter about to be inserted into the old water line.
Wire Connections Behind Water Heater
Make your wiring connections with butt connectors
6. Add the Front Mount & DoorApply butyl tape to the back of your front mount or door where it sits against the RV. Screw the hardware into place, then add a bead of sealant around the edge of your new unit. Choose a location to mount your new thermostat, then run the thermostat wires from the back of your water heater to the control unit. Mount the thermostat into place.
Applying Butyl Tape to Water Heater Door
This mount sits flush against the RV, so it needs butyl tape for a reliable seal
Install Mounting Plate and Hardware
Once the mount is in place, we can add the screws and our sealant.
RV Water Heater Thermostat
Screw the door into place
7. Enjoy Hot WaterYou'll want to test all your faucets to make sure everything's running properly, but this is basically the end of the process. It really is as simple as old water heater out, new water heater in! And if you run into any snags or have any questions, just leave it in the comments below!


Departments

Towing

Sports and Recreation

Trailer Parts

Vehicle

What our customers are saying:

"Fast Shipping They are AOK Thanks"

John
Lynchburg, VA

Popular Vehicles