bing tracking image

Cleaning Your RV Black Water Tank in 4 Easy Steps

Just like cleaning your bathroom at home is a necessary chore, cleaning your RV's sewer system is crucial to maintaining a hygienic, smooth-functioning RV. Maintaining your RV's black water tanks (also known as waste tanks or holding tanks) is probably the least glamorous part of RV life, but regularly cleaning your sewer system will help prevent unpleasant odors, prevent clogs in the system, and keep your tank sensors working correctly. Read on to discover how to clean, treat, and maintain your RV black tank, or see all RV sewer products.
How Do I Clean My RV Black Water Tank?
  • Drain Tank
  • Remove Buildup
  • Add Water
  • Add Treatment
Watch now: Our resident expert Jake H. walks us through how to clean black and gray RV tanks

How Do I Clean My RV Black Water Tank?

Cleaning your RV's black water tank can be one of the most intimidating RV maintenance tasks if you've never done it. Fortunately, sanitizing your tank is actually quite simple and, in time, will become just a routine matter. The biggest concern with black water tanks is waste collecting along the tank walls and not draining when you empty into the RV dump station. If not removed, this buildup can cause problems in the form of unpleasant odors and clogs, neither of which you want in your RV.Note: When dealing with your black water tank, be sure to protect yourself from any drips, leaks, or splatters by always wearing gloves. There are four main steps required to thoroughly clean your waste tank:
1. Drain Tank
Draining Your RV Black Tank
2. Remove Buildup
Remove buildup in tank
3. Add Water
Cover the bottom of your RV tank with water
4. Add Treatment
Add treatment to your RV black tank
Learn more about each step below.
Draining Your RV Waste Tank

1. How Do I Drain My RV Black Tank?

Draining your RV's black water tank is a simple enough process (if an unpleasant one). Simply connect your sewer hose to the designated dump station hole, connect the other end to your black tank valve, open your tank valve, and let things flow.A few helpful things to remember:
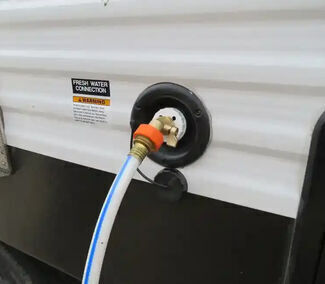
  • Dump the tank when it's at least 2/3 full. This will ensure there is enough water to suspend the solid matter and allow the tank to drain. If you have to dump before this point, fill the tank with water first.
  • Dump your black tank first, then dump the gray tank. The gray tank water will help flush out anything stuck to the insides of the sewer hose.
  • Be courteous at the dump station. Many dump stations around the U.S. are closing due to uncourteous RVer behavior and the use of harmful chemicals to treat waste tanks. Using environmentally friendly treatments (no formaldehyde!) and good dump station manners helps keep these vital stations open for public use.
  • Don't keep your black valve open at the campground. You can leave your gray valve open, but the black should remain closed until you're ready to dump. Leaving it open allows the water to drain out, so all you're left with is undrainable sludge in your tank. That's a mess you don't want to mess with.
  • Don't use your drinking (potable) water hose to flush out your sewer hose or black water tank. If backflow occurs, you don't want your waste water anywhere near your fresh water. Use a separate hose!
RV Black Tank Dumping Tips
Draining Your RV Waste Tank with the Tornado 360-Degree Tank Rinser

2. How Do I Remove Black Tank Waste Buildup?

As nice as it would be, you can't simply drain your RV waste tank and be on your way. If not removed, waste and toilet tissue can stick to the tank walls. Over time, this buildup will cause unpleasant odors and, worse, potentially disastrous blockages. To avoid any messy mishaps (and your RV smelling like a sewer), you'll need to properly clean the tank each time you dump.There are a variety of ways to clean your black water tank. We'll go over the best methods in more detail below.
Macerator System for RV Waste Tanks
A macerator system breaks up waste and removes buildup inside your black tank. Watch a video review.

1. Macerator

A macerator system is an excellent option for flushing out your black water tank. Like a reverse flush valve (see below), a macerator system shoots high-velocity water jets into the waste tank and sewer hose to remove buildup. The macerator, however, is unique in that it also pulverizes waste with a high-pressure stream of water, then shoots the waste through the included drain hose (which replaces your sewer hose and minimizes mess during the dumping process). The clear connector lets you know when the tank is clean, and the included backflow preventer makes sures your water source stays clean, too.Simply twist the nozzle's bayonet fitting onto your RV waste valve, attach the other end to the dump station with the included 4-in-1 elbow adapter, and you're ready to go. The system also stores easily in a compact 14-inch spool.
Reverse Flush Adapter for RV Holding Tanks
Attach a garden hose to the barrel and direct the flow of water where you need it to clean your holding tanks and sewer hose.

2. Flush Valve

Flush valves allow you to rinse your black water tank and flush out your sewer hose in order to break up clogs and clean your tank sensors. Connect a garden hose to the barrel (see image), then choose either the "tank" setting or the "hose" setting to direct the flow of water where you need it. Flush valves also include built-in backflow preventers to keep your water source contaminant-free, so you don't have to worry about waste water backing up into your hose. Many flush valves come with clear barrels so you can see when the water runs clean.Most flush valves, such as the Flush King, attach and detach with each use and require no tools to install. Simply connect one end to your black waste valve, connect the other end to your sewer hose, and attach a garden hose to the female coupling on the barrel. There are also flush valves available that install permanently by connecting to the tank and outside wall of your RV, such as the Valterra No-Fuss Flush Valve. Permanent flush valves do require some drilling, but these are DIY installations for most.
Swivel Stik RV Black-Water Tank Rinser

3. Tank Rinser

There are two types of tank rinsers: those that install permanently inside your waste tank, and those that are inserted into the tank each time you want to clean it. Permanent tank rinsers like the Tornado 360-Degree Tank Rinser are inserted into a hole drilled in your black tank and connected to a hose. Wand-style rinsers like Camco's Swivel Stik are connected to a hose (or a faucet, with the use of an adapter), then the other end is inserted into the tank via the toilet. Both rinser types spray water at a high pressure to flush away waste buildup in the tank.
RV Permanent Tank Rinser
Permanent tank rinsers install directly into your black tank and provide an exterior connection point for a garden hose.
There are a few things to keep in mind when selecting a tank rinser. The nozzle style is one consideration—some rinsers shoot straight streams of water, others shoot side jets to reach difficult areas, and others have 360-degree rotating heads for maximum reach.Also keep in mind that for wand-style tank rinsers, both straight and flexible tank rinsers are available. If your tank is mounted directly under the toilet, a straight rinser will work best. If you have bends in your plumbing and your tank is mounted slightly offset under the toilet, a flexible rinser will allow you to achieve the necessary angle.
Straight vs flexible tank rinsers
Straight tank rinsers are best for tanks directly below the toilet. Flexible tank rinsers are best for tanks offset below the toilet.
The Ice Method: Fact or Fiction?
All RVers have their favorite go-to cleaning methods to share, and occasionally these methods rise to an almost mythical state in the RV community. For instance, if you've researched RV waste tank cleaning tips, you've likely heard of the "ice method." This method involves dumping about 20 lbs. of ice in the tank, adding some water, and taking a drive to create friction between the ice and waste buildup. Some RVers live by this simple treatment; however, you'll find just as many, if not more, who insist that ice is only useful for keeping their drinks cold.So—does it work? Sort of. The right amount of ice can sometimes dislodge matter stuck on the tank side walls. However, you'll typically be better off using one of the cleaning methods mentioned above and saving your ice for your beverage of choice.

3. Add Water

Before you can treat your black tank, you need to add water back into it. An easy way to do this is to fill your toilet with water and flush until the bottom of the tank is covered (usually 4-5 bowls). When it comes to your waste tank, water is the most important component for keeping your plumbing free of buildup and clogs.
Flush water into your RV black tank
Pure Power Blue Treatment for RV Holding Tanks

4. What is the Best Way to Treat a Black Water Tank?

After thoroughly cleaning your black water tank and removing any buildup from the tank walls, it's time to treat the tank in order to ready it for future use. Treating your tanks helps prevent odors and clogs by breaking down waste. It's best to treat your black water tank each time you empty it.There are any number of treatment methods, and most experienced RVers come to find a favorite method they swear by. One crucial thing to remember is that only environmentally friendly treatments should be used—stick with those that are enzyme-based and formaldehyde-free. Check out some of the most popular black water tank treatments below.
Pure Power Blue Treatment for RV Holding Tanks

1. Liquid Treatments

Most liquid treatments designed for RV holding tanks are chemical-free, biodegradable enzyme/bacterial formulas, which makes them perfect for breaking up waste without introducing harmful chemicals to the environment when you empty the tank. To use a liquid treatment, add water to the tank after cleaning (enough to cover the bottom of the tank—usually 4-5 toilet flushes). Then add the appropriate amount of liquid and flush one more time. Make sure you use the correct amount of liquid for your tank (check the bottle for measuring instructions)—more is not better.Liquid sensor cleaners designed specifically for removing buildup from your tank sensors are also available. If you find your gauge readings are no longer as accurate as they once were, a cleaner like TST RV Tank Probe Cleaner can help remove any remaining buildup and improve tank readings.
Valterra Potty Toddy Tabs

2. Drop-In Treatments

Drop-in RV black tank treatments include tablets, pouches, and scoopable additives. Many RVers prefer drop-in treatments over liquid treatments for the convenience factor—unlike liquids, drop-in tablets and pouches don't require any measuring, and you don't have to worry about accidental spills.
No Bleach in Black Tank

3. DIY Treatments

Rather than use premade formulas or additives made for motorhomes, many RVers swear by their DIY treatment of choice. Note: for best results, use a product designed to treat RV waste tanks, such as the liquid or drop-in treatments mentioned above. However, if you are dead set against using an RV-specific cleaner, it's still important to make sure you're using safe, environmentally friendly products.We list some of the most common DIY RV treatments below. Keep in mind that some are more effective than others, and it may take some trial and error to find the method and measurements that work best for you.
Most Recommended
  • GEO method: The GEO method is great for preventing solids from adhering to the tank and sensors. This is one of the oldest and most popular DIY treatments among RVers.
  • 1 cup powdered water softener OR 1 cap liquid softener (Calgon is the popular choice. Many RVers use Borax as a substitute as well.)
  • 1 cup laundry detergent OR Dawn dish soap
Other Top Choices
  • Dawn liquid soap: Although Dawn soap is more effective with the assistance of a water softener like Calgon (see the GEO method above), Dawn is also used to treat tanks on its own. This is another very common treatment method among RVers.
    • 1 cup Dawn liquid dish soap
  • Baking soda: This method is primarily used for reducing odors and is less common than the more popular methods mentioned above.
    • 1 cup baking soda
  • Yeast: Yes, the same yeast that goes into baking a delicious loaf of bread can also eat away at waste buildup in your RV tank. However, this method does take several days to have any effect, so it's not the best choice if you have to dump your tank frequently. Yeast will also not break down toilet paper as it will waste. There are certainly more effective tank treatments even within the DIY category. Yeast is sometimes used in combination with hydrogen peroxide (see below).
    • 4 oz. baker's yeast
  • Hydrogen peroxide: Store-bought peroxide is heavily diluted (about 3% peroxide), which isn't strong enough to have a very dramatic effect on your RV black tank. Peroxide will also not break down toilet paper as it will waste. You're better off using a treatment designed for RV tanks or a more effective DIY method, like the GEO method described above. Hydrogen peroxide is sometimes used in combination with yeast (see above).
    • 10 oz peroxide
No Additives
  • Water: A considerable number of RVers choose to forgo chemicals and additives altogether. If you do so, the important thing is to make sure you use plenty of water to make sure solids don't have a chance to stick. Also ensure that you're flushing out the tank thoroughly after dumping, using one of the cleaning methods mentioned above.
    • Water, water, and more water
Not Recommended
  • Bleach: Bleach will certainly kill bacteria in your black water tank, but this includes the bacteria necessary to break down waste. Too much bleach can also damage your RV's seals and gaskets. In fact, many RV owner's manuals warn against using bleach in toilets and drains. For these reasons, using bleach in your black tank is not recommended—particularly not when there are so many safe, simple, economical alternatives.
    • 1/2 cup bleach
Related Products
Save or Share This Idea
Written by: Amber S.Updated on: 11/16/18

Mark C.

11/10/2022

Thank you for this information, I found it to be very helpful. I bought a used RV that wasn’t taken care of properly and I think there is a lot of buildup in my black tank. I can flush it until the water runs clean and it will stay that way until I put a couple bags of ice in the tank before traveling. I only add enough water to make sure the ice sloshes and scrapes the bottom. When I arrive at my next park I empty the tank and lots buildup comes out. My sensors never read less than 1/3 full so I am convinced that buildup has been allowed to harden on the bottom of the tank. The RV has a flush system but it’s not enough to break up buildup. I would appreciate any advice on an easier was to clean up the tank. BTW the ice method does work if done right. Adding too much water will cause the ice to float. We used to glass clean coffee pots by putting a handful of ice cubes in it with some salt and swish it around. The coffee pot is left spotless. So I am wondering if I could add some rock salt to the mix to act as a scouring agent. The salt should dissolve and flush on the next rinse. What do you think?

Rosa B.

2/23/2021

I live in my RV, do I still need to open/close my black and gray water tank valves?

Etrailer Expert

Jon G.

2/24/2021

Since you still have a tank for your black water you do want to keep it closed until you're ready to dump. As the first segment of this help article suggests, if you keep your black tank valve open all of the time then all of the water will run out and you'll be left with solids. Your gray tank isn't as crucial since it shouldn't have any extras with it, but I would still wait until you dump your black tank that way you can dump your gray tank afterwards to help clean out your system.

Curtis L.

5/8/2020

Thank you, most of the things that you went over has proven that all it takes is a little common sense and a couple of minutes to research. Thanks again for the refresher!

Etrailer Expert

Chris R.

5/11/2020

I'm glad we could help!

Gary G.

4/17/2020

Boondock camping. I purchased a black holding tank and a fresh water tank from an old travel trailer and put them in the bed of my truck. Each is about 40 gallons. They were only 10 dollars each. I also bought a grinder pump. I pump my gray water into the holding tank in the back of the truck. Than I refill the fresh water tank from the fresh water tank in the truck bed. Than when we go to town I empty and refill the fresh water tank in the truck bed. This extends our stay without having to pull the trailer back to town to empty tanks.

Etrailer Expert

Chris R.

4/17/2020

Thanks for sharing your experience! This might help our neighbors looking to stay on site a bit longer.


Departments

Towing

Sports and Recreation

Trailer Parts

Vehicle

What our customers are saying:

"Thank you! I enjoyed shopping your site."

Jamie
Mechanicsville, VA

Popular Vehicles