
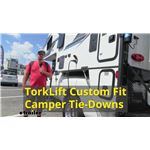
Custom Fit Tie Down Kit With TLR3500 | TLT2301
(0 reviews)
Price: $853.16


- All Info
- Q & A (0)
- Videos (6)
- Photos
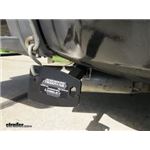
TorkLift Truck Camper Tie Downs - TL47NR
- Front Tie-Downs
- Frame-Mounted
- TorkLift
- Custom Fit
- Powder Coated Steel
Get the safest and most comfortable ride while hauling your camper with tie-downs that mount on the frame of your pickup. Great for your truck's looks: remove the arms from the brackets and you'll hardly know that the brackets are there.
Features:
TorkLift Custom Frame-Mounted Camper Tie-Downs - Front:- Creates attachment points for securing your camper to your truck bed
- Pairs with rear tie-downs (sold separately)
- Requires turnbuckles (sold separately) to attach camper to tie-downs
- Ensures excellent handling by distributing camper's weight evenly and lowering its center of gravity
- Avoids a top-heavy setup that would be vulnerable to strong winds and sway
- Remains virtually invisible beneath your vehicle
- Remove the arms and you'll hardly know the brackets are there
- Adjusts for simple, secure connection to camper
- Extend arms out from truck body to clear bowed sidewalls and fenders
- Choose between 2 anchor holes to get the best angle for a secure hold
- Made of black powder coated steel to resist corrosion
- Mounts tight to your vehicle's frame - minimal loss of ground clearance
- Uses pre-existing holes in the frame - little to no drilling required
- Includes 2 front tie-downs and installation hardware
- Made in the USA
- Lifetime warranty
TorkLift Custom Frame-Mounted Camper Tie-Downs - Rear:
- Creates attachment points for securing your camper to your truck bed
- Pairs with front tie-downs (sold separately)
- Requires turnbuckles (sold separately) to attach camper to tie-downs
- Ensures excellent handling by distributing the weight evenly and lowering the center of gravity
- Avoids a top-heavy setup that would be vulnerable to strong winds and sway
- Remains virtually invisible beneath your vehicle
- Remove the arms and you'll hardly know the brackets are there
- Adjusts for simple, secure connection to camper
- Extend arms out from truck body to clear bowed sidewalls and fenders
- Choose between 2 anchor holes to get the best angle for a secure hold
- Made of black powder coated steel to resist corrosion
- Mounts tight to your vehicle's frame - minimal loss of ground clearance
- Requires drilling into the frame
- Includes 2 rear tie-downs and installation hardware
- Made in the USA
- Lifetime warranty
R3500 Tork Lift Truck Camper Tie Down - Rear Frame Mount - Custom Fit
Replaces 39114 and R3502
T2301 Tork Lift Truck Camper Tie Down - Front Frame Mount - Custom Fit
Video of Custom Fit Tie Down Kit With TLR3500 | TLT2301


Videos are provided as a guide only. Refer to manufacturer installation instructions and specs for complete information.


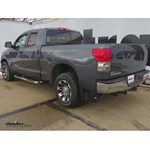
Video Transcript for TorkLift Rear Frame Mounted Camper Tie Downs Installation - 2008 Toyota Tundra
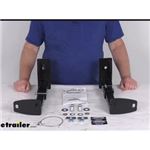
Today on our 2008 Toyota Tundra we're going to be installing the Torklift custom frame-mounted camper tie downs. This is for the rear. Part number is TLR3500. inaudible 00:00:11 see our camper tie down once you get in place. It's going to be adjustable from the setting it's at out to a wider setting just depending on the width of our camper, and when not in use can be completely removed to give us a very clean factory-style look. It's not going to hang down.
As you can see, it's tucked up here above our exhaust, above the bottom of our frame hitch, so we've really got no issues with bottoming out, getting it snagged up on anything. Really cool. Our arms, we can just set these aside for when we need them. Each one's going to come with a label to indicate the passenger rear, driver rear, driver front, passenger front. That way there's no confusion if after a long winter we can sometimes forget exactly how that camper or that tie down system works.
Just throw them on. We're going to have two of the tie down brackets. We're going to have two of the frame brackets. We're going to have all the hardware that we need to get these installed. As you can see, this one has installed right to the factory receiver hitch. These also are going to install right into the frame rather then what we used to see a lot of we're the bed-mounted tie downs.
So they'd be right on the cap of the bed and it really brings that center of gravity where it's held down to the middle of the truck, whereas now we're bringing that pull down or that force all the way down here to the bottom directly into the frame, giving us a nice, sturdy, stable ride for our camper. To begin our installation we're first going to determine where we're going to be mounting the permanent portion of our tie downs. Here on the side of the receiver hitch there's a nice flat spot. We're going to bring this right up as high as we can and as far back as we can. Now as you're putting these up into place just make sure that you don't have any interference behind, like in our case here we've got a metal plate on that backside that runs on an angle here, so we'll be setting it just inside of that, make sure it sits nice and flush. Then we'll just go through and mark the center of each of our four holes.
Then we'll repeat that process for the other side as well. You can see our mounting locations there. Now let's go through and drill each of our four holes out. We'll start with the pilot bit. Just want to use a little small-diameter bit. Be careful as you're doing this that you don't have any wires or any fuel lines or anything like that on the backside. Then we'll just run it on through. Now let's just continue on and drill out our other three. We've got the four done on this side. Now let's grab our bracket again and just verify our hole locations, make sure they're pretty close to being in the center of that bracket. All those look good. Let's go over to the driver side and get those pilots. Now with all eight of those drilled out let's step up to our next drill bit and drill it out. Now ultimately we're going to drill these out to a 7/16" hole. You could go right to a 7/16" bit and try to get it through there but it's a good idea to step up gradually. In our case today we're going to use three different bits. We've already got our small holes drilled, our pilot holes. We'll start with an intermediate bit now, drill those out, and then right to our 7/16. We got the four of those done. Now let's go over there to the passenger side and take care of those as well. Now for the top rearmost hole we're having issues getting a full-length drill and drill bit in there so we're just going to lower the spare down a little bit, allow us to slide that over slightly so we can get a good clean angle on it while we drill out our final hole. The final hole we're going to drill all eight locations is going to be 7/16. Just keep that in mind. Just pull that out and should give us the room we need now. While I've got the tire down I'm going to go ahead and drop that same one on the other side just to get it out of the way. With those two drilled out let's go ahead and raise that tire back up and get it out of the way. Now with all of our holes drilled we can just throw our drill away and hope we never have to use it ever again. Now we're going to grab the bracket, place one of our 3/8 bolts through it. Just place a couple through here now and then inside once we have them in place we'll slide on our flat washer, then a little lock washer, and then we'll have our nut. We'll be able to thread that right down on as well. We just need to do that for all eight locations. We'll have four on each side of course. We'll do these loosely for now. We're just going to get everything started. Once we've got it started we can tighten our stuff down. Now here on the passenger side let's go ahead and through that same process. Each one's going to get the same flat washer, lock washer, and nut. Now we'll get them all tightened down. We're going to use the torque specs that are listed in your instruction manual. Look into that. It's going to give you the exact torque specification to set them to. With those all torqued down let's add our extensions. Now for putting our arms in place, you see how this tapers down towards the rear and it's a little narrower We want that to face the rear of our vehicle. We'll then just slide the arms right in and we're going to have the choice of a longer set of holes or a shorter set of holes to line up with the pinhole in the bracket we just installed. You can see there that's at its widest point where this is going to stick out the furthest from the vehicle. Next setting's going to be narrower, brings it in a little bit tighter to the vehicle. It's just depending on the style of camper you're going to be using. We'll be able to adjust that. Now another nice thing is they're going to give you your driver's rear and passenger side rear labels. We can mark these and we won't have to look up which one goes where every time we got to load up the camper. We'll just apply those into place. Now let's head over, get the passenger side put on. This side's also going to be fully adjustable. We'll have the two settings there to pick from. We'll just slide this into the second one so it matches up with the other side there. Apply our identification sticker so we know what's what. That's really all there is to getting these installed on your vehicle: drilling a few holes, bolting them on. Now we're ready to throw the camper in the back. We'll be able to get it tied down securely. We can head right on down the road. With everything secure that's going to complete today's installation of the Torklift rear camper removable tie downs, part number TLR3500, on our 2008 Toyota Tundra. .
0
0
See what our Experts say about this TorkLift Truck Camper Tie Downs
Info for this part was:

Written by:
Lindsey S

Edited By:
Leah B
At etrailer.com we provide the best information available about the products we sell. We take the quality of our information seriously so that you can get the right part the first time. Let us know if anything is missing or if you have any questions.
Product Experts Available Now!
Call 1-800-940-8924
Thank you! Your comment has been submitted successfully. You should be able to view your question/comment here within a few days.
Error submitting comment. Please try again momentarily.