
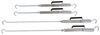
Get the safest and most comfortable ride while hauling your camper with tie-downs that mount on the frame of your pickup. Great for your truck's looks: remove the arms from the brackets and you'll hardly know that the brackets are there.
Features:
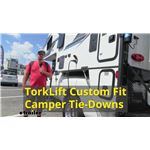
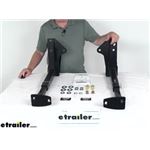
TorkLift Custom Frame-Mounted Camper Tie-Downs - Front:Videos are provided as a guide only. Refer to manufacturer installation instructions and specs for complete information.
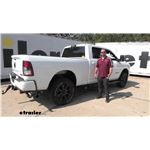
Hello neighbors, it's Brad here at etrailer and today we're taking a look and installing the TorkLift front camper tie-downs on a 2023 Ram 3500. So when installing your front camper tie-downs, actually don't detract from the truck at all. You'll see this small opening here, but when you're driving around, it's really not that noticeable and it sits really perfectly underneath the bed to where there's just a little bit of gap here. It's not too tight, but it's also not hanging down. It's not gonna cause any interference with anything. And then whenever you're ready to get your camper in-bed, and get it all strapped down, you can simply just slide this into place.
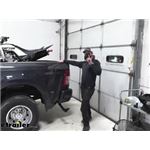
And you do have two adjustment points. So if you need to go a little bit wider with your turnbuckles, no problem, you'll just slide this out and put it in that configuration if you need it a little bit tighter, you can also slide this in right here, get it pinned up. We'll then get your turnbuckles in place, get your camper strapped down, and then you're ready to hit the road. Now in-bed campers I think, are really awesome. You don't see 'em too much here in the Midwest, but they really make a lot of sense to me, especially if you're going on some pretty off-road, or you know, off-grid places.
A truck like this shouldn't have a problem getting around and the in-bed campers have quite a bit of space, believe it or not, to be able to get around. But the downside of them is they are rather top heavy and they can create a little bit of a sail as you're going down the highway. And so that's why having camper tie-downs is key. Having frame mounted camper tie-downs is even better. It's gonna get that center of gravity a little bit lower once it's all strapped down and gonna make a much more comfortable ride.
It's gonna keep that camper from shifting around. Now we've also installed the rear camper tie-downs that bolt up directly to the TorkLift SuperHitch Magnum, which is a beast of a hitch. But that also comes into play if you are going that in-bed camper route, you really want it to be secure. And this hitch is really designed for those in-bed campers because you have your rear camper mounts that bolt indirectly, but also, it allows you to have the TorkLift super truss system. So as your camper sticks out a little bit, if you plan on pulling a trailer behind the truck with the camper in, you can get the super truss, which will allow you to have that extension to be able to still tow and still maintain a really heavy weight capacity as far as gross trailer weight.
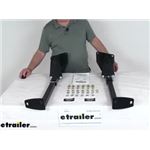
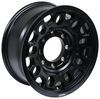
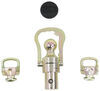
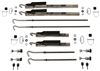
What's really nice too with our mounting plates here is you do have that adjustability as far as going out a little bit wider, but you can choose from either side, front or back, whatever works best for your camper. And as far as tensioning it down with turnbuckles, there's a few different styles. And this first one is from TorkLift. This is the spring load and this will bolt down here with a chain. You then have this turnbuckle here that'll attach to the camper. And as you tighten this down, it's gonna cinch that down perfectly, making sure that the camper's not gonna move. But if you take your camper out quite often, something you might wanna look at that just is gonna be a little bit easier and set up for each time you use it is going to be the TorkLift FastGun. So these are really sharp, same thing, same concept. It's threaded here so you can get it perfectly dialed in. And there's actually a spot here that designates driver front, rear, passenger, front, rear. So once you get all four of 'em set up, it's gonna be as simple as just simply dropping this in, be able to unlatch here, you'll put that in place, tighten this down, pin it up, and then it's gonna be secure, already dialed into the length that you need. Something else that I might recommend on something like this or really any truck with an in-bed camper, that's a lot of weight that you're gonna be putting on the truck and you want it to be able to handle that. So a sway bar's a great option. But also you might wanna look at something like a Timbren rear helper spring, maybe airbags, SumoSprings also has some great options available as well. But something to beef up that suspension so it's not constantly squatted down. That's gonna take away from not only steering and braking, but overall it's just gonna wear that suspension down. So something else you might wanna consider when going with the in-bed camper route. As far as installation on the front camper tie-down, this isn't horrible. If you did the SuperHitch yourself, that's a pretty extensive install. So this shouldn't be too bad, but it does bolt up to where the leaf spring mount is. So you're gonna be taking that leaf spring bolt out just a little bit, not completely, and bolt up a bracket. And some of the other bolts to get in place are a little bit tricky, so you're gonna need a pretty big torque wrench to be able to get that torque back down on the leaf spring. But if you have all the tools to do it or know someone that you can borrow tools from, it's really not too bad to do. And you could probably knock this out I would say about an hour or two. But either way, I'm gonna walk you through all the steps to make sure you get it installed so let's take a look. The installation of our front camper tie-downs, it's really not that hard as far as looking at what bolts need to go where, the hardest part is going to be our large bolt that goes through the eyelet of our leaf springs here. It's rather strong, it's rather big. So you're gonna need to get a little bit creative here as far as either having a long breaker bar or having a pipe. Also to torque this back down, you're gonna want a really heavy duty torque wrench. It does get pretty tight here as well, but the main thing that we're doing, we're not removing it completely, we just need to get a gap to where we can slide our plate in place. So this will slide here and then once it's loose, we'll be able to slide this up. There's gonna be a bolt that goes through here that holds that in place. So to get this loose, we need about a 5/16" gap and kind of what I did is you have this locking nut plate that kind of stays in place. You have maybe about a half inch of threads. And what I did, I installed the other side already. I backed this out to where it's practically flushed with that nut plate and that was a good gap. So to get this loose, a 30 millimeter socket was the ticket. It's like I said, you're gonna have to kind of fight this a little bit here, so don't be surprised. It is gonna take a little bit of elbow grease to get this moving. So you can see here I'm putting a decent amount of force on it, so I'm gonna use a little cheater bar here to break this loose. So again, as I loosen this, I'm gonna try to get this flush with that welded on nut there. And that should give us our gap. Now you may find that this starts to flex a little bit, so if you need to, just kind of take a pry bar, a flat head screwdriver and just kind of pull the head of the bolts out as much as you can. And that's gonna allow us to get this plate in place. Now you'll see a notch here at the top. On the driver's side this needs to face forward, on the passenger side it's gonna be the reverse, so just make sure you have it in the proper orientation. And what we're gonna do is just slide this on there for now and this is gonna go all the way up to where it aligns with this hole. So let's go ahead, we'll get our hardware slid up and that way it's gonna hold this in place. So we'll take this bolt with a flat washer and we're gonna just kinda reach up over the leaf springs here, again, slide this up and we should be able to get this to align. And I'm gonna just loosely put our hardware in place right now. So that's a flat washer, a split washer, and then our nut. And as I hand tighten this down, what I'm gonna do is push this up as far as I can. And that seemed to put us at a good point to get the rest of our brackets in place on the other side. So I'm just gonna hand snug this down so it kinda holds it in place. So now I'm gonna grab my torque wrench with a 17 millimeter socket and a 17 millimeter wrench. And again, make sure that plate is all the way up. If it's tight around where that big bolt was, you can kind of just take a dead blow and knock that up. You're also gonna wanna make sure it's nice and level. So as that is in place, once we torque this down, it should hold it pretty good. And torque settings are found in the instruction manual. So go ahead and torque this down. Tightening the leaf spring bolt back down is where it gets kind of tricky. This is gonna require a pretty high torque setting. So you can see I have a rather large torque wrench here. You probably don't have one of these at home. If you do, you're in luck but also it's pretty tight here. So to get a socket, I have an extension here. I really don't have a whole lot of room to work, so I recommend tightening it down by hand using whatever method you loosened it up with first and then come back with your torque wrench to save you a little bit here. But we're gonna go ahead and get this torqued down to the torque settings down in the instruction manual. So now we need to grab our bracket and you'll see that it kind of angles up and this matches the hole on the backside of the leaf spring mount. Now this is also tricky because this bracket needs to slide in front here and tolerance wise it's pretty, it's a great fit. But in order to get the hardware up through here, it is not particularly easy to feed it in and get this threaded out. So I tried a few different methods. One of the holes is slightly oblong. So if you use a fish wire technique where you thread onto the bolt, you could be able to pull it out on one. But this top one here, it's about the same size as the bolt. So it can get tricky here. And what I've found to work well was a very long needle nose pliers that I have here. And with that in place I was able to kind of just feed that through and just make sure you have a nut handy. That way you can get it tightened down once it's in place. But what we're gonna do is we'll grab our metric bolts and this is gonna feed in through here and just with that plate in place. Now there is a large pocket here, so maybe this might be the time to convince someone that has smaller hands, they should be able to feed this through but it's still pretty tricky, it has to be pretty lined up. So if you need to, you can put like a bottle jack or something to support it to make sure that the holes are perfectly lined up. It's gonna make it a little bit easier. So the issue I was having is I couldn't quite get my hands in place and fed through and get the bracket and then be able to get my hands out. So that's really the difficult part. So whatever you need to do to get creative, I try to magnet that was also a potential, but I think a long needle nose to just kind of feed that through the hole is gonna be the ticket. So again, as you, if you want to use a bottle jack to kind of support it, again, that's gonna make it a little bit easier and a little less cumbersome but get your holes aligned. And you may have to kind of move the bracket around a little bit to get this dropped through. There we go. And once that's pulled through, we'll just finish that up with a flat washer, a split washer, and then our nut. Now leave that hardware just hand tightened or you know, somewhat loose because we need to run our bolts through here. Now we're gonna be using the 3/8 instead of the M10, so make sure you have that in the larger washer. So put flat washer on there and then as you pass it through, we'll do a flat washer, a split washer, and then our nut. And then we'll get the other side in as well. Now we're gonna want to tighten these down before taking a torque wrench to them. And these are gonna be 17 millimeters. So what I recommend, it's pretty tight against the gas tank here. On the passenger side that's not gonna be like that. So you'll have a little bit more room to work. But for this instance, I'm gonna go ahead, I'll get my wrench on the head of the bolt and then I have a ratcheting wrench here. So we'll just go ahead and get this tightened down. Now these two bottom bolts are gonna be 9/16. So have your socket and your wrench ready. Now we do need to torque these down and because it's really close to the gas tank, obviously it's going to be really hard to do with a standard torque wrench in a socket. So for this, I'm using the a 17 millimeter crows foot and that's gonna allow us to squeeze this up in there and still get this torqued down properly. Now the torque settings are in the instruction manual, so we'll get these two torqued down and then we'll head to these. Just know that the torque settings do change between the two of them. So with our hardware all torqued down, we officially have our driver's side installed. So all that's left to do is repeat on the other side. And I will mention again, passenger side is gonna be a little bit easier 'cause the fuel tank's not in the way, but again, the biggest struggle is definitely the large bolt that's for the leaf springs and then also these bolts feeding those in. But after that it's pretty simple. We just need to take our tie-down, slide this in here, determine which width we want, put our pin in place. And then we can strap down our in-bed camper. And that was a look and installation of the TorkLift front camper tie-downs on a 2023 Ram 3500.
Info for this part was:
At etrailer.com we provide the best information available about the products we sell. We take the quality of our information seriously so that you can get the right part the first time. Let us know if anything is missing or if you have any questions.


Thank you! Your comment has been submitted successfully. You should be able to view your question/comment here within a few days.
Error submitting comment. Please try again momentarily.