
Get the safest and most comfortable ride while hauling your camper with tie-downs that mount on the frame of your pickup. Great for your truck's looks: remove the arms from the brackets and you'll hardly know that the brackets are there.
Features:
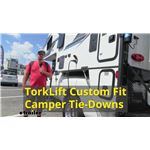
TorkLift Custom Frame-Mounted Camper Tie-Downs - Front:Videos are provided as a guide only. Refer to manufacturer installation instructions and specs for complete information.
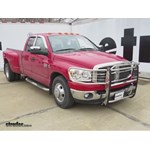
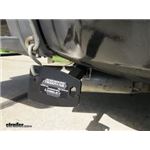
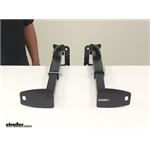
Today on our 2008 Dodge Ram Pick-up 3500, we will be installing the TorkLift Custom Frame Mounted Camper Tie Downs for the front. Part number: TLD2101. These tie downs provide attachment point to the front of your truck bed for securing a bed mounted camper. These secure to the truck's frame instead of the bed which distributes the weight to keep your set up from being too top heavy. They have a nice powder coated steel construction. They're made in the USA and have a limited life-time warranty. Here on the driver's side you can see the camper tie down has three mounting locations which it's a no drill application so you have one here, one here, and one up at the top where the bed connects to the frame so it's a really easy installation. When you're not towing a camper or you have it out of the bed of the pick up, you can go ahead, undo this clip, pull that out, pull the arm out, and it really cleans up the look as you're driving on the road without hauling any camper.
When you're ready to load up and you need to tie down the camper, just insert the arm. You can see there's two different holes here. Depending on how wide your camper is in the bed of your truck, you can adjust this to fit your application. Put it in there, line up the pin and clip, latch those, you're ready to hook your tie down under your camper and hit the road. Now, that you've seen what it looks like her eon the driver's side, we'll go ahead and install it on the passenger side. First step to installation, you can see right up here in the frame where the bed attaches to the frame there's this bolt.
You're going to want to go ahead and take that bolt out. We'll use the 18mm socket. It's a good idea to get it loose by hand first instead of using an impact on it, because they tend to be tight so if you break the bar, you get that started so you don't break the bolt off. You also want to hold onto this bolt because we will be reusing for the install. So here we have the passenger side bracket that I'd go into place. There's two attachment points on the side of the frame and then the attachment point up where we took the bolt our previously.
This attachment point right here and right here on this side and we'll use this pre-drilled hole in the frame. Right here we'll use the bigger hole where a special block on the inside will secure that. Our first step in the installing the side bracket after we removed that bolt, we will have to put it into place to put that bolt back up in there to hold it while we put our hardware into the frame. In order to do that, we'll reuse the bolt. We'll also bring in this 5 inch by 3 and 1/4 inch plate that comes with the kit. It will actually sit on top of the bracket here.
The bolt will go through both and then back into the attachment point. If you look at the plate you can see that it's offset to one side. The offset will be towards the back of the truck. So now we'll go ahead and put our frame bracket up into place and re-use the hardware we took out. It is a good idea to get an extra set of hands because it is kind of awkward to hold it up there while you're putting the bolt in, but if not, you'll just have to get it up into place and just get the thread started in that bolt. You want to go ahead once you get it up there get it hand tight just to hold the bracket in place while we get our other hardware into position. As you can see on the passenger side here, there is this cut out for the frame. It'll go ahead and go around the stud that's in the frame and it'll line up with your two attachment points. Once we have that hand tightened up in there into place, you'll see it'll hold it into place so we can get our other hardware into position. For this front attachment point, I'll be using the 1/2 inch by 2 inch hex bolt. You want to take a 1/2 inch star washer that comes with the kit, put that on there. A 1/2 inch flat washer, put that between, and then we'll go ahead and install another 1/2 inch star washer, which that will be fish wired into the frame and come out this attachment point to hold it into position. It does come with a 1/2 fish wire. So we'll go ahead, feed that into the frame right here. There will be an access point on the back side of the frame about right here that we can grab it, throw our hardware into the frame, and then pull it out through the hole. So we'll go head and go to the back side of the frame and get the fish wire out of that access point. We'll grab the fish wire. All right, here on the back side of that frame, you'll see this access point. It's pretty much right behind the back hole on the passenger side of the frame right behind it there's an access point that will fit the hardware through there, so that's where you'll pull your fish wire out and put your hardware into the frame. Once you get ahold of that, pull that out, then you have it on both sides right here. So, we'll go ahead, take the bolt, the star washer, flat washer, and the other star washer and put it onto the bolt leader. It's a pretty snug fit but it keeps it from pulling off as you're pulling it to the frame. We'll go head and put the hardware into the frame. Had to separate the washers from the bolt to get them fed in through the frame and then go back to the outside and pull that into position. All right, now we're back to the attachment point. You have the bolt leader coming out of there. We'll go ahead, just take it and pull it through. As you see, comes right out. If the bolt's having trouble coming through there, it's probably stuck on one of those star washers, so just jiggle it around a little bit. It should come through the access point then. So we'll go ahead and undo the fish wire from it. It's pretty tough so if you get a pair of pliers, kind of hold it in there, and you twist the bolt off just be careful not to push the bolt back into the frame. Once you get that off there. And to attach to the outside of the frame we'll be using 2 1/2 inch flat washers. Go head and put those on there. Be careful not to push to bolt back into the frame. Just put some tension on the side of it. It'll lock it against the frame and hold it in position. Use a 1/2 inch lock washer and then a 1/2 nut. Once you get that on there, just put it on there, hand tighten for right now until we get our other hardware into the frame. Here in the rear attachment point for the frame the access hole to get your bolt into your frame is actually pretty much directly across from there. So, when you put your fish wire through, it should come out right back on that side of the frame, which will allow you to pull it back through. For this attachment point, we'll be using the 1/2 inch by 2 inch hex bolt. We'll be using a 1/2 inch star washer, and you'll be using this 1 inch by 3 inch block which will get trapped under the frame and hold your bolt while you tie it down and torque it. It'll go through the frame, through our attachment point on our bracket, and it will again attach with 2 flat washers, a lock washer, and a nut. So first, we'll take our fish wire, we'll fed that through the bracket, through the frame, and again out the other side. As you can see, it pretty much comes straight out from that. We'll again thread on our hardware. For this one, you'll have to put the block into the frame first, the star washer, and then the bolt. So now that we have that in there, we'll go ahead and put some tension on it to hold it in place so we don't push it back into the frame. Get our bolt leader off there. Once you have that off there, go ahead and put our 2 1/2 inch flat washers on there, 1/2 inch lock nut, and our 1/2 inch hex bolt. Again, just keep some tension on the bolt to keep it in place while you get that in there. We'll spin it around a little bit on the inside until the block locks on there. Once it does you'll be able to tighten it down. Now we'll go ahead and tighten everything down and torque it to the specifications that's indicated in the instructions. So then tighten the bolt that we took down from the bed first and torque that to specifications before we tighten and torque the other two. Now that we have everything tightened and torqued, we can go ahead and bring in the camper tie down arm, slide that into position. Time to do our pin and clip. Slide that through. Do the clip. We're ready to load up our camper and tie it down. So, we have a secure mounting location for our camper in the bed of our pick up truck. Now that we have everything tightened and torqued, we can go ahead, put our camper into our bed, secure it to our camper tie downs, and hit the road. And that'll do it for the TorkLift Custom Frame Mounted Camper Tie Downs for the front. Part number: TLD2101 on our 2008 Dodge Ram 3500. .
Info for this part was:
At etrailer.com we provide the best information available about the products we sell. We take the quality of our information seriously so that you can get the right part the first time. Let us know if anything is missing or if you have any questions.


Thank you! Your comment has been submitted successfully. You should be able to view your question/comment here within a few days.
Error submitting comment. Please try again momentarily.