
Custom Fit Tie Down Kit With TLC2220 | TLC3212
(0 reviews)
Price: $854.19
In Stock


- All Info
- Q & A (0)
- Videos (6)
- Photos
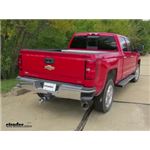
TorkLift Truck Camper Tie Downs - TL75PR
- Frame-Mounted
- Front Tie-Downs
- TorkLift
- Custom Fit
- Powder Coated Steel
Get the safest and most comfortable ride while hauling your camper with tie-downs that mount on the frame of your pickup. Great for your truck's looks: remove the arms from the brackets and you'll hardly know that the brackets are there.
Features:
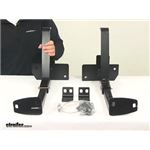
TorkLift Custom Frame-Mounted Camper Tie-Downs - Front:- Creates attachment points for securing your camper to your truck bed
- Pairs with rear tie-downs (sold separately)
- Requires turnbuckles (sold separately) to attach camper to tie-downs
- Ensures excellent handling by distributing camper's weight evenly and lowering its center of gravity
- Avoids a top-heavy setup that would be vulnerable to strong winds and sway
- Remains virtually invisible beneath your vehicle
- Remove the arms and you'll hardly know the brackets are there
- Adjusts for simple, secure connection to camper
- Extend arms out from truck body to clear bowed sidewalls and fenders
- Choose between 2 anchor holes to get the best angle for a secure hold
- Made of black powder coated steel to resist corrosion
- Mounts tight to your vehicle's frame - minimal loss of ground clearance
- Uses pre-existing holes in the frame - little to no drilling required
- Includes 2 front tie-downs and installation hardware
- Made in the USA
- Lifetime warranty
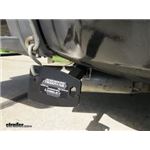
TorkLift Custom Frame-Mounted Camper Tie-Downs - Rear:
- Creates attachment points for securing your camper to your truck bed
- Pairs with front tie-downs (sold separately)
- Requires turnbuckles (sold separately) to attach camper to tie-downs
- Ensures excellent handling by distributing the weight evenly and lowering the center of gravity
- Avoids a top-heavy setup that would be vulnerable to strong winds and sway
- Remains virtually invisible beneath your vehicle
- Remove the arms and you'll hardly know the brackets are there
- Adjusts for simple, secure connection to camper
- Extend arms out from truck body to clear bowed sidewalls and fenders
- Choose between 2 anchor holes to get the best angle for a secure hold
- Made of black powder coated steel to resist corrosion
- Mounts tight to your vehicle's frame - minimal loss of ground clearance
- Uses pre-existing holes in the frame - little to no drilling required
- Includes 2 rear tie-downs and installation hardware
- Made in the USA
- Lifetime warranty
C2220 Tork Lift Truck Camper Tie Down - Front Frame Mount - Custom Fit
Replaces C2213
C3212 Tork Lift Truck Camper Tie Down - Rear Frame Mount - Custom Fit
Replaces 31963
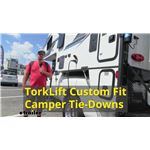
Video of Custom Fit Tie Down Kit With TLC2220 | TLC3212


Videos are provided as a guide only. Refer to manufacturer installation instructions and specs for complete information.


Video Transcript for TorkLift Frame-Mounted Front Tie-Downs Installation - 2016 Chevrolet Silverado 2500
Speaker 1: Today on our 2016 Chevrolet Silverado 2500 we're going to be taking a look at and showing you how to install the Torklift Custom Frame Mounted Camper Tie Downs for the front, part number TLC2220. Here's what our camper tie downs look like once they're installed. Now, we always do recommend using four tie down points, so we're using it in conjunction with the rear as well. Now, if you need some of the rear tie down points, you can pick some up on our website using part number TLC3215.These are frame mounted tie downs, which is going to give you a very stable point to mount your camper to. Now, the frame style tie down is going to have a big advantage over the bed style because we're not going to have to worry about any bed damage or drilling into our bed or bumper causing rust down the line. It's also a lower attachment point, which is going to benefit us because of our camper being up so high, it's going to take some of the stress off from having that top-heavy load.Now, since it's mounted to the frame we're not going to lose any ground clearance, because as you can see, it's going to come in and go up to our frame where our frame is actually going to hang down lower farther forward.
I know a big concern a lot of you might have is if it's going to work with your running boards. Well, as you can see, we have our factory running boards on here, and it's not going to interfere at all. One feature that I know you're going to like is the fact that the arms here are removable. We come to this pin, we can pull the clip and remove the pin. Then we can actually remove the arm completely and it's virtually invisible and you won't have to see that sticking out.Our arms are going to have two holes, and that's going to accommodate different width campers.
If you have a rather wide camper you can use the outer one, or you can use the inner one if it's not that wide. Then simply just flip the pin in and secure it down with the clip. Now, our camper tie downs are going to feature a steel construction with a nice black powder coat finish, so you know it's going to look nice for a long time. Now that we've seen what they look like and we've gone over some of the features, let's show you how to get them installed.To begin your installation, we're going to need to find our leaf springs on the back axle, and we're going to find the front mount, and this is where we're going to be starting working at. If we look right towards the inside of our spring perch, we're going to notice that there's going to be a rather large access hole in there.
If we come to the front of our spring perch, there's going to be a rather small hole that we can reach from the inside.You're going to want to take your fish wire and take the coiled end and feed it in through the front of the spring perch in that small hole, and you're going to want to feed it through until it comes out the back access hole so you can grab it. Then we can take our square bolt, you're going to want to feed it on and thread it onto your pull wire until it's nice and secure and it's not going to drop. Then we're going to feed our square bolt through the access hole until we can pull it out. May take a little bit of maneuvering until it comes out like that through the front of our spring perch. Then you're going to want to unthread your pull wire off the bolt, trying not to stretch it out because we will have to reuse this.The bolt we just pulled through the spring perch, if we just come forward we're going to see an oval hole in our frame.
Then if we continue to move forward, right by our emergency brake cable on our driver's side we're going to have a circular hole. Our goal is to take our pull wire with the coiled end through the oval hole, feed it through the frame, and then come out the circular hole. Now, I will say, it's going to take a little bit of patience, a little bit of time, but it is possible. You just need to start feeding it through, and if you need to you can take your finger, put it in there, see if you can feel the pull wire. Just kind of finesse it into place until you can get it pulled out. Now, once you have your coiled end coming out the round hole you don't want to let go or have this go all the way into the frame.Once you have your pull wire through the round hole, we're going to take our 1/2 inch by 2 inch bolt and we're going to thread it onto our pull wire. You're going to want to push it back into the frame. Now that we have our bolt in place, we're going to take our star washer, we're going to feed it onto the end of our pull wire and we're going to insert it into the frame. Then we're going to take our 1/2 inch plate washer and do the same thing.With all of the hardware through, we're going to go ahead and pull our pull wire up. It'll take a little bit of a wiggle to get all of our hardware and the bolt through. The end goal is to have the bolt go through the washer and through that plate, and coming out of the frame. Just want to be careful and try not to stretch that pull wire as much as you can. A quick tip is you want to leave that pull wire attached to the bolt. That way, when we start getting our other brackets in place, it doesn't fall back in the frame, and if it does we can just pull it right back out.Our frame we're going to have our bed support right here. If we go directly up we'll see that there's a bolt holding it in place. We're going to need to remove that bolt. Now, I'm going to be using an 18 millimeter socket to pull it out. Now we're going to want to grab our driver's side bracket, and the way you're going to know it's the driver's side bracket is with the long extension piece with the tab going in, we're going to have this cutaway here and the hole's going to be on top. The passenger side is going to be faced the other way, so if we have it sitting like this everything should line up. If not, nothing's going to line up. It's really not that hard to figure out which one's which.Once we have our bracket we're going to take our pull wire and we're going to go through the front hole. You're going to push the bolt through the front hole and our tab is going to line up in between the bracket for our bed. Then we're going to take that factory bolt that we just removed and we're going to secure it up top. Now, right now you only want to get this hand tight so we have a little bit of wiggle room and make any adjustments as needed.Now we'll get ready to take our pull wire off. Before we take it all the way off, what I'm going to do is I'm going to take a 1/2 inch flat washer and I'm going to thread it onto my pull wire and over and around my bolt and kind of push down on it. That way, I know the bolt's not going to fall in. Then I can pull my pull wire off, and it'll help keeping it from spinning. Then we're going to follow that flat washer up with a 1/2 inch lock washer, and then finally a 1/2 inch nut. Again, if you kind of push on that flat washer it'll help keep that bolt from spinning as much when you're tightening it up by hand.We're going to grab our other bracket here. Now, there is going to be two holes in one side and one hole in the center. We're going to want to line up the center hole on the back side of our bracket here and loosely put it into place. When we line up our hole, the slotted hole should line up with that bolt that we dropped down through our spring perch. Now, coming from the back side going out, we're going to take another one of our 1/2 inch bolts and we're going to slide it through our bracket to the outside, and we're going to follow it up with a 1/2 inch flat washer, lock washer, and nut. That's going to be the same combination of hardware we're going to put for the bolt that's coming through our spring perch; flat washer, followed by a lock washer, and then finally securing it with a nut.We can come back and start snugging up all of our hardware. For all of our 1/2 inch hardware I'm going to be using a 3/4 inch socket, and where there's a bolt going through that I can reach the head of it, I'm going to be using a 3/4 inch wrench to hold it. We'll go back and tighten up all of our hardware. We're going to come back, and using a torque wrench and that same 3/4 inch socket, we're going to tighten up all of our hardware to the specified amount in the instructions.With all of our brackets torqued we can grab the arm, you're going to want to slide it in, and there's two holes, so we're going to use the inner one. We're going to slide it in, and we can take the provided pin and clip, once we have the holes lined up we can slide it through and secure it down. Now, you're going to know that it's the driver's side because the thinner part is going to be facing towards the front. That way we know that everything's lined up properly.Now, to help us remember which one's which once we take them out, they do provide us with some stickers. That way we can label them and we're going to know where they go once we put them back in. After you have the driver's side done you can go ahead and do the same thing on the passenger side. That'll finish up your look at the Torklift Custom Frame Mounted Camper Tie Downs for the front, part number TLC2220 on our 2016 Chevrolet Silverado 2500.
0
0
See what our Experts say about this TorkLift Truck Camper Tie Downs
Info for this part was:

Written by:
Lindsey S

Edited By:
Leah B
At etrailer.com we provide the best information available about the products we sell. We take the quality of our information seriously so that you can get the right part the first time. Let us know if anything is missing or if you have any questions.
Product Experts Available Now!
Call 1-800-940-8924
Thank you! Your comment has been submitted successfully. You should be able to view your question/comment here within a few days.
Error submitting comment. Please try again momentarily.