
To see if this custom-fit item will work for you please tell us what vehicle you'll use it with.
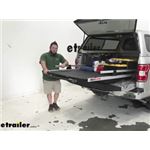
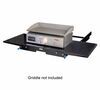
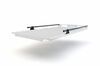
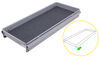
Sliding tray saves you from having to climb into your truck bed to reach groceries, luggage, and other items stored at the front of the bed. Perfect for a truck with a tonneau cover or camper shell. Extends 51" past your tailgate.
Features:
Specs:
The BedSlide Classic sliding truck bed tray is perfect for do-it-yourselfers, designated grocery getters, and adventurers who will be carrying a lot of gear in the back of their truck. Instead of climbing into your truck bed or having to reach a long way, you can simply slide the items to you. It's much easier on your body and reduces the risk of injury from slipping, falling, or pulling a muscle. It also makes it easy to retrieve the items that you typically store in the front of your truck bed. The tray supports up to 1,000 pounds, so you can safely carry yard tools, luggage, coolers, and more.
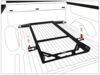
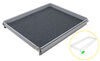
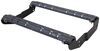
Deck rails and guard rails along the sides and in the back of the BedSlide keep your gear contained on the tray. The deck rails attach directly to the edges of the tray. They help prevent smaller items from sliding off and falling into your truck bed. The guard rails attach to the deck rails and sit 5" above the deck surface. They help prevent taller gear from tipping over or falling off the tray and crashing to the ground. T-tracks in the deck rails and the guard rails let you attach accessories for anchoring your gear and storing and organizing smaller items.
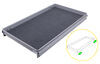
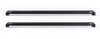
4 Included D-rings provide anchor points for tie-down straps, allowing you to easily secure buckets, boxes, and other gear. Just insert the D-rings into the T-tracks on the guard rails or deck rails and slide them wherever you want. Extra D-rings (sold separately) are available if you need more than 4 tie-down points.
The available BedBins (sold separately) keep hand tools, gloves, and other smaller items organized. Just slide them to the most convenient location along the T-tracks and secure them with the included hardware.
You can also set a deck divider (sold separately) on the tray for easy cargo organization, or to create a make-shift storage bin. You can place groceries near the front of the tray so they're easy to grab when you get home, or keep buckets, spray cans, and other tall items upright so they don't fall over and spill or roll around. The deck divider sits loose on the BedSlide but has a non-skid pad on the bottom that prevents it from sliding around.
If you're going to haul smaller items and need more storage space than the BedSlide provides, you can add an upper tray (sold separately). This lets you store items over the BedSlide without losing access to valuable deck space. Mount it in at the front of the BedSlide for easy access to items you will use regularly, or at the back for less-used items. Use the included hardware to mount it in the T-tracks on the side guard rails.
Videos are provided as a guide only. Refer to manufacturer installation instructions and specs for complete information.
Hi, everyone. Aiden here with etrailer. Today, we're gonna be taking a look at and showing you how to install this Bedslide on your 2023 Chevrolet Silverado 1500. That's gonna be a great way to access your cargo, whether you've got a camper shell or a tonneau cover. And this is going to be a sliding tray capable of holding up to a thousand pounds, having two locking positions. And when it's all said and done, pushing all the way back inside of your truck bed where no one can see it, and all of your stuff remains easy to access without having to open up that tonneau cover or crawl into the back of your camper shell.
Let's check it out. When you pull it out, you do get 75% extension which isn't all the way, but it's enough where you can very easily get to the step at the very front of that Bedslide, whether it be a generator or a cooler. And you can reach it very easily. So even though it doesn't slide out all the way, it still creates much more accessibility with your truck bed. It also comes with tie-down points here.
You get two for each side that you can tighten and loosen, move around as you see fit. And really anywhere along these rails that it slides, you can make work. And I will say they are plastic. So because of that I wouldn't use ratchet straps. And if you do, maybe just really lightly tighten them.
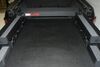
Don't really crank on 'em because you're gonna be putting a lot of stress on that, but cam buckle straps should be just fine and give you more than enough ability to tie things down and secure them. Now in addition to, the top deck here is going to be this rough composite material, very much like a spray-in bedliner, but it's got a very coarse grit, keeping things in place quite well, a lot less chance for things sliding around as they might on a bare metal bed or even a plastic bedliner. to release it, you have a spring-loaded latch right by the large metal handle. And I will say that is a nice spring. When you pull that, you definitely feel attention.
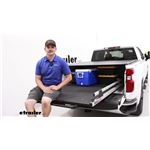
You can release it and it'll auto latch in at the next stopping point. And release it again for the fully retracted position. Now, there's some pretty annoying squeaking going on. This is brand new out of the box. And if you go quicker, you really don't hear it. So I think that's partially just the speed of it and also the newness of it. Things will break in the more we use it. And if you wanna have it from fully extended to fully retracted, just hold onto that handle until you get past that first locking point. And the other thing I wanna point out while you're at the side here is, as I extend this, you'll notice that the tray actually slants up pretty noticeably. Now, the reason for that is, with 1,000 pound weight capacity, you've gotta consider how much weight you're putting towards the end of your truck. And I can sit on it right now and show you that the back end's gonna sag down a fair bit. Now, I'm only around 225 pounds, so if we had more weight back here, we'd be experiencing more drop. But rather than dropping things down and sloping it down, we're actually just leveling the thing out. So we've got that rise built into it so that nothing rolls away when we fully extend it. I've opened up the tonneau cover to give us a bit of a better view as we slide this back in. And one thing I do wanna say is, obviously, we're taking up space in our truck bed with this, but we still have usable space on the side next to the wheel wells. Maybe something like a jump box or a two-gallon gas can on the other side. So if you do have the Bedslide fully loaded with other stuff, you're not totally out of room. You do still have space on the sides. Plus Bedslide does make a variety of different accessories, whether it's storage bins or organizers that can mount to these guardrails on the sides. All these T-track systems are capable of accepting other accessories or additional tie-down points to make them a little bit more functional and add storage space off to the side of the tray. And I want to take some time to get some measurements to see what kind of usable space you have and how it sits on your Silverado. From side to side of the inside rails, we're gonna be looking at 45 1/4 inches of usable space. From the front to the back here, we're looking at 63 inches of space before that Bedslide ends. It does sit up from your truck bed a little bit, going from the tallest point on one of these ridges to the top of the deck is 4 1/2 inches. And from the deck to the top of the bed rails is about 18 inches, maybe just a little bit under. So that measurement at the end there is gonna tell us if we have clearance with the things we wanna stack up and still be able to close our tonneau cover on top of it. If you've got a camper shell, you're much less likely to have to worry about that, but it's pretty important to know because we are cutting it kind of close with some of the cargo we have stacked up on our tonneau cover today. But that's really all there is to it, and you get a lot of space with it. Now they make these in versions with bigger and better weight capacities if that's what you need. Something a little bit more heavy duty maybe for some job site applications, but this one I think is going to be great for any sort of recreational use and just giving you easier access into your truck bed. Now, I will say that the install process is a little bit involved. Honestly, it's not too bad. There's a few things you gotta keep in mind. You'll need an extra set of hands to help you lift things into place and maybe help with some of the install process later on like you'll see. Drilling into your truck bed can be Nerve-racking. It could be really just a mental barrier because, honestly, measuring it out, it's pretty easy. The base of the Bedslide tells you exactly where you need to drill and makes it easy to mark the holes. So once you mark those and you get past the mental barrier of it, it's not bad. And then the one part of the install that is a little bit more involved and tricky is the rivnuts. You will need to install those to give you some mounting points in the bed, but that part's not too bad either. We found a good trick to get it accomplished, and we'll show you all of that in the install process right now. Starting off your installation, you wanna get things organized. It's just gonna make the whole process a little bit easier. And a lot of the starting stuff is gonna be on the ground doing some pre-assembly but I also like to gather up the tools that I'll need for the install. Now, in the box of hardware you're gonna have two bags. The smaller bag is going to have all the rivnuts that you need for mounting it to your truck bed. You don't need that yet. Just set it to the side and the larger bag will have all the other hardware for our pre-assembly on the ground. I've already got that set aside and we'll check that out in just a second, but it's a good idea to get some other things. A piece of wood that has an inch and a half thickness is gonna be a great idea to act as a spacer block. You'll see how we use this once we get to lifting this into the bed, but having that on hand is a great idea. It's gonna help a lot. Then you're gonna need a drill with a half inch drill bit. I like to also have a smaller drill bit for a pilot hole. You can use something like a Sharpie, but I also like to have a punch just to mark my holes for drilling and make it a little bit easier to guide the drill bit and keep it from slipping. And you'll also need something like a half-inch wrench and socket. Aside from all that, we can start with our pre-assembly on the ground. In the other bag, you're gonna have things like these plastic threaded blocks. Gonna have a number of these screws, and it doesn't come with an Allen key so you will need to provide your own. Just pick up a set if you don't have it already, and you'll use that for a number of steps in the install here. And then in shipping, your brackets will be on the Bedslide upside down. Just take those off and identify the corner brackets and the side brackets. Pretty easy to tell which one's which. And you can see on the other side of me, we've got it partially started. Keep everything loose for now until it's fully attached, and then we can go back and tighten everything down. We're gonna start off though at this back rail, and we need to take this end cap off by loosening the set screw and taking that cap off. With that out, we can grab one of these plastic blocks, slide it in with the curved side down. That way, it can slide over the screws that are in this rail and pop the cap back on. And make sure you tighten that set screw down once it's back in place. We're gonna do the same thing on the back end of the Bedslide except we're gonna slide five of these blocks into the channel. Now I'm just gonna push those up to the front. We'll space them out properly later. Right now they just need to be in the track so they can serve as our attachment points for the guardrails. For the guardrails that come in your kit, you're gonna have one shorter one. That's for the cab side of the Bedslide. And two longer ones for the side. We're gonna also slide two of these blocks into the side channels 'cause they'll serve as attachment points on our corner brackets. So I'm just gonna get that loosely set into place here, slide the block in line at the corner bracket, and we can use the screws to attach both the bottom holes here to the blocks in the bottom tracks and in the side tracks here. Starting with the corner bracket, we'll loosely set it in place and get these blocks slid underneath, lining the holes up with the holes on the bracket. Use your Allen key or something to line it up and push it into place because this channel's a little bit too small for a finger to fit in there. And you will need a slightly larger Allen key for these screws. Something you can do to make that process a little easier since you're gonna be working around the brackets is having some hex head bits and a small bit driver like this that can ratchet can just speed that process up for you. And like I mentioned before, when we're doing this you wanna run 'em down but don't fully tighten it. Let there be a little bit of movement still left in here so we can get everything attached loosely before tightening. It'll be the same process here for the head rail getting the holes aligned, starting the screws on both sides, and leaving them loose. And we'll repeat that process as well for the side bracket and the side rail. For the sides, you'll notice that we have four of these plastic threaded blocks left in the channel and only two mounting holes for the side bracket. I'm gonna leave one block on either side of the bracket for the included eye bolts. You can arrange these tie-downs however you want, but I find it most helpful to have one pair on the very end and one pair that we can put towards the very front, and spread them around however we need in the future. For the last side rail and the two remaining blocks, again, just slide them in like we had before. On these side rails, notice that there's an end cap. We want the end cap facing towards where the tailgate's gonna be on our truck. The other end will be open for us to slide those blocks in. Now that everything's loosely in place, we just need to take one measurement before we tighten everything down. I can see everything's lined up pretty much exactly as I want it. But right here, from the side bracket to the end of the side rail, we want that measurement to be six inches. So I'm gonna move this one in just a little bit. We want six inches of overhang on both sides. Once we've got that, we can go back through and tighten down all the hardware. Like I mentioned before, you can put these wherever you want. You don't need to have one on either side of the bracket. That's just where I like to put mine. And finally, we need to attach our handle. That's going to have two screws that come partially installed when you open up your box right on the outside here. Again, using an Allen key that they do not provide, you can undo those and use them to attach the brackets on the handle. Let's get those lined up through the bracket holes on the ends of the handle. And on those holes, it's not quite big enough to just push through. It actually kind of threads through, so it may be helpful to use that tool from earlier to speed up the process until it's poking out far enough that it can thread back into the hole on the Bedslide. Now we're ready to get things lifted up into the bed. Grab that piece of two by four, anything that can space this out an inch and a half, like I told you before, and get that set against the bulkhead of your truck. That's gonna be our spacer block. Whenever we lift this into place, we can put it against that and trust that it's gonna be parallel to the front of the bed, and then all we have to do is center it side to side. It's a good idea if you've got a bare bed like this, use the box that the bedside came in. Lay down the cardboard here so we don't scratch up the whole bed, getting it lifted in, 'cause it is heavy and we don't want that bracket scratching the whole way up to the front. Once in place, we can remove the cardboard and do small shifts side to side. It's gonna be a lot easier to keep any damage away from the bed that way, but grab some help and get to lifting. Now we can get this lined up in the bed. We've got the cardboard there waiting for us. And once we get it set down, just start sliding it forward until it hits that wood block. Let's get that cardboard out from underneath the Bedslide. That's pretty easy to do on your own if you need to. Our extra set of hands had places to be and things to do, so I'm just gonna get this shimmied out from underneath, and then we can center it between the wheel wells using those as reference points, and measure out on each side, and make sure that it's even. Now, be careful when you're doing this. But if you stand on the tire, you can get your measurement pretty easily on both sides and I need to scoot it towards me just a little bit. So just grab it by that base piece, pull it towards you just a little bit. Be careful 'cause it will just kind of move a little too much like that. But make some adjustments, find the right spacing. Again, that extra set of hands could be helpful here, but it's not entirely necessary. When you've got it centered up, make sure it's still pushed against that spacer block at the front. And also check for clearance with your tailgate. Right here, everything's looking good. We're not touching the handle at all. It's fully closed. I think we're good to go. Now that everything's spaced out properly, we can do the fun part. It's actually drilling into our truck bed and mounting it up. To do this, we need to expose the mounting bracket below and we're gonna slide the tray out to its first stop, pulling on the handle and slowly pulling it back. We don't want it shifting around on us. So when we do this, we'll approach that first locking point right there. I'm just gonna give it a quick push, make sure it's still against our spacer block up front. And you might notice if you look up there, there's a little bit of movement. You can see it from back here too, just because the weight is pulling down so our bracket up front isn't actually sitting entirely flat with our bed, which isn't good. So you can do a number of things here. If you've got some weight, maybe some sandbags, lay it down towards the cab of the truck to help even this out. If your friend's still around, have them maybe just sit on it. Whatever you can do to make this level and ensure that the holes you're drilling are in the proper locations. Now that we're up here, I've got my cameraman standing on the tray to weigh it down for us. It's working perfectly. We're gonna take your half-inch drill bit, that's the final size we're drilling these holes out to, and our punch. I'm gonna use the drill bit to just mark up where I'm going to make that initial punch and drill out my pilot holes. And you'll notice up here that we've got three slotted holes. You can choose between any one of these, depending on your truck bed. So if you don't have the exact same setup as us, then you might have something looking a bit different. What we want to aim for though is the slotted hole that lines up closest and most completely with these raised ridges on your bed. So for us today, that's gonna be these innermost mounting holes here. Once you have your location marked with the drill bit, I'm gonna go right in there, mark it out as close to the center of that ridge as I can. I'm gonna probably get in the way of the camera a bit here just so I can line this up appropriately with the punch. And once I've got it centered, I'm gonna mark it. (punch banging) After doing that marking for the first two holes, we slid the bed tray out to the next stop. My cameraman's standing on the bracket now to weigh this down, and do the same process, marking out your holes on these slots. (punch banging) I am gonna slide this back into the first slot again and actually pull the entire Bedslide back a bit so we can drill out those holes and get our rivnut installed. Now, at this point, for drilling those holes out, it's gonna probably be helpful to have a couple sizes in between your pilot hole and your final half-inch size. You can choose to do it that way you will, however many intervals you want to take, depends on maybe how sharp your drill bits are, or you could maybe use something like a step bit just making sure to go back and frequently check with the rivnuts in your kit because you wanna make sure it fits, but you also wanna make sure it's not too big of a hole to where this can't expand and to tighten down properly. But we'll get started with our initial pilot hole and go one by one from there. (drill whirring) Once you've got that final hole drilled out, you can test your fit with your rivnut there, making sure it pops down in. Right there's looking pretty good. And we can get all this vacuumed up. Installing the rivnuts is probably gonna be the most difficult part of your install. It's really just a pain because the tool they give you isn't great, and something like this tool that you can get for rivnuts is going to be invaluable. Now, the one we have at the shop here has a small problem that the threads are not quite long enough. The rivnuts included in the kit are quite long. And when you get it started on there, you only get about one thread in, not giving us enough room to compress this and expand it properly. So we're gonna start off using the tool they provide, work our way down with it just a little bit, and then switch to the rivnut tool. Now, depending on what you have or what you get for this project, you might not have that problem at all and you can just use the rivnut tool from the start. But if you need to, you can use the one they provide. Now, the things you're gonna need to make it work, you're gonna need one of the bolts that comes in the kit. We'll use these later for the install, but we're gonna use this to crush the rivnut first. Then you can take the rivnut tool itself, it's that dark metal, and slide it onto the bolt with the teeth facing down towards the threads and the hex head up towards the cap of that screw, and then thread your rivnut on. The teeth are designed to bite into the top of that rivnut, and we'll hold the hex head down with a wrench while we tighten with an Allen key from the top. Now, you can use a regular Allen key, but if you've got one that'll go onto a socket, this is gonna be great because it gives you a lot more leverage. It's going to be very difficult to turn. So just be mindful of that as you're going into this. But once you've got all that set up, drop this into the hole you just drilled out and get to tightening. This will go right into place. I'm holding this into place with our wrench, and I'll do my best to stay outta your way, but get that Allen key in place and start tightening down while trying to put downward pressure on that rivnut tool, keeping it flat to the bed. (tool ratcheting) Now, it can be helpful to jam that wrench against the bulkhead of the truck while we put as much downward pressure on the ratchet as we can, and turn it. Now that we've got it started, I'm actually gonna remove this and try to switch over to that rivnut tool 'cause it's gonna be so much easier to work with. We can tell we've got a good start because I can't lift this rivnut back out. It is partially compressed. So we decided to switch once we noticed that the tool was skipping on the rivnut there just a little bit. So we'll go ahead and grab that tool. So we'll drop that in, thread it into place as best we can, and then close the arms up while we're pushing down. And when we reopen them, we should notice that the tool sitting a little higher up than it was before. We're just gonna take a couple more passes at this to crush it the rest of the way. And after that last close, it felt like the appropriate amount of tension. Basically, the instructions say don't overtighten it, but you definitely want it snug. So once you feel like you really can't go any further by hand, then you can unthread your tool. Or if you went all the way with the tool that Bedslide provided, you can check it out. And as I try to move it around, nothing's shifting whatsoever. It's sitting flush to the bed and I can see those threads right at the surface. So I'd say we're good to go. And here's just a better view of that. You can see, as I'm trying to move it around, nothing's shifting. Once you've got that done, again, just slide your tray out to the next stop. Maybe have someone support it since we do have it shifted back a little bit, and do the same process drilling out the holes for your rear two mounting locations, going ahead and stepping up to that final half inch size, and install your rivnuts. It's gonna be the exact same process with all the rive nuts in place, we put our spacer block back at the bulkhead push the Bedslide back into it, and redid all of our measurements side to side of the wheel wells just because things kinda shifted around as we moved it back and after we marked our drilling locations. So once all that was fixed up, push it back, you can take those long screws that we used before to expand those rivnuts this time with a flat washer. And I'm gonna loosely install it through those slotted holes and into the rivnuts at the front. Then I'll hold the bed, slide back, install the other ones. And having sure they're all fitting properly, I'll fully tighten them down. Like I mentioned, these don't need to be fully tightened down yet. This is just gonna serve as an anchor so when we pull this out, we don't need that friend sitting on it to weigh it down anymore. We can see our other ones are lined up at the rearmost mounting locations. So we're just gonna repeat these steps and fully tighten everything down. We will tighten all these down, and there isn't any specific torque spec for these, but just get them really snug and be sure to not overtighten. Once everything's tightened down, the install is finished. You can remove that wooden spacer from before and you can test it out. Everything supports your weight just fine. and I'll step out and test all of the stops. Overall, the install process wasn't too bad. Drilling the holes may be a little nerve-racking. Making sure all the rivnuts are in place, probably the most difficult part. But the finished product I think is something really remarkable. It's something very useful for your truck, whether you've got a tonneau cover or a camper shell like this. It's easy to operate and it brings all of our cargo to us, making it easier to reach. But that's just been our look at and installation of this Bedslide on our 2023 Chevrolet Silverado 1500. Thanks for watching.
Average Customer Rating: 1.0 out of 5 stars (1 Customer Reviews)
Sliding tray saves you from having to climb into your truck bed to reach groceries, luggage, and other items stored at the front of the bed. Perfect for a truck with a tonneau cover or camper shell. Extends 51" past your tailgate.
Info for this part was:
At etrailer.com we provide the best information available about the products we sell. We take the quality of our information seriously so that you can get the right part the first time. Let us know if anything is missing or if you have any questions.


Thank you! Your comment has been submitted successfully. You should be able to view your question/comment here within a few days.
Error submitting comment. Please try again momentarily.