
To see if this custom-fit item will work for you please tell us what vehicle you'll use it with.
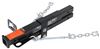
This fully welded trailer hitch receiver bolts onto your vehicle's frame with no welding required. Powder coated steel is sturdy and corrosion resistant.
Features:
Specs:
At etrailer.com we're committed to the products we sell, and to our customers. Our experienced and knowledgeable staff are available via both phone and email to address your questions and concerns for the lifetime of your hitch. The technicians at etrailer perform hitch installations on a daily basis, making them a valuable resource for do-it-yourselfers. The one-on-one, personal service you'll receive comes straight from an expert in the towing and automotive field. We've installed it, we've wired it and we've towed with it, so whatever your question, we can answer it.

Videos are provided as a guide only. Refer to manufacturer installation instructions and specs for complete information.
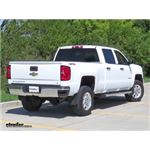
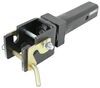
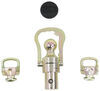
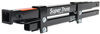
Speaker 1: Today on this 2015 Chevrolet Silverado 2500, you'll be taking a look at and being shown how to install the Curt Class 4 trailer hitch receiver, part number C14009. Here's what the hitch looks like installed. With this concealed cross tube, this hitch gives the appearance of a factory hitch. Now this being a class 4 hitch, this is a heavy duty hitch that'll get the job done for any of your recreational needs, such as carrying a bike rack or a cargo carrier, or towing a heavy trailer. On the side of our hitch, you'll find our industry standard 5/8 of an inch diameter hitch pin hole secure neighboring hitch mount and accessories.Welded on the bottom of the receiver, we have our plate style safety chain loops, and we have a fairly large opening, so we shouldn't have much problem at all hooking on any size safety chain to them. This hitch features a 1,000 pound max gross tongue weight rating, which is the amount forcing down, and a 10,000 pound max gross trailer weight rating, which is the amount it can pull.
It does support the use of weight distribution, and when we have that on our trailer, our max tongue weight rating increases to 1,200 pounds, and our max gross trailer weight rating increases to 12,000 pounds. You want to make sure you consult with the owner's manual of your Silverado 2500 to not exceed what the vehicle was rated for.Now for a few measurements to better assist you in choosing any hitch mounted accessory you may need, such as a ball mount, bike rack or cargo carrier, you're looking at about 23 inches from the ground to the top of the 2 inch receiver opening, and about 2 inches from the center of the hitch pin hole to the rear most part of the back bumper. Now that we've gone over some features, we'll show you how to get it installed.We've already gone ahead and removed our spare tire. You'll need to do the same in order to install the hitch. Now we need to begin the process to remove our factory bumper hitch, which already exists on the vehicle.
Now right behind where our license plate resides, we'll have two 13 millimeter bolts, one on each side, that we need to remove. Aside of each frame rail, where our factory bumper hitch bracket comes up behind our leaf spring shackle, we'll find two 21 millimeter bolts that we need to remove. It's the same on both sides. Now we have one final bolt on each side. Underneath we have another 21 millimeter bolt.
At this point we will remove these bolts with an extra set of hands to hold the hitch up.Now where our vertical bolt was in the frame originally holding the factory bumper beam up, we'll be replacing that bolt with a new M14 bolt, with a conical tooth washer. The teeth will face up towards the vehicles frame and the hitch. Now our next attachment points, you won't be able to see once the hitch is in position, but it's the forward most hole in the frame. It's not this one here closest to our leaf spring hanger. It's the one closest to the front.
Now we're raising the hitch up, and we'll loosely start our 14 millimeter bolts. Now for our forward attachment point, we'll use one of our square hole blocks, and our longer carriage bolt. Stick it inside, go through the access hole in the frame, drop it through the hole, and we'll use one of our flange nuts. Keep in mind anything we do on one side, we'll be repeating on the other side.Now we'll take one of our rear support brackets, and one of the factory bolts that we removed, go through the round hole, and we'll use the bottom hole in the frame. Now we'll take one of our short carriage bolts, and we'll go through the square hole into our hitch. Once we have one end to support the weight, push the other one in, thread on our flange nuts. Now even though we're not using this top hole to hold the hitch in place, we will reinstall the bolt that we removed back into it, because that bolt does help hold the vehicle's rear bumper on. Now we'll tighten down all of our hardware. Now we'll torque all of our hardware to the amount specified in the instructions. Now you can put your spare tire back up. It'll fit perfectly back in the position around the hitch. Not an issue, there'll be no interference at all. For video purposes here today, we'll be leaving it off.That completes your look at and the installation of the Curt Class 4 trailer hitch receiver, part number C14009 on this 2015 Chevrolet Silverado 2500.
Average Customer Rating: 2.0 out of 5 stars (1 Customer Reviews)
This fully welded trailer hitch receiver bolts onto your vehicle's frame with no welding required. Powder coated steel is sturdy and corrosion resistant.I have had good luck with previous Curt products, but this model does NOT tie in and support the center of the step bumper on the Sierra like the OEM hitch does. It is double the gauge and very well made, but I think the engineers missed something here. I will have to make something to address this, or I may damage the step bumper center when I stand on it at the center.
Do you have a question about this Trailer Hitch?
Info for this part was:
At etrailer.com we provide the best information available about the products we sell. We take the quality of our information seriously so that you can get the right part the first time. Let us know if anything is missing or if you have any questions.


Thank you! Your comment has been submitted successfully. You should be able to view your question/comment here within a few days.
Error submitting comment. Please try again momentarily.