
Custom Fit Brake Controller Kit With C51110 | C51515
(0 reviews)
Price: $79.75
In Stock
Custom Fit Brake Controller Kit With C51110 | C51515
Item # C52SV
Our Price: $79.75
In Stock


- All Info
- Q & A (0)
- Videos (17)
- Photos
CURT Trailer Brake Controller - C52SV
- Electric
- Electric over Hydraulic
- Up to 3 Axles
- Time Delayed Controller
- CURT
- Under-Dash Box
- Dash Mount
- Automatic Leveling
- LED Display
- Up to 360 Degrees
A simple LED display and a slide-bar manual override make this time-delayed brake controller easy to read and easy to use. Installation is quick and simple with no mounting restrictions. Activates brakes with a preset intensity.
Features:
[NLA]Curt Venturer Brake Controller - Time Delay - 1 to 3 Ax:- Brake controller activates trailer brakes with preset intensity
- Adjustable power output control lets you select the amount of braking force
- Slide-bar located on top of module for easy access
- Sync setting adjusts how aggressively the brakes are applied
- Select a higher setting for harder braking and lower for more gradual braking
- Slide-bar manual override is within easy reach for controlling trailer sway or stopping in emergencies
- Simple LED display shows the amount of power output
- Self-diagnostics monitor trailer connection and check for shorts - glows red if disconnect occurs
- Quick and easy installation with no mounting restrictions
- No need to mount level - install anywhere at any angle
- Mounting bracket and hardware included
- Plug-in, vehicle-specific brake control adapter (sold separately) available for select vehicles to reduce installation time
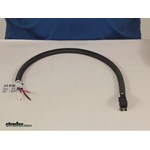
Curt Universal Brake Control Adapter:
- Universal wiring adapter eases installation of your electric trailer brake controller
- No need to wire brake controller directly to your vehicle
- Wire end splices into your vehicle's wiring
- Use on a vehicle that does not have a factory tow package or on one that has a brake control harness but is not equipped with a plug-in port
- Connector end joins with the plug on your electric brake controller
- Compatible with time-delayed and proportional brake controllers from Curt
- Simple to plug and unplug control for removal
- 2' Long, 12-gauge wires have protective covering to deter damage
- Limited 1-year warranty
Specs:
[NLA]Curt Venturer Brake Controller - Time Delay - 1 to 3 Ax:- Application: trailers with up to 3 axles (6 brake assemblies)
- Compatible with electric or electric-over-hydraulic trailer brakes
- Dimensions: 4-1/2" long x 3-3/8" wide x 5/8" thick
- Limited lifetime warranty
51110 Curt Venturer Time Based Trailer Brake Control - 1 to 3 Axles
51515 Curt Universal Quick Plug Brake Control Adaptor Harness with Pigtail
Video of Custom Fit Brake Controller Kit With C51110 | C51515

Videos are provided as a guide only. Refer to manufacturer installation instructions and specs for complete information.


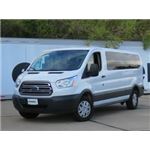
Video Transcript for Trailer Brake Controller Installation - 2016 Ford Transit T350
Speaker 1: Today, in our 2016 Ford Transit 350, we'll be having a look at and showing you how to install the Curt Triflex trailer brake controller, part number C51140. To ease our installation, we'll also be using the Curt Trailer Brake Controller Wiring Adapter, part number C51515 with the E-trailer ETBC7 kit.Now, this is a proportional brake controller, and what that means is that as we're slowing down gradually in our vehicle, the brakes on our trailer will be applied in an equaled manner. As opposed to a time delayed brake controller, where there is a time delay of the brakes being applied, and you can't have a little bit of power being applied. It's either all or nothing, depending on how you have it set. These will gradually start to apply the brakes, so you have a smooth and safe stop.One thing that sets this brake controller apart from others on the market is how easy it is to operate. It does everything that you need it to do, but yet, it has very simple and easy to use controls, so it doesn't confuse you.
These two dots here mean we have a proper connection with our trailer. We've already plugged into our trailer, so we can go over some of the features.We have three buttons on our controller that we need to concern ourselves with. The top one here, this knob towards the left side of it . this is what controls our power levels. It'll start all the way at .6, and we can go all the way up to 9.9, which is maximum brake power being applied to our trailer brakes.
It's a good idea to set it someplace in the middle, and you can adjust as needed from there. So, about four and a half is a good starting point for you. Now, off to the left, we have a manual brake override switch. The further you push it, the more power's being applied to your trailer brakes.Now, this will only apply the trailer brakes, so it doesn't matter if your foot is on your vehicle's brake pedal or not. This is great for a jack knife situation, when the trailer starts to step out to the side on you.
You can bring it back in line by applying the brakes on the trailer, using the brake controller. It'll slow it down and bring it back behind your vehicle.On the very far left side of our brake controller, toward the back of it, we have a slider adjuster knob here. And, this adjusts the sensitivity of our brake controller so the brakes will be applied quicker and more aggressively, depending on how we have it set. There are 9 sensitivity level settings. You can see, as we move up, we'll go from level one and work our way up towards nine.
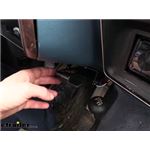
Just dial it down for right now so we can adjust it as we feel necessary.And now that we've gone over some features, we'll show you how to get it installed. The first thing we need to do is mount our seven-way bracket. On our bumper support beam right here, this is a great spot. So, we'll hold it up into place, make a couple marks with a paint marker . now we'll take a small drill bit, line up where we made our marks, and drill a hole. Since we're drilling in the metal right above our face, we wanna make sure we're wearing safety glasses. Now, we'll take our bracket, place it over our holes, take our machine head screws, go up through the hole . where our screws come up, we'll drop a flat washer on, followed by a star-lock washer, and we'll thread on a nut. We'll hold the nut still with a wrench, and we'll tighten the screw up with a phillips screwdriver.Here's what it looks like with the hardware in place. Now, we'll take our seven-way slider wires through the gap. Slide the seven-way onto the bracket, and we'll secure it with the provided hardware. Now, we'll hold the nut still while we tighten the screw, and we'll do the same for all four of our screws.Okay. Now, we have a couple different options here. Our seven-way connector can just plug into the back of our existing four-pole flat wiring on our vehicle. But, this is just an invitation to get corrosion and a short circuit from moisture getting inside. So, what I like to do is cut off our four-pole connectors. We also get rid of the excess slack in our wires by doing this. We'll separate our four wires. And, we'll strip back the insulation from our four on our existing four-pole flat wiring. We'll do the same for the three wires off of our new seven-way. Take our white wire, which is our ground wire . measure off about the same length. Cut off the excess, and we'll strip that back, too. Now, we'll take some blue heat-shrink butt connectors, which we have available on our website. These are for 14- to 16-gauge wires. These will provide a better seal because they seal up against the elements when you shrink them with a heat gun. Crimp these on each of our four wires.Okay. Once we have a butt connector on each of our four wires, we can now match them up color-for-color. Now, our blue wires for the output for our electric trailer brakes . we're gonna cut off the factory crimped standard butt connector. Do the same for the black wire, which is our constant 12 volt power. Strip back some insulation from both ends. And, we'll replace these with 12- to 10-gauge heat shrink butt connectors. They're yellow. We have these on our website. Our purple wire here is for reverse input or reverse output. You may need this if you're towing a boat trailer that has a reverse solenoid for hydraulic serge brakes. In our instance, we're not gonna be needing it. So, we'll just cut off the excess, and still have some left in case we ever decide to go back and install it.We went ahead and took some electrical tape, and wrapped up our wires, making sure we covered up the purple wire to protect it, just to the end of our butt connectors. Now, we'll take a gray duplex wire. We'll take a utility knife . go right in the middle. Make sure we don't cut the wires inside. Peel back the outer cover, and we'll find a black and a white wire inside. And, I'll strip back the black wire, and the white wire. Now, I'll take our black wire, put it in the butt connector for our black wire. Crimp it. And, the white wire will go to our butt connector for our blue wire. Now, we'll use a heat gun to shrink down all of our butt connectors.Now, we'll finish up this part of the install by continuing to wrap it up with some electrical tape. This will just help better conceal our wires, and better protect them from the elements. We went ahead and routed our duplex wire towards the front of our vehicle. Runs along side our driver's side frame, and we have it secured in several spots to a factory wiring harness with zip ties. Goes over our rear axle. Made sure we avoided any moving parts or sources of heat. By following the factory wiring harness, we knew we would be safe. Goes to the side of our gas tank, still following the wiring harness. Now, we are at the end of our firewall. So, we can grab the wire, and just put it into our engine bay, where we will grab it from underneath the hood, and bring it up into our engine bay.We secured our wire up to our power wire that goes into our fuse box with a zip tie. Now, we'll take our utility knife, and we will separate our duplex wire just like we did on the back. Now, our white wire from our duplex wire . we need to get this inside of our firewall. We're gonna do that by going through this grommet on the driver's side of our firewall, right next to our brake booster. We'll make a small notch in it with our utility knife. Make sure we go through both layers, and we'll push the wire through. Now, pull our white wire the rest of the way through our firewall.Alright, so we're underneath our dash now. We're gonna cut off the excess of our white wire, strip back some insulation, take one of our yellow butt connectors that comes with our kit, stick it on the wire, and crimp it down. Now, we'll take our brake control harness adapter, take our blue wire, strip back a little insulation from it . we'll stick that into our butt connector, and crimp it.Now, in order to install our brake controller, we need to access our brake light switch. It's really easy to get to if you remove this panel that's below our steering column. In order to do that, just grab by the steering column, and pull back. Now, we need to test our brake light switch to figure out which wire has power going through it only when the brake pedal is depressed. That's the cold side of your switch. So, we'll do what's called a back probe. Now, we don't pierce any of the wires. And, I'll start with this purple and white wire. And, as I press on the brake pedal, we can tell that is our cold side for our brake light switch. So, that's where we're going to make our connection with.So, it's this purple and white wire here that's all the way off to the left. Now, we'll make the connection to the purple and white wire with the red wire of our brake controller harness. And, we'll do that using our quick connector that's designed to splice into our factory wiring. So, we'll slide our quick connector over the wire, making sure it's in one of the grooves, and we'll take our red wire, slide it into the other groove, making sure that it's gonna be past the point here, the metal tab. And, I'll squeeze the metal tab onto our two wires. Okay, with that squeezed down, we'll now close the connector until it snaps into place. And, here's what it looks like once we have it connected.These are our two circuit breakers that we're gonna be using. Our kit comes with three. But, we'll be using the 40 amp and the 30 amp. We need to find a place to mount these. Right on top of the support here will be a great spot. It'll be out of the way for when the hood closes, and won't make any contact with it. We'll just secure these into place with the provided self-tapping screws. Okay, our black wire here . this goes back to our constant 12-volt on our seven-way. We need to connect this to our auxiliary side, which is the silver side on our 40-amp breaker. So, we'll measure off how much we need, cut off the excess, strip back some insulation, take one of our small, yellow ring terminals, place it on the wire, remove the nut, place it on, reinstall the nut. Now, take one of the ends of our excess flash wire, strip off some insulation, take another one of our small, yellow ring terminals, crimp it into place, and this will go to the other break for the auxiliary side, the silver side.Now, we'll pass the other end of that black wire through our firewall, through the same grommet that we did our white wire earlier. Now, we'll grab the wire from our grommet, and pull it the rest of the way in. Now, we'll measure off how much we're gonna need of that black wire, cut off the excess, strip back some insulation now, place on the yellow butt connector, crimp it in place, take the end of our black wire from our brake controller harness, strip back some insulation from it, crimp it . okay, now we'll take our leftover white wire, strip off the insulation from one end, take one of our larger diameter yellow ring terminals, and we'll crimp it onto the wire.Now, we need to attach this white wire to our vehicle's chassis ground. Ideally, we'd like to attach this directly to the negative post on our battery to provide a ground for our brake controller. But, our battery is located in an inaccessible position, and this is actually the batter cable ground point for our vehicle anyway. So, it's still going there in a round about way. We'll just remove this factory ground bolt right here. It's an 8 mm, and place our ring terminal underneath that bolt as we reinstall it.Now, the other end of our ground wire will pass through our firewall the same way as we've done our other two wires. We'll pull that wire through our firewall now. We'll cut off our excess now, strip back some insulation, take one of our yellow butt connectors, crimp it down . and we have one final wire left on our brake controller adapter . the white wire. Place it into the other end of the butt connector. Crimp it. Okay, now we'll take one end of our leftover black wire, strip off some insulation, take one of our small ring terminals, crimp it into place, and we'll attach this to the bronze side or copper side of one of our breakers. It doesn't matter which one. We need to do the same for both of these.Now, we need to connect this to a positive 12-volt source that's connected directly to our battery. This is our vehicle's jump spot post. So, this is a perfect spot to do it. We'll take our wire . there's a gap underneath. So, we pass the wire up. It comes out. We'll measure off how much we're gonna need. Cut off the excess. Take one of our large ring terminals, and we'll crimp it down. We'll take our leftover black wire, and we'll repeat the same process for the other breaker. Now, we'll tighten down all the nuts fully with a wrench for our breakers.Okay. Now, we'll remove this nut, and place our two terminals underneath, and reinstall the nut. It's a 15 mm nut. Okay, now, in order to get these ring terminals to fit over our stud since the the stud it just slightly bigger than the ring terminals, we'll cut it, and then it'll bend apart a little bit, and it'll go over. Do the same for the other one. Now, we're gonna install the nut.Now, we'll close up the cover for our jump start post. Now, we can reinstall our lower dash panel. Now, we need to mount our brake controller bracket to our dash. We'll do it right about in this area here using the provided self-tapping screws. Plug our brake controller into our harness adapter. Now, we will mount our brake controller to our bracket using the provided screws. Use a phillips screwdriver to tighten these down fully. We went ahead and zip tied all of our wires underneath the dash so that these aren't gonna interfere with our feet as we're driving, or get stuck in the pedals.And, that completes our look at and installation of the Curt Triflex Trailer Break Controller, part number C51140 on our 2016 Ford Transit 350.
by: Christopher04/29/2023
I’ve owned 5 brake controllers. This is the only one I’ve disliked. This controller has non digital controls (should have been my first clue it might not be good) it just has two slide controls. Problem is two things, the slide controls themselves are black, the same color as the case on the unit and you can’t even see the position of the slide controls because they blend in with the color of the case. It’s impossible to tell if they’re turned down all the way, turned up all the way, in the middle? The other problem is that the slides are so imprecise, They slide way too easily and there’s no detents and I found if you even bump the unit slightly or are going over rough roads the slide switches migrate. I was towing a couple of weeks ago and I thought I had the switches dialed in as good as I could, I was on some rough roads, due to road construction in the area, the output switch vibrated over to maximum and the next time I hit the brakes , the trailer locked up completely. So I had to turn it off until I could get to the next town where there was a parking lot I could readjust. I’m definitely getting rid of this thing and I definitely recommend you do not buy it. Buy something with digital output controls so you know precisely where the settings are. I firmly believe this controller is dangerous and I know if I keep using it I’m going to get an accident.


by: Chris06/12/2023
Supper easy to install the hardest part was deciding where to mount the controller. The whole installation took less than 10 minutes. Definitely get the wire harness it made things plug and play.


by: David M.05/29/2013
When used with part number C51515, easy install, hardest part of install is deciding where to drill into your new vehicle's dash to mount controller, or just ask your wife :). The included test light makes finding the correct "cold" brake wire a breeze.


by: Kory K.03/18/2014
Sorry for the late follow-up. I just wanted to let you know that the brake
controller and wiring harness I purchased through eTrailer worked very well
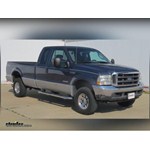
with my 2008 Dodge Ram 2500 with the Cummins 6.7L diesel. Pictures are
attached for your use, as required.
The trailer was an 18-foot enclosed snow machine tailer with a steel
chassis. I can't remember the empty weight, but it's substantial. We towed
empty and full on dry and snow covered roads from Oklahoma to Colorado and
back. Even with th exhaust brake on my truck, I can't imagine towing this
load through the hills and mountains without a brake controller. It's been
done before, but I would say it's an unnecessary risk given the more than
reasonable prices at eTrailer...it was cheap insurance pulling such a heavy
rig with my family on board.
The controller was definitely not your top-of-the-line model, but the
adjustability and controls were more than adequate for somebody who tows
occasionally. A professional may desire more proportional controls and
adjustability, but not much more. This unit peformed flawlessly.
Thank you for your time. Please feel free to contct me if you would like
any clarification on my statements or pictures.


by: Tom K.08/23/2018
The CURT Venturer brake controller works as described in the user guide. It would be better if the display LED segments were bright enough to see in bright light. My installation is different from most. I mounted the brake controller and a trailer 7-pole socket to my Trailer Valet with a magnet and use the controller to operate the electric brakes on my trailer. This is far better than relying on the Trailer Valet brake alone, especially when moving the trailer on a grade.


by: Tommy J.01/31/2014
With this brake controller and wiring harness installation was a snap in my 2014 Ford F150 STX. The unit is so light I used velcro to attach it to the dash rather then drill holes and use screws with the bracket provided. Easy to adjust the brake sync and braking force. Just a great product for the price.


by: C Fisher10/11/2019
Straight forward installation. Works flawless. Simple and effective. Nearly impossible to find more bang for the buck. Used for hauling a twin axle trailer when loaded with my skid steet exceeds 13k lbs. Set the strength of the braking and rate of application with an emergency whammy switch. I have no reason to get anything else.


by: KENNY09/06/2016
I installed the Curt C51110 along with Plug & Play C51382 into my 2016 Frontier. The installation took me about 2 minutes. I did not drill holes or use the supplied mounting bracket, just Velcro. Works perfectly!


by: Steve T.06/18/2016
Super easy installation on my 99 Dodge Ram. I have only tested this item but I will be using it on a road trip soon. although I believe it will work perfectly. easy installation I recommend purchasing the wiring harness that plugs in under the dash. you can install this in about 10 minutes or less.


by: Glenn H.08/11/2018
Received product very fast. Everything I ordered was exactly what I got. Plug and play with what i ordered. It was hooked up with in less than 2 minutes then a couple minutes to screw in the bracket screws. Very pleased . I needed trailer brakes because I bought a camper and I did not want to wear out my truck brakes faster than normal. I looked around locally and on internet Etrailer had the best deal .


by: G.01/04/2015
simplistic and it works for my purposes. Small form factor to fit to the left of the driver side dash.


by: RJ06/11/2014
Excellent site! Excellent information and How-To videos! Saved several hundred dollars installing myself. Free shipping was a bit slow, but that's expected. Will definitely recommend!


by: Dwight03/17/2023
I ordered thru etrailer twice. Both for brake controller and wire adaptor. Pleased with first shipment as it came fast and packaged well in its own individual package. My second order was fast as well,but the brake controller was in a damaged plastic box and looked like it was opened and crushed. Try to close it and wouldn't close. The wire harness was lose and just thrown in the box unlike my first order, which was in its own packaging as well. All in all I would purchase from etrailer again.
by: Paul02/28/2023
We have a small car. So our trailer is reasonably light, but the added control is great! The controller works seamlessly with our driving
by: Brandon08/27/2023
I have a 2015 Traverse with V92 Factory tow package. All I had to do was plug this controller into the vehicle harness with the supplied plug and wala, everything worked perfect. Amy placed my order and she was very helpful in choosing what controller I wanted. Good Job Amy!


by: Ernest 08/06/2023
Received my brake controller but no bracket! Called E trade an talked to Phillip, fixed me right up! Great Customer service!
by: Jason08/20/2022
I purchased the Curt Venturer trailer brake controller to install in my '06 Tundra to tow a 3,000 lb, single axle, travel trailer. The controller was easy to install and I used one of the Curt custom harnesses that plugged directly into the pigtail connector of the truck. No wiring work required; just plug and play.
This little controller does what it claims and will stop the trailer, and truck, depending on how it is set and the road surface. It is a great value. I only with wish it had a rotary adjuster for the brake power level. See next paragraph for why.
There are two sliding adjusters on this controller; (1) for the power level applied to the brakes and (1) for the delay time prior to brake application. There is very little resistance to moving the slide adjuster for brake power level and there is a wide range of power in a fairly short slide travel. Therefore, it requires some finesse to get the power level set where I like it for changing road surfaces; sand, gravel, and asphalt.
Other than taking care to make power level adjustments, I like the value and performance of this controller.
by: DeannaG01/18/2023
It does the job for the price, but the slightest adjustment makes drastic changes in how my trailer brakes.
by: Wayne J.08/20/2020
Please know this is not a progressive trailer brake controller - meaning the harder you push the truck's brake pedal has no effect on the trailer brakes. Think of it as either on or off (digital) and not "analog."
But you CAN control the delay in when the trailer brake kicks in after pushing the pedal, AND the power at which the brakes are applied; you can also manually control it with your fingers if you install the controller near the dash; I chose to hide mine near the pedals and I adjust it based on the terrain I'm expecting the traverse.
We used this controller for a cross-country trip and all over Colorado - and it worked great. Took me a while to get used to how it worked, so my brakes were quite hot when I pulled into Silverthorne after an hour of straight decline. I also learned about my truck's active engine braking while in tow mode at the same time, so consider me a novice...
by: Michael02/28/2019
I received the trailer brake system and have already installed it. Seem to be working perfectly.


by: Richard06/20/2023
I only received the adapter and no cont roller
by: Paul04/07/2021
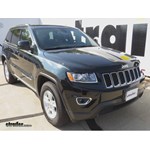
we had a lot of complications in the installation, but found the big problem was with the car, not the device. it was a challenge because both the Curt people and the car people said the other was the issue. it took a Jeep service person who took it a step further and found there was a problem with a car connector pin not making contact. i also found installing the mounting bracket unto the bottom of the dash very awkward. installing it so it wasn't in the way of the driver limited the tools i could use I do like it's performance and it works great now.
by: Ryan C.12/15/2015
Product installed in 10 minutes and works as described. I highly recommend it and love the service from e-trailer.


by: Pekup Andropov01/24/2021
Manual brake slider broke, was stuck after a few uses. However, company was good about a replacement. Have two of these-on different vehicles- that work very well otherwise. Had to buy 30 amp cycling circuit breaker type 1 , fuse and fuse holder and extra 12 ga wire 3 colors that should have been in the kit or at least told about prior to getting it installed. Unhappy about the delay it caused on the 1st one but, was prepared for the 2nd.
25
750
Show More Reviews
See what our Experts say about this CURT Trailer Brake Controller
- Troubleshooting Trailer Brakes that Lock Up at Low Brake Controller Output SettingA lot of times when we see this problem the issue is that one of the stop/turn circuits has shorted out to the brake output circuit which ends up putting 12 volts on the brakes as soon as the brake pedal is touched. This is especially the case if the brakes immediately lock up when you touch the brake pedal or if the brakes will pulse with one of the blinkers on which is pretty easy to test. You can even go out and listen around the trailer wheels and you should hear them click when the...
view full answer... - Why Wouldn't Brake Controller Work with Brake Pedal If you have a brake controller setup that doesn't work with the brake pedal that means there's an issue on the red wire of the brake controller wiring. Sometimes it's as easy as a blown third brake light fuse so you might check there first. It can also be the connection of the red wire to the vehicle wiring as well so check that. Also make sure the circuit the red wire is connected to is a circuit that sees voltage only when the brakes are applied.
view full answer... - Recommended Curt Brake Controller Adapters for a 2020 Ford F-150 If your 2020 Ford F-150 came with a 4-way or 7-way from the factory you can use the Curt Custom Wiring Adapter item # C51436 to install the Venturer Brake Controller item # C51110. If your truck didn't come with a 7-way or 4-way connector then you don't have the towing package and will need to use the Universal Wiring Adapter for Curt Trailer Brake Controllers item # C51515.
view full answer... - Wiring Harness for Curt Venturer Installation on 2007 Jeep CommanderInstallation of the Curt Venturer # C51110 on your 2007 Commander will require the # C51515 universal wiring harness. Unfortunately, there is no plug and play option for your Jeep.
view full answer... - Where is Brake Output Circuit on 2002 Ford F-150 to Connect 7-Way toI attached a picture that shows where you'll find the brake output circuit you need to connect your 7-way blue wire to on your 2002 Ford F-150.
view full answer...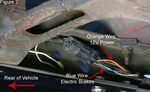
- Does Curt 7-Way 56431 Fit 2023 Ford RangerYes, the Curt 7-way part # C56431 is a confirmed fit for your 2023 Ford Ranger and will work great with your Curt Venturer # C51110.
view full answer...
Do you have a question about this Trailer Brake Controller?
Info for this part was:

Edited by:
Lindsey S

Written by:
Sabrina W
At etrailer.com we provide the best information available about the products we sell. We take the quality of our information seriously so that you can get the right part the first time. Let us know if anything is missing or if you have any questions.
Product Experts Available Now!
Call 1-800-940-8924
Thank you! Your comment has been submitted successfully. You should be able to view your question/comment here within a few days.
Error submitting comment. Please try again momentarily.