
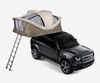
This rooftop tent can accommodate 4 people. Weather-resistant yet breathable material will keep you comfortable while camping year-round. Installs easily with included quick-mount brackets. Pelican gray color.
Features:
Specs:
Note: This tent is compatible with roof racks that install on raised side rails, flush side rails, or in fixed mounting points. It is not compatible with roof racks for naked roofs that clamp to door jambs, flush roof racks with no overhang, or factory roof racks. When used on vehicles with raised side rails, the rails must be supported.
To be able to use this tent on your vehicle, both your roof and your aftermarket roof rack must have a minimum load capacity of 165 lbs. This weight capacity, also known as dynamic weight capacity, is the maximum weight your roof and roof rack can safely support while the vehicle is in motion. If your setup meets these requirements, then you should be able to safely hold the tent and occupants when your vehicle is stationary. The stationary capacity, or static weight capacity, won't be listed in your vehicle's manual or your roof rack's installation instructions. Instead, it is determined by the 165 lbs minimum load carrying capacity explained above.
 Alternate Instructions
Videos are provided as a guide only. Refer to manufacturer installation instructions and specs for complete information.
Hey everyone, it's Evangeline here at etrailer, and today we're going to talk about the Thule Approach Rooftop Tent. We're gonna go over some of its features, compare it with some other tents, right here at etrailer.com. So I've been trying out different rooftop tents. In fact, I took this one camping just a week ago. So, we do have a bunch of different features we're gonna talk about and look at. Why would you get the Thule Approach Well, where it really excels is three main features, very easy to set up, very comfortable mattress.
The main downside, though, to the Thule Approach Rooftop Tent is it's price point. It is priced pretty high up for a soft shell tent. Now Thule justifies this by saying it has more modern design features and systems in place, so we're gonna take a look at that and decide for ourselves. Now this tent is available in three different sizes and three different colors, small, medium, large, and then you can pick whichever color matches your style more. My favorite feature is how easy this tent is to set up, and that's why its name is Thule Approach Tent.
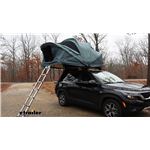
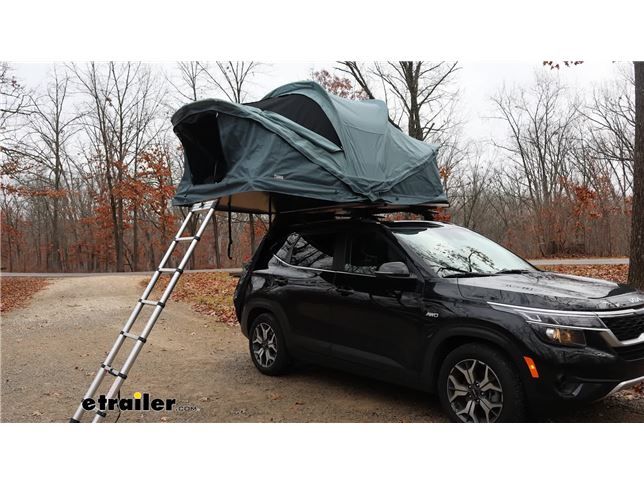
This is what it's gonna look like when you get to the campsite, when you get to your spot in the woods or in the mountains, where you wanna set up camp. Now from experience, I've had this on during a rainstorm, during a snowstorm, and it's held up very well despite being a soft shell cover. So the material for the travel cover is durable. Now setting it up will involve taking that cover off. Unzip the cover, (zipper clicking) with your zipper.
If you choose so, you can completely take the cover off. I like to leave it hanging by a corner so I don't have to redo the zippers. But from here, this just lifts off of the tent. (material rustling) Next is to unbuckle. So there's three touch points.
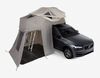
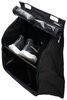
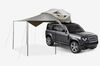
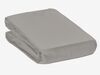
One is the buckle between the hinge, the other one is the buckle for the ladder, and finally there's a hook and loop strap holding the ladder together. So with those three undone, you can then extend your ladder. Grabbing the ladder legs, extend them out to its furthest position. (ladder clattering) Once everything locks, you can then use the ladder as a hinge. I like to bring it close to the car, and then use the ladder as support to bring our platform down. (tent rustles) You may want to also adjust the height of your ladder. So we're gonna lift our top rungs up, like this, make sure we're stopped where we still have an angle downwards for our ladder but we're also not pushing our platform up. (ladder clattering) Give your platform a good pull. And that will help you determine whether your ladder is at the right height, or not. (ladder continues clattering) Right there is good. So this is the Thule Approach M that we have, which is the medium size. Now this can fit two to three people, technically three people, but in reality, maybe two people and a dog, or a child. Your sleeping footprint is gonna be 95 inches by 51 inches. (zipper hisses) The canopy is made of two important layers. The first layer is gonna be a canopy fabric. This is gonna be a 600 D polyester, which is a bit thicker than most ground tent fabrics. It holds up well to the rain. You also have a rain fly, if you have extreme thunderstorm, but I had some, just a little bit of water sprinkle throughout the night, and it was totally fine. Now the other layer is beneath that canvas fabric, and that is gonna be your mosquito screen. (zipper hissing) So if you want to stay inside, and you want a bit more breathability, but you also wanna keep the bugs out, that's gonna be an option for you. In my opinion, the second most important feature of the Thule Approach is the mattress it has. So we have a double layer mattress. This is gonna be a foam mattress, but it does have a soft EVA foam. So you can see here, lifted up that it's gonna provide about two inches of thickness. It's got some good support, much better compared to the ground if you we inchesre in a ground tent. The mattress is custom cut, to fit within your tent. For that reason and because of the sleeping footprint, you would have to get the custom fitted sheets from here at etrailer for your tent, to make sure to match your tent size. What I do, though, is I use my own queen size flat sheet and I pair that with my sleeping bag and blankets. On the inside, it has pockets. Technically you have four mesh pockets. They're really just two pockets sewn together. And this is gonna be a great spot for your accessories, your glasses, your hygiene items, smaller items throughout the night. You are gonna have to lift your larger items up into the tent with you, so just keep that in mind when you're getting things set up. I like to leave a sleeping bag and blankets, those are perfectly fine to keep folded in your tent. And while you're here, you can also see that we have other zippers, (zipper hissing) with our mosquito screens and our lights, creating a lot of of airflow, as well as light throughout the entire tent. There's also a window on this side. So on the back side you have a door, similar to what you'll find in the front. And all these windows and all of these doors can be secured with their included straps. They have these little dog bones, that fit into the hoop. In my opinion, it's a very fast set up for all those windows and doors. This also hasn't included rain fly, so this is gonna be your more waterproof top cover. This tent will include four tension rods along with your rain fly. That way if you want a little bit more breeze, even during a rainstorm, you can push up the sides, just like this. Or if the rainstorm is a bit too intense, you can batten down the hatches and secure it in the down position. It did rain during one of the nights of my camping trip and I didn't want to open up the windows to get that tension rod out, because water was coming down too fast, so I kept my tent in this position. If you want to leave your rain fly on your tent, you can. Without the tension rod, it is still secured by these button snaps. So just secure the top front, the center snaps, and you can even fold up your tent with the rain fly attached. Something that actually impressed me here is how those tension rods are designed. So for your more affordable brands, they'll just have a tiny little match there. Here with our Thule Approach, let's fit that into the pocket, and it fits securely into the groove. You can hear it slide in and click. Compared to Thule's old design of U bolts and nuts, they've definitely improve their crossbar clamping system. So this will fit most heights of crossbars, factory bars, oval bars, round bars. I currently have arrow bars, and this can even fit some ladder racks, as long as your crossbar is no thicker than 46 millimeters, which translates to a little over an inch and three quarters of an inch. So notice here how we have it mostly set up. You get it up to the crossbar, you flip the clamp over into the secured position like that, and then you use your included tool to tighten it down. This is going to be a ratcheting torque tool. So once you reach the required tension, it will click just like that, to prevent over tightening of your bolts. Before you install your tents, you do have to decide on if you want this mounted to the passenger side or the driver's side. I currently have it off of the passenger side, just to make it easier when I get to the campsite. You can also install this off of the rear of your vehicle, as long as you install the clamps in the proper decision beforehand. As we did put this on this roof, I did notice this was a very hefty rooftop tent. There was three of us that we inchesre carrying it onto the crossbars. So because of that, be mindful of your roof weight and crossbar weight capacity. We recommend a minimum crossbar capacity of 165 pounds. That's because if you get the small tent, that's already 110 pounds, the medium tent like this, 128 pounds, and the large tent is 150 pounds in tent weight. Now that weight is for your dynamic weight capacity, which means you're moving and you have cargo on top of your roof. Once you're parked and you're stopped and the ladder is in the support position, you then enter into the static weight capacity. So the static weight capacity is actually 600 pounds for this tent. Other items that you can find here at etrailer.com are accessories that are available to be added onto this tent. You can go from humongous accessories, like the Approach Annex, which creates an entire room around your ladder. You can also get smaller accessories like shoe organizers, which attach to the bottom platform, and that way as you climb up onto your tent, you can put your shoes in that spot. Something I like to do too is I like to use little carabiners, and I like to utilize the hooks that are on the bottom of your platform. That way if you wanna put a bag or a light, you can do so. There are also holes along the bottom of the platform, so if you have items that use M six hardware, those can bolt right in. So compared to other Thule tents that have a slide to slide those accessories through, you're gonna have to utilize those bolt holes instead. So while I really liked the extra little features Thule added to their things to make this a lot more easy to use, I'm not entirely sold on if it justifies that extra price point. That is gonna depend on where you're going and what features are important to you. I'd actually compare this with some other rooftop tents that I'm familiar with, like the Yakima SkyRise HD, or the predecessor of the Approach, which is the Thule Explorer Kukenam. So the Yakima SkyRise HD has a similar footprint and space for people. It also has a very easy to use clamping system. It's just clamps that go around your crossbar and you tighten it down with a knob. No tools required. The downside, though, to the SkyRise HD, it doesn't have the same modern large canopy design. Plus the rain fly tent poles are a struggle to use. Now if you have other Yakima accessories, though, then it might be something worth considering. If you want something that's a lot more affordable and tried, tested and true, that's where the Thule Explorer Kukenam can be something worth looking into. It definitely has an older design in both how it mounts to the crossbars as well as the tent itself. But if you want something that's more entry level that you know is gonna work, you can find that here at etrailer.com. So when I took this out camping, I had a great time. This is definitely gonna be a four season tent with a lot of adjustability with the windows, the rain fly, the doors, for those different seasons. There are also a lot of accessories available for it, so that way you can customize your adventure. Now, will you have a good adventure with this tent That's gonna be something for you to decide. Hopefully this video helped you out, and you really got to see those features and how it all works. For me, the biggest thing about this is how easy it is to set up and to take down. But, depending on your vehicle, you may or may not have a different experience. Hopefully, you're able to explore our website here at etrailer.com, check out all of our pictures and descriptions of our different rooftop tents, and then find the best fit for you. But right here, right now, this is a look at the Thule Approach Rooftop Tent. My name is Evangeline and I hope you enjoyed the journey.
Info for this part was:
At etrailer.com we provide the best information available about the products we sell. We take the quality of our information seriously so that you can get the right part the first time. Let us know if anything is missing or if you have any questions.


Thank you! Your comment has been submitted successfully. You should be able to view your question/comment here within a few days.
Error submitting comment. Please try again momentarily.