
SightClip Fit Kit for Yakima SightLine and RidgeLine Roof Rack Towers
(8 reviews)
Price: $143.95
In Stock
SightClip Fit Kit for Yakima SightLine and RidgeLine Roof Rack Towers
Item # Y56AR
Our Price: $143.95
Will this fit?
To see if this custom-fit item will work for you please tell us what vehicle you'll use it with.
In Stock


Need help with installation?
Locate installers near me- All Info
- Reviews (8)
- Q & A (0)
- Videos (1)
- Photos
Yakima Roof Rack - Y56AR
- Fit Kits
- Yakima
- 4 Pack
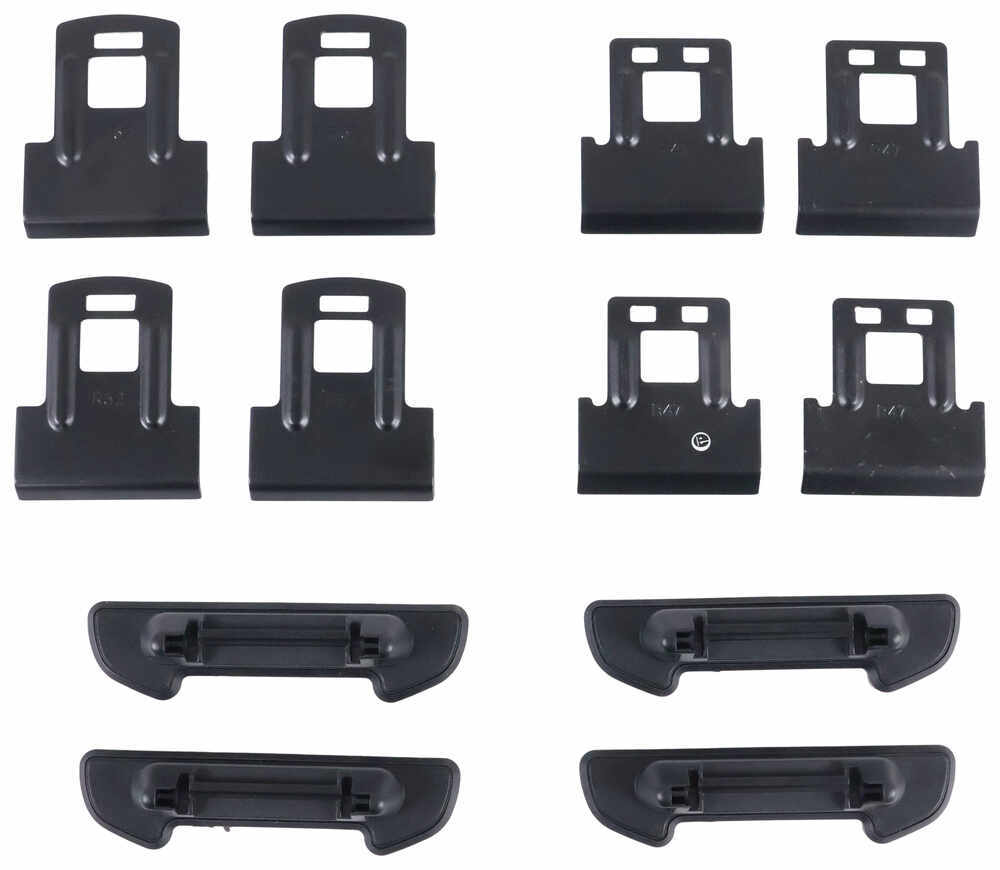
These custom clips and pads let you mount Yakima SightLine or RidgeLine towers on your vehicle with flush, factory side rails. Clips attach to hooks in tower assembly and tighten together with a single bolt. Kit includes 4 clips and 4 pads.
Features:
- Custom-fit clips and pads allow you to mount 4 SightLine or RidgeLine towers (sold separately) on your vehicle with flush, factory side rails
- Inner and outer clips tighten together with a single bolt for even, secure grip on rails
- Snap into place on DropHooks inside towers
- Powder coated stainless steel clips are durable and rust resistant
- Molded rubber pads fit the contour of your side rails
- Clip onto bottoms of towers
- Protect side rails from scratches and abrasions
Specs:
- Quantity: 4 clips and 4 pads
- Limited lifetime warranty
DropHook System Installation

Custom-fit SightClips let you mount SightLine and RidgeLine towers (sold separately) to your vehicle with flush, factory side rails.

The clips are easy to install - simply attach them to the hooks inside the towers. Once the clips are installed just sit the towers on top of your flush rails and tighten them down. The inner and outer clips in each tower tighten with a single bolt to ensure an even, secure grip on your rails.

The included molded rubber pads protect your side rails from scratches and abrasions. The pads easily clip onto the bottoms of the towers and are specifically designed to fit the shape and contour of your flush side rails.
8006446 Custom Sight Clips and Pads for Yakima Sight Line and Ridge Line Towers
Installation Details

Video of SightClip Fit Kit for Yakima SightLine and RidgeLine Roof Rack Towers


Videos are provided as a guide only. Refer to manufacturer installation instructions and specs for complete information.

Video Transcript for Yakima JetStream Crossbars Roof Rack Kit Installation - 2023 Kia Seltos
Hey everyone, it's Evangeline here at etrailer and today we have a Yakima roof rack system here on the 2023 Kia Seltos. I'm gonna show you how to install it as well as how it fits on our car. If you're looking for a roof rack system that can allow you to carry all kinds of things, whether it's extra long ladders or expand your cargo space with a roof box, a roof basket, or carry on kayaks or bikes on your roof, well, a roof rack system like our Yakima here is gonna be a great way to go. Now I currently have the extra long crossbar version with the 60 inch bars, but the recommended fit is the 50 inch bars. It's gonna look and work almost the exact same way. This one is just what I like to use when I carry on kayaks because it's easier to reach.
Now comparing this with some other roof racks for your Seltos, this is designed for the flush rail system. So if your trim does not have the flush rails, you are gonna be looking at a different type of kit. This utilizes the flush rails to create a really good base for all of those fun accessories. Plus, because of how it clamps around your flush rails, we are able to get it to a really good spot on our roof compared to other racks which have this further forward in an awkward spot. This one sits right by the end of your doors.
But first let's talk about overhang. So with the 60 inch bars here and because of how our roof is sloped, we are gonna have a lot of extra space. I like it because then it's easier to reach and load things up onto the roof. For some people they don't like too much overhang because when getting into the vehicle you run the risk of running into the crossbars, although because of where it sits, probably not gonna be that big of a deal, but that is up to you. Here's some measurements.
Measuring from our tower to the end of the crossbar before the end cap, I have it at eight and a quarter inches for the front bar and then for the rear bar it's gonna be nine inches and that's what your overhang measurement is. Some lift assist kayak carriers require specific overhang. This actually might be too much, but this is still going to be legal in most areas since the rule of thumb is as long as your crossbars do not extend past your mirror and you can also see it really doesn't extend past the side of the vehicle, then you are good to go. But if this is too much for you, then go ahead and check out the 50 inch crossbar video. Another thing I like about the Yakima system is the crossbar spread.
So for most vehicles they offer you a further distance apart of the crossbars, which is gonna be the spread. In our case here, it's 32 inches and that's gonna be helpful for carrying extra long items like ladders or some roof boxes or large kayaks. But this still stays within the average range of crossbar spreads. You can still carry around most of your accessories. Now you cannot adjust where these sit though, so double check your accessories. Usually roof boxes and roof baskets and roof bike racks, that requires specific measurement. Now, when I tried the Thule roof rack system on this car, those crossbars sat a little bit more forward, which was right in the center of the open sunroof, which was not good for noise. Now this one still sits over the opening, but a little bit further back, almost lined up with where that window slides all the way back. So you are gonna still experience wind drag and noise with the open window, but not as much. Now let's talk about roof clearances while we're up here. There's gonna be two measurements for that. One's gonna be from the top of the roof to the bottom of the crossbar. I have it at about four and an eighth of an inch, and that's gonna be how much space there is for your clamps, your U bolts, things like that. This is actually a pretty good height and will fit most accessories. The next measurement is the height this adds to the roof, so top of the roof to top of the crossbar, about five and a quarter inches almost to that measurement, and that's gonna be where your cargo sits. So let's say you have skis with extra tall bindings, you wanna make sure that there's enough clearance for those bindings and if not, that's when you get accessories that give you more height. This is also pretty high up above the roof compared to other vehicles, so you are gonna have some pretty good experiences there. So this is actually my personal vehicle and I have tried those different roof rack systems and this is the one that I prefer for different adventures, although I do mix and match the 50 inch bars with the 60 inch bars depending on what I'm carrying around and what type of profile or a look I am going for. Now, if you are looking at the Thule system, then yes, that one is preferred by some people because of how it mounts into the rails rather than around the rails. Plus, if they have other Thule accessories, then being able to have everything keyed alike is helpful in the long run. But if you don't have Thule accessories, maybe you have Yakima or other branded accessories and you're looking for the more versatile roof rack, that gives you a better experience too with opening up that sunroof. Then I have found a good experience with this system. So hopefully this video helped you out with showing the different measurements, clearances as well as where this is installed on your roof. Now as for how to install this roof rack, let's go take a look. Getting everything set up, I have everything laid out here. Now for your kit, everything you need is going to be included. We are going to start with the front crossbar because this is gonna be where our measurements base off to install the rear crossbar. Start by removing the end cap off of your crossbar. You're also gonna have some rubber fillers. So this is gonna go underneath, we're not gonna put those yet, but grab them so that they're ready. Then you set up your tower. So here we have the end cap on still, we're gonna pitch the door in order to remove it. And then we have our security door. So if this is locked, you're gonna use a flat head screwdriver or the back of your key. And then once it's unlocked, you can then just take that out. Now we're gonna grab our other tower here so I can show you how to attach your adapters. So in our case here with a JetStream bar, and this is the adapter we are going to use. Now in order to thread that plate though, we need access underneath. See that bolt there That's what you're gonna use to thread that plate if you do not see that bolt. That's because you need to loosen the bolt up front. So there's two bolts here, there's one and then two. Once both of them are loose, you can then attach your adapter, which goes like this, fit the plastic piece, and then just get that lined up. You're then going to fit the metal piece up top and see how that bolt is visible. Use that to thread down to the metal piece. We're going to keep this loosely threaded. Keeping that loose allows you to slide that metal piece into your crossbar. So notice how this slides through the tracks. You're gonna do this for both towers, making sure that's facing the right way. See how we have our clips towards the outside of the crossbar Well, have that for both sides. Now you actually slide these to a specific spot on your crossbar. So that's going to be the M1 and the M3 measurements on your instructions. So for the front crossbar it's gonna be 36 and an eighth of an inch lined up with the end of the tower. You'll see the numbers underneath. And then before you tighten down, you also wanna make sure your pitch is gonna be correct, or in our case, our toll. So see how this can pivot back and forth Well, we have it set to be, so that's gonna be in the center, so we have it in the right spot. We have it pivoted the right way. So we're gonna tighten it down with our included tool until it torques down. So you're going to hear the click from the tool and this will prevent over tightening. With both sides torqued down, we're then going to attach these legs. They clip into your tower. We're then going to attach the clips. So see these little springs You pinch them in order to remove them on both sides. And if you find this doesn't come out a lot, then you can loosen the bolt on the other side. Now there's going to be an inside clip and then an outside clip. You'll also notice them by these tabs and how they fit into the individual clips. They'll help you not get them mixed up. So notice here, I'm just gonna fit the clip in past the bolt into the little tab over there and then to hold it in place we're then going to put these springs back in, ideally on each side in the hole. One thing I did notice is that these bend pretty easily. So just be careful that you don't apply too much force so you don't warp them. Now, before you put the crossbars onto your rails though, measure to make sure you put them in the right spot. So you're gonna have a measurement M2, and that's gonna be the distance of your crossbar. So from the front edge of your windshield, we're gonna go 19 inches up onto our rail and that's gonna sit right there. So make a marker for yourself, but you also go up there and verify it once the crossbars are on. Now carefully get this up and onto your roof. Some things I do recommend is if you want to, you could put a towel down just to make sure that you don't actually scuff up or scratch up your roof. Having another person on the other side grab the other end of the bar is helpful too, but something we do wanna look for when we get it lined up to that 19 inches from the front windshield is making sure that the pad is on that flush rail on both sides. And if you find that yours isn't, then maybe as you're tightening it down it moves a little bit. So you can go ahead, take the crossbar off, maybe adjust it forward, the towers forward, backward, however much you need in order to get it flush onto your flush rails. Now the rear crossbar is going to install the exact same way. And the funny thing about the Seltos is it actually sits on top of one of the holes on the flush rail. But the proper way to measure for that is you want this 32 inches away from the front crossbar. So I measure at the front of the front crossbar to the front of the rear crossbar, 32. Now tighten down on your clips and notice, see here the contours of the flush rail. So in our case, I need to push down on the top clip just to make sure it's fully lined up as I tighten the tower down on both sides. What I have found to be a good way to do this is to tighten this down evenly on both sides. So I made contact with the rail on the driver's side and now I'm going over here to the passenger side and then fully tightening that one down. That way I'm not fully tightening one side and pulling it that way while the other one is completely loose. Just like all the other Yakima bolts, tighten these down until your torque tool clicks. With all four towers tightened down, final step is to put the end caps on. So you're gonna have two end caps. One's gonna be the security end cap, and this one tightens down with a flathead screwdriver or whichever is the similar shape. And then we're gonna put the end cap on over that. So this clips into place. There we go. And with all four end caps, that completes your install of your roof rack system. And that right there was a look at our Yakima roof rack system with the 60 inch long JetStream crossbars, the SightLine towers and the custom Sight clips, fit kit for your 2023 Kia Seltos.
Customer Reviews
SightClip Fit Kit for Yakima SightLine and RidgeLine Roof Rack Towers - Y56AR
Average Customer Rating: 5.0 out of 5 stars (8 Customer Reviews)
These custom clips and pads let you mount Yakima SightLine or RidgeLine towers on your vehicle with flush, factory side rails. Clips attach to hooks in tower assembly and tighten together with a single bolt. Kit includes 4 clips and 4 pads.by: Stephan02/03/2024
The SightClips with bases were very easy to use with my Yakima Ridgeline Roof Towers. When the towers are loosened and off of the vehicle the clips can come off, but it is really no big deal. I just take the off when not using the rack. When I put the the rack back on I only put the inner clips on before putting the rack on the roof. Then I add the outer clips and snug everything down. It is much easier that way.
by: Tim 10/18/2023
One quick phone call and Gwendolyn figured out exactly what I needed for our new car to use my old Yakima rack.
by: Adam K05/14/2023
Straight forward installation
by: Nicholas07/11/2023
Order was easy to place and delivered in less than a week as promised. The sales advice was perfect fit despite multiple pieces having been ordered. Used the rack once and very sturdy
by: Scott 05/20/2024
by: Frederick 01/13/2024
by: Stephen 02/10/2024
by: Gary 09/02/2023
8
8
See what our Experts say about this Yakima Roof Rack
- Recommended Roof Rack for a 2023 Kia Seltos w/ Raised Roof RailsTo add a Yakima roof rack to your wife's 2023 Kia Seltos raised roof rails you will want the following parts: Yakima JetStream Crossbars - Aluminum - Black - 50" Long - Qty 2 item # Y00425 SightLine Towers for Yakima Crossbars - Flush Side Rails - Qty 4 item # Y64AR SightClip Fit Kit for Yakima SightLine Roof Rack Towers item # Y56AR This aero bar roof rack system has a 165 lbs capacity. I recommend adding the Yakima Same Key System item # Y07204 to prevent theft. Since you're a fan...
view full answer...
Info for this part was:

Video Edited:
Dustin K

Updated by:
Leah S

Updated by:
Michael B

Edited by:
Daron K

Video by:
Jonathan Y

Video by:
Ethan H

Video by:
Samuel H

Written by:
Alex H
At etrailer.com we provide the best information available about the products we sell. We take the quality of our information seriously so that you can get the right part the first time. Let us know if anything is missing or if you have any questions.
Product Experts Available Now!
Call 1-800-940-8924
Thank you! Your comment has been submitted successfully. You should be able to view your question/comment here within a few days.
Error submitting comment. Please try again momentarily.