
Fit Kit for Thule Podium-Style Roof Rack Feet - 3163
(1 reviews)
Price: $149.95
In Stock
Fit Kit for Thule Podium-Style Roof Rack Feet - 3163
Retail:$179.90
Our Price: $149.95
You Save: $29.95
In Stock


Need help with installation?
Locate installers near me- All Info
- Reviews (1)
- Q & A (0)
- Videos (1)
- Photos
Thule Roof Rack
- Fit Kits
- 4 Pack
- Thule
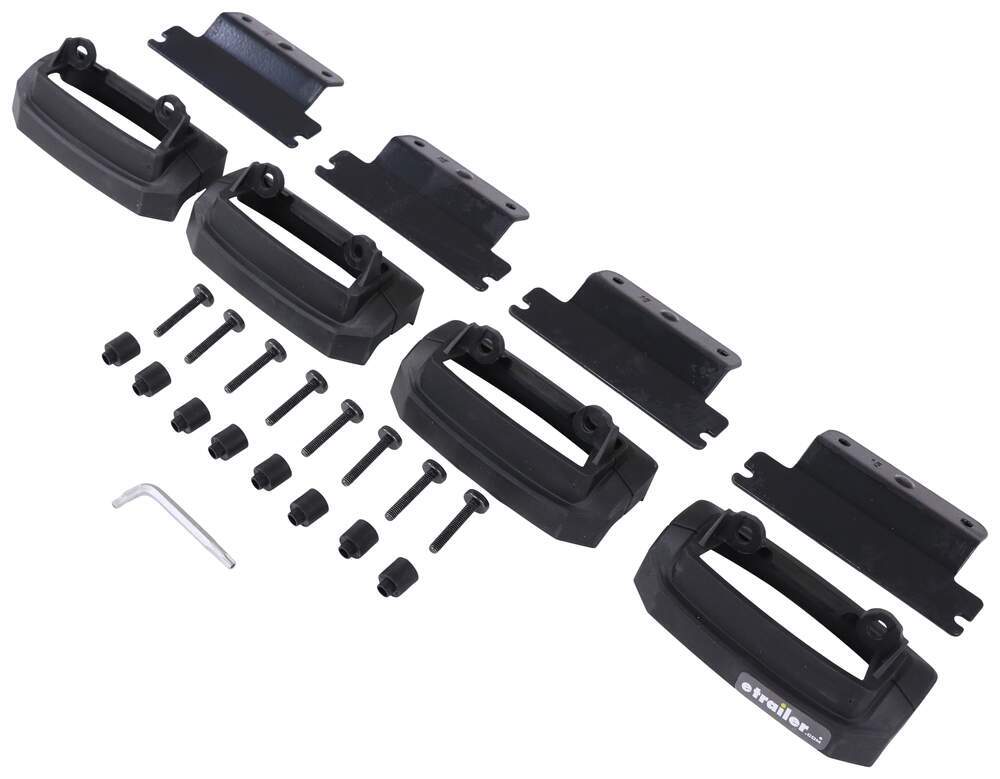
This fit kit lets you mount Thule Rapid Podium-style feet to your vehicle with factory roof-rack tracks. The fit kit includes pads, hardware, and tools necessary for installation.
Features:
- Custom-fit pads let you mount Rapid Podium feet (TH460R - sold separately) on your vehicle with fixed mounting points
- Easy installation - does not require drilling
- Remove factory side rail plates and install fit kit pads with included hardware
- Slide molded rubber pads to protect the surface of your vehicle from scratches
- Easy to remove when not in use
- Includes 4 pads, 4 mounting brackets, and hardware
Specs:
- Quantity: 4 brackets and 4 pads
- Limited lifetime warranty
183163 Custom Base Pads for Thule Podium Style Foot Pack - Qty 4
Replaces Thule KIT3163
Item # THKIT3163
Installation Details


Video of Fit Kit for Thule Podium-Style Roof Rack Feet - 3163

Videos are provided as a guide only. Refer to manufacturer installation instructions and specs for complete information.

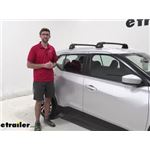
Video Transcript for Thule AeroBlade Edge Roof Rack Installation - 2020 Nissan Kicks
Zach: Hey everybody. Zach here at etrailer.com. Today we're taking a look at the Thule AeroBlade Edge on our 2020 Nissan kicks. This is a really good way to get a roof rack on top of your vehicle. If you have a Kicks you're familiar with the lack of cargo space. If you're looking to go on a trip with your friends or family, this will give you the ability to put a cargo basket or a cargo box on top of your roof.
But also you can put a roof bike rack, ski and snowboard carrier up there. You have a lot of capabilities of getting different stuff on top of your roof.One thing that stands out with this style roof rack is the Edge system, how it ends in the foot pack. So a lot of the crossbars that you'll see, they'll stick out past the foot pack. So it will go out this far. And that's really good, allowing you to carry more gear on top of your roof, but this style gives you more of a factory look.
It's a little bit more sleek and I think the Kicks are pretty stylish vehicles. So I think this is a really good way to go. Now, if you're looking to maximize space, there are definitely other options out there to get some longer crossbars. But I think that this is a really nice way to have a good looking roof rack, but also be able to carry a good amount of gear.Now, this is an aero shaped design. So it's going to cut down on wind noise and drag.
No roof acssessory is going to be so aerodynamic where it's not completely noticeable, but I think if you're just driving at a normal radio volume, you're not really going to get too much noise compared to some other styles out there, like the old traditional square bars. And if I take this end cap off here, use a Flathead screwdriver, and that's a plastic lock core right there. This comes with it. I would definitely swap those out for the metal lock cores that Thule offers. We have those here at etrailer and you can get those inaudible 00:01:43 with your Thule accessories.
And those are really easy to swap out.But if I take that end cap off, you can see really strong construction on this crossbar, but this foot pack down to this fit kit is custom fit for our Kicks. So this fit kit only fits the Kicks. So it's going to be really nice design. They've done a good job of getting everything in place. So we've got a really nice strong fit. And if we get this back in place, get that lock core, we're ready to get stuff loaded up.Now, when it comes to the usable space with this crossbar, we are losing some not only because it doesn't extend out further, but the way this foot pack and this end cap goes over part of it. So let's see what we have right here. Usable crossbar space, we're at about 30 and a quarter inches on this front bar and the rear cross bar is 29 inches. So that's a good amount of space. We can definitely get a basket, box, a couple bike racks, kayak carrier, all kinds of stuff up here. So even though we're losing some capacity, still have a good amount of range there.Now, when it comes the crossbar spread, this is a fixed mounting location. The way that our flush rail on our Kicks is installed. So the crossbar spread, I'm going to go center to center on these crossbars. This will help you out if you already have some accessories. This measures at about 28 and a quarter inches, center to center. So that's a pretty standard crossbar spread. Most roof rack items are going to fall within some sort of range where that 28 and a half inches is.We don't have a sun roof on our Kicks here today. But just to give you a measurement on the amount of space down here, if you do have one, this is about three inches to the lowest spot from the roof here to the bottom of our crossbar. And then the top of this is going to measure about a little over four inches from the roof to the top of our crossbar. So good amount of space there. You're going to be able to get most accessories in place. And even if you do have a sun roof on yours, I don't think you're going to have any issues with that.Now, when it comes to how much stuff you can put on this roof rack, it has a weight capacity of 165 pounds, but always double check your owner's manual to see what your roof can withstand and go with whichever those two numbers is the lowest. With this being custom fit and it mounting right into those mounting locations, the installation's not too difficult. Has a few extra steps compared to some others, but let's just walk you through how we got this put in place.To begin our installation. I already have the front crossbar installed, but the rear one we'll install the same way. The same exact parts, we're just putting it in the rear fixed point. So what I'm going to do is I'm going to start with this rubber piece and this metal plate here for our fit kit. And I'm going to slide this plate through the center of this rubber piece. So just like this. So then what we can do just kind of have those prepped, we'll do the other one the same way. Get those set aside.Next, I'm going to take a small flat head screwdriver and I'm going to prep the mounting locations for these. So we can grab a couple of our pieces. I'm going to grab these bolts here. I'll grab two of those and two of these spacers and just one of our fit kit pieces right here, and we'll head onto the roof.So I'll take that screwdriver and I'm just going to gently pry out on these pieces right here. You don't need to be really rough with it. So we don't want to run the risk of scratching our vehicle. You can see those pop out pretty easily and set those aside.Now, I like to put a small towel on top of my roof, so I don't set my hardware in place and potentially scratch it, or it's not rolling all over the place. And then what we can do is we can take that piece that we put together, and what I like to do is you can see where this is going to mount up with those holes. But what we need to do first is take one of the spacers. And what I like to do is take the spacer, get it inside there. There's already a head on the hardware that's holding this in place, but I will get this started right here, just barely, and that will allow me to hold this in place. So you can see, I just slide that right there. And then I can take this other one and do the same thing, but not going to be able to slide that in place so we can just start threading that through.So I'll get those started. And then I can grab my included tool and start tightening those down. Now this comes with the kit and this has a very specific indention on it. And you won't be able to use just a standard hex key to remove this. So that's kind of a nice feature about making sure that this will stay on your roof and we will just kind of go back and forth and tighten those down, so we get nice even pressure on that. And we'll just keep working our way back and forth until we get that tight. And then once we get that pretty tight, we can just repeat the same process for the other side.Now we can place our bar on our roof. Now, if you have a hard time reaching this across, not a bad idea to grab a friend to place this down, but you just want to be very careful. And what I like to do is you can see this is kind of loose right now. I'll extend it out all the way. So I'll make sure these feet are extended out all the way and then what I'll do is I'll gently place this on there until I find that right fit.What we're looking for is to place this section of our crossbar on the inside of this pack right here. So extend this out and then we can take one of these bolts right here, and we're going to mount it right through there. Now you can see right there is where it's going to install. Those are threaded and you can see they're kind of angled down. So what I'm going to do is just use my tool, try to get it to rotate around. There we go. So now it's lined up. So I like to just pull this little tab down. You don't need to put a lot of pressure on it because you don't want to tear it. We'll get that down and we'll start threading these bolts in place.We'll get this one installed as well. You may have to kind of change the pitch of the foot pack here to fit where it's at because the roof is not a perfectly straight line. So once we get those started, just hand tight, you can just place those back over. And if you can get that bolt to fit through there when you're tightening that down the first time, go right ahead. I just have a hard time getting it to fit through all the way, but I'm not going to tighten these down all the way just yet. I'm going to go to the driver's side and I'm going to repeat this same process.Once that side started, we can begin tightening this down with the included tool. This one's just a little bit different and we're just going to go back and forth. Get a nice, even tightness on all of the sides here. And we'll just kind of work our way back and forth until we get it tightened down all the way.Once you get those tightened down all the way, the next thing we need to do is secure where our crossbar is within the foot pack. So you can see it comes a little loose. So it allows you to kind of adjust it within the foot pack so you get a nice even fit. And there's a little ruler on the top here that kind of makes it a little bit easier to know where you're at on each side. So once you get that secured to where you need to be, we can tighten this down and we'll just use that same included tool. And we'll just tighten this down.The next step is to put on our end gaps. I went ahead and did the driver's side. Pretty simple. Just slide them in place, get them to line up and then you can put it in your plastic lock core, pop them in there. And then you're going to just take a flathead screwdriver and get those to lock in place.There's a few extra steps in here compared to some other roof racks, but I think this is a really nice looking roof rack. I like the streamline look compared to the style with the overhang. As I mentioned earlier, when you have that overhang you can fit a few more accessories on here, but I think the looks of this roof rack for the Kicks is a really cool way to go, but that's going to do it for our look at the Thule AeroBlade Edge on our 2020 Nissan Kicks.
Customer Reviews
Fit Kit for Thule Podium-Style Roof Rack Feet - 3163 - THKIT3163
Average Customer Rating: 5.0 out of 5 stars (1 Customer Reviews)
This fit kit lets you mount Thule Rapid Podium-style feet to your vehicle with factory roof-rack tracks. The fit kit includes pads, hardware, and tools necessary for installation.by: Pete 07/16/2021
1
1
See what our Experts say about this Thule Roof Rack
- Will the Sportrack Vista XL Fit a 2019 Nissan Kicks?Yes the SportRack Vista XL Cargo Box part # SR7018 will fit the factory cross bars on your 2019 Nissan Kicks. The box is compatible with bar spreads of 23-5/8", 25-7/8", 27-7/8", and 29-7/8" and can be adjusted slightly around that. If you do not have factory installed crossbars the complete kit is listed in the three parts. Thule Evo WingBar Crossbars part # TH711100 Rapid Podium Feet for Thule Crossbars part # TH460R Fit Kit for Thule Podium-Style Roof Rack Feet part # THKIT3163
view full answer...
Info for this part was:

Edited by:
Tyler C

Video Edited:
Dustin K

Updated by:
Wilson B

Updated by:
Alex H

Updated by:
Carrie F

Written by:
Matthew S

Video by:
John S
At etrailer.com we provide the best information available about the products we sell. We take the quality of our information seriously so that you can get the right part the first time. Let us know if anything is missing or if you have any questions.
Product Experts Available Now!
Call 1-800-940-8924
Thank you! Your comment has been submitted successfully. You should be able to view your question/comment here within a few days.
Error submitting comment. Please try again momentarily.