
To see if this custom-fit item will work for you please tell us what vehicle you'll use it with.


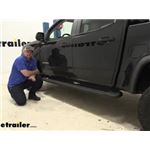
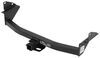
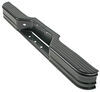
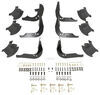
The aluminum bases of these step boards are covered in molded polymer for sure footing. Integrated light assemblies turn on when the doors are open. Boards sit close to your vehicle's frame for a streamlined look. Custom mounting kit is included.
Features:
Specs:

California residents: click here
Videos are provided as a guide only. Refer to manufacturer installation instructions and specs for complete information.
Shane: Hey guys, Shane here with etrailer.com. Today, I have a 2020 Chevrolet Colorado. And I want to walk through how to install the Westin Molded, Illuminated Custom Running Boards.Adding running boards like this to your vehicle is going to allow you to get in and out of your vehicle much easier. Not only for yourself, but also for your passengers. They're going to span from the front all the way to the back door. Each step is going to give you two lights, one in the front, one on the back.
That'll help light up a step to give you that easy footing when you're getting in and out of the vehicle at night so you can see. We'll go ahead and shut the lights off and show you what it looks like. These are going to come on as soon as you open the door, because they're tied in with your dome light.Now, if you noticed that the lights we're kind of a yellowish color, they're very easy to change out if you wanted to switch them out for LEDs. These bulbs are going to be basically the same as your dome light bulbs, very easy to pull in and out. As far as the board goes itself, as I mentioned, it spans from in front of the front door, all the way to the back of the back door.
The steps are going to be six inches wide. So they're plenty wide to get your foot on when you're getting in and out of the vehicle. We're going to have a raised back so it contours nicely with the vehicle, fits in very nicely. You're going to notice the grooves here, this is to help channel water away from your feet when the boards are wet.And when you compare these to other sets of running boards, except they have a plastic centerpiece, those plastic pieces can get a little slick when they get wet. With this, this is a polymer material, it's plastic but it almost seems like it has a textured rubber coating.
Which is going to allow much better grip than a plastic. When you compare them to tube steps. Tube step again is just a bar that comes out and you have a plastic piece step here, and then one in the back. I think adding this on there really helps clean it up, gives it a nice finished look. Now you might be questioning the plastic material on the outside, the whole underside of it is going to be aluminum construction.
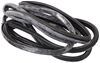
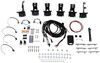
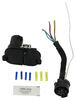
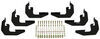
So with the aluminum construction, we're not going to have to worry about rust and corrosion. And being aluminum, even though you might think that it's not durable enough, I'm 240 pounds and six foot, and it holds me up just fine. So plenty of durability with them, plenty of grip.We're going to do a test here, I'm going to go ahead and dump some water on them, and show you how much grip these have, even when they're wet. And you can see with the flex in it, I'm pushing on them pretty hard. So we got plenty of grip there. A lot better than those plastic ones. The polymer material is UV resistant, it's not going to crack or fade. These are going to be custom fit boards, they're going to come with the mounting brackets and hardware. They're also going to come with the wiring harnesses. The only things that it's not going to come with is your ring terminal, and also your connector for your power wire, or for your wire to tie this into the factory wire inside the vehicle. Now that we've gone over some of the features, let's walk you through how to get it installed.To start our installation we're going to start on the driver's side. We need to come to the inside, under panel of the vehicle, and we need to locate our mounting holes. We're going to be using these two on the very front, these right here in the center, and then the very back ones. So if you have rubber plugs in these, you need to make sure you remove those. You're going to have clips that look like this, we need to install those into the holes. We're going to go in the large hole, lining up with the small hole. Do the same thing for this bottom one, like that. We'll do the same thing for our four remaining holes.You're going to have six brackets, look like this, you want the front two on each side of the vehicle, this flange to face towards the back. So this one and your center one, this flange is going to face back. The very back one, this flange is going to be facing towards the front. Hex bolt, lock washer, and flat washer, we're going to line it up with the clips we just installed. And we're going to install the hardware. We're just going to leave them loose for now, we're just going to hand tighten them. Just like that, we're going to repeat the process for the five remaining brackets.For our driver's side you're going to have a plug, it's going to look like this, two ends on it. We're going to take the wire, and we're going to push it right in the center channel. You're going to get four caps, essentially they're going to go on like this and they'll snap into place over the bottom of your lights to help protect them. But with this vehicle where the brackets are, the hardware is going to sit about right here. So you won't be able to put these in. However, I'm going to show you once we get everything installed, how to seal these lights so that they last.You're going to have square head bolts like this, we're going to slide them into the outside channels. We get two right to the center, two on this end, and then two on the other end. Once we get those on, we can set our board in place on top of our brackets. And our bolts line up here with our brackets. Do the same thing with these. And then again with our front ones. So now each one of our bolts, we're going to put a lock washer, flat washer, and a nut. We're just going to loosely install these for now so we can get our board to slide back and forth enough where it's centered, and to make sure that all of our bolts are holding onto our board.Next, we'll take a 12 millimeter socket. We're going to tighten our hardware from our boards down to our bracket. You want to make sure that the bolts are in the grooves, or in these channels on the ends of the boards, because on the very ends they're going to get very close because of this opening. So just make sure that your bolts' heads are all the way in those channels. When you tighten them down, take your board and push it back so it's up tight against your vehicle. We're going to tighten them down. Your directions are going to tell you to torque these. I'm going to say, don't torque them because these bolts will break. And this is also aluminum and it bends pretty easy. So once you get them tight, just do another quarter turn or so, and that should hold them on there pretty tight.We're going to take a 13 millimeter socket. We're going to tighten the bolts holding our brackets to the side of the vehicle. We'll tighten all of our lower ones to pull the step up, and then we'll tighten the top ones. Once we get these tight, these are going to get torqued to the specifications in the instructions. Once you get one side done, you're going to repeat the process for installing the board on the other side, exactly the same way. The only difference is you're going to have one long wire with one single plug on it. We'll go ahead and show you how we ran that over to our driver's side.So I took my wire and I tucked it in the same groove here in a small channel, ran it up over top of my frame rail, make sure you're staying away from anything hot or moving. There's a cross brace right here, that's got factory wiring on the top, you can see where this is hanging. What I'm going to do is I'm going to take it, I'm going to zip tie it right up on top of this bracket, this is going to keep it away from my exhaust, and away from here. And it's going to go right over top of my fuel tank, over to my driver's side, and we'll take one end, we'll plug it into of our plugs. Make sure it clips into place. Then we can take this, once we get our other wire connected, and pull it up and zip tie it right up to this factory wiring right up here on top of our frame rail.Your other wiring harness is going to have a power and ground, take it and plug the other end into the other side here. Again, you want to make sure it snaps in place. Going to take it, I'm going to run it up behind my body mount. This is going to be a fuse. Once we get all of our wire and everything tied into place, we've got a tested, and we'll take it, all this in a bundle, zip tie it here. As I mentioned earlier, our fuse, we'll zip tie it right there to our factory wiring. And the rest of this, we can zip tie it up in here anywhere.Now, what we need to do is we need to go inside the truck, locate our wire that we're going to be tapping into, and ground our black wire. You're going to have a kick panel like this, all you're going to do is pull up, pull back on it, pull that out. What we need to do is we need to tie into our dome light, which is going to be this gray wire right here. We're going to pull our carpet up, you're going to have a plug right here that goes right down to the bottom, we need to drill a small hole in it to get our red wire up to tie into this gray wire. I'm going to pull the tape off, pull my red wire out enough that the only thing I'm pushing up there is the red wire.I'm going to use a quick splice connector rather than splitting this completely in half, these quick splice connectors do not come in your kit, but you can find them here at etrailer. Go ahead and cut the red wire. Now what we can do, I'm going to go ahead and put a little bit of silicone around this hole just to kind of help seal it. And we can put our carpet back in place, and get our panel put back in place.Once we get all of our wire tidied up, we can come back down and we can ground our black wire. We can ground it anywhere to the frame, anywhere to the body of the vehicle. We just want to make sure it's a good ground. Thinking I might ground it right about right here. Your kit is not going to come with the ring terminal, or the self tapping screw as I mentioned, we can't put the end caps on. So how we're going to seal the light is if we pop the light out, we're just going to twist it, we'll slide it out, we're going to remove the bulb. We're going to take some dielectric grease, it does not come in your kit but you can find it here at etrailer. We are going to put some down in that hole. It's going to help any moisture, keep those connections from corroding. Re-install the bulb.Now we've got it all hooked up. We'll go ahead and test it out. We're going to open our door, make sure our lights come on with our dome light. We're going to take some RTV silicone, we're run to run it right around this edge here. And take it, go right back up into place. Make sure you twist it to lock it in place. You can see how the silicone pushes out. It's going to help seal that from any water getting up inside. Once you get one done, you're going to repeat the process for the remaining ones. Once you've got everything siliconed up, you've tested it, and make sure everything's working correctly, you're ready to go.That's going to do it for a look at installation on the Westin Molded, Lighted Running Boards on your 2020 Chevrolet Colorado.
Average Customer Rating: 4.6 out of 5 stars (5 Customer Reviews)
The aluminum bases of these step boards are covered in molded polymer for sure footing. Integrated light assemblies turn on when the doors are open. Boards sit close to your vehicle's frame for a streamlined look. Custom mounting kit is included.The item was ordered and delivered quickly. Company follow up was awesome. I found the video on installation was super valuable, compared to reading the printed instructions, what a time saver. Thanks for providing videos for us DIY's . The item looks and performs wonderfully. Will patronize etrailer again. Thanks
The original shipment was sent missing bracket components necessary to accomplish the running board installation. Thank goodness etrailer had in stock the complete package of hardware and shipped it quick only delaying the installation a week. The sad part was the actual running boards had nothing for wiring installation instructions. We were forced to contact Westin directly then what they provided was basically useless. Others companies provided color illustrations and videos that made self installation a snap. We basically completed the installation after several failed attempts over a 2 day period. Why the etrailer sales representatives were super to deal with, the installation of the product was horrible. This information was shared with Westin in great lengths.

The running boards are great on our 2022 4Runner Limited.
I haven’t been able to figure out how to hook up the lights, so they come on when I open the door.
I requested help from e trailer for help and they did respond, but it didn’t work.
So if folks aren’t concerned about lights on their boards, I would just get unlit ones.
Info for this part was:
At etrailer.com we provide the best information available about the products we sell. We take the quality of our information seriously so that you can get the right part the first time. Let us know if anything is missing or if you have any questions.


Thank you! Your comment has been submitted successfully. You should be able to view your question/comment here within a few days.
Error submitting comment. Please try again momentarily.